Chapter 1 Designing with Communication Adapters
The following sections provide conceptual and reference information for Java CAPS Communication Adapters. If you have any questions or problems, see the Java CAPS web site at http://goldstar.stc.com/support.
Adding the DLL file to the Path for the COM/DCOM Application Server Process
The runtime JNI bridge DLL file, comewayruntime.dll, must be added to the PATH for the App Server process before running a COM/DCOM Project. To make sure that the correct file is added to the proper PATH location, complete the following steps before launching your Project:
 To Add the DLL file to the Path for the Application
Server Process
-
Download the runtime JNI bridge DLL file, comewayruntime.dll, to a temporary directory.
-
Copy comewayruntime.dll to the following location:
C:\winnt\system32
    or
C:Windows\system32 (for Windows XP)
An alternative to this procedure is to add the JNI bridge DLL file to the library path using the Integration Server Administration console and specifying the location of the downloaded comewayruntime.dll in the library path. For more information about the Integration Server Administration Configuration Agent, see the Enterprise Service Bus Administration Guide.
Installing the MSMQ DLL and JNI Files
The MSMQ adapter installation includes two additional components (as well as the Enterprise Manager Plug-In), as seen in the following figure , that must be downloaded and installed for the MSMQ adapter:
-
MSMQ adapter - Runtime win32 bridge DLLS Zip: This file contains a number of required DDL files that must be copied to the Windows Environment Variable Path.
-
MSMQ adapter - Runtime JNI: This file must be downloaded using the Sun JavaTM Composite Application Platform Suite Installer.
 To Download the MSMQ DLLs and Runtime JNI
-
From the Sun Java Composite Application Platform Suite Installer, click the DOWNLOADS tab. The MSMQ DLLs and Runtime JNI Component list are available from the Repository Downloads list.
-
Download both files to a local directory. For directions on adding the msmqjni.jar file to the Windows Environment path, see To Add the Runtime JNI File. For directions on adding the DLL files to the PATH for the App Server process, see To Add the DLL Files to the Environment Path.
 To Add the Runtime JNI File
-
Prior to creating your MSMQ adapter Project, copy the Runtime JNI (msmqjni.jar), downloaded from the Suite Installer, to the following locations:
JavaCAPS6\netbeans\lib\ext
      JavaCAPS6\appserver\is\lib
where JavaCAPS6 is the directory in which Sun Java Composite Application Platform Suite is installed.
These file must be copied manually.
Note –You need to copy the msmqjni.jar file to the \compile\lib\ext folder before deploying and running command line codegen. You also need to copy the msmqjni.jar file to the c:\Sun\ApplicationServer\lib folder before deploying and running via the Sun Java System Application Server Enterprise Edition 8.1.
 To Add the DLL Files to the Environment Path
The Runtime win32 bridge DLL files must be added to a directory that is included in the Windows Environment System Variable Path before running an MSMQ Project. To make sure that the correct file is added to the proper path location, do the following:
-
Locate the msmqruntimejni.zip file that you downloaded to a local folder.
-
Extract the ZIP file to a directory that is part of the Windows Environment path.
Enabling Rollback When an MSMQ Message Fails
 To Roll back an Outbound MSMQ Message
In order to roll back an outbound MSMQ message when a failure occurs in the Java Collaboration Definition (for example, failure to insert a duplicate row into a database table that is defined to have unique keys), do the following:
-
Select Manual as the MSMQ Connection Mode in the outbound MSMQ adapter Connectivity Map properties .
-
Use the following JCD code:
try {
    MSMQClient_1.getEwayConfiguration().setOutMSMQName( "public" );
    MSMQClient_1.getEwayConfiguration().setOutMSMQShareMode( "DENY_RECEIVE_SHARE" );
    MSMQClient_1.getEwayConfiguration().setOutMSMQReceiveActionCode
( "ACTION_PEEK_CURRENT" );
    MSMQClient_1.connect();
    MSMQClient_1.getMSMQMessage();
    TestDB_1.getTEST1().insert();
    TestDB_1.getTEST1().setTESTSTRING( "From JCD" );
    TestDB_1.getTEST1().insertRow();
    MSMQClient_1.getEwayConfiguration().setOutMSMQReceiveActionCode
( "ACTION_RECEIVE" );
    MSMQClient_1.getMSMQMessage();
    MSMQClient_1.disconnect();
} catch ( Exception Catch ) {
    MSMQClient_1.disconnect();
}
The key code items are highlighted in bold. You must also use a try/catch block to catch the exception (for this example, the error is a failed insert to database).
-
Open the queue with the following settings:
-
MSMQ Share Mode– DENY_RECEIVE_SHARE: This locks the queue so that other applications cannot open the queue in Receive mode. Until your application closes the queue, no other application can open the queue to receive the message.
-
MSMQ Receive Action Code– ACTION_PEEK_CURRENT: This opens the queue so you can “peek” (view) the message.
-
-
Next, try a database update on the message you received from the queue. If this fails, move on to step 7 (close the queue instance). If that succeeds, change the adapter configuration properties to receive messages programmatically in this manner .
-
Next, receive the message. This removes the message from queue.
-
Disconnect from the queue.
-
Finally, close the queue using MSMQClient_1.disconnect(). This closes the current queue instance and unlocks the queue.
Streaming Data Between Components with the Batch Adapter
Components in the Batch Adapter implement a feature for data streaming. This topic explains data streaming, how it works, and how to use it with the adapter and Sun Enterprise Service Bus.
Introduction to Data Streaming
Data streaming provides a means for interconnecting any two components of the adapter by means of a data stream channel. This channel provides an alternate way of transferring the data between the Batch Adapter components. Streaming is available between BatchLocalFile and BatchFTP, or BatchLocalFile and BatchRecord.
Each OTD component in the adapter has a Payload node. This node represents the in-memory data and is used when the data is known to be relatively small in size or has already been loaded into memory. The node can represent, for example, the buffer in the record-processing OTD, as it is being built or parsed, or the contents of a file read into memory.
Instead of moving the data all at once between components in Java CAPS’s memory, you can use a data-stream channel to provide for streaming the data between them a little at a time, outside of Java CAPS.
Data streaming was designed primarily to handle large files, but you can use it for smaller data sizes as well.
Use the Netbeans IDE’s Collaboration Rules Editor to set up data-streaming operations. The rest of this section explains the data streaming feature and how to set it up.
Note –
Payload-based and streaming-based transfers are mutually exclusive. You can use one or the other but not both for the same data.
Overcoming Large-file Limitations
The primary advantage of using data streaming is that it helps to overcome the limitations of dealing with large files. For example, if you have a 1-gigabyte file that contains a large number of records, you need a large amount of resources to load the payload into memory just to parse it.
Streaming allows you to read from the file, little by little, using a data-streaming mechanism. This way, you do not need to load the file into the Java CAPS system’s memory. Using streaming is not as fast as using in-memory operations, but it is far less resource-intensive.
Using Data Streaming
Each data-streaming transfer involves two OTDs in a Collaboration as follows:
-
One provides the stream adapter.
-
The other consumes the stream adapter to perform the data transfer.
 Caution –
 Implementing InputStream must support skip() with negative numbers as an argument.
This section explains how the two data-streaming OTDs operate to effect the transfer of data.
Data-streaming Operation
Each of the OTDs in the Batch Adapter exposes stream adapter nodes that enable any OTD to participate in data-streaming transfers. The nodes are named InputStreamAdapter and OutputStreamAdapter. You can associate the stream adapters by using the drag-and-drop features of the Java CAPS IDE.
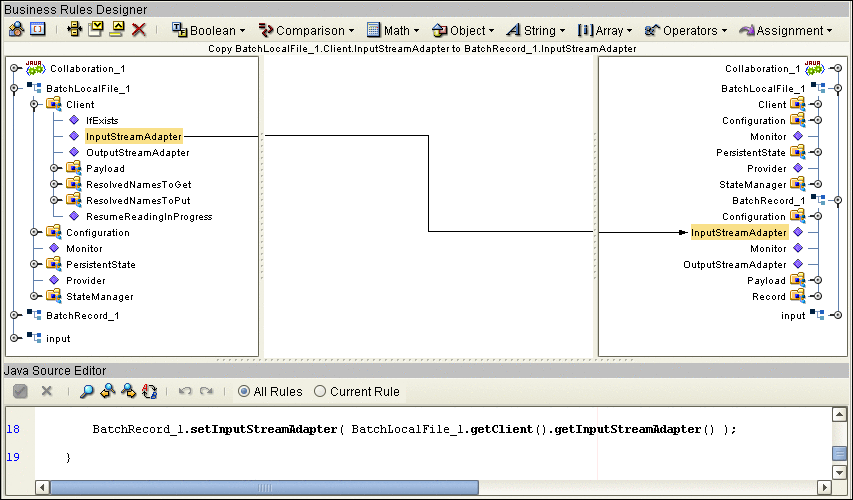
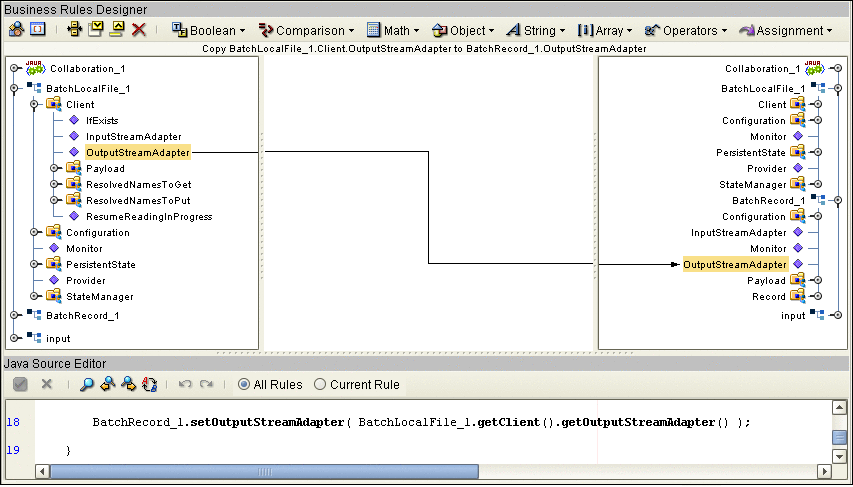
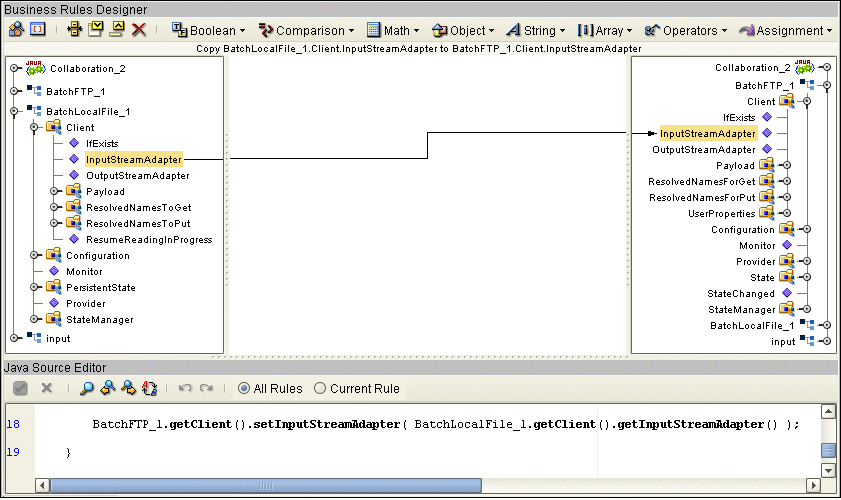
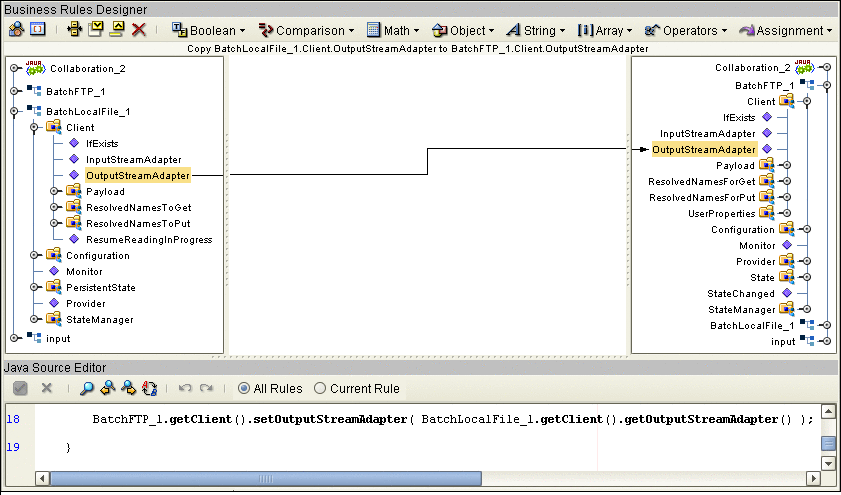
The InputStreamAdapter (highlighted) and OutputStreamAdapter nodes in the OTD are used for data streaming. This feature operates as follows:
-
Stream-adapter consumers: The FTP and the record-processing OTDs can only consume stream adapters. Therefore, their stream-adapter nodes are write-only. Their node values can be set (modified).
-
Stream-adapter provider: The local file OTD can only provide stream adapters, so its stream-adapter nodes are read-only. Its node value can only be retrieved.
The local file OTD is always the stream provider, and the FTP and record-processing OTDs are the consumers.
Data Streaming Versus Payload Data Transfer
Use of the InputStreamAdapter and OutputStreamAdapter nodes is an alternative to using the Payload node as follows:
-
Use these stream adapter nodes to transfer data if you want data streaming.
-
Use the Payload node for a data transfer without data streaming (payload data transfer).
All operations that, in payload data transfer, read from the Payload node require the InputStreamAdapter node when you are setting up data streaming. Using the same logic, all operations that, in payload data transfer, write to the Payload node require OutputStreamAdapter node for data streaming.
Do not confuse the stream adapter nodes with the get() and put() methods on the OTDs. For example, the BatchFTP OTD’s client interface get() method writes to the Payload node during a payload transfer, so it requires an OutputStreamAdapter node to write to for data streaming. In contrast, the record-processing OTD’s get() method reads from the Payload node during a payload transfer, so for data streaming, get() requires an inputStreamAdapter node to read from.
Data Streaming Scenarios
The four typical data-streaming scenarios are:
-
Transfer data from a local file system (BatchLocalFile) to a record-processing (BatchRecord) setup. This scenario uses the InputStreamAdapter OTD node (see Data Streaming Scenarios).

-
Transfer data from a record-processing (BatchRecord) setup to a local file system (BatchLocalFile) using the OutputStreamAdapter OTD node (see Data Streaming Scenarios).

-
Transfer data from a local file system (BatchLocalFile) to a remote FTP (BatchFTP) setup. This scenario uses the InputStreamAdapter OTD node (see Data Streaming Scenarios).

-
Transfer data from a remote FTP server (BatchFTP) to a local file system (BatchLocalFile) using the OutputStreamAdapter OTD node (see Data Streaming Scenarios).

Consuming-stream Adapters
This section explains how to use consuming-stream adapters.
 To Obtain a Stream
 To Use a Stream
 To Dispose of a Stream
-
Release any references to the stream.
-
Release the stream (XX) using the releaseXXStream() method. Some of the OTDs support post-transfer commands. The Success parameter indicates whether these commands are executed. Do not close the stream.
Stream-adapter Interfaces
This section provides the Batch Adapter’s OTD stream-adapter Java interfaces. This information is only for advanced users familiar with Java programming, who want to provide custom OTD implementations for stream-adapter consumers or providers.
Inbound Transfers
The following Java programming-language interface provides support for inbound transfers from an external system:
public interface com.stc.adapters.common.adapter.streaming.InputStreamAdapter {
public java.io.InputStream requestInputStream() throws StreamingException;
public void releaseInputStream(boolean success) throwsStreamingException;
}
|
Outbound Transfers
The following Java interface provides support for outbound transfers to an external system:
public interface com.stc.adapters.common.adapter.streaming.OutputStreamAdapter {
public java.io.OutputStream requestOutputStream() throws StreamingException;
public void releaseOutputStream(boolean success) throws StreamingException;
}
|
- © 2010, Oracle Corporation and/or its affiliates
