Chapter 1 Migrating From eTL to Sun Data Integrator
The topics listed here provide information and procedures for migrating projects from Sun SeeBeyond eTLTM Integrator 5.1.x (eTL 5.1.x) to Sun Data Integrator in JavaTM Composite Application Platform System 6 (Java CAPS 6), and integrating them with other Java CAPS components and projects. These topics do not cover information on eTL, Java CAPS generally, or detailed instructions for designing projects using Data Integrator, which can be found elsewhere.
If you have any questions or problems, see the Java CAPS web site at http://goldstar.stc.com/support.
At a Glance
Once you are familiar with Java CAPS 6, you need little more than a reminder of the following key pieces of information, each covered in greater detail in the presented topics.
-
Initial migration from eTL to Data Integrator is done on a project-by-project basis after using the Uploader to install the eTLMigrationTool SAR file to the Repository.
-
To import an eTL project into Java CAPS 6, use NetBeans menu item Tools -> CAPS Repository -> Import Project and select its ZIP file. This creates two project folders: A Data Integrator (DI) project containing migrated eTL collaborations, and a CAPS Repository-based project containing repository-based artifacts.
-
After an eTL project is imported, you can use it in several different ways:
-
(JBI only; simple) Build the DI project and use its JAR file as a JBI module in a composite application project.
-
(JBI only; BPEL module) Build the DI project, use its WSDL as a partner role in a new BPEL process, and use the BPEL module's JAR file as a JBI module in a composite application project.
-
(Repository-based, with JBI Bridge) Build the DI project, import its WSDL into the CAPS Repository-based project and substitute it in Business Processes that reference eTL Collaborations, add and connect a JBI Bridge component into each Connectivity Map and a JBI external system into each CAPS Environment, create and build a deployment profile to generate an EAR file, and then use the repository-based project's EAR file as a JBI module in a composite application project.
-
What You Need to Know
The following topics provide information on what you should know about migrating eTL projects and using them in Java CAPS 6.
What You Need to Do
The following topics provide instructions on migrating eTL components and reusing them in Data Integrator.
-
Using Migrated Data Integrator Components in a Composite Application
Simplest case: No JBI bridge; only one or two eTL collaborations
BPEL 2.0 case: No JBI bridge; several eTL collaborations orchestrated by BPEL 2.0 module
-
Creating, Configuring, and Building BPEL 2.0 Modules for Data Integrator
-
Using Data Integrator Components as JBI Modules in Composite Applications
BPEL 1.0 case (repository-based): Using a JBI Bridge
More Information
For additional information about Data Integrator, see the following.
About Migration to Sun Data Integrator
The information presented here explains only the concepts involved in migrating from eTL to Data Integrator. Task-based step-by-step migration procedures are found in other topics.
In Java CAPS 6, the product previously known as Sun SeeBeyond eTL Studio has been superseded by Sun Data Integrator. Although the functional capabilities and much of the look-and-feel has been retained, the architecture has changed. Accordingly, a tool is provided for migrating eTL 5.1.x projects to Java CAPS 6, and components migrated from eTL are used in different ways in Data Integrator and composite applications.
About eTL Project Migration
In Java CAPS 5.1.x, projects are saved as ZIP files that can be imported into Java CAPS 6. Individual eTL components can only be used in Data Integrator after the entire project has been imported.
Because Java CAPS 5.1.x is exclusively repository-based, you must install and start a repository before you can migrate eTL projects into Java CAPS 6. Also, a special tool called the eTL Migration Tool (eTLMigrationTool.sar) must be uploaded to the repository. If this tool has not been uploaded, then 5.1.x projects that contain eTL components cannot be imported into Java CAPS 6.
Importing a 5.1.x project that contains eTL components has the following results.
-
A Data Integrator project is created, containing the eTL collaborations.
-
A Repository-based CAPS project is created, containing the other CAPS 5.1.x project artifacts.
-
If the project contained one or more CAPS environments, their components are added to the Services window, under the CAPS Environments folder.
About Using Migrated eTL Components in Java CAPS 6
As with all Java CAPS 6 projects, the Data Integrator project must be built, creating a WSDL file: a file that describes the web services provided by the project.
Note –
For Data Integrator projects created from imported eTL projects, the WSDL files created by building the projects are located in JavaCAPS6.netbeans\caps\eTL\Imported Projects\.
For a composite application project to be usable as an executable Service Assembly, it must include as one of its JBI modules one or more of the following files.
-
A project JAR file, in the case of a purely JBI-based project. This type of composite application could include either no BPEL module or one or more BPEL 2.0 modules.
-
A project EAR file, in the case of a repository-based CAPS project. The CAPS project must be updated to include a JBI bridge, and then rebuilt. Typically, this type of composite application reuses BPEL 1.0 business processes in the repository-based CAPS project.
JBI modules can be added to the composite application either by dragging them into the CASA Editor or by right-clicking the composite application's JBI Modules folder in the project tree.
About Runtime eTL Components
For any project that uses repository-based CAPS components in conjunction with a JBI bridge, the CAPS environment components must be properly configured to reflect the runtime environment. These runtime components are located in the NetBeans Services window, under Servers -> CAPS Environments.
For any Data Integrator project that uses a flatfile type of database (also called a Data Mashup database), the properties of the sun-etl-engine must be properly configured. This runtime component is located in the Services window, under Servers -> GlassFish V2 -> JBI -> Service Engines.
For any Data Integrator project that uses a relational database, the database resources and connection pools must be properly configured. This is accomplished using the Admin Console application, under Common Tasks -> Resources -> Connectors -> Connector Resources | Connection Pools.
Uploading the eTLMigrationTool SAR File to a Repository
This topic provides instructions on uploading the eTL Migration Tool to a Java CAPS repository.
 To Upload the eTLMigrationTool
SAR File
Before You Begin
The CAPS repository must already be running. If it is not, use the start_repository script to start it.
-
Start a fresh browser session.
-
Point the browser at the URL for the Java CAPS Uploader.
Tip –If all installation defaults were retained, this URL is http://localhost:12000
-
In the CAPS Uploader: Enter the username and password, and then click Login.
Tip –If all installation defaults were retained, the username is Administrator and the password is STC (case-sensitive).
-
In the Administration tab: Click the link to install additional products.
-
In the Display>> Select panel: Open the Core Product category, select the checkbox for eTLMigrationTool, and then click Next.
If you need to upload other items for other products, you can select their checkboxes as well.
-
In the Select>> Upload panel: Browse to the location of the file eTLMigrationTool.sar, select it, and then click Next.
Repeat as needed for other SAR files for other products you selected in the previous step.
-
Click Finish.
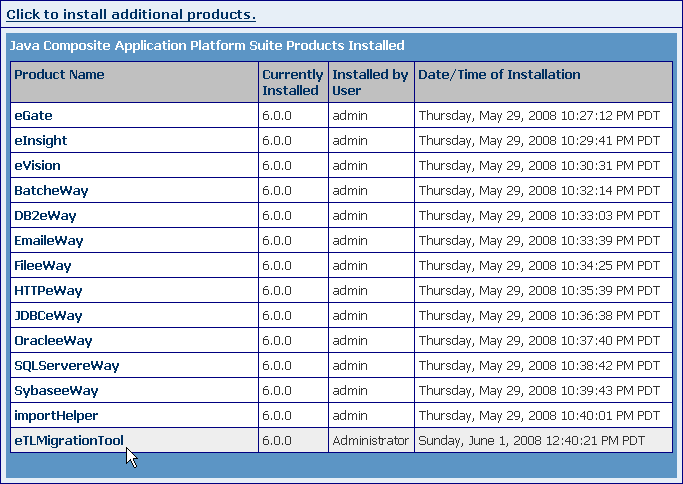
Next Steps
If you have no other SAR files to upload, you can close the browser window. If the NetBeans IDE is already running and has a current repository connection, stop and restart the IDE.
Importing eTL Projects Into Java CAPS 6
This topic provides instructions on importing an existing Java CAPS 5.1.3 project that contains eTL components. It assumes that the project is already available in the form of a ZIP file.
 To Import an eTL Project
Before You Begin
If necessary, start the CAPS repository, start the NetBeans IDE, and use Tools -> CAPS Repository -> Connect to connect to the repository.
Tip –
If the installation defaults were retained, the Login ID is admin and the Password is adminadmin. If a repository is connected, the Projects window contains a top-level node labeled CAPS Library Components and the Services window contains a top-level node labeled CAPS Environments.
-
In the NetBeans IDE, start Import Manager in one of the following ways:
-
In the Import Manager dialog box: Browse to and select a project ZIP file to be imported, specify where in the project tree you want the imported project to reside, and click Import.
Tip –If a previous project has been imported that contains the same environment, a dialog appears warning you that new object names will be created if you continue. If this occurs, you can either acquiesce to the new object names or (preferably) cancel the operation, rename or delete the old environment, and restart the import process.
-
After receiving the message “Import was successful”: You can either repeat the previous step with a new ZIP file, or click Close.
Next Steps
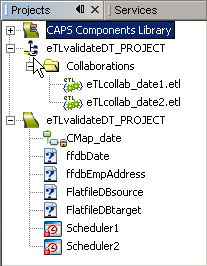
In the Projects window, two new projects are created at the project tree location you specified.
-
A CAPS MDM Data Integrator project containing eTL collaborations
-
A CAPS ESB Repository-based project containing CAPS artifacts other than eTL collaborations
The two projects have the same name, but can be distinguished by their different icons.
Building Data Integrator Projects
This topic provides instructions on building Data Integrator projects so that their web services (WSDL files) and project JAR files can be made available to other projects.
Note –
For Data Integrator projects created from imported eTL projects, WSDL files created by building the projects are located in JavaCAPS6.netbeans\caps\eTL\Imported Projects\.
 To Build a Data Integrator
Project
Before You Begin
If necessary, start the NetBeans IDE.
-
In the Projects window: Right-click the Data Integrator project you want to build.
-
Select menu item Clean & Build.
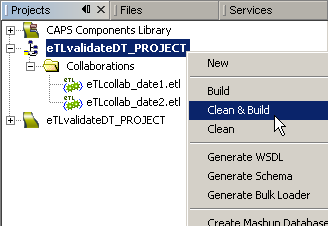
-
In the Output window: Check for the confirming message BUILD SUCCESSFUL (total time N seconds)
Tip –The very first time building a newly imported project can result in warning messages. If this occurs, simply rebuild the project.
Next Steps
The project tree displays a new WSDL file in the Collaborations folder of the Data Integrator project.
Creating, Configuring, and Building BPEL 2.0 Modules for Data Integrator
This topic provides instructions on using Data Integrator components in BPEL 2.0 modules. It presupposes that you are familiar with using the BPEL 2.0 editor in Java CAPS 6, and that a Data Integrator project has already been built so that its WSDL and JAR files are available.
Note –
JAR files created from imported eTL projects are saved in the location JavaCAPS6\.netbeans\caps\eTL\Imported Projects\projname.
 To Use the Data Integrator Web
Service in a BPEL 2.0 Module
In this procedure, you will create a new BPEL 2.0 module and add a new WSDL, and add a new BPEL process. Then, in the BPEL 2.0 editor, you will: Drag the new WSDL into the Partner Link column on the left and configure it as “My Role”; drag the WSDL file from the Data Integrator Collaborations folder into the Partner Link column on the right and configure it as “Partner Role”; drag web services (Receive, Invoke, Reply, Partner Link) and, optionally, activities (Assign and others) into the BPEL process; and then connect and configure appropriately. Finally, you will build the BPEL module.
Before You Begin
If necessary, start the NetBeans IDE and access the Projects window.
-
In the NetBeans main menu: File -> New Project.
-
In the New Project wizard: For Categories, choose CAPS -> ESB; for Projects, choose BPEL Module; and then click Next.
-
In the New BPEL Module wizard: Specify a project name and location, and then click Finish.
The project tree displays a new BPEL module.
-
Right-click the new BPEL module: New -> WSDL Document.
-
In the New WSDL Document wizard:
-
Accept or modify the default name and location and then click Next.
-
Accept or modify the default abstract configuration (default: Request-Response) and then click Next.
-
Accept or modify the default concrete configuration and then click Finish.
Under the BPEL module's Process Files folder, the project tree displays a new WSDL node.
-
-
Right-click the new BPEL module: New -> BPEL Process.
-
In the New BPEL Process wizard: Accept or modify the default name and location, and then click Finish.
The BPEL Editor displays the newly created BPEL process without any partner links, web services, or activities.
-
In the BPEL Editor:
-
Drag the BPEL module's newly created WSDL into the left Partner Link column and configure it as My Role.
-
Drag the Data Integrator project's WSDL into the right Partner Link column and configure it as Partner Role.
-
From the palette, drag a Receive service, an Invoke service, and a Reply service into the Process column.
-
Connect the left partner link to the Receive service, the Invoke service to the right partner link, and the Reply service to the right partner link.
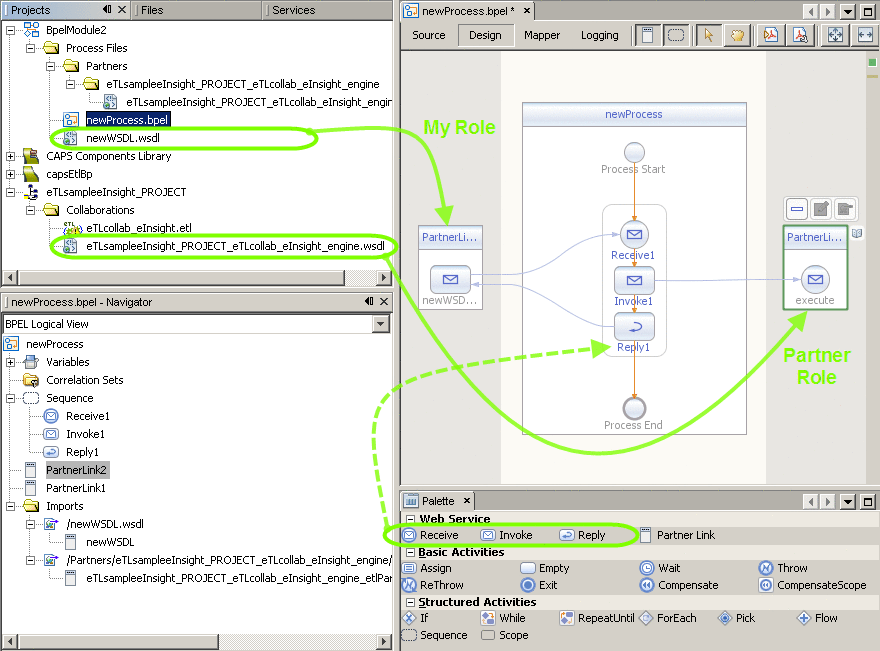
-
(Optional) From the palette, drag activities into the Process column.
-
(Optional) As needed, configure properties and perform mappings.
-
Validate the XML and correct any errors.
-
-
In the project tree: Right-click the BPEL Module folder and select menu item Clean and Build.
-
In the Output window: Check for the confirming message BUILD SUCCESSFUL (total time N seconds)
Tip –The very first time building a new BPEL module can result in warning messages. If this occurs, simply rebuild the module.
Next Steps
After the BPEL module is complete, you can create a composite application.
Configuring Repository-based Projects to Use Data Integrator
This topic provides instructions on customizing a CAPS repository-based BPEL 1.0 project so as to use an eTL collaboration from a Data Integrator project. Typically, such projects include eTL components that have been migrated to Java CAPS 6 Data Integrator projects.
Note –
JAR files created from imported eTL projects are saved in the location JavaCAPS6\.netbeans\caps\eTL\Imported Projects\projname.
 To Use the Data Integrator
Web Service in a BPEL 2.0 Module
In this procedure, you will import the Data Integrator WSDL file into the CAPS repository-based project. Then, in the CAPS project and corresponding environment, you will: Find instances of the 5.1.x eTL collaboration and substitute the “execute” node from the imported WSDL; create appropriate connections and mappings; extend the project's connectivity map and environment with a JBI bridge, and create a new deployment profile.
Before You Begin
If necessary, start the CAPS repository, start the NetBeans IDE, and use Tools -> CAPS Repository -> Connect to connect to the repository.
Tip –
If the installation defaults were retained, the Login ID is admin and the Password is adminadmin. If a repository is connected, the Projects window contains a top-level node labeled CAPS Library Components and the Services window contains a top-level node labeled CAPS Environments.
If you have not already built the Data Integrator project, do so now. If necessary, see Building Data Integrator Projects.
-
In the NetBeans IDE, project tree, right-click the CAPS repository-based project you want to customize: Select Import -> Web Service Definition.
-
In the Import WSDLs wizard:
-
In the Location Type step, accept the default of File System by clicking Next.
-
In the Select WSDLs step, navigate to location JavaCAPS6\.netbeans\caps\eTL\Imported Projects\projname\Collaborations, select its WSDL files, and then click Next.
-
In the Import Preview step, retain the selected checkbox for ALL WSDLs and then click Next.
-
In the Projects Window Preview step, click Next.
-
In the Summary step, check for any errors or warnings and then click Finish.
In the CAPS project folder, the project tree displays a new web service node corresponding to the eInsight (BPEL) engine.
-
-
In the project tree, under the CAPS project, double-click the business process node.
The Business Process Editor (also called the BPEL 1.0 Editor) displays the uncustomized business process.
-
In the BPEL 1.0 Editor:
-
Delete the placeholder for the old eTL collaboration
-
In the project tree, open the CAPS project's web service for eInsight engine -> Port Types -> eTL..._etlPortType and drag its “execute” activity onto the canvas where the old eTL collaboration used to be.
-
Reconnect to other components in the business process as they were previously.
-
As needed, add business rules and restore mappings as they were previously.
-
-
Repeat the previous two steps as needed for other business process nodes.
After you have restored all business process connections and mappings, you can close all instances of the BPEL 1.0 Editor.
-
In the project tree, under the CAPS project, double-click the connectivity map.
The Connectivity Map Editor displays the unbridged connectivity map.
-
In the Connectivity Map Editor:
-
Double-click the business process container to open it.
-
Delete the obsolete container for the eTL collaboration.
-
In the tool palette, pull down the choices for the External Applications tool and select JBIBRIDGE External Application.
-
From the now-augmented tool palette, drag a JBIBRIDGE onto the connectivity map.
-
Carefully connect the JBI Bridge component to the invoked service corresponding to eTL.
-
-
Repeat the previous two steps as needed for other connectivity maps.
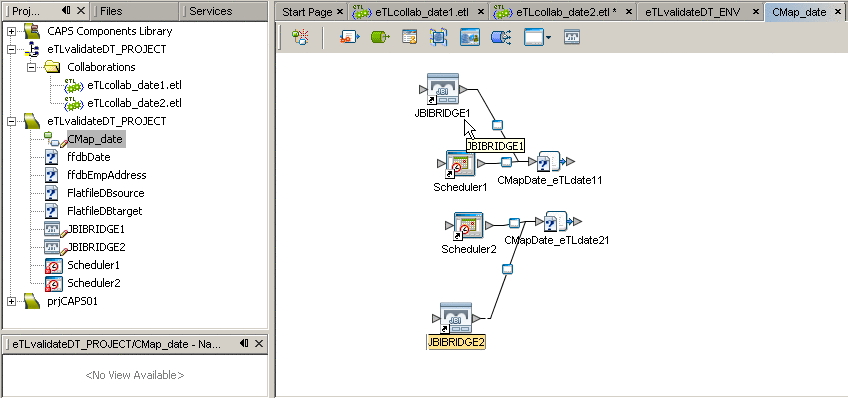
After you have substituted JBI Bridge components for eTL collaborations in all connectivity maps that require it, you can close all instances of the Connectivity Map Editor.
-
In the NetBeans IDE, Services window, open the CAPS Environments folder.
-
For each CAPS environment that requires a JBI Bridge, right-click the environment and select menu item New -> JBI Bridge External System.
-
As needed, configure other components in each environment. For example: eWay adapters for File or databases, parameters for logical host -> integration servers, and so forth.
-
In the NetBeans IDE, Projects window, right-click the CAPS project and select menu item New -> Deployment Profile.
-
Select the appropriate environment and connectivity maps for this deployment profile, and then click OK.
-
In the Deployment Profile Editor, click Automap.
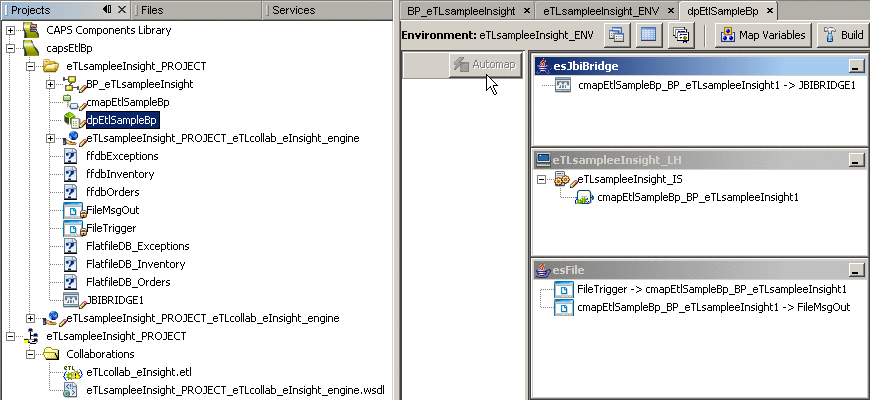
If any components do not map, double-check the environment to be sure that all necessary external systems have been defined and configured properly.
Next Steps
After the CAPS deployment profile is complete, you can use the corresponding EAR file in a composite application.
Using Data Integrator Components as JBI Modules in Composite Applications
This topic provides instructions on using components migrated from eTL to Data Integrator as modules in a composite application. It covers the simplest case (no BPEL modules), the BPEL 2.0 case (orchestration without using the CAPS repository), and the BPEL 1.0 case (using 5.1.x business processes with a JBI bridge).
Note –
JAR files created from imported eTL projects are saved in the location JavaCAPS6\.netbeans\caps\eTL\Imported Projects\projname.
 To Use the Data Integrator
Web Service in a BPEL 2.0 Module
In this procedure, you will create a new composite application project, add files to it as JBI modules (WSDL, JAR, or EAR files depending on the case), and build the composite application.
Before You Begin
If necessary, start the NetBeans IDE and access the Projects window.
-
In the NetBeans main menu: File -> New Project.
-
In the New Project wizard: For Categories, choose CAPS -> ESB; for Projects, choose Composite Application; and then click Next.
-
In the New Composite Application wizard: Specify a project name and location, and then click Finish.
The project tree displays a new composite application project, and the CASA Editor displays the newly created service assembly without any WSDL ports or JBI modules.
-
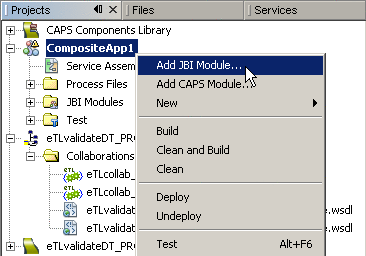
Right-click the composite application and select menu item Add JBI Module.
-
(Always required) In the Select Projects dialog box: Navigate to JavaCAPS6\.netbeans\caps\eTL\Imported Projects\, select the imported eTL project, and click Add Project JAR Files.
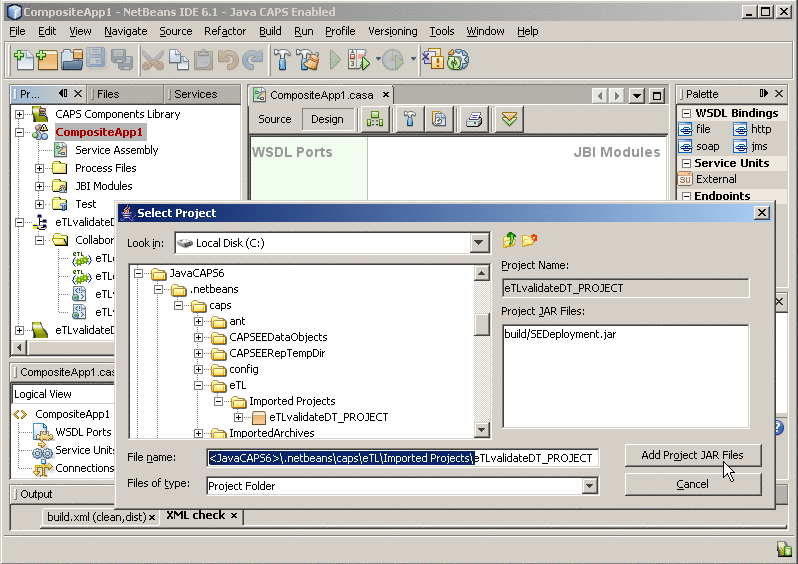
The project tree displays the newly imported JAR file in the JBI Modules folder of the composite application, and the CASA Editor displays the JAR file in the JBI Modules column.
-
(Required only if there is a BPEL 2.0 module):
-
Right-click the composite application and select menu item Add JBI Module.
-
In the Select Projects dialog box: Select the corresponding BPEL module project and click Add Project JAR Files.
-
Repeat as needed for additional BPEL 2.0 modules.
The project tree displays the newly imported JAR file in the JBI Modules folder of the composite application.
-
-
(Required only if using a CAPS Repository-based project with a JBI bridge):
-
Right-click the composite application and select menu item Add CAPS Module.
-
In the Add CAPS Module dialog box: Browse to and select the corresponding deployment profile, select the appropriate application server (also called “logical host” in the CAPS Environment), and specify one of the following behaviors for importing the EAR file.
-
On add (now): To import the EAR file immediately. This presupposes that the EAR file has already been built and will not need to be regenerated.
-
On clean: To import or re-import the EAR file whenever the composite application is cleaned.
-
On build: To import or re-import the EAR file whenever the composite application is built.
-
-
Click Finish.
The project tree displays the newly imported EAR file in the JBI Modules folder of the composite application.
-
-
In the project tree: Right-click the composite application folder and select menu item Clean and Build.
-
In the Output window: Check for the confirming message BUILD SUCCESSFUL (total time N seconds)
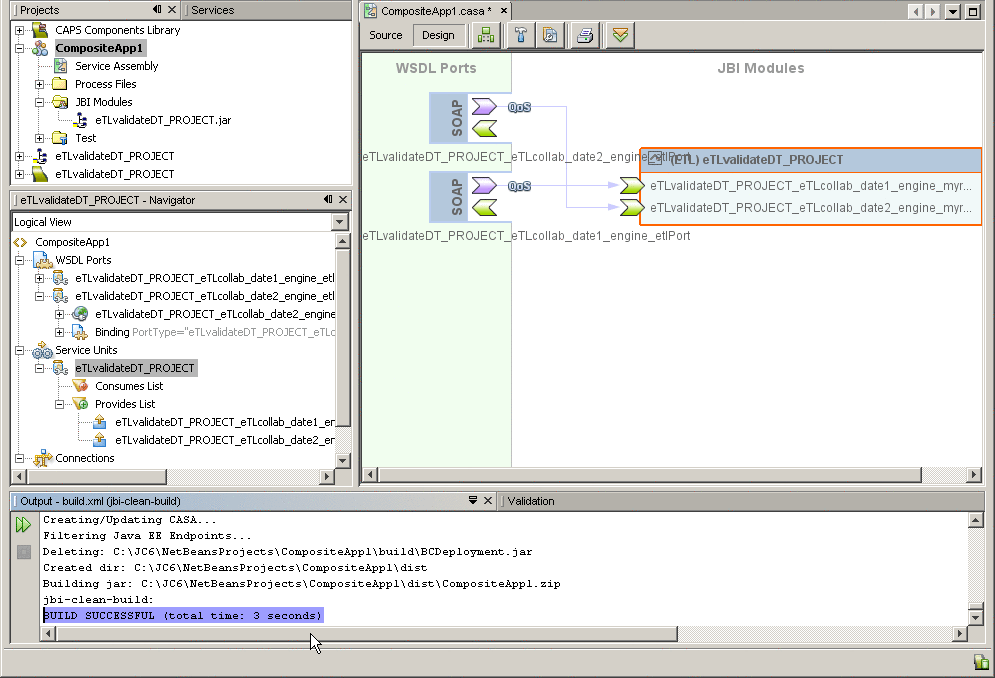
Tip –The very first time building a new composite application project can result in warning messages. If this occurs, simply rebuild the project.
Next Steps
After the composite application is built, you can create test cases for runtime testing.
- © 2010, Oracle Corporation and/or its affiliates
