Using Business Process Designer to Create Business Rules
Business Rules, created between the Business Process Activities, allow you to configure the relationships between the input and output Attributes of the Activities using the Business Process Designer's Business Rule Designer.
This section walks you through creating the project's five business processes:
Creating the bpDelete Business Rules
The bpDelete business process describes how to delete a record in the DB2 database using the Business Process Designer.
 Create the bpDelete Business Rules
-
Double-click bpDelete in the Projects window to open the Business Process Designer to the bpDelete Business Process.
-
Create the bpDelete FileClient.receive -> FileClient.write rule.
-
Right-click the link between FileClient.receive and FileClient.write and select Add Business Rule from the popup menu.
A Business Rule icon is add to the link.
-
Double-click the Business Rule icon.
The Business Rule Designer opens to the new Business Rule.
-
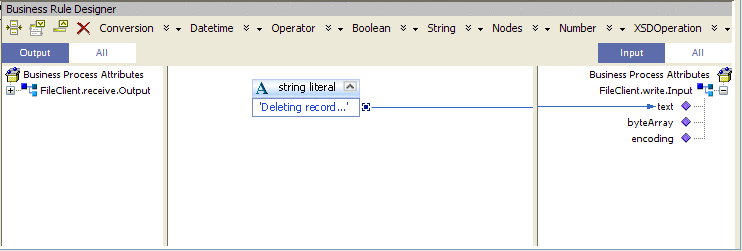
From the Business Rule Designer toolbar String menu, select string literal.
A string literal method box is added to the Business Rule Designer canvas.
-
Double-click the string literal method box value field, and enter Deleting record... as the value.
-
Map the Deleting record... output node of the string literal method box, to text under FileClient.write.Input in the Input pane (right pane) of the Business Rule Designer. To do this, click on the Deleting record... output node of the string literal method box, and drag your cursor to the text node under FileClient.write.Input in the Input pane of the Business Rule Designer.

-
-
Create the bpDelete FileClient.write -> otdDB2.DB_EMPLOYEEDelete rule.
-
Add a Business Rule to the link between FileClient.write and otdDB2.DB_EMPLOYEEDelete and double-click the new Business Rule icon.
The Business Rule Designer opens to the new Business Rule.
-
Map text under FileClient.receive.Output in the Output pane of the Business Rule Designer, to whereClause under otdDB2.DB_EMPLOYEEDelete.Input -> input in the Input pane of the Business Rule Designer.
A visible link now connects the two nodes in the Business Rule Designer.

-
-
Create the otdDB2.DB_EMPLOYEEDelete -> bpDelete FileClient.write rule.
-
Add a Business Rule to the link between otdDB2.DB_EMPLOYEEDelete and bpDelete FileClient.write and double-click the new Business Rule icon.
The Business Rule Designer opens to the new Business Rule.
-
From the Business Rule Designer toolbar String menu, select string literal.
A string literal method box is added to the Business Rule Designer canvas.
-
Double-click the string literal method box value field, and enter Delete done.. as the value.
-
Map the Delete done.. output node of the string literal method box, to text under FileClient.write.Input1 in the Input pane of the Business Rule Designer.
-
-
Save your project.
Creating the bpInsert Business Rules
The bpInsert Business Process implements the Input Operation to read the TriggerInsert.in. file. It then unmarshals data from the input data into the otdInputDTD_DBEmployees OTD, calls the otdDB2, and inserts records into the database, and writes a message to confirm an inserted record.
 Create the bpInsert Business Rules
-
Double-click bpInsert in the Projects window to open the Business Process Designer to the bpInsert Business Process.
-
Create the bpInsert FileClient.receive -> FileClient.write rule.
-
Add a Business Rule to the link between FileClient.receive and FileClient.write and double-click the new Business Rule icon to open the Business Rule Designer.
-
From the Business Rule Designer toolbar String menu, select string literal.
-
Enter Inserting records into db_employee table..as the String value in the string literal method box.
-
Map the Inserting records into db_employee table.. output node of the string literal method box, to text under FileClient.write.input in the Input pane (right pane) of the Business Rule Designer.
-
-
Create the bpDelete FileClient.write -> otdInputDTD_DB_employee.unmarshal rule.
-
Add a Business Rule to the link between FileClient.write and otdInputDTD_DB_employee.unmarshal and double-click the new Business Rule icon.
The Business Rule Designer opens to the new Business Rule.
-
Map text under FileClient.receive.Output in the Output pane of the Business Rule Designer, to contents under otdInputDTD_DB_employee.unmarshal.Input in the Input pane of the Business Rule Designer.
-
-
Create the otdInputDTD_DB_employee.unmarshal -> Insert (Scope) element rule.
-
Add a Business Rule to the link between otdInputDTD_DB_employee.unmarshal and the Insert (Scope) element and double-click the new Business Rule icon.
The Business Rule Designer opens to the new Business Rule.
-
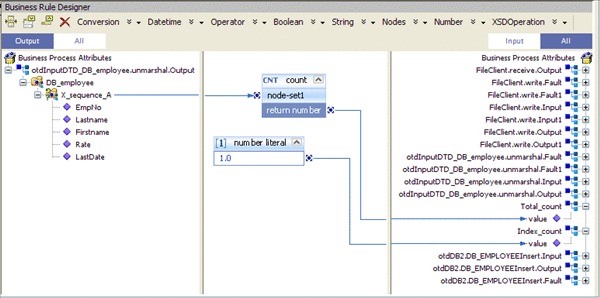
From the Business Rule Designer toolbar Nodes menu, select count.
A count method box is added to the Business Rule Designer canvas.
-
Map the X_sequence_A under otdInputDTD_DB_employee.unmarshal.Output -> DB_employee in the Output pane of the Business Rule Designer, to the node-set1 input node of the count method box.
-
Map the return number output node of the count method box, to value under Total_count in the Input pane of the Business Rule Designer.
-
From the Business Rule Designer toolbar Number menu, select number literal.
A number literal method box is added to the Business Rule Designer canvas.
-
Double-click the number literal method box value field, and enter 1.0 as the value.
-
Map the 1.0 output node of the number literal method box, to value under Index_count in the Input pane of the Business Rule Designer.

-
-
Create the X_sequence_A[number(getContainerData('Index_count'.'value'.'/value'))] predicate for the DTD.
-
Right-click otdInputDTD_DB_employee.unmarshal.Output -> DB_employee -> x_sequence_A, and select New Predicate from the popup menu.
The Predicate window appears
-
From the Predicate window's Number menu, select number.
A number method box is added to the Predicate window canvas.
-
Map value under Index_count in the Business Process Attributes pane of the Predicate window, to the object1? input node of the number method box.
-
Map the Return Number output node of the number method box, to Result in the right pane of the Predicate window.
-
Click OK.
The X_sequence_A[number(getContainerData('Index_count'.'value'.'/value'))] predicate is added to the Output pane of the Business Rule Designer under otdInputDTD_DB_employee.unmarshal.Output -> DB_employee.
-
-
Create the While -> otdDB2.DB_EMPLOYEEInsert rule.
-
Add a Business Rule to the link between While input node and the otdDB2.DB_EMPLOYEEInsert and double-click the new Business Rule icon.
-
From the Business Rule Designer toolbar Number menu, select Settings.
The Method Pallette appears.
-
From the Method Palette, click the Number tab and select the number option. Click Close.
The number option is added to the Number menu.
-
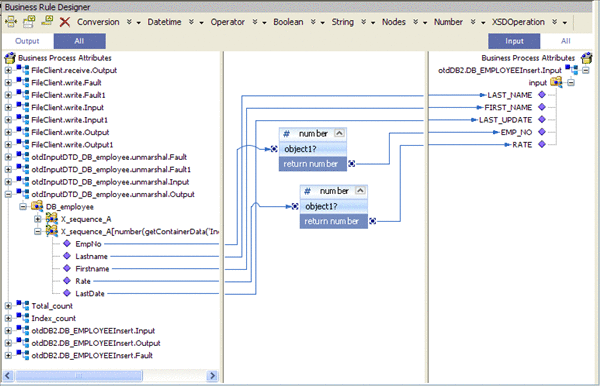
From the Business Rule Designer toolbar Number menu, select number.
A number method box is added to the canvas.
-
Map EmpNo under otdInputDTD_DB_employee.unmarshal.Output -> DB_employee -> X_sequence_A[number(getContainerData(´‘Index_count'.‘value'.‘/value'))] in the Output pane of the Business Rule Designer, to the object1? input node of the number method box.
-
Map the return number output node of the number method box, to EMP_NO under otdDB2.DB_EMPLOYEEInsert.Input -> input in the Input pane of the Business Rule Designer.
-
From the Business Rule Designer toolbar Number menu, select number to add another number method box.
-
Map Rate under otdInputDTD_DB_employee.unmarshal.Output -> DB_employee -> X_sequence_A[number(getContainerData(´‘Index_count'.‘value'.‘/value'))] in the Output pane of the Business Rule Designer, to the object1? input node of the number method box.
-
Map the return number output node of the number method box, to RATE under otdDB2.DB_EMPLOYEEInsert.Input -> input in the Input pane of the Business Rule Designer.
-
Map Lastname under otdInputDTD_DB_employee.unmarshal.Output -> DB_employee -> X_sequence_A[number(getContainerData(´‘Index_count'.‘value'.‘/value'))] in the Output pane of the Business Rule Designer, to LAST_NAME under otdDB2.DB_EMPLOYEEInsert.Input -> input in the Input pane of the Business Rule Designer.
-
Map Firstname under otdInputDTD_DB_employee.unmarshal.Output -> DB_employee -> X_sequence_A[number(getContainerData(´‘Index_count'.‘value'.‘/value'))] in the Output pane of the Business Rule Designer, to FIRST_NAME under otdDB2.DB_EMPLOYEEInsert.Input -> input in the Input pane of the Business Rule Designer.
-
Map LastDate under otdInputDTD_DB_employee.unmarshal.Output -> DB_employee -> X_sequence_A[number(getContainerData(´‘Index_count'.‘value'.‘/value'))] in the Output pane of the Business Rule Designer, to LAST_UPDATE under otdDB2.DB_EMPLOYEEInsert.Input -> input in the Input pane of the Business Rule Designer.

-
-
Create the otdDB2.DB_EMPLOYEEInsert -> While rule.
-
Add a Business Rule to the link between the otdDB2.DB_EMPLOYEEInsert activity and the While output node and double-click the new Business Rule icon.
-
From the Business Rule Designer toolbar Operator menu, select addition.
A addition method box is added to the canvas.
-
Map value under Index_count in the Output pane of the Business Rule Designer, to the number1 input node of the addition method box.
-
Double-click the number2 field of the addition method box and enter a value of 1.0
-
Map the return number output node of the addition method box, to value under Index-count in the Input pane of the Business Rule Designer.
-
-
Create the Insert -> FileClient.write rule.
-
Add a Business Rule to the link between the Insert output node and FileClient.write and double-click the new Business Rule icon.
-
From the Business Rule Designer toolbar String menu, select string literal.
-
Enter Insert Done as the String value.
-
Map the Insert Done output node of the string literal method box, to text under FileClient.write.Input1 in the Input pane of the Business Rule Designer.
-
Creating the bpPsSelect Business Rules
The bpPsSelect business process describes how to use a Prepared Statement query to select all records in the DB2 database via the Business Process Designer.
 Create the bpPsSelect Business Rules
-
Double-click bpPsSelect in the Projects window to open the Business Process Designer to the bpPsSelect Business Process.
-
Create the bpPsSelect FileClient.receive -> FileClient.write rule.
-
Add a Business Rule to the link between FileClient.receive and FileClient.write and double-click the new Business Rule icon to open the Business Rule Designer.
-
From the Business Rule Designer toolbar String menu, select string literal.
-
Enter Selecting record(s) from db_employee table via Prepared Statement select...as the String value in the string literal method box.
-
Map the Selecting record(s) from db_employee table via Prepared Statement select... output node of the string literal method box, to text under FileClient.write.input in the Input pane (right pane) of the Business Rule Designer.
-
-
Create the FileClient.write -> otdDB2.Select_psPSSelectAll rule.
-
Add a Business Rule to the link between FileClient.write and otdDB2.Select_psPSSelectAll and double-click the new Business Rule icon to open the Business Rule Designer.
-
From the Business Rule Designer toolbar Number menu, select number literal.
-
Enter 0.0 as the number value.
-
Map the 0.0 output node of the number literal method box, to EMP_NO under otdDB2.Select_psPSSelectAll.Input -> input in the Input pane of the Business Rule Designer.
-
-
Create the Records found -> otdInputDTD_DBemployees.marshal rule in Case 1 of the Decision branching activity.
-
Add a Business Rule to the link between the Records found input node and otdInputDTD_DBemployees.marshal and double-click the new Business Rule icon to open the Business Rule Designer.
-
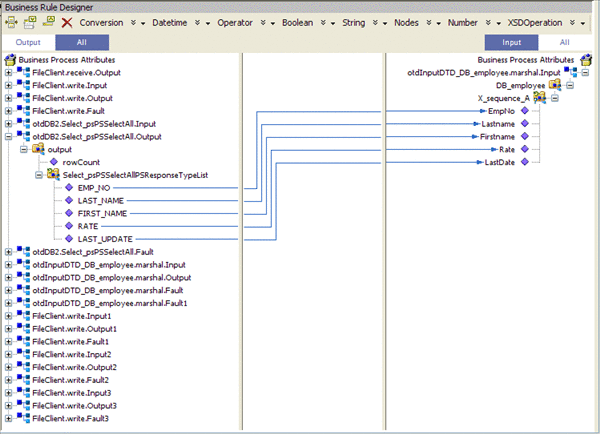
Map nodes under otdDB2.Select_psPSSelectAll.Output -> output -> Select_psPSSelectAllPSResponseTypeList in the Output pane of the Business Rule Designer, to the corresponding nodes under otdInputDTD_DBemployees.marshal.Input -> DBemployees -> X_sequence_A in the Input pane of the Business Rule Designer, as follows:
-
EMP_NO -> EmpNo
-
LAST_NAME -> Lastname
-
FIRST_NAME -> Firstname
-
RATE -> Rate
-
LAST_UPDATE -> LastDate

-
-
-
Create the otdInputDTD_DBemployees.marshal -> FileClient.write rule in Case 1 of the Decision branching activity.
-
Add a Business Rule to the link between otdInputDTD_DBemployees.marshaland FileClient.write within the Records found element, and double-click the new Business Rule icon to open the Business Rule Designer.
-
Map contents under otdInputDTD_DBemployee.marshal.Output, in the Output pane of the Business Rule Designer, to text under FileClient.write.Input3 in the Input pane of the Business Rule Designer.
-
-
Create the Norecord -> FileClient.write rule in Case 2 of the Decision branching activity.
-
Add a Business Rule to the link between No record input node and FileClient.write within the Records found element, and double-click the new Business Rule icon to open the Business Rule Designer.
-
From the Business Rule Designer toolbar String menu, select string literal.
-
Enter Records Not Found as the String value in the string literal method box.
-
Map the Records Not Found output node of the string literal method box, to text under FileClient.write.Input2 in the Input pane (right pane) of the Business Rule Designer.
-
-
Create the Decision Gate Properties for the Decision Case 1 and Case 2.
-
Double-click the red Case 1 icon between Decision input node and Records found input node.
The Decision Gate Properties Editor appears.
-
From the Decision Gate Properties Editor toolbar Operator menu, select Settings.
The Method Pallette appears.
-
From the Method Palette, click the Operator tab and select the greater than option (for Case 1) and select the lesser or equal option (for case 2). Click Close.
The new options are added to the Operator menu.
-
From the Decision Gate Properties Editor toolbar Operator menu, select greater than.
The greater than method box is added to the editor's canvas.
-
Map rowCount under otdDB2.Select_psPSSelectAll.Output -> output in the left pane of the Decision Gate Properties Editor, to the number1 input node of the greater than method box.
-
Double-click the number2 field of the greater than method box, and change the value to 0.0.
-
Map 00 output node of the greater than method box, to the Result node in the right pane of the Decision Gate Properties Editor.
-
From the Order of Execution field, select Case 2.
-
From the Decision Gate Properties Editor toolbar Operator menu, select lessor or equal.
The lessor or equal method box is added to the editor's canvas.
-
Map rowCount under otdDB2.Select_psPSSelectAll.Output -> output in the left pane of the Decision Gate Properties Editor, to the number1 input node of the lessor or equal method box.
-
Double-click the number2 field of the lessor or equal method box, and change the value to 0.0.
-
Map 00 output node of the lessor or equal method box, to the Result node in the right pane of the Decision Gate Properties Editor.
-
Click OK to close the Decision Gate Properties Editor.
The Case 1 and 2 icons change from red to green to indicate that the properties have been set.
-
-
Create the Decision.end -> FileClient.write rule.
-
Add a Business Rule to the link between the Decision.end element and FileClient.write, and double-click the new Business Rule icon to open the Business Rule Designer.
-
From the Business Rule Designer toolbar String menu, select string literal.
-
Enter Select Done as the String value in the string literal method box.
-
Map the Select Done output node of the string literal method box, to text under FileClient.write.Input3 in the Input pane of the Business Rule Designer.
-
-
Save your project.
Creating the bpTableSelect Business Rules
The bpTableSelect business process describes how to select all records the DB2 database using the Business Process Designer.
Note –
The where clause in the business rule reads the trigger value as a placeholder for input. This permits you to modify the query to select a specific record. Also note that all records are selected from the database when the TriggerTableSelect.in file is empty.
 Create the bpTableSelect Business Rules
-
Double-click bpTableSelect in the Projects window to open the Business Process Designer to the bpTableSelect Business Process.
-
Create the bpTableSelect FileClient.receive -> FileClient.write rule.
-
Add a Business Rule to the link between FileClient.receive and FileClient.write and double-click the new Business Rule icon to open the Business Rule Designer.
-
Create a string literal and enter Selecting record(s) from db_employee table via table select...as the String value.
-
Map the Selecting record(s) from db_employee table via table select... output node of the string literal method box, to text under FileClient.write.input in the Input pane (right pane) of the Business Rule Designer.
-
-
Create the FileClient.write -> otdDB2.DB_EMPLOYEESelectAll rule.
-
Add a Business Rule to the link between FileClient.write and otdDB2.DB_EMPLOYEESelectAll and double-click the new Business Rule icon to open the Business Rule Designer.
-
Map text under FileClient.receive.Output in the Output pane of the Business Rule Designer, to the whereClause under otdDB2.DB_EMPLOYEESelectAll.Input in the Input pane.
-
-
Create the otdDB2.DB_EMPLOYEESelectAll -> otdInputDTD_DBemployees.marshal rule.
-
Add a Business Rule to the link between otdDB2.DB_EMPLOYEESelectAll and otdInputDTD_DBemployees.marshal and double-click the new Business Rule icon to open the Business Rule Designer.
-
Map nodes under otdDB2.Select_psPSSelectAll.Output -> output -> DB_EMPLOYEESelectAllTableResponseTypeList in the Output pane of the Business Rule Designer, to the corresponding nodes under otdInputDTD_DBemployees.marshal.Input -> DBemployees -> X_sequence_A in the Input pane of the Business Rule Designer, as follows:
-
EMP_NO -> EmpNo
-
LAST_NAME -> Lastname
-
FIRST_NAME -> Firstname
-
RATE -> Rate
-
LAST_UPDATE -> LastDate
-
-
-
Create the otdInputDTD_DBemployees.marshal -> FileClient.write rule.
-
Add a Business Rule to the link between otdInputDTD_DBemployees.marshal and FileClient.write, and double-click the new Business Rule icon to open the Business Rule Designer.
-
Map text under otdInputDTD_DBemployees.marshal.Output in the Output pane of the Business Rule Designer, to text under FileClient.write.Input1 in the Input pane.
-
-
Create the FileClient.write -> FileClient.write rule.
-
Add a Business Rule to the link between FileClient.write element and FileClient.write, and double-click the new Business Rule icon to open the Business Rule Designer.
-
Create a string literal and enter TableSelect Done...as the String value.
-
Map the TableSelect Done... output node of the string literal method box, to text under FileClient.write.input2 in the Input pane (right pane) of the Business Rule Designer.
-
Creating the bpUpdate Business Rules
The bpTableSelect business process describes how to select all records the DB2 database using the Business Process Designer.
Note –
The where clause in the business rule reads the trigger value as a placeholder for input. This permits you to modify the query to select a specific record. Also note that all records are selected from the database when the TriggerTableSelect.in file is empty.
 Create the bpUpdate Business Rules
-
Double-click bpUpdate in the Projects window to open the Business Process Designer to the bpUpdate Business Process.
-
Create the bpUpdate FileClient.receive -> FileClient.write rule.
-
Add a Business Rule to the link between FileClient.receive and FileClient.write and double-click the new Business Rule icon to open the Business Rule Designer.
-
Create a string literal and enter Update the Rate and Last_update fields...as the String value.
-
Map the Update the Rate and Last_update fields... output node of the string literal method box, to text under FileClient.write.input in the Input pane (right pane) of the Business Rule Designer.
-
-
Create the FileClient.write -> otdDB2.DB_EMPLOYEEUpdate rule.
-
Add a Business Rule to the link between FileClient.write and otdDB2.DB_EMPLOYEEUpdate and double-click the new Business Rule icon to open the Business Rule Designer.
-
Create a string literal and enter 2008-10-21as the String value.
-
Map the 2008-10-21 output node of the string literal method box, to LAST_UPDATE under otdDB2.DB_EMPLOYEEUpdate.Input -> insert in the Input pane (right pane) of the Business Rule Designer.
-
Create another string literal and enter 23.0as the String value.
-
Map the 23.0 output node of the string literal method box, to RATE under otdDB2.DB_EMPLOYEEUpdate.Input -> insert in the Input pane (right pane) of the Business Rule Designer.
-
Map the text under FileClient.receive.Output1 in the Output pane of the Business Rule Designer, to whereClause under otdDB2.DB_EMPLOYEEUpdate.Input -> insert in the Input pane (right pane) of the Business Rule Designer.
-
-
Create the otdDB2.DB_EMPLOYEEUpdate -> FileClient.write rule.
-
Save your Project.
Next Steps
For your next step, see Creating the Connectivity Maps .
- © 2010, Oracle Corporation and/or its affiliates
