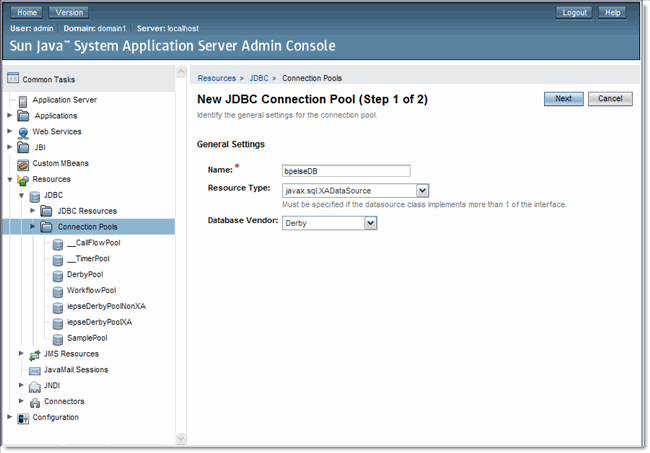
Creating an XA Connection Pool and a JDBC Resource
 To create an XA Connection Pool:
-
Log into the GlassFish Admin Console. To do this, right-click your application server node, in the Services window under Servers, and choose View Admin Console.
You can also open the Admin Console from your web browser using the correct URL. For example: http://localhost:4848.
-
In the navigation tree, expand the following nodes: Resources -> JDBC.
-
Select Connection Pools, and in the right panel, click the New button.
-
Under General Settings, specify a name (such as bpelseDB).
-
Set the Resource Type to javax.sql.XADatasource.
-
Set the database vendor to the appropriate database vendor (Derby, Oracle or MySQL). Click next.

-
From the New JDBC Connection Pool (Step 2 of 2) window, under Connection Validation, enable Allow Non Component Callers.
-
Under Additional Properties, specify the following properties for your database:
-
Derby:
-
ServerName -> machine-name
-
DatabaseName -> DatabaseName: bpelseDB;create=true
-
User -> bpelse_user
-
Password -> bpelse_user
-
-
Oracle:
-
URL -> jdbc:oracle:thin:@machine-name:port:sid
-
User -> bpelse_user
-
Password -> bpelse_user
-
-
MySQL:
-
URL -> jdbc:mysql://machine-name:port/databasename
-
User -> bpelse_user
-
Password -> bpelse_user
-
If you did not use the default values, make sure that the ServerName, User, Password and DatabaseName values are those that you specified when you created the database.
-
-
Click Finish. The new user and database are created.
-
Click the connection pool name and click the Ping button to verify your database connection.
-
Click Finish.
 To create a new JDBC resource:
-
From the admin console navigation tree, expand the Resources -> JDBC nodes, and select JDBC Resources.
-
In the right panel, click the New button.
-
Provide a JNDIName (such as jdbc/bpelseDB) and specify the JDBC Connection Pool (bplseDB) you created previously. You will use this JNDIName later when you enable persistence in the BPEL Service Engine properties.
-
Expand the Configuration node and select Transaction Service.
-
For the On Restart parameter, enable Automatic Recovery by selecting the Enabled check box.
- © 2010, Oracle Corporation and/or its affiliates
