Using the File Binding Component
This tutorial is designed to show how the File Binding Component polls for a file in a specified directory and writes it into the designated directory.
File BC provides a comprehensive solution as a transport to interact with the file system within a JBI environment.
What You Need to Know
These topics provide information you need to know before you start the tutorial:
What You Need to Do
This tutorial includes instructions on how to perform these tasks:
Tutorial Requirements
Before you proceed, make sure you review the requirements in this section.
Prerequisites
This tutorial assumes that you have some basic programming experience with the Java language and platform, and knowledge of the NetBeans IDE.
System Requirements
This tutorial assumes that your system meets the requirements specified in the System Requirements topic of the NetBeans IDE 6.1 Release Notes. NetBeans IDE runs on operating systems that support the Java VM (Virtual Machine).
Configuring the Tutorial Environment
Before you can deploy your composite application, the application server and the appropriate JBI components must be configured correctly and must be running.
The following software is required for this tutorial:
-
GlassFish ESB (Installation Instructions)includes the following:
-
GlassFish V2 Update Release 2 (UR2)
-
NetBeans IDE 6.1
-
Open ESB core components
-
Java Business Integration (JBI) service engines
-
Java Business Integration (JBI) binding components
-
Java Business Integration (JBI) component tooling
-
Note –
Glassfish ESB installer installs all the components including NetBeans IDE. To download only the NetBeans IDE, see NetBeans IDE Download.
Note –
You must have the JDK (Java Development Kit) software installed and JAVA_HOME set as an environment variable, prior to installing the GlassFish ESB or the installation will halt midway. See Installing the JDK Software and Setting JAVA_HOME for details.
Starting the GlassFish Software
Before deploying and performing test runs of a Composite Application project in the NetBeans IDE, make sure that the GlassFish Application Server is started.
 To Check the Status of the GlassFish V2 Application
Server in the NetBeans IDE
-
If the Services window is not visible, on the NetBeans IDE menubar choose Window -> Services.
-
In the Services window, expand the Servers node.
The Servers node should contain a GlassFish V2 subnode. If the GlassFish V2 node is not visible, see To Register the GlassFish V2 Application Server with the NetBeans IDE.
If a green arrow icon appears on the GlassFish V2 node, the server is running. If you do not see a green arrow icon, see To Start the GlassFish V2 Application Server in the NetBeans IDE.
 To Register the GlassFish V2 Application Server
with the NetBeans IDE
-
If the Services window is not visible, on the NetBeans IDE menubar choose Window -> Services.
-
In the Services window, right-click the Servers node and choose Add Server from the pop-up menu.
The Add Server Instance dialog box opens.
-
In the Choose Server page of the dialog box, select GlassFish V2 from the Server drop-down list.
-
If you want to change the server name that the IDE uses to identify the server, type it in the Name field.
-
Click Next .
The Platform Location Folder page opens.
-
In the Platform Location field, click Browse and select the installation location of the application server.
-
Select the Register Local Default Domain option and click Next.
-
Type the user name and password for the domain's administrator.
If you accepted the default values during the installation, the user name is admin and the password is adminadmin.
-
Click Finish.
 To Start the GlassFish V2 Application Server
in the NetBeans IDE
-
On the NetBeans IDE page, in the Services window, right-click the GlassFish V2 node and choose Start.
-
Wait until the following message appears in the Output window:
"Application server startup complete."
When the server is running, the IDE displays a green arrow icon on the GlassFish V2 node.
Creating a BPEL Module Project
This section provides step-by-step directions to create a simple BPEL module project called PollInOut, and also provides instructions to create a WSDL document, BPEL process, adding partner links and to clean and build the BPEL module project.
 To Create a BPEL Module Project
-
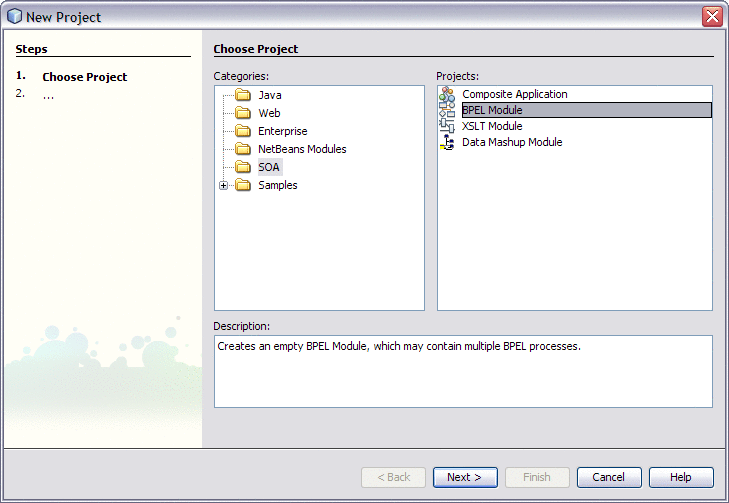
From the NetBeans IDE's main menu, choose File -> New Project.
The New Project wizard opens.
-
In the Categories list, select the SOA node and in the Projects list select BPEL Module and click Next.
-
In the Project Name field, type PollInOut.
You can choose to change the Project Location or just use the default location.
-
Leave the Set as Main Project option selected and click Finish.
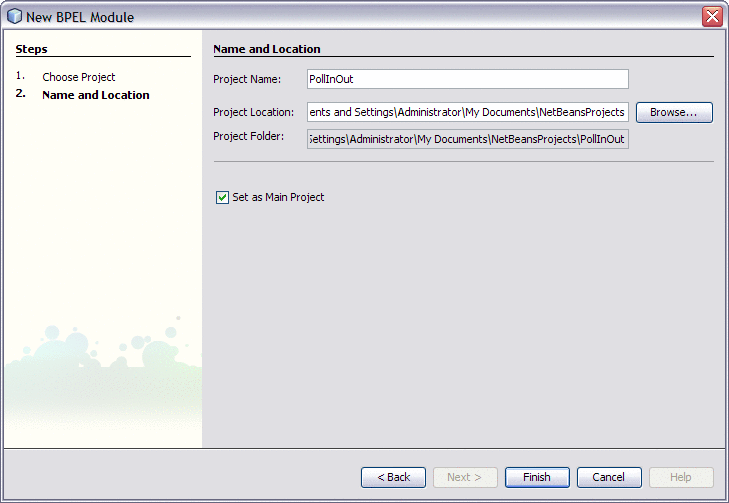
The Projects window now contains a node for the BPEL Module project called PollInOut.
 To Create the WSDL Document for Type Poll
-
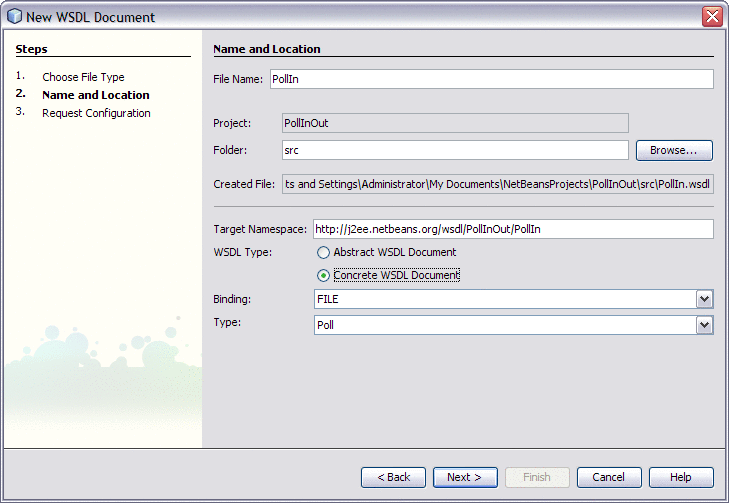
In the Projects window, expand the PollInOut Module, right-click the Process Files node, and choose New -> WSDL Document from the pop-up menu.
The New WSDL Document dialog box appears.
-
In the File Name field type PollIn.
-
In the WSDL Type, select the Concrete WSDL Document option.
-
In the Binding field, select FILE and in the Type field, select Poll and click Next.
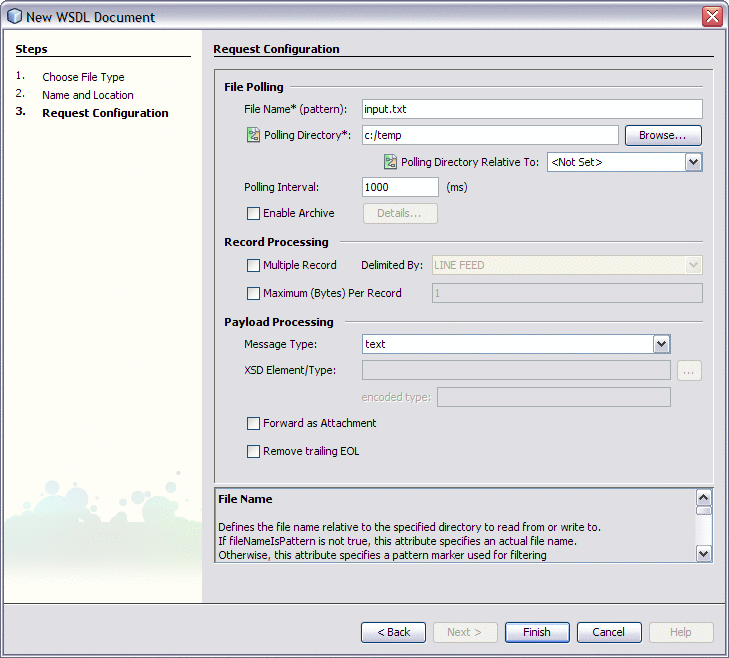
The Request Configuration page appears.
-
In the File Name* (pattern) field, change input.xml to input.text.
You can specify the file name as .txt or else use .xml, but it must be same as the input file type
Note that the Polling Directory is c:/temp by default. You can change the directory if required.
-
Click Finish.
The Projects window now has a node PollIn.WSDL under Process Files node.
 To Create the WSDL Document for Type Write
-
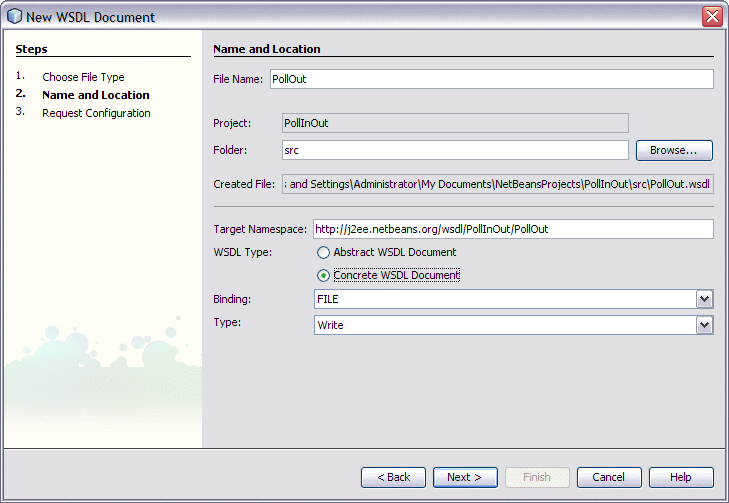
In the Projects window, expand the PollInOut Module, right-click the Process Files node, and choose New -> WSDL Document from the pop-up menu.
The New WSDL Document dialog box appears.
-
In the File Name field type PollOut.
-
In the WSDL Type, select the Concrete WSDL Document option.
-
In the Binding field, select FILE and in the Type field, select Write and click Next.
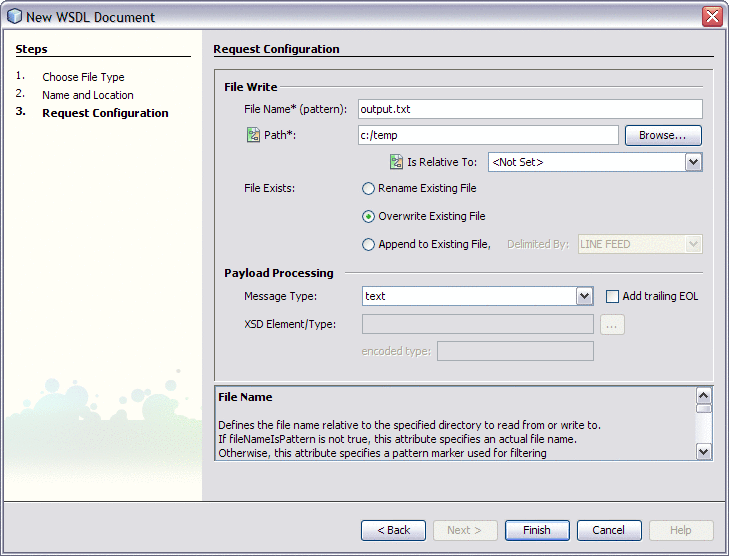
The Request Configuration page appears.
-
In the File Name* (pattern) field, change output.xml to output.text.
You can specify the file name as .txt or else use .xml, but it must be the same as the output file type.
Note that the Path is c:/temp by default. You can change it if required.
-
In File Exists, select the Overwrite Existing File option.
-
Click Finish.
The Projects window now has a node PollOut.WSDL under Process Files node.
 To Create a BPEL Process
-
In the Projects window, expand the PollInOut Module, right-click the Process Files node, and choose New -> BPEL Process from the pop-up menu.
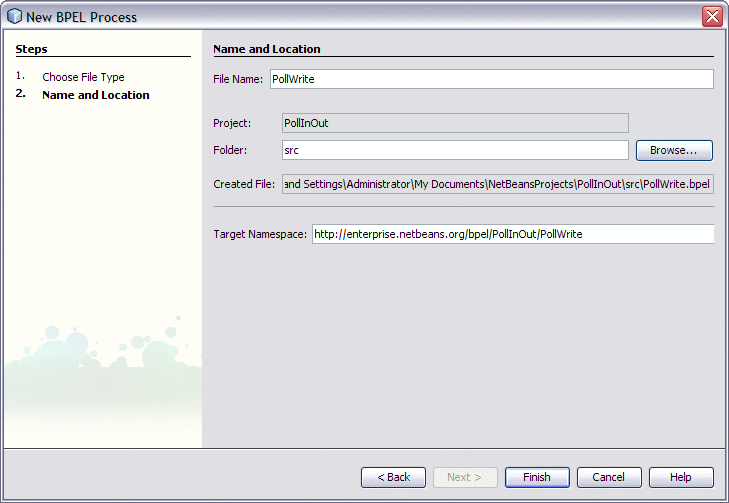
The New BPEL Process dialog box appears.
-
In the File Name field type PollWrite and click Finish.
The Projects window now has a node PollWrite.BPEL under Process Files node.
You can now see the new BPEL file, PollWrite in the Design view.
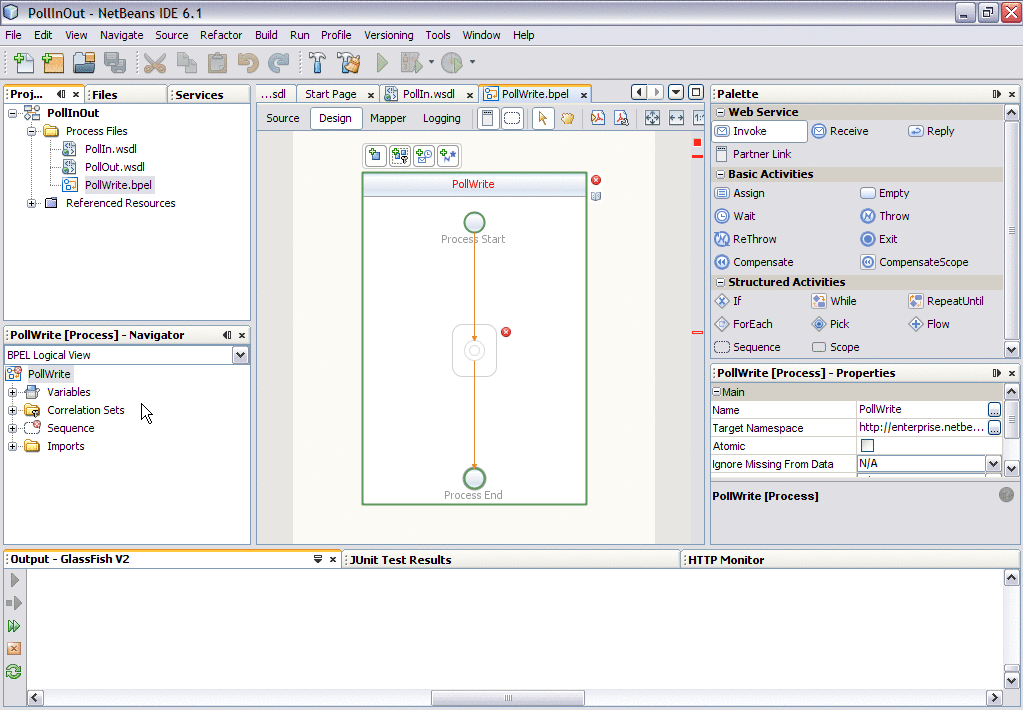
If the Palette and Properties windows are not displayed in your current view, click Windows -> Palette on the NetBeans menu.
 To Add Partner Links to the BPEL Process
-
In the Projects window, expand PollInOut and Process Files nodes and select the PollIn.wsdl file.
-
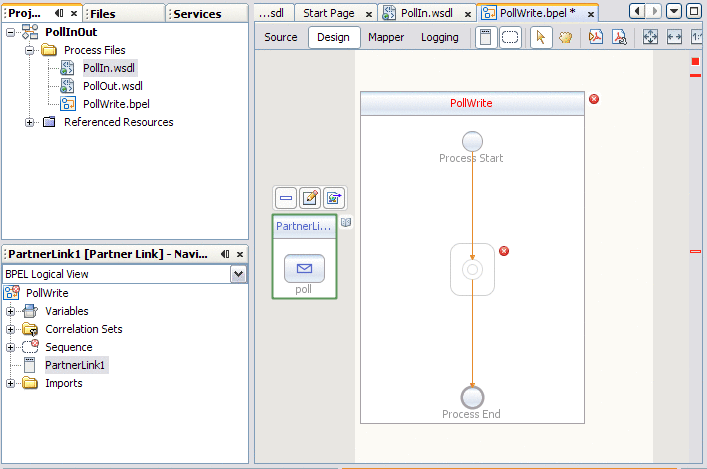
Drag the PollIn.wsdl file from the Projects window to the left side of the Design view canvas.
The IDE provides visual prompts to show you where you can drop the selection. The BPEL Editor adds a partner link to the canvas.
-
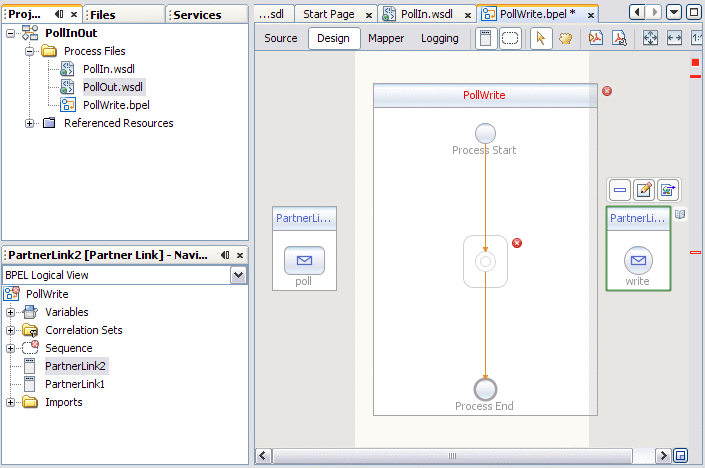
Now, select the PollOut.wsdl file from the Projects window and drag it to the right side of the Design view canvas.
 To Add a Receive Activity to the BPEL Process
-
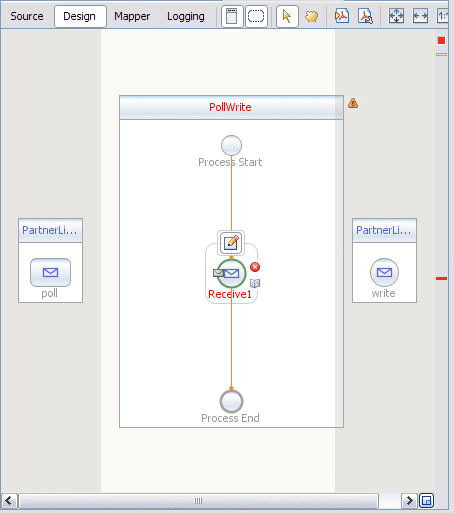
From the Palette window, in the Web Service section , select the Receive activity and drag it to the PollWrite process box in the Design view canvas, between the Process Start and the Process End activities.
The Receive1 activity is added to the process box.
-
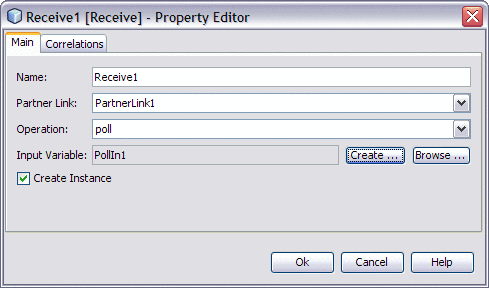
Click the Receive1 activity's Edit icon.
The Receive1 Property Editor appears.
-
On the Main tab, accept the value in the Name field. From the Partner Link drop-down list, choose PartnerLink1. The IDE populates the Operation field with Poll.
-
Click the Create button next to the Input Variable Field. The New Input Variable dialog box appears. Click OK to accept the default values.
-
Click OK to close the Receive1 Property Editor.
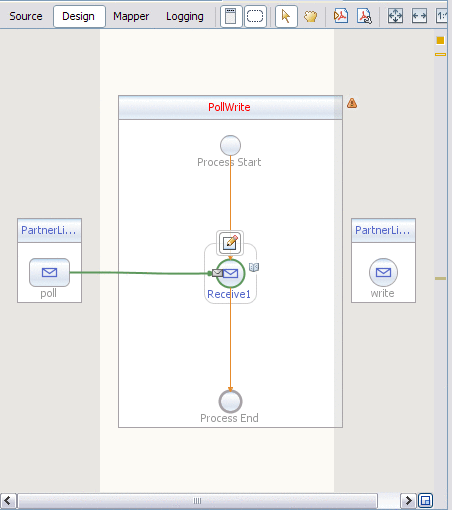
The Design view displays the new connection between PartnerLink1 and the Receive1 in the process box.
 To Add an Invoke Activity to the BPEL Process
-
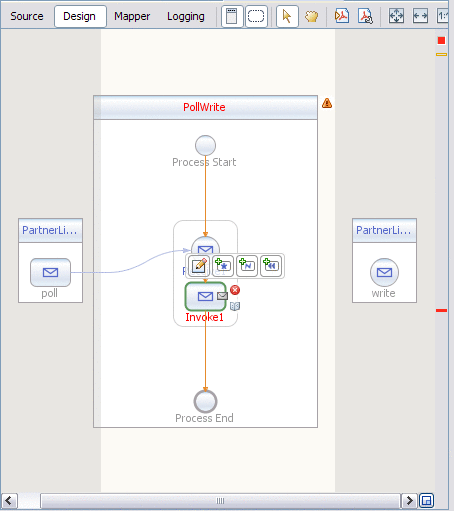
From the Palette window, in the Web Service section , select the Invoke activity and drag and drop it to the prompt between the Receive1 activity and the Process End activity in the process box on the design view canvas.
A Invoke1 activity is added to the design view canvas.
-
Click the Invoke1 activity's Edit icon.
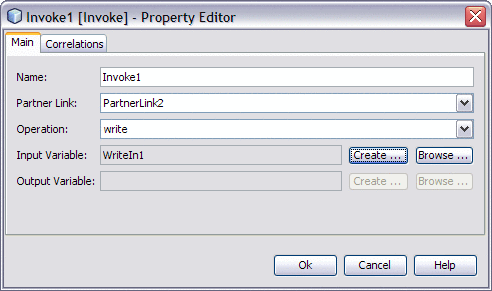
The Invoke1 Property Editor appears.
-
On the Main tab, accept the value in the Name field. From the Partner Link drop-down list, choose PartnerLink2. The IDE populates the Operation field with write.
-
Click the Create button next to the Input Variable Field. The New Input Variable dialog box appears. Click OK to accept the default values.
-
Click OK to close the Invoke1 Property Editor.
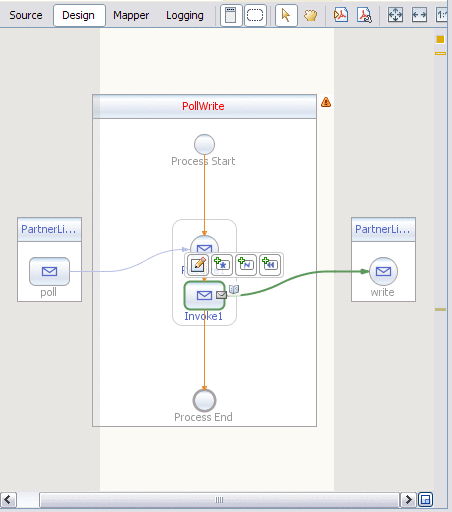
The Design view displays the new connection between PartnerLink2 and the Invoke1 in the process box.
 To Add an Assign Activity to the BPEL Process
-
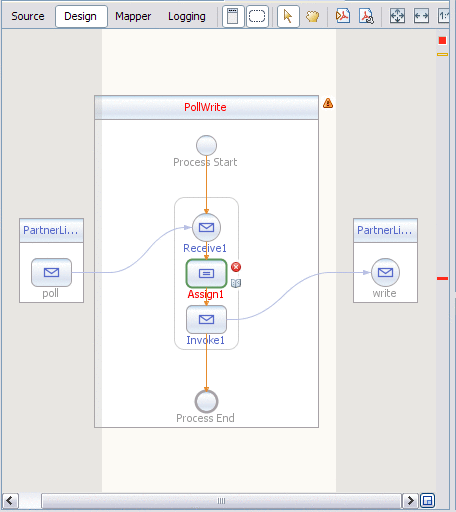
From the Palette window, in the Basic Activities section, select Assign and drag and drop it the prompt between the Receive1 activity and the Invoke1 activity in the process box on the design view canvas.
The Assign1 activity is added to the design view canvas.
-
Select the Assign1 activity and click the Mapper button on the editors toolbar.
The BPEL Mapper appears.
-
Map the part1 node under Variables -> PollIn1 in the Output pane of the BPEL Mapper, to the part1 node under Variables -> WriteIn1 in the Input pane of the Mapper.
To do this, select the part1 node in the Output pane, and drag your cursor to the part1 node in the Input pane.
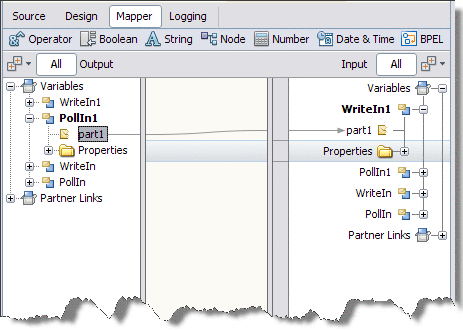
This assignment copies the input statement into the output.
-
Click the Save All icon on the IDE toolbar.
 To Clean and Build the BPEL Module Project
-
In the Projects window right-click the PollInOut node and choose Clean and Build from the pop-up menu.
When the build is complete the Output window reports BUILD SUCCESSFUL.
If the Output window is not visible, from the NetBeans IDE's menubar choose Window -> Output -> Output.
Creating a Composite Application Project
A BPEL Module project is not directly deployable. You must first add a BPEL Module project, as a JBI module, to a Composite Application project. You can then deploy the Composite Application project.
Deploying the project makes the service assembly available to the application server and enables its service units to run.
 To Create a Composite Application Project
-
From the NetBeans IDE's main menu, choose File -> New Project.
The New Project wizard opens.
-
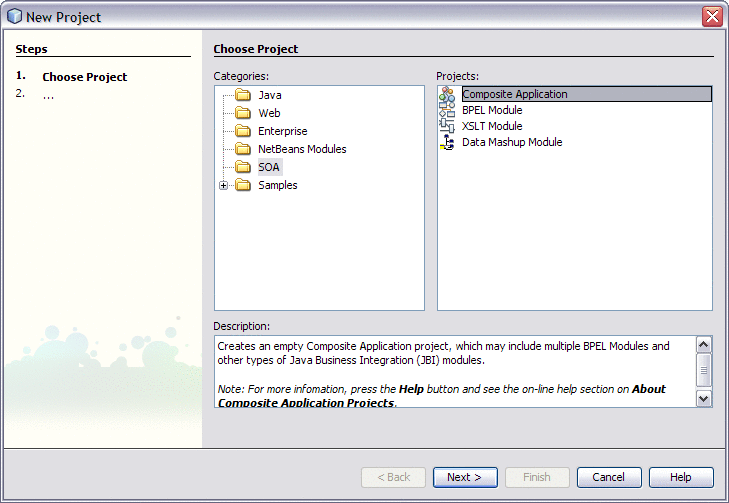
In the Categories list, select the SOA node and in the Projects list select Composite Application and click Next.
-
In the Name and Location page, change the project name to PollWriteCompApp, and specify the location of project files or just use the default location.
-
Leave the Set as Main Project option selected and click Finish.
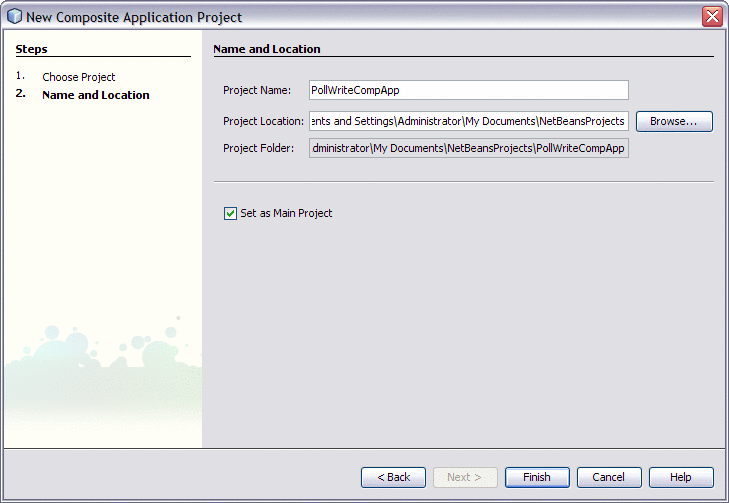
In the Projects window the new Composite Application PollWriteCompApp node is visible.
-
To add the BPEL Module project as a JBI module to the Composite Application project, right-click PollWriteCompApp and choose Add JBI Module.
The Select Project dialog box opens.
-
Select the PollInOut BPEL project you created earlier. Under Project JAR Files, select the .jar file and click the Add Project JAR Files button.
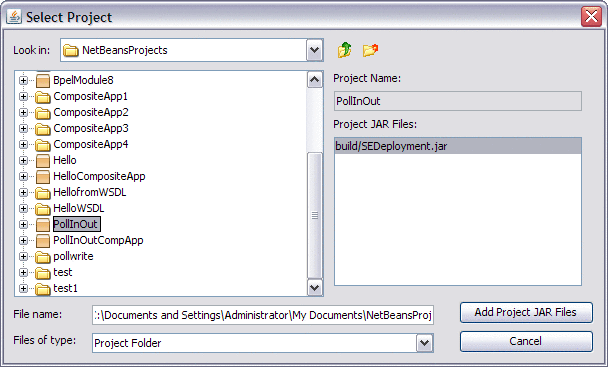
The Select Project dialog box closes and the BPEL module project is added to the JBI Modules node of the PollWriteCompApp Composite Application.
Building and Deploying the Composite Application Project
Building a project compiles the BPEL source file and packages the BPEL file and web service artifacts, including WSDL.
Deploying the project compiles the files in the Composite Application project, packages the compiled BPEL and related web service artifacts (including WSDL) into an archive, and deploys them to the Application Server.
 To Build and Deploy the Composite Application
-
In the Projects window, right-click the PollWriteCompApp project's node, and choose Build from the pop-up menu.
When the build is complete the Output window reports BUILD SUCCESSFUL.
-
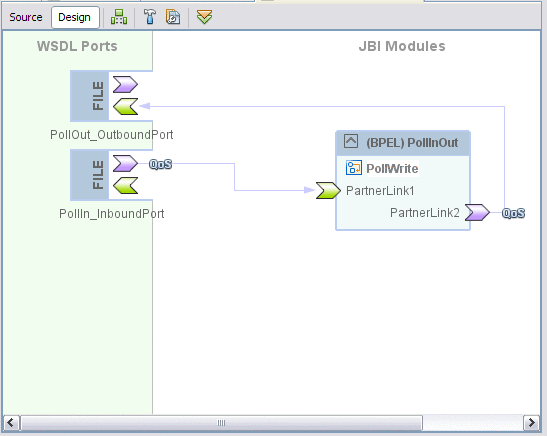
Right-click the PollWriteCompApp node, and choose Clean and Build from the pop-up menu.
The design view displays the build of the project.
-
Right-click the PollWriteCompApp node, and choose Deploy from the pop-up menu.
Deployment has succeeded when you see a BUILD SUCCESSFUL message in the GlassFish tab of the Output window.
-
Open the Services window and expand Servers -> GlassFish V2 -> JBI -> Service Assemblies to see your new deployed Service Assembly.
If you do not see the deployed project, right-click the Service Assemblies node and choose Refresh.
Testing the Composite Application
You can test your Composite Application project by navigating to the c:\temp folder and creating a input.txt file.
 To Test the PollWriteCompApp Composite Application
-
Navigate to the c:\temp folder of your system.
Note that c:\temp was the designated polling directory for both Poll and Write operations when WSDL documents were created.
-
Create a .txt file and add some content to the file and rename it as input.txt.
-
Instantly the input.txt file is replaced by output.txt file.
The output.txt file retains the content of the input.txt file. That is, the content of input.txt is written to output.txt.
Summary
In this tutorial, you learned how to use the File Binding Component to implement a simple Poll and Write operation. You created and tested a composite application.
This tutorial demonstrates how to:
-
Create a BPEL Module project
-
Create the WSDL Documents for Types Poll and Write
-
To add activities to the BPEL process
-
Build and deploy a Composite Application project to GlassFish
-
Test the composite application
- © 2010, Oracle Corporation and/or its affiliates
