Creating JMS-Based Concrete WSDL Documents
You can use a wizard to create a concrete WSDL document that contains JMS binding and service information.
In the initial part of the wizard, you must select one of the following types:
-
Receive – Choose this type for scenarios in which the JMS Binding Component receives a message from a JMS destination and invokes a JBI service with the message.
-
Receive with Reply – Choose this type for scenarios in which the JMS Binding Component receives a message from a JMS destination, invokes a JBI service, and sends the response from the service back over JMS.
-
Send – Choose this type for scenarios in which a JBI service invokes the JMS Binding Component to send a message to a JMS destination.
-
Send and Wait for Reply – Choose this type for scenarios in which a JBI service invokes the JMS Binding Component to send a message to a JMS destination and receive the response over JMS.
-
On Demand Receive – Choose this type for scenarios in which a JBI service invokes the JMS Binding Component to read a message from a JMS destination.
The configuration steps that appear next depend on the type that you selected.
 To Create a JMS-Based Concrete WSDL Document
from the New WSDL Document Wizard
-
In the Projects window of the NetBeans IDE, right-click the project node and choose New ⇒ WSDL Document.
-
Set the WSDL Type option to Concrete WSDL Document.
-
Set the Binding drop-down list to JMS.
-
Set the Type drop-down list to the appropriate type of JMS-based WSDL document.
-
Click Next.
-
Complete the configuration steps that appear next. For a description of each step, see the following topics.
 To Create a JMS-Based Concrete WSDL Document
from the New File Wizard
-
In the Projects window of the NetBeans IDE, right-click the project node and choose New ⇒ Other.
-
In the Categories list, select ESB.
-
In the File Types list, select Binding.
-
Click Next.
-
Set the Binding drop-down list to JMS.
-
Set the Type drop-down list to the appropriate type of JMS-based WSDL document.
-
Click Next.
-
Complete the configuration steps that appear next. For a description of each step, see the following topics.
Request Connection Configuration
When you are creating a JMS-based concrete WSDL document, the Request Connection Configuration step appears for all of the possible types.
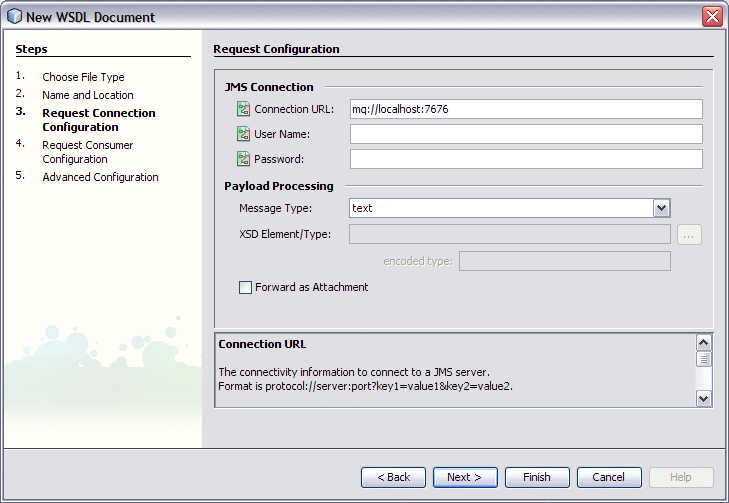
The JMS Connection section enables you to specify information for connecting to the JMS server.
-
Connection URL – The URL for connecting to the JMS server.
For more information, see Connecting to the JMS Server.
-
User Name – The user name for connecting to the JMS server.
-
Password – The password for connecting to the JMS server.
The Payload Processing section enables you to define the type of JMS messages being created and sent to the JMS destination.
-
Message Type – Specifies whether the message payload is treated as text data, binary data, XML data, or encoded data.
-
XSD Element/Type – This field is enabled when the message type is XML data or encoded data. Click the ellipsis points (...) and select a user-defined XSD element.
-
Encoded Type – This field is enabled when the message type is encoded data.
-
Forward as Attachment– If you want to send the message data as an attachment, then select this check box.
For binary data, the data is sent as an attachment by default.
For XML data, sending the data as an attachment prevents the JMS Binding Component from parsing the XML. If the XML is large, then this approach can improve performance.
Request Consumer Configuration
When you are creating a JMS-based concrete WSDL document, the Request Consumer Configuration step appears when you select the Receive type.
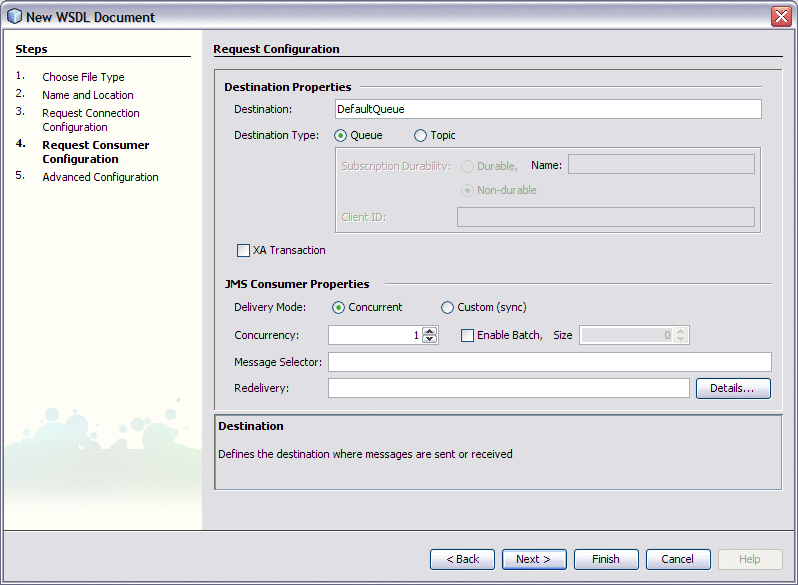
The Destination Properties section enables you to specify the JMS destination from which messages are received.
-
Destination – The name of the destination.
-
Destination Type – Indicates whether the destination is a queue or a topic.
-
Subscription Durability. This field is enabled when the destination is a topic. Indicates whether the subscriber is durable or nondurable. Durable subscribers can survive any disconnection from the JMS server.
-
Subscription Name – For a durable subscriber, indicates the name that is used to denote the durable subscription.
-
Client ID – This field is enabled when the destination is a topic. Defines a unique client ID.
-
XA Transaction – If you want to configure a two-phase commit scenario, then select this check box.
For more information, see XA Scenario.
The JMS Consumer Properties section enables you to configure properties that apply only to consumer message flows.
-
Delivery Mode – Specifies the concurrency mode.
-
Concurrency – Indicates the maximum number of concurrent receivers.
-
Enable Batch – If you want to receive messages in a batch, then select the Enable Batch check box and specify the size.
-
Message Selector – Enables you to filter messages. A message selector consists of a boolean expression, such as Age > 30.
-
Redelivery – Enables you to specify what actions to take when a message is repeatedly redelivered. For example, you could place the message in a dead letter queue.
For more information, see Configuring Redelivery Handling.
Request Publisher Configuration
When you are creating a JMS-based concrete WSDL document, the Request Publisher Configuration step appears when you select the Send type.
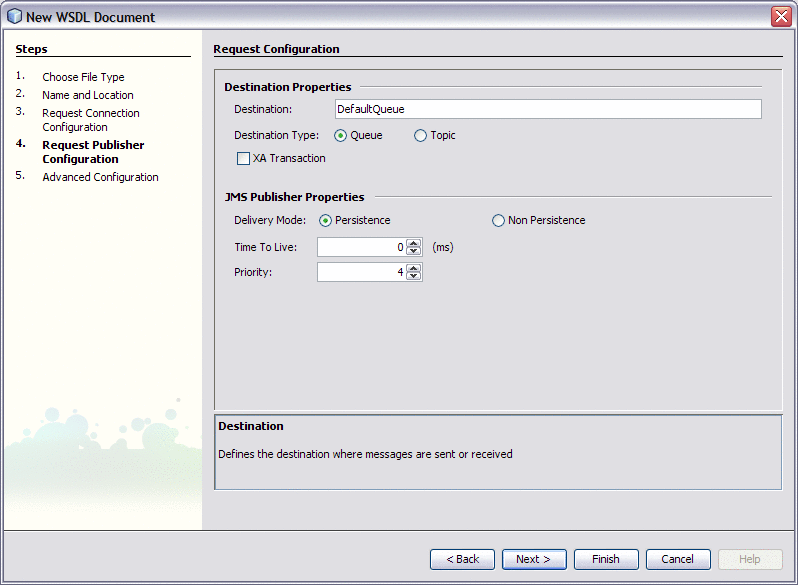
The Destination Properties section enables you to specify the JMS destination to which messages are sent.
-
Destination – The name of the destination.
-
Destination Type – Indicates whether the destination is a queue or a topic.
-
XA Transaction – If you want to configure a two-phase commit scenario, then select this check box.
For more information, see XA Scenario.
The JMS Publisher Properties section enables you to configure properties that apply only to provider message flows.
-
Delivery Mode – Indicates whether the message is persistent or nonpersistent. Persistent messages can survive the failure of the JMS server.
-
Time To Live – Indicates how long the message is retained (in milliseconds).
-
Priority – Defines the message priority. The valid values are 0 through 9, where 0 is the lowest priority and 9 is the highest priority. The default value is 4.
Response Destination Configuration
When you are creating a JMS-based concrete WSDL document, the Response Destination Configuration step appears when you select the Receive with Reply type or the Send and Wait for Reply type.
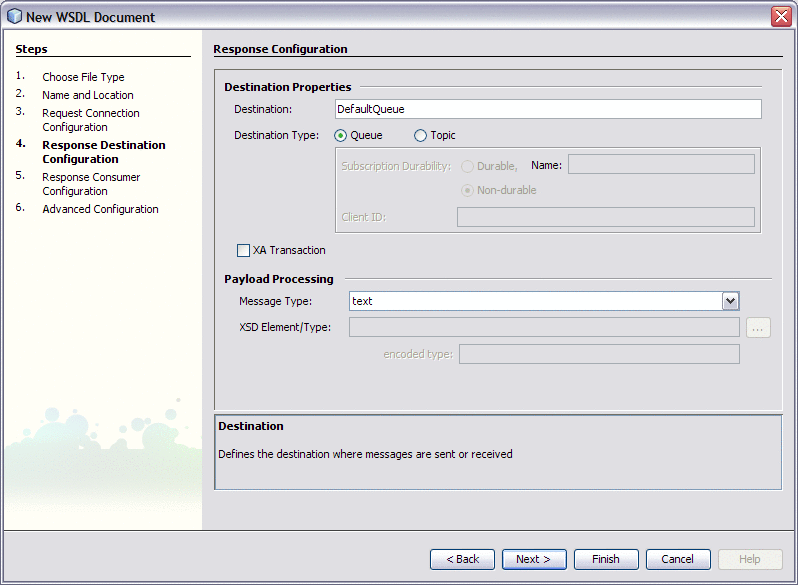
The Destination Properties section enables you to specify the JMS destination to which messages are sent.
-
Destination – The name of the destination.
-
Destination Type – Indicates whether the destination is a queue or a topic.
-
Subscription Durability – This field is enabled when the destination is a topic. Indicates whether the subscriber is durable or nondurable. Durable subscribers can survive any disconnection from the JMS server.
-
Subscription Name – For a durable subscriber, indicates the name that is used to denote the durable subscription.
-
Client ID – This field is enabled when the destination is a topic. Defines a unique client ID.
-
XA Transaction – If you want to configure a two-phase commit scenario, then select this check box.
For more information, see XA Scenario.
The Payload Processing section enables you to define the type of JMS messages being created and sent to the JMS destination.
-
Message Type – Specifies whether the message payload is treated as text data, binary data, XML data, or encoded data.
-
XSD Element/Type – This field is enabled when the message type is XML data or encoded data. Click the ellipsis points (...) and select a user-defined XSD element.
-
Encoded Type – This field is enabled when the message type is encoded data.
Response Consumer Configuration
When you are creating a JMS-based concrete WSDL document, the Response Consumer Configuration step appears when you select the Receive with Reply type.
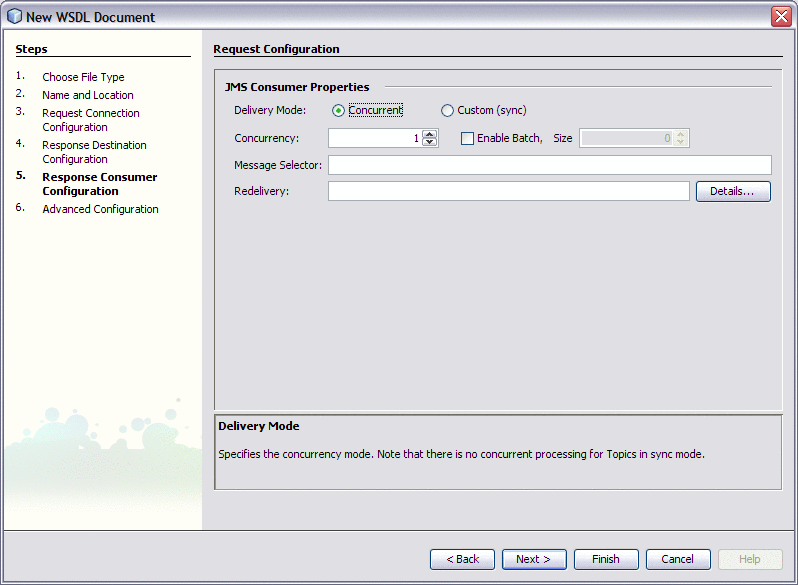
The JMS Consumer Properties section enables you to configure properties that apply only to consumer message flows.
-
Delivery Mode – Specifies the concurrency mode.
-
Concurrency – Indicates the maximum number of concurrent receivers.
-
Enable Batch – If you want to receive messages in a batch, then select the Enable Batch check box and specify the size.
-
Message Selector – Enables you to filter messages. A message selector consists of a boolean expression, such as Age > 30.
-
Redelivery – Enables you to specify what actions to take when a message is repeatedly redelivered. For example, you could place the message in a dead letter queue.
For more information, see Configuring Redelivery Handling.
Response Publisher Configuration
When you are creating a JMS-based concrete WSDL document, the Response Publisher Configuration step appears when you select the Send and Wait for Reply type.
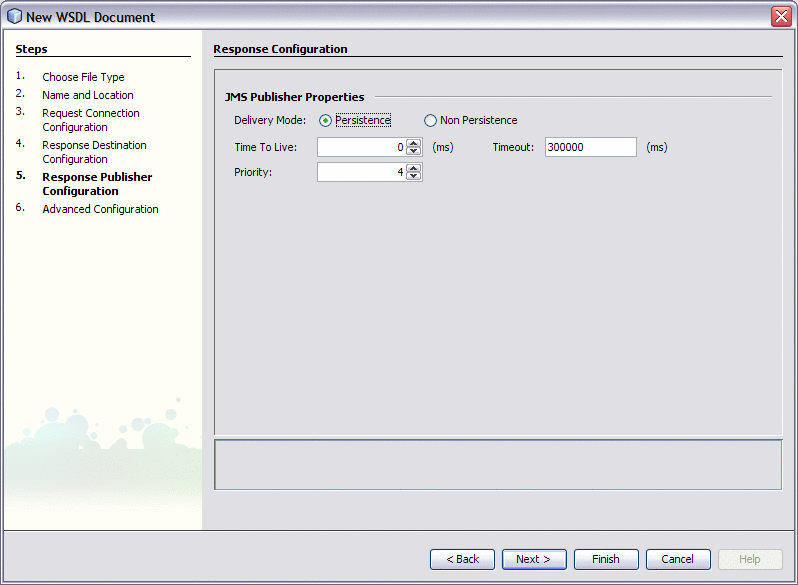
The JMS Publisher Properties section enables you to configure properties that apply only to provider message flows.
-
Delivery Mode – Indicates whether the message is persistent or nonpersistent. Persistent messages can survive the failure of the JMS server.
-
Time To Live – Indicates how long the message is retained (in milliseconds).
-
Timeout – The timeout in milliseconds on a message consumer receive for a reply message.
-
Priority – Defines the message priority. The valid values are 0 through 9, where 0 is the lowest priority and 9 is the highest priority. The default value is 4.
Advanced Configuration
When you are creating a JMS-based concrete WSDL document, the Advanced Configuration step appears for all of the possible types.
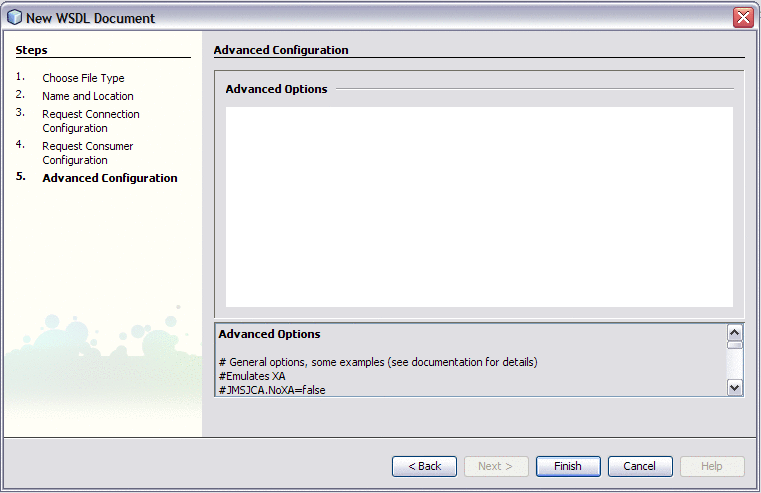
You can specify any option supported by JMSJCA in the Advanced Configuration step. For example:
JMSJCA.NoXA=false |
If you set the connection URL to jndi:// in the Request Connection Configuration step, then you specify the JNDI options in the Advanced Configuration step. For example:
JMSJCA.UnifiedCF=JNDI-name JMSJCA.TopicCF=JNDI-name JMSJCA.QueueCF=JNDI-name java.naming.factory.initial=com.sonicsw.jndi.mfcontext.MFContextFactory java.naming.provider.url=tcp://localhost:2506 java.naming.security.principal=Administrator java.naming.security.credentials=Administrator com.sonicsw.jndi.mfcontext.domain=Domain1 com.sonicsw.jndi.mfcontext.idleTimeout=60000 |
For more information about using the jndi approach, see Connecting to the JMS Server.
- © 2010, Oracle Corporation and/or its affiliates
