Creating and Configuring Batch Adapters
All adapters contain a set of parameters with properties unique to that adapter type. After the adapters are established and a Batch External System is created in the Project’s Environment, the adapter parameters can be modified for your specific system. The Batch Adapter contains Properties templates for the following OTDs:
-
BatchFTP
-
BatchFTPOverSSL
-
BatchSCP
-
BatchSFTP
-
BatchLocalFile
-
BatchRecord
-
BatchInbound
All Batch Adapters contain properties that are accessed from the Connectivity Map and the Environment Explorer tree. Connectivity Map properties most commonly apply to a specific adapter, and may vary from other adapters (of the same type) in the Project. The adapter properties accessed from the Environment Explorer tree are commonly global, applying to all adapters (of the same type) in the Project.
Selecting a Batch External Application
To create a Batch Adapter, you must first create a Batch External Application in your Connectivity Map. Batch Adapters are located between a Batch External Application and a Service. Services are containers for Collaborations, Business Processes, eTL processes, and so forth.
 To create the Batch External Application
-
From the Connectivity Map toolbar, click the External Applications icon.
-
Select a Batch External Application from the menu. The selected Batch External Application icon appears on the Connectivity Map toolbar.
Figure 1 External Applications Selection Menu

-
Drag the new Batch External Application from the toolbar onto the Connectivity Map canvas. This represents an external Batch system.
From the Connectivity Map, you can associate (bind) the External Application with the Service to establish an adapter (see Figure 2).
Figure 2 Adapter Location

When Batch is selected as the External Application, it automatically applies the default Batch Adapter properties, provided by the OTD, to the adapter that connects it to the Service. These properties can then be modified for your specific system, using the Properties Editor.
Modifying the Adapter Properties
A Project’s properties can be modified after the adapters are established in the Connectivity Map and the Environment is created.
 To Modify the Batch Adapter (Connectivity Map) Properties
-
From the Connectivity Map, double click the adapter icon, located in the link between the associated External Application and the Service.
-
The adapter Properties Editor opens to the Adapter Batch Connectivity Map parameters. Make any necessary modifications and click OK to save the settings.
 To Modify the Batch Adapter (Environment Explorer)
Properties
-
From the Environment Explorer tree, right-click the Batch external system. Select Properties from the shortcut menu. The Properties Editor appears.
-
Make any necessary modifications to the Environment parameters of the Batch Adapters, and click OK to save the settings.
Using the Properties Editor
The Batch Adapter properties are modified using the Batch Adapter Properties Editor.
 To Modify the Default Adapter Configuration Properties
-
Open the Properties Editor for a Batch Adapter (for this example, BatchFTP Connectivity Map Properties.
-
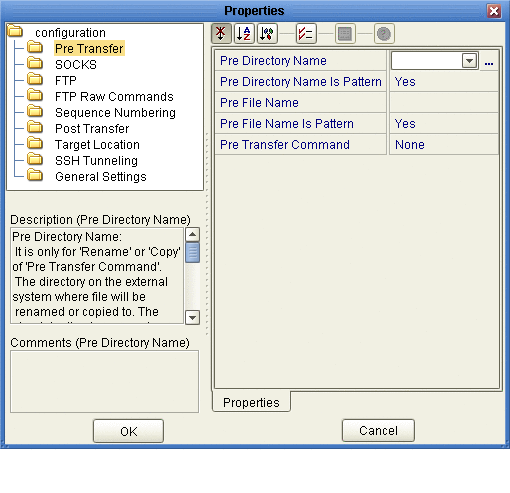
From the upper-right pane of the Properties Editor, select a subdirectory of the configuration directory (for this example, select the Pre-Transfer subdirectory). The editable properties contained in that subdirectory are now displayed in the Properties pane (see the figure below).

-
Click on any property field to make it editable. For example, click on the Pre Directory Name parameter. You can now type the Pre Directory Name value into the property field. If a parameter’s value is true/false or multiple choice, the field reveals a submenu of property options.
-
Click on the ellipsis (. . .) in the properties field to open a separate configuration dialog box. This is helpful for large values that cannot be fully displayed in the parameter’s property field. Enter the property value in the dialog box and click OK. The value is now displayed in the parameter’s property field.
-
A description of each parameter is displayed in the Description box when that parameter is selected, providing an explanation of any required settings or options.
-
The Comments box, located below the Description box, provides an area for recording notes and information regarding the currently selected parameter. This is saved for future referral.
-
After modifying the configuration properties, click OK to close the Properties Editor and save your current changes.
-
After modifying the configuration properties, click OK to close the Properties Editor and save the changes.
Note –Properties set from the Collaboration override the corresponding properties in the adapter’s configuration file. Any properties that are not set from the Collaboration retain their configured default settings.
- © 2010, Oracle Corporation and/or its affiliates
