Cluster Environment
A cluster is a group of multiple server instances, spanning across more than one node, all running identical configuration. All instances in a cluster work together to provide high availability, reliability, and scalability.
With load balancing, a cluster offers uninterrupted service and session data persistence by providing failover and session replication.
Hardware and Software Requirements
The use case described in this section, the Web Server cluster consists of the following entities:
|
1) Four instances (running on four identical nodes) |
|
2) An Administration Server |
|
3) A reverse proxy for load balancing HTTP requests |
To set up a cluster, you need two or more identical nodes with the same operating system version and patches installed. For example, if you select a machine with Solaris® 9 SPARC® operating system, other machines in the cluster must also have Solaris 9 SPARC installed.
For information on supported platforms and patch requirements, see the Sun Java System Web Server 7.0 Release Notes.
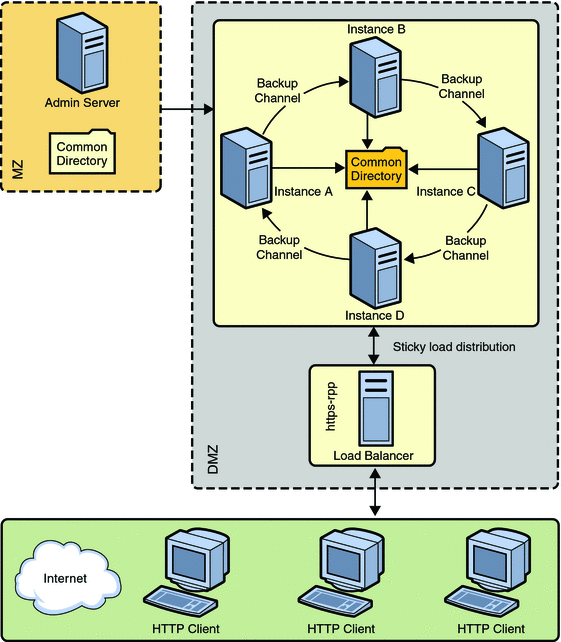
The following figure describes a clustered environment.
Figure 4–2 Cluster Set Up

In the figure, nodes are configured in the De-Militarized Zone (DMZ). The Administration Server is configured behind a firewall, the Militarized Zone, to restrict and protect the Administration Server against general access. Another node is configured as the Reverse Proxy Server. A reverse proxy server resides inside the DMZ to enhance security.
Note –
The Solaris zone feature is supported only on Solaris 10 operating system.
Setting Up a Cluster
This section describes the procedure to set up the cluster and enable reverse proxy to support load-balancing of HTTP requests.
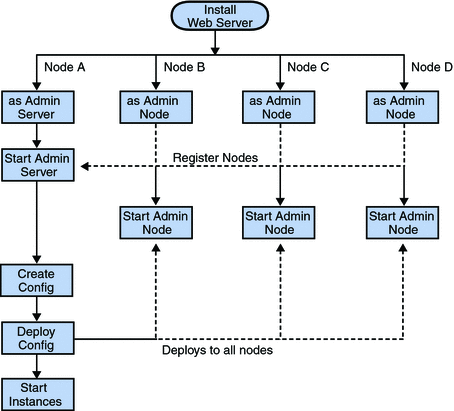
The following flowchart illustrates the procedure to set up a cluster.
Figure 4–3 Flowchart illustrating the cluster set up

-
On one of the nodes, install Web Server that acts as the Administration Server in a cluster.
-
On other three nodes, install Web Server. Select the option of installing Web Server as an Administration Node. During the installation, choose the option of registering the node with the server.
-
Make sure the Administration Server is using SSL port for communication, as an Administration Node can be registered with the server only in secure mode.
-
Make sure the system date and time on all the nodes where the Administration Server and the Administration Nodes are installed are the same. The certificate associated with the server is created based on the system date and time of the node where the Administration Server is installed. If the system date of the Administration Node is earlier than the Administration Server, the registration fails as the certificate of the Administration Server will not yet be valid. As a corollary, the certificate may be deemed valid if it is has expired.
-
Start the Administration Server from the install_dir/admin-server/bin/ directory.
install_dir/admin-server/bin>./startserv
-
Start the wadm command-line tool from the Administration Node. The wadm command-line tool is located in the install_dir/bin directory.
install_dir/bin>./wadm
-
Register each Administration Node with the Administration Server. Use the register-node command to register each node with the server.
For Example:
./wadm register-node -user=admin --host=abc.sfbay.sun.com --port=8989
Where,
- abc.sfbay.sun.com
-
is the host name of the Administration Server to which you are registering the Node.
- port
-
is the SSL Port number of the Administration Server.
-
You will be prompted to enter the administration password. Enter the administration password of the Administration Server.
The Administration Server authenticates each other by the Administration Server trusting the Administration Node's server certificate and the Administration Node trusting the client certificate presented by the Administration Server. During registration of an Administration Node, the Administration Server generates a server certificate for that Administration Node, which is then downloaded and installed on the Administration Node. The issuer of the server certificate is also installed on the Administration Node.
Note –The registration can be done only over SSL.
For information about registering nodes, see the Registering the Administration Node From the Command-Line in Sun Java System Web Server 7.0 Installation and Migration Guide.
-
Start all the Administration Nodes using the startserv command from the install_dir/admin-server/bin/ directory.
-
Using the Admin Console or the CLI, create a new configuration in the Administration Server.
Provide configuration information such as configuration name, HTTP Listener port, and the server name for the new configuration.
-
Create instances of the configuration on all the nodes.
-
Start the instances on all the nodes.
Note –Web Server provides the flexibility to expand or reduce your cluster. You can add or remove instances to the cluster at any point of time.
Configuring Reverse Proxy for Load-balancing
Web Server 7.0 provides a sophisticated built-in load balancer, the reverse proxy. A reverse proxy is a gateway for Web Servers in a server farm. By configuring reverse proxy, the requests are forwarded to multiple similarly configured web servers
Use the following procedure to enable reverse proxy in Web Server 7.0:
-
Install Web Server on the node that you want to use for configuring reverse proxy.
-
Create a configuration. For example, rp.
-
Using the Administration Console, select Configurations > Virtual Servers > Content Handling > Reverse Proxy tab. Click the New button.
-
Enter the reverse proxy URI and the server URLs of all the machines in the cluster separated by comma.
The format for entering the server URL is hostname:portnumber.
-
Save the changes.
-
Deploy the modified configuration to apply the changes to the configuration.
-
Start all the instance of this modified configuration.
This completes configuring reverse proxy for load balancing HTTP requests.
- © 2010, Oracle Corporation and/or its affiliates
