Chapter 7 Deploying Portal Server Communities
Portal Server communities are associations of members and services that end users can establish and manage themselves. All the community data (community membership and configuration data, as well as application data for portlets) is designed to be stored in a database of the administrator's choice that can be connected to using a jdbc driver. Portal 7.1 uses Derby database by default for storing the above data and is shipped with the Portal product. As such it becomes important to consider tuning this database for performance and scalability.
This chapter provides the following common examples of deployment scenarios for Portal Server communities.
Deploying Communities on the Default Database Installation
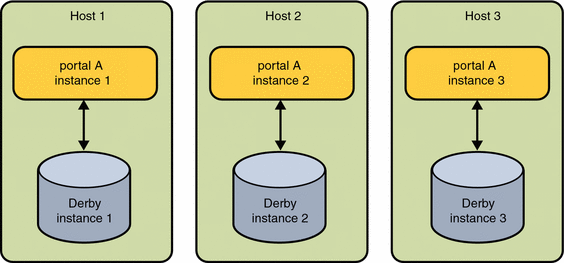
By default, each Portal Server installation creates a instance of a Derby Database. This instance is configured as a Network Server that is accessible from any client using the Derby Client JDBC.

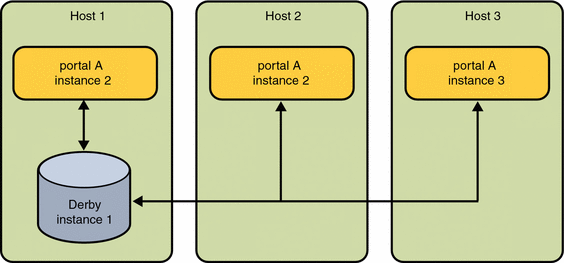
When multiple Portal instances are deployed to different hosts, but serving the same community, it is necessary to use a common Derby server instance.

To deploy Portal communities on multiple hosts that use a single database instance, see Deploying Communities on Multiple Hosts Using a Single Database Instance.
By default, the Derby Network Server is configured to listen on port 1527. To test if derby is running use the following UNIX command
netstat -an | grep 1527
If there is nothing listening on the port the derby database is not running. It can be started using the following lines:
###start_derby.sh####
PATH=/usr/jdk/jdk1.5.0_09/bin:${PATH};export PATH
derby_classpath=/opt/SUNWjavadb/lib/derby.jar:/opt/SUNWjavadb/lib/derbynet.jar;
exportderby_classpath
derby_home=/var/opt/SUNWportal/derby;export derby_home
java -Dderby.system.home=${derby_home} -cp ${derby_classpath}
org.apache.derby.drda.NetworkServerControl start &
|
Deploying Communities on Multiple Hosts Using a Single Database Instance
When multiple Portal instances are deployed to different hosts, each instance has different community data unless you configure the instances to use a common database instance. This section describes how to configure multiple Portal Server instances on different hosts to use a single, common Derby network server instance.

Deploying multiple instances of Portal Server on a single, common Derby instance can be accomplished in two ways.
-
You can use a Derby instance that is already installed on a Portal Server host and configure other Portal Server instances to point to the Derby instance. To Point All Portal Server Instances To The Common Derby Network Server Instance
-
You can create a derby instance on a dedicated Derby host and configure other Portal Server instances to point to the host running the dedicated Derby instance.
Deployment Requirements
The platform requirements for deploying multiple Portal Server communities on single Derby instances include the following:
Operating System
-
Solaris 9 U6 or Solaris 10 on SPARC
-
Solaris 9 or Solaris 10 on x86
-
RedHat Enterprise Linux 2.1, 3.0 Update 3 or 4.0 on x86.
For more detailed information please refer to the release notes.
These requirements are similar to those required for setting up any portal instance. The requirements for setting up a dedicated derby instance also require the use of java sdk which is normally packaged with the Java Enterprise System 5. The required version is 1.5.0_09 or later.
 To Set Up a Common Derby Network Server Instance (Solaris)
-
Install JDK from Java Enterprise System 5 distribution. This step is required if the required Java version is not present on the machine.
-
Install the Derby database packages on the dedicated host.
-
Transfer the Derby data files from the Portal Server install host to the dedicated Derby network server instance host. The data files are located in /var/opt/SUNWportal/derby.
The Derby data files are:
-
derby.properties
-
and the following directories
-
communitymc_portal1
-
surveydb_portal1
-
filesharingdb_portal1
-
wikidb_portal1
-
-
Archive the Derby data files using the tar command on the Portal Server install host.
cd /var/opt/SUNWportal/derby
tar -cvf derby-system.tar *
-
Create the Derby system home directory on the dedicated Derby network instance host.
mkdir -p /var/opt/SUNWportal/derby
-
Transfer the derby-system.tar file from the Portal Server install host to the system home directory on the dedicated Derby network instance host.
On the dedicated Derby network instance host, execute the following commands from the /var/opt/SUNWportal/derby directory.
ftp> portal install
ftp> cd /var/opt/SUNWportal/derby
ftp> get derby-system.tar
ftp> quit
-
Extract the derby-system.tar file using the tar command.
tar -xvf derby-system.tar
-
-
Modify the Derby properties file.
-
Change the derby.drda.host property to the fully qualified host name assigned to the interface on which the common Derby network server instance runs.
-
Delete the derby log file
rm derby.log
-
create empty log file.
touch derby.log
-
(Optional) Change the derby.drda.port property to run the server on a non default port. Port 1527 is the Derby default port. Changing the port property is optional.
-
-
Start the Derby network server instance. You can use the following sample script:
###start_derby.sh#### PATH=/usr/jdk/jdk1.5.0_09/bin:${PATH};export PATH derby_classpath=/opt/SUNWjavadb/lib/derby.jar:/opt/SUNWjavadb/lib/derbynet.jar; exportderby_classpath derby_home=/var/opt/SUNWportal/derby;export derby_home java -Dderby.system.home=${derby_home} -cp ${derby_classpath} org.apache.derby.drda.NetworkServerControl start & -
(Optional) Modify the Derby tuning properties in derby.properties or add JVM tuning parameters to the Java command used to start the Derby network server. For details, refer to the Apache Derby manuals, and java.sun.com.
 To Point All Portal Server Instances To The Common
Derby Network Server Instance
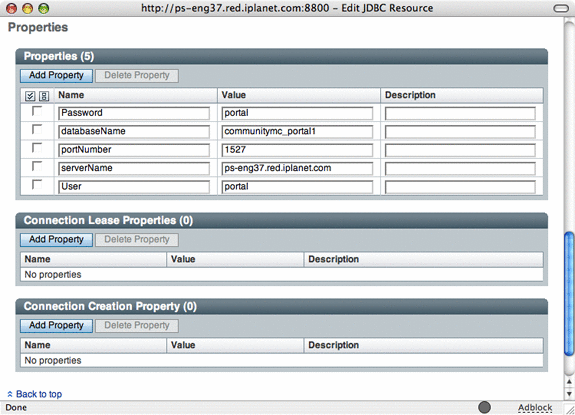
Portal clients of the Derby network server instance access it through a JDBC data source that is configured in the web container. Configuring a Portal instance to use a non-default Derby network server instance means reconfiguring these data sources to point to a different host. The method depends on the brand of web container. This procedure uses Sun Java Webserver 7.0 as an example.
Perform the following procedure for each Portal Server instance that you want to use a common Derby network server instance.
-
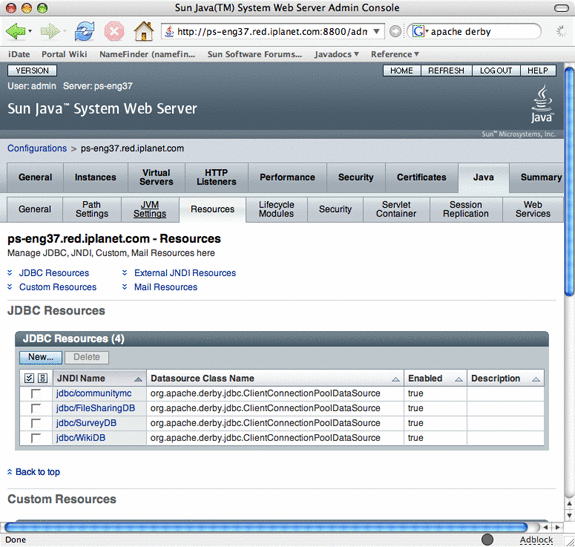
Access the Sun Java System Web Server.
For example, http://sesta.iplanet.com:8800
-
Under the Common Tasks Tab, click Edit Java Settings under Configuration Tasks.
-
Click the Resources tab.
A list of the JDBC resources in the web container is displayed.

-
Perform the following steps for each of the following resources:
-
jdbc/communitymc
-
jdbc/FileSharingDB
-
jdbc/SurveyDB
-
jdbc/WikiDB
-
-
Deploy the configuration by performing the following steps:
-
Restart the Web Container.
Deploying Communities on a High-Availability Database
To provide high availability to an enterprise scale community, the Derby database that is installed with Portal Server must be replaced by a jdbc connectable database that provides high availability.
 To Replace the Derby Database
-
Set up the database.
-
Set up the Web Container for the New Database.
-
Configure Community Membership and Configuration.
-
Configure the communitymc database configuration file:
PORTAL-DATA-DIR/portals/PORTAL-ID/config/portal.dbadmin.
Parameters
db.driver=vendor-specific-classpath.jdbc.ClientDriver
db.driver.classpath=/opt/jarfile-directory-pathclient.jar
community.db.user=database-user-account (created in step 1c).
community.db.password=database-user-account-password (created in step 1c).
community.db.url=jdbc:xxx://xxxxx.pstest.com:port/database-instance-created-in-step-1b.
-
Remove the derby-specific property in:
PORTAL-DATA-DIR/portals/PORTAL-ID/config/communitymc.properties.
For example: javax.jdo.option.Mapping=derby
-
Load the schema onto the database by using the following commands:
cd /var/opt/SUNWportal/portals/portal1/config
/usr/sfw/bin/ant -f config.xml -D"portal.id=portal1" configure
-
Edit the JDBC resource in the web container configuration to point to the new database.
-
-
Configure and Install Portlet Applications.
-
Locate the portlet applications:
PORTAL-DATA-DIR/portals/PORTAL-ID/portletapps
-
Configure the portlet applications to use the new database, for example:
cd /var/opt/SUNWportal/portals/portal1/portletapps/surveys
Edit the tokens_xxx.properties file.
-
Create the JDBC Resource for each application using the values from the tokens_xxx.properties file.
-
Resource JNDI Name: jdbc/DB-JNDI-NAME
-
Resource Type: javax.sql.DataSource
-
Datasource Classname: DB-DATASOURCE
-
User: DB-USER
-
Password: DB-PASSWORD
-
URL: DB-URL
-
-
Undeploy the existing portlets that use Derby Database as the datastore.
-
Deploy the newly configured portlet applications.
-
 To Deploy High-Availability Database
Before You Begin
Install the Oracle 10g Release 2 database.
-
Prepare the Oracle database.
-
Create a database instance named portal. An example is, SID=portal.
Note –To avoid ORA-27102 out of memory errors on Solaris 10, perform the following command: projadd -U oracle -K "project.max-shm-memory=(priv,4294967295B,deny)" user.oracle
-
b. Log in to the Oracle Enterprise Manager as SYSTEM. The path is typically http://hostname:1158/em. (em stands for Enterprise Manager).
or command line sqlplus /nolog CONNECT sys/password AS SYSDBA;
-
Create a tablespace communitymc_portal-ID for example, communitymc_portal1.
For example,
SQL> CREATE TABLESPACE COMMUNITYMC_PORTAL1 LOGGING DATAFILE '
/app/oracle/oradata/portal/communitymc_01.dbf' SIZE 400M REUSE AUTOEXTEND ON NEXT
1280K MAXSIZE UNLIMITED EXTENT MANAGEMENT LOCAL;
-
Create a user account with the following values:
Username: portal
Password: portal
Default Tablespace: communitymc_Portal—ID
Assign roles: CONNECT and RESOURCE
For example,
SQL> create user portal identified by portal;

SQL>alter user portal default tablespace  COMMUNITYMC_PORTAL1;

SQL> grant connect,resource to portal;
-
-
Prepare the web container for the new database.
-
Locate the Oracle JDBC driver using one of the following methods. The file isojdbc14.jar.
-
Use the existing ojdbc14.jar file on the machine on which Oracle is installed. It is normally located in: $ORACLE_HOME/jdbc/lib/ojdbc14.jar.
-
Download the ojdbc14.jar file from the Oracle website. Verify that you download the version that is compatible with the your Oracle RDBMS.
-
-
Add the JDBC driver to the JVM classpath.
Add the JDBC driver (ojdbc14.jar) to the JVM classpath.
For example,
class-path-suffix...//opt/SUNWjavadb/lib/derbyclient.jar: /oracle/ojdbc14.jar...
-
Add the following JVM option:
-Djdbc.drivers=oracle.jdbc.OracleDriver.
For example, in Web Server server.xml
<jvm-options>-Djdbc.drivers=org.apache.derby.jdbc.ClientDriver</jvm-options>
<jvm-options>-Djdbc.drivers=oracle.jdbc.OracleDriver</jvm-options>
Note –It is possible to remove the derby classfiles and options once all the portlets/applications that are using derby database jdbc resources have been converted to using oracle resources.
-
-
Configure Community Membership and Configuration.
-
Edit the communitymc database configuration file:
vi Portal-data-dir/portals/Portal-ID/config/portal.dbadmin
db.driver=oracle.jdbc.OracleDriver
db.driver.classpath=JDBC-Driver-Path/ojdbc14.jar url=jdbc:oracle:thin:@Oracle-Host:Oracle-Port:portal
For example, portal.dbadmin
db.driver=oracle.jdbc.OracleDriver
db.driver.classpath=/oracle/ojdbc14.jar
community.db.user=portal
community.db.password=portal
community.db.url=jdbc:oracle:thin:@machine1.pstest.com:1521:portal
portal.id=portal1
-
Remove or comment out the following property from the communitymc configuration file.
vi Portal-Data-Dir/portals/Portal-ID/config/communitymc.properties
#javax.jdo.option.Mapping=derby
-
Load the community schema onto Oracle by using the following commands:
cd /var/opt/SUNWportal/portals/portal1/config
/usr/sfw/bin/ant -f config.xml -D"portal.id=portal1" configure
-
When finished check that tables have been created in oracle by typing the following:
SQL> connect portal/portal
Connected.
SQL> select * from cat;

TABLE_NAME                     TABLE_TYPE
------------------------------ -----------
BIN$I3usV+V+I7HgRAgAIMbswQ==$0 TABLE
JPOX_TABLES                    TABLE
COMMUNITY                      TABLE
COMMUNITY_USER                 TABLE
COMMUNITY_DP                   TABLE
-
Edit the communitymc JDBC resource to point to Oracle.
-
Log in to the web container administration console.
-
Locate the JDBC resource named jdbc/communitymc.
-
Set the Datasource classname to oracle.jdbc.pool.OracleDataSource.
-
Set following properties:
-
user: portal
-
password: portal
-
url: jdbc:oracle:thin:@Oracle-Host:Oracle-Port:portal
<jdbc-resource> <jndi-name>jdbc/communitymc</jndi-name> <datasource-class>oracle.jdbc.pool.OracleDataSource</datasource-class> <idle-timeout>30</idle-timeout> <wait-timeout>10</wait-timeout> <property> <name>Password</name> <value>portal</value> </property> <property> <name>portNumber</name> <value>1521</value> </property> <property> <name>databaseName</name> <value>communitymc_portal1</value> </property> <property> <name>User</name> <value>portal</value> </property> <property> <name>serverName</name> <value>machine1.pstest.com</value> <description/> </property> <property> <name>url</name> <value>jdbc:oracle:thin:@machine1.pstest.com:1521:portal</value> <description/> </property> </jdbc-resource> -
Note –On some web containers, you might need to edit the JDBC Connection Pool instead of the JDBC resource.
-
-
-
Configure and Install the Fileshare, Surveys, and Wiki Portlet Applications.
-
Locate the portlet application:
Portal-Data-Dir/portals/Portal-ID/portletapps/Portlet_Application
-
Configure tokens_ora.properties.
Each application located under /portals/portal1/portletapps/ has its own tokens_ora.properties file in addition to a tokens.properties file. The necessary oracle database access parameters need to be corrected in the tokens_ora.properties file to reflect the actual database connectivity.
-
Create a JDBC Resource for each application using the values from the tokens_ora.properties file.
-
Resource JNDI Name: jdbc/OracleFilesharingDB. The value should match the DB-JNDI-NAME value in the tokens_ora.properties file.
-
Resource Type: javax.sql.DataSource.
-
Datasource Classname: oracle.jdbc.pool.OracleDataSource. The value should match DB-DATASOURCE value in the tokens_ora.properties file.
-
User: portalfs. The value should match the DB-USER value in the tokens_ora.properties file.
-
Password: portalfs. The value should match the DB_PASSWORD value in the tokens_ora.properties file.
-
URL: jdbc:oracle:thin:@oracle.acme.com:1521:portal. The value should match the DB-URL value in the tokens_ora.properties file.
Note –On some web containers, you might need to define the JDBC Connection Pool connection pool prior to setting up the JDBC resource.
-
-
Undeploy the existing portlets that use the Derby Database as the datastore.
/opt/SUNWportal/bin/psadmin undeploy-portlet -u uid=amadmin,ou=people,dc=acme,dc=com -f Password-File -p Portal ID -g portlet
-
Deploy the newly configured portlet.
cd Portal-Data-Dir/portals/Portal-ID/portletapps/Portlet_Application
/usr/sfw/bin/ant -D"portal.id=portal1" -Dapp.version=ora
-
- © 2010, Oracle Corporation and/or its affiliates

