Choose Components for Installation
Java ES consists of product components (with subcomponents) and shared components. Product components and their subcomponents can be selected for installation in the Java ES installer. Shared components support product components and are selected automatically when a product component that depends on them is selected. Product components are also selected automatically if another product component requires their services. To better understand component dependencies, see Are There Component Interdependencies that I Need to Know About?
The Choose Software Components page lists the product components and subcomponents you can select to install. To see subcomponents, click the symbol to the left of a product component check box, as shown for Portal Server Secure Remote Access in the following screen capture.
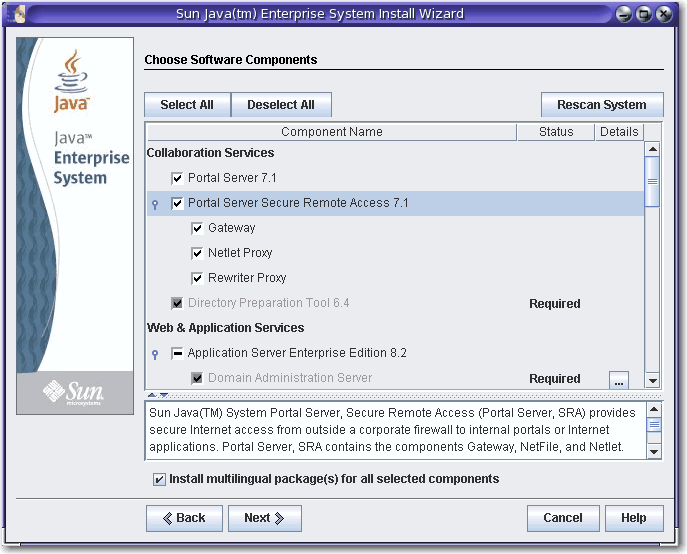
The marks in the check boxes on the Choose Software Components page indicate the following:
-
A checkmark in an unshaded box indicates a component or subcomponent is selected for installation.
-
A dash (as shown for Application Server) indicates a component's subcomponents are in a mixed state. For example, some subcomponents are already installed, some will be installed through the new installation, and some have been deselected.
-
A checkmark in a shaded, unselectable box next to a dimmed name (shown for Domain Administration Server) indicates that a correct version of the component is already installed on the host.
Use the buttons and other interface elements on the page to do the following:
-
To select all components and subcomponents, click Select All. If you want to install many components but not all, click Select All and then deselect the components or subcomponents you do not want.
-
To deselect all components and subcomponents, click Deselect All.
-
To rescan your system for existing components and update the Status and Details information, click Rescan System.
-
To select components and subcomponents for installation, select component check boxes. Click the symbol to the left of the check box to see a component's subcomponents. When you select a component that has subcomponents, the subcomponents are selected automatically.
-
To upgrade all shared components to the current Java ES release, select All Shared Components listed under Shared Services. If you do not select this check box, the installer installs or upgrades only shared components for the product components you select.
The Monitoring Console and Java DB are also listed under Shared Services. Monitoring is a new feature in Java ES 5 and includes the Monitoring Console. For more information about monitoring, see the Java ES 5 Monitoring Guide. Java DB is Sun's supported distribution of the open source Apache Derby 100% Java database and was formerly called Derby Database.
-
To see information about the installation status of components and subcomponents, review the Status and Details columns. These columns are usually empty, indicating that the component or subcomponent is not installed on the system. Other values for Status include the following:
-
Installed: The current version is already installed.
-
Required: Another selected component requires this one.
-
Upgradable: A previous version is installed and the installer can upgrade that version to the current one.
-
Nonupgradable: A previous version is installed but the installer cannot upgrade that version to the current one. For information about upgrade issues, see the Java ES 5 Upgrade Guide.
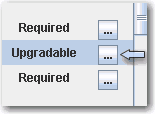
For information about items listed in the Status column, click the corresponding icon in the Details column as shown in the following screen capture.
-
-
If you do not want to install multilingual packages for the selected components, deselect the multilingual packages check box at the bottom of the Choose Software Components page. If you deselect this option, multilingual packages are not installed and cannot be added later using the Java ES installer. You must add them manually. For more information about languages and the installer, see How Language Selection Works.
For information about dependencies and remote hosts, see Does the Installer Check Dependencies on Remote Components?
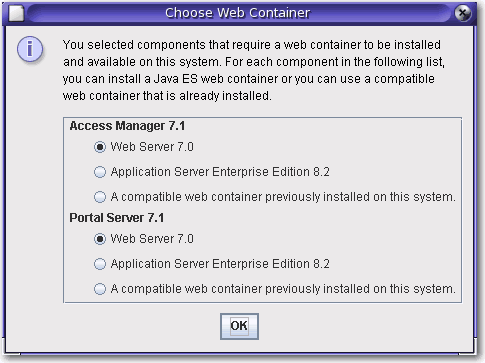
When you click Next on the Choose Software Components page and component dependencies have not yet been met, messages tell you what you need to do. Take the appropriate action and then proceed with the installation. Typical issues include such items as a web container is required but is not selected, or required components or subcomponents are not selected. An example advisory message is shown in the following screen capture. For information about third-party web containers supported in Java ES, see How Do I Use a Third-Party Web Container?
Upgrading the J2SE SDK
On the SolarisTM Operating System (Solaris OS), after clicking Next on the Choose Software Components page you might see the following page regarding the Java 2 Software Development Kit, Standard Edition (J2SE SDK).
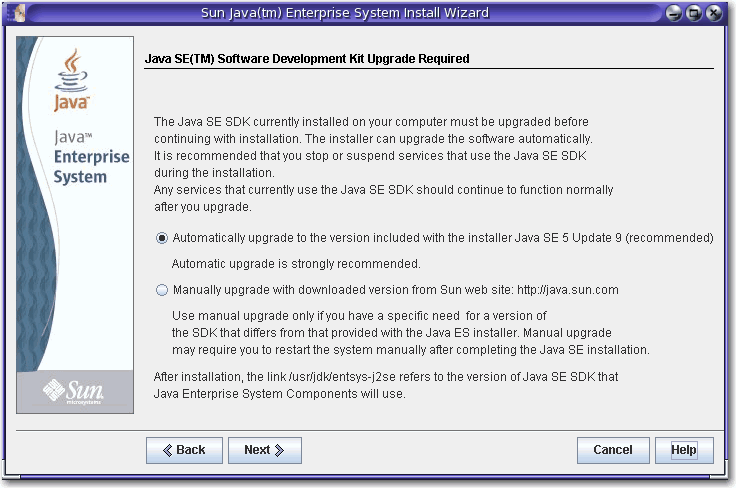
This page is displayed if the installer detects an incompatible system-wide version of the J2SE SDK. Keep the default selection of an automatic upgrade, which brings the version up to date.
Note –
If the installer encounters a higher version of the JDK and one or more JDK packages are missing (for example, the 64–bit JVMTM software), the installer treats this version as incompatible. In that case, when you keep the automatic upgrade option the JDK is downgraded to the version of the JDK required by Java ES.
Component Version Compatibility
If incompatible versions of product components exist on the host on which you are installing the software, you must remove the incompatible components. Product components generally cannot be upgraded by the installer, but there are some exceptions. For detailed information about version compatibility issues, see Does it Matter if Other Java ES Components are Already on My Host?
During installation, the installer automatically installs the required shared components if they are not already installed on the host. If some shared components are already on the host but the versions do not match the Java ES release requirements, the Shared Component Upgrades Required page is displayed, listing the incompatibilities. You cannot proceed in the installer until compatibility issues are resolved.

Take the desired action:
-
To direct the installer to automatically upgrade the shared components to the correct versions, click Next.
-
To specify you do not want the installer to automatically upgrade the shared components, click Cancel to exit the installer. Upgrade the incompatible shared components and then run the installer again.
-
To proceed without exiting the installer, click Back and modify the selection of components you want to install, removing those for which there are compatibility issues.
After you click Next on the shared components page, the Specify Installation Directories page displays the default installation directories for the selected components.
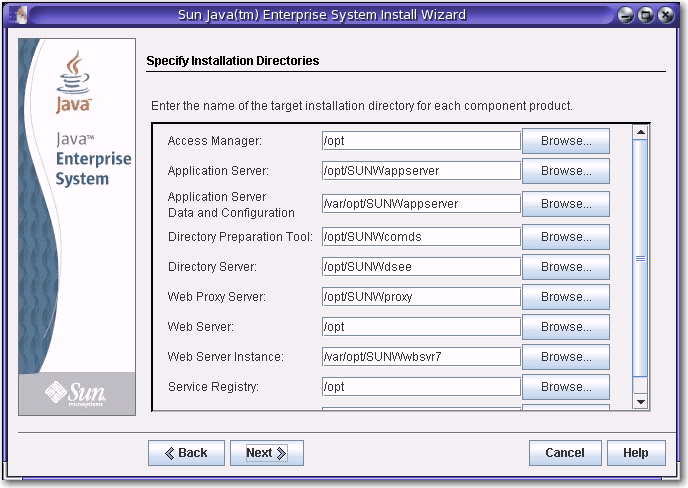
If the default directories are not acceptable, browse for alternate paths and change as needed. Make note of these alternate path names because you must specify the information whenever path names are requested by the installer or a configurator. To see a complete list of default directories and ports, see Default Installation Directories and Ports.
When you click Next, the installer runs a system check to verify that all system requirements are met. This process checks system resources such as disk space, memory, swap space, and patches based on the components you selected. When the installer completes the check, the Verify System Requirements page is displayed and lists the results.
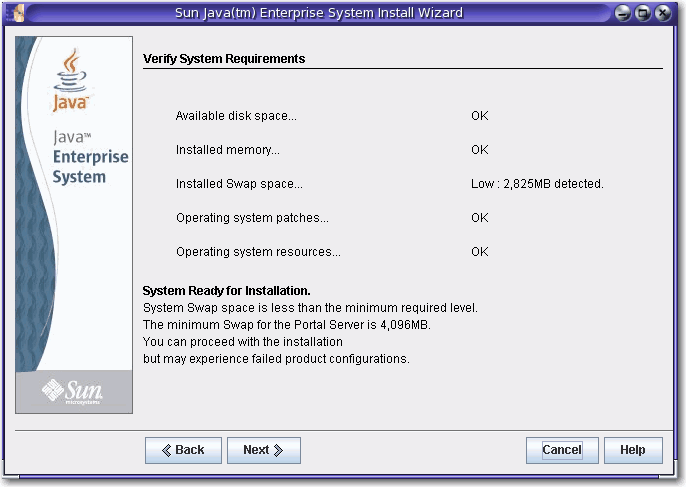
If requirements are not met, messages tell you what you need to do. Take the desired action based on the system check:
-
If your system meets requirements, System Ready for Installation appears on the page without any qualifications. Click Next to proceed with the installation.
-
If your system does not meet the minimum memory or swap space recommendation, System Ready for Installation appears on the page with qualifications (as shown in the previous screen capture). Click Next to continue, but add memory or swap space when installation is complete or you might encounter degraded performance and other serious problems.
-
If your system does not meet the requirements to proceed with the installation, System Not Ready for Installation appears on the page and you must take action before you can proceed. Click View Report to identify the problems, then fix the specified errors and click Check Again to recheck the system (if the problems can be fixed without stopping the installer). If your system continues to fail to meet the requirements, click Cancel to exit the installer, troubleshoot and resolve the problems, and then run the installer again.
When the system check is complete and you are satisfied with the state of the system, click Next.
- © 2010, Oracle Corporation and/or its affiliates
