| Skip Navigation Links | |
| Exit Print View | |

|
Sun Blade 6000 Virtualized Multi-Fabric 10GE M2 Network Express Module Documentation Sun Blade 6000 Virtualized Multi-Fabric 10GbE M2 Network Express Module Documentation Library |
| Skip Navigation Links | |
| Exit Print View | |

|
Sun Blade 6000 Virtualized Multi-Fabric 10GE M2 Network Express Module Documentation Sun Blade 6000 Virtualized Multi-Fabric 10GbE M2 Network Express Module Documentation Library |
About This Documentation (PDF and HTML)
Overview of Sun Blade 6000 Virtualized Multi-Fabric 10GbE M2 NEM User's Guide
Features of the Sun Blade 6000 Virtualized Multi-Fabric 10GbE M2 NEM
Physical Appearance of the Virtualized Multi-Fabric 10GbE M2 NEM
External Virtualized M2 NEM Ports
RJ45 Ethernet Connector Port LEDs
Performing Hot Plug Insertion and Removal
Installing or Replacing the Virtualized M2 NEM
Installing and Removing SFP+ Optical Transceiver Modules
Booting Over the Virtualized M2 NEM 10-Gigabit Ethernet Port
Booting over the Network With an x86 Blade Server
Booting over the Network With a SPARC Blade Server
Installing and Configuring the hxge Driver on a Solaris SPARC or x86 Platform
How to Configure the Network Host Files
Configuring the hxge Device Driver Parameters
Configuring the Jumbo Frames Feature
Installing and Configuring the hxge Driver on a Linux Platform
Installing and Removing the Driver on a Linux Platform
Configuring the Network Interface
Checking and Testing the hxge Device
Changing the hxge Driver Configuration
Installing and Configuring Drivers on a Windows Platform
Installing Drivers on a Windows Platform
Installing and Configuring Drivers on a VMware ESX Server Platform
Installing the ESX Server Drivers on an Existing ESX Server
Installing the ESX Server Drivers With a New ESX Installation
Configuring the Virtual NEM M2 Network Adapters
Accessing ILOM Documentation and Updates
Enabling Private and Failover Mode
Fixing Problems with Oracle ILOM Using the Preboot Menu
Overview of the Sun Blade 6000 Virtualized Multi-Fabric 10GbE M2 NEM Product Notes
Supported Software and Firmware
Hardware and Networking Issues
Packet Drop at 1Gb with 100m Cable (6879222)
Special Instructions for Network PXE Booting for the Sun Blade X3-2B Server (7183913)
ILOM Failover and Private Mode Cannot Be Enabled Simultaneously (6911661)
Cannot Set NEM SP IP Address When NEM Is Powered Off (6938660)
ipmitool Command Fails (6940791)
Prepare-to-Remove and Return-to-Service Does Not Work on NEM ILOM (6948103)
Green Rear SAS Link LEDs All Turn On When Setting Prepare-to-Remove (6950981)
NEM SAS Firmware Updates Must be Performed from the CMM and Not the NEM SP (7020854)
Oracle Linux: Server Module Might Hang When NEM Replaced Repeatedly (6935520)
Oracle Solaris: Virtualized M2 NEM hxge 10 GbE Driver Can Hang Under High Stress (6932684)
Linux: Configuring PCIe Hot Plug in Linux (7075694)
Windows: Incorrect Driver Version Displayed When Driver File Properties is Viewed (7069358)
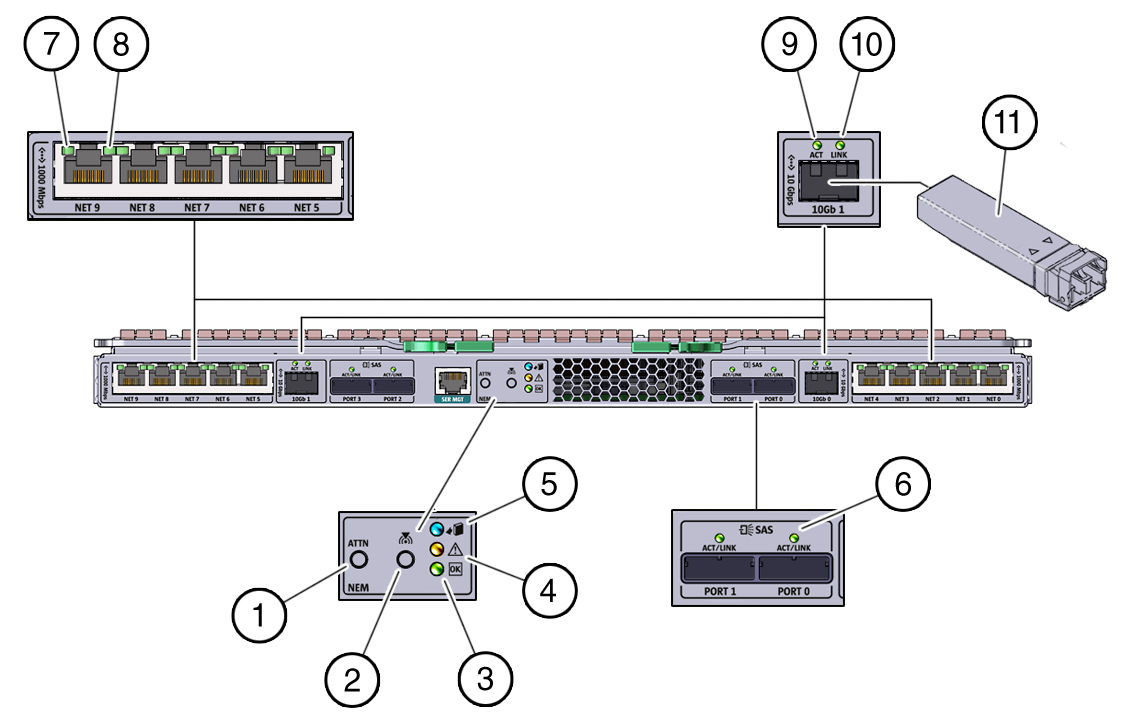
The following illustration shows the NEM front panel and LEDs, viewed from the back of the chassis. The following table describes the LED behavior.

Table 5 NEM Front Panel and LED Descriptions
|