Installing Portal Server on Application Server 9.1 Cluster
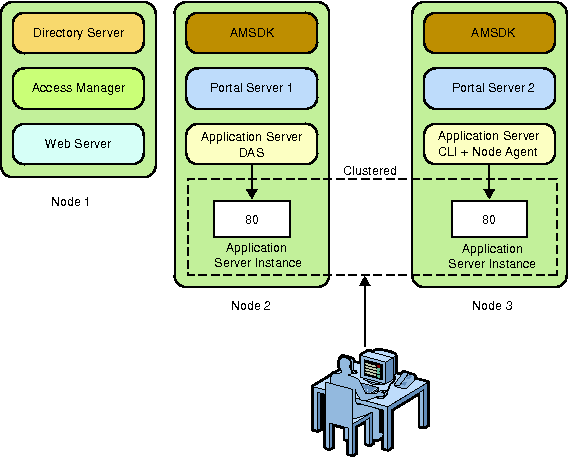
This section explains how to install Portal Server 7.2 in an Application Server 9.1 cluster environment. In a cluster environment, a primary node exists where Portal Server is installed. A cluster is created in the primary node. One or more secondary nodes exist where instances of Portal Server are created. The user accesses the portal through a load balancer. In such an environment, if any of the servers installed on any node goes down, the load balancer automatically redirects the user to the other available Portal Server instances.
Note –
If Portal Server is installed on a clustered environment, any deployment or undeployment of container specific files should be done on the primary instance, where DAS is installed.
Figure 7–2 Portal Server on Application Server 9.1 Cluster

 To Install Portal Server on Application Server 9.1
Cluster
The instructions provided in the task are for setting up a cluster configuration that contains only two instances.
-
Install Web Server 7.0 using Java ES 5 or Java ES 5 Update 1 installer.
-
Install Application Server 9.1 and Load Balancer plugin. Start DAS after installation.
ApplicationServer-install-dir/appserver/bin/asadmin start-domain --user admin --passwordfile password-file domain1
-
Install Access Manager and Directory Server on port 8080.
-
Start Directory Server.
DirectoryServer-install-dir/opt/SUNWdsee/ds6/bin/start /var/opt/SUNWdsee/dsdsins1
-
Start Application Server 9.1.
ApplicationServer-install-dir/appserver/bin/asadmin start-domain --user admin --passwordfile password-file domain1
-
Verify whether you are able to access, Access Manager Administration Console.
http://machine-name.domain-name.com:8080/amconsole
-
Start Web Server Administration Server and the default instance running on running on port 80.
-
Create Application Server 9.1 cluster, pscluster.
ApplicationServer-install-dir/appserver/bin/asadmin create-cluster --user admin --passwordfile password-file pscluster
-
Create node agent for Node 1.
ApplicationServer-install-dir/appserver/bin/asadmin create-node-agent --user admin --passwordfile password-file node1-nodeagent
-
Add an Application Server 9.1 instance named node1-7788 to the cluster.
ApplicationServer-install-dir/appserver/bin/asadmin create-instance --user admin --passwordfile password-file --cluster pscluster --nodeagent node1-nodeagent --systemproperties HTTP_LISTENER_PORT=7788 node1-7788
-
Start the local node agent.
ApplicationServer-install-dir/appserver/bin/asadmin start-node-agent --user admin --passwordfile password-file node1-nodeagent
-
Using Portal Server 7.2 GUI installer, install Portal Server 7.2 in the Configure Now mode.
-
Provide the cluster name in the installer and the port on which, portal instance is running properly.
-
Run the following command.
PortalServer-install-dir/SUNWportal/bin/psconfig --config example14.xml
-
After configuring, restart the cluster: pscluster.
-
Verify whether the portal desktop displays properly.
http://node1:7788/portal/dt
 To Add a Portal Server Instance to a Cluster
-
Create a node agent that points to the DAS on Node 1.
/opt/SUNWappserver/appserver/bin/asadmin create-node-agent --user admin --passwordfile password-file --host Node 1 --port 4848 node2-nodeagent
-
Create an instance for the cluster.
/opt/SUNWappserver/appserver/bin/asadmin create-instance --user admin --passwordfile password-file --cluster pscluster --nodeagent node1-nodeagent --systemproperties HTTP_LISTENER_PORT=8877 node2-8877
-
Start the node agent.
/opt/SUNWappserver/appserver/bin/asadmin start-node-agent --user admin --passwordfile as_password hostBnodeagent
-
Invoke the Portal Server 7.2 GUI installer and provide details about this instance. Provide the same portal-id as Node1. The installer will automatically create a portal instance on this Node.
 To Install Load Balancer on Node 2
-
Setting up Load Balancer for pscluster and copy over the loadbalancer.xml file.
asadmin create-http-lb-config -u admin portal_lb
asadmin create-http-lb-ref -u admin --config portal_lb pscluster
asadmin enable-http-lb-application -u admin --name portal pscluster
asadmin create-http-health-checker -u admin pscluster
asadmin export-http-lb-config -u admin --config portal_lb loadbalancer.xml
-
Modify theloadbalancer.xml file. Change enabled to “true” for all entries.
-
Copy the loadbalancer.xml file to the Web Server 7.0 instance configuration directory.
-
Restart DAS and cluster.
-
Stop and start Web Server 7.0 instance.
-
Ensure that portal is accessible through Load Balancer.
 To Display the Default WSRP Portlets in the WSRP tab
of Portal Desktop
When you configure Portal Server on Application Server 9.1 cluster, the default portlets are not displayed on the WSRP tab of the desktop. Do the following to get portlets displayed on the WSRP tab.
-
Create a producer with the portlets that you want to add to the WSRP tab.
-
Configure a consumer with the producer.
-
Add the consumer to the WSRPSamplesTabPanel container.
Note –You can also do the following to display the defaults portlets on the WSRP tab:
-
Create a producer with Bookmark, JSP Remote, Notepad, and Weather portlets.
-
Configure a consumer with the producer.
-
Copy the producer entity ID after configuring the producer.
-
Go to Manage Channels and Container.
-
Under Developer Sample, select the WSRPSamplesTabPanel container.
This container displays Bookmark, JSP Remote, Notepad, and Weather portlets.
-
Select the portlet and paste the producer entity ID to the Producer Entity ID field.
-
 To Configure Portlet Session Failover on Application
Server 9.1
Before You Begin
The portal instances should be clustered and HADB should be installed.
-
Undeploy the portal.war from the Application Server 9.1 DAS (Administration Server), and add the <distributable/> tag in the WEB-INF/web.xml of portal.war. Refer to the sample web.xml file displayed below:
<?xml version="1.0" encoding="UTF-8"?>
<!DOCTYPE web-app PUBLIC "-//Sun Microsystems, Inc.//DTD Web Application 2.3//EN
" "http://java.sun.com/dtd/web-app_2_3.dtd">
<web-app>
<display-name>Sun Java Enterprise System Portal Server Desktop Web Application</
display-name>
<description>Provides a user customizable interface for content that is aggregat
ed from Portlet applications</description>
<distributable/>
<context-param>
<param-name>desktop.configContextClassName</param-name>
<param-value>com.sun.portal.desktop.context.PropertiesConfigContext</param-value>
-
Add the same <distributable/> tag to the web.xml of the portlet.war which is used for storing session variable.
-
Ensure that the Availability option is selected for both portal.war and the portlet.war files.
- © 2010, Oracle Corporation and/or its affiliates
