 To Install Sun Java System Portal Server 7.2 on Application Server 9.1
Using Portal Server 7.2 GUI Installer
-
From the installation location, go to the OS-arch directory, where OS-arch can be Solaris_sparc, Solaris_x86, or Linux_x86.
-
Run ./installer -j $JAVA_HOME to invoke the Portal Server 7.2 GUI installation wizard to install the software.
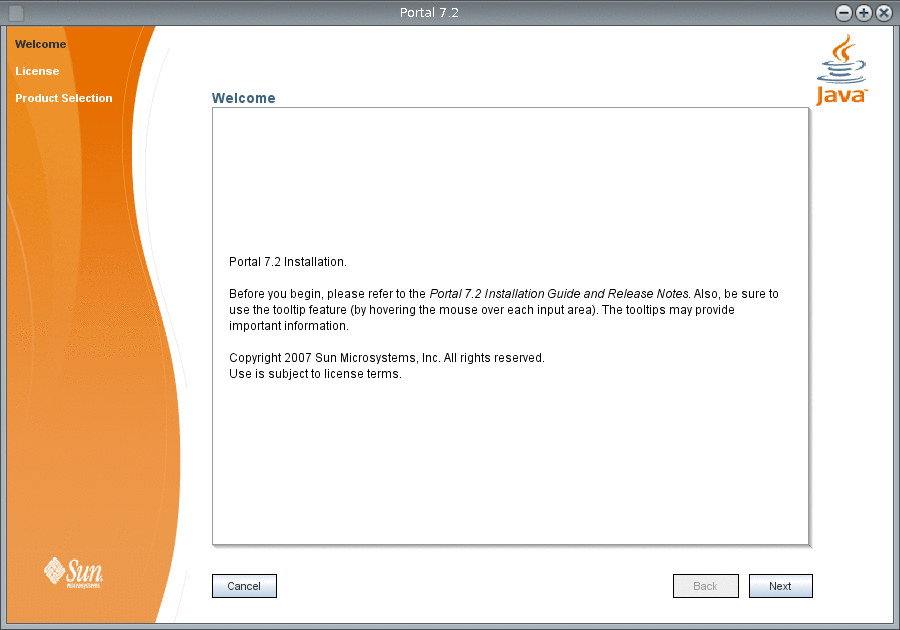
The Portal Server 7.2 installation wizard is invoked and the Welcome screen appears.
Figure 1–1 Portal Server 7.2 Installation Wizard Welcome Screen
-
In the Welcome screen, click Next.
The License screen appears. Read the terms provided in the license agreement.
Figure 1–2 Portal Server 7.2 Installation Wizard License Screen

-
By default, the option to accept license agreement is not selected. If you accept the terms of the license agreement, choose the other option. Click Next.
The Product Selection screen appears.
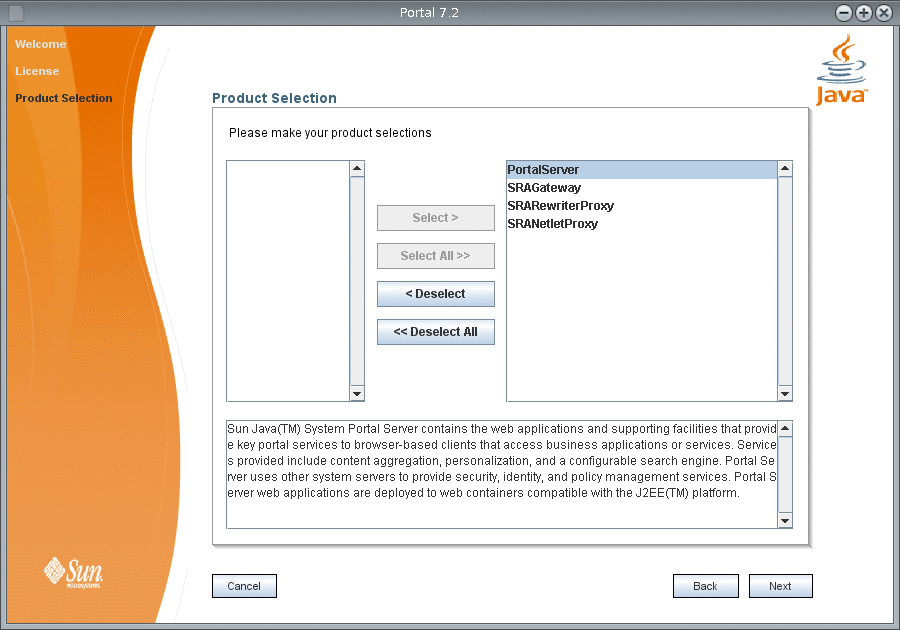
Figure 1–3 Portal Server 7.2 Installation Wizard Product Selection Screen
-
If you want to install all the products listed in the left pane, Click Select All. If you want to install a particular product, choose the product and Click Select.
The products that you have selected are listed in the right pane. Select a product and click Deselect, if you do not want to install any product. To start-over your selection, click Deselect All.
-
Click Next.
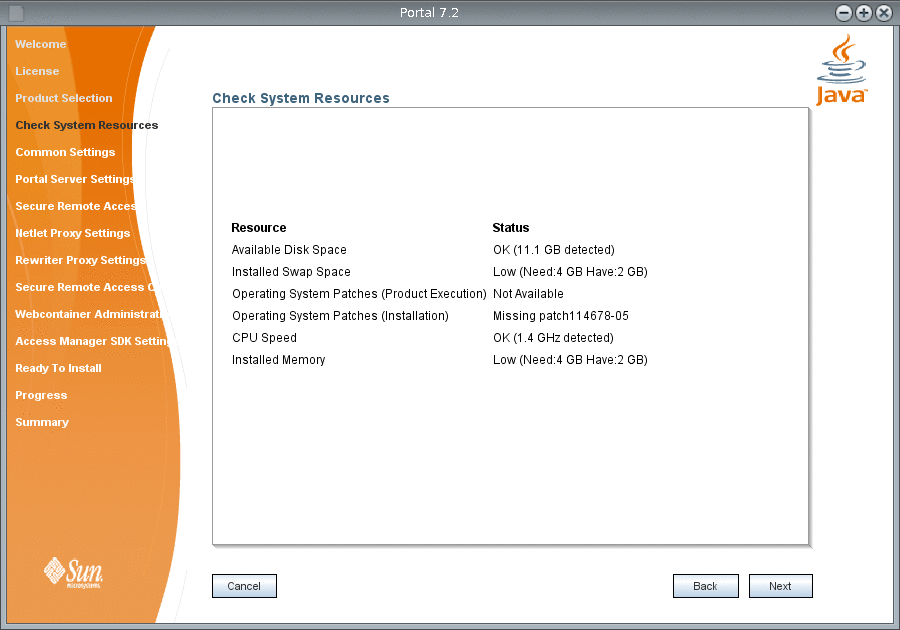
The Check System Resources screen appears. The necessary resources for Portal Server installation are listed in the left pane and the status of the resources are listed in the right pane. The installer checks whether the necessary resources are available for installation and displays the status against each resource.
Figure 1–4 Portal Server 7.2 Installation Wizard Check System Resources Screen
-
Click Next.
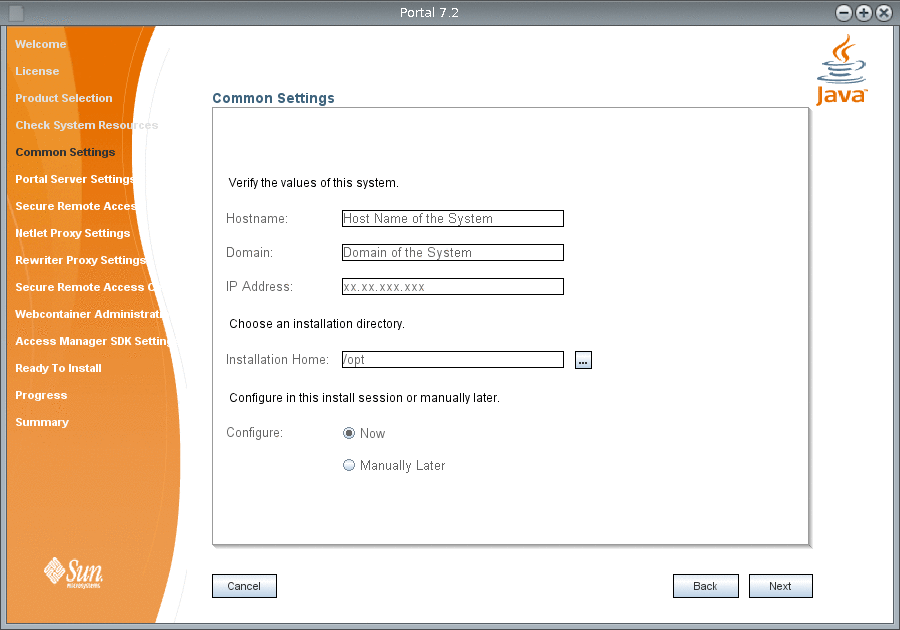
The Common Settings screen appears.
Figure 1–5 Portal Server 7.2 Installation Wizard Common Settings Screen
-
Verify the following details and click Next.
- Hostname
-
Name of the machine where you want to install Portal Server. For example, machine1.
- Domain
-
Domain name of the host. For example: country.sun.com
- IP Address
-
The IP address of the host machine, where you install Portal Server.
All the above host details are picked by the installer and displayed for your reference.
- Choose an installation directory
-
The default installation home directory is /opt. Click the button provided against the text field to choose the home directory in which you want to install Portal Server.
- Configure in this install session manually or later
-
By default, Configure Now option is selected. If you want to configure Portal Server later, choose Configure Later option. For more information on how to configure later, see Chapter 2, Configuring Sun Java System Portal Server in the Configure Later Mode After Installation
The Portal Server Settings screen appears. This screen contains four sections to enter information such as access to Portal Server, the web container in which you deploy Portal Server, Portal Server components, and support for Secure Remote Access.
Figure 1–6 Portal Server 7.2 Installation Wizard Portal Server Settings Screen

-
In the How Will Portal Server Be Accessed? section, verify the following information.
- Protocol
-
HTTP is selected as the default protocol. This protocol is valid, if you use Application Server 9.1 as the web container.
- Port
-
The default port is 8080.
- DeployURI
-
Type the URI to deploy Portal Server. The default deploy URI is /portal.
-
In the Values For The Web Container That Portal Server Will Deploy Into. section, verify the following information about the web container on which, you deploy Portal Server.
- Install Directory
-
If you use Application Server 9.1 as web container, then the default web container installation directory is /opt/SUNWappserver/appserver. Click the button next to this text field, to change the installation directory of web container.
- DocRoot
-
If you use Application Server 9.1 as web container, then the default DocRoot directory is /opt/SUNWappserver/appserver/domains/domain1/docroot. Click the button next to this text field, to change the DocRoot directory of web container.
- Instance Directory
-
If you use Application Server 9.1 as web container, then specify the Application Server 9.1 Instance directory as /opt/SUNWappserver/appserver/domains/domain1. Click the button next to this text field, to change the Instance directory of web container.
- Instance Name
-
Type the Instance name of the web container that you use to install Portal Server. The default instance name for Application Server 9.1 is server.
- Cluster Id
-
Type the Cluster Id, if you install Portal Server on Application Server 9.1 cluster.
-
In the Portal Server Components section, verify the following information.
- Portal Server Id
-
Type the Id for Portal Server component installation. The default value is portal1.
- Search Server Id
-
Type the Id for Search Server component installation. The default value is search1.
- Portal Server Instance name
-
Type a name for Portal Server instance.
-
In the Secure Remote Access Support section, verify the following information.
- Log User Password
-
Type the password for log user to provide Secure Remote Access support.
Based on the web container that you installed to deploy Portal Server, the installer displays the above necessary information. Accept the default values or modify and click Next.
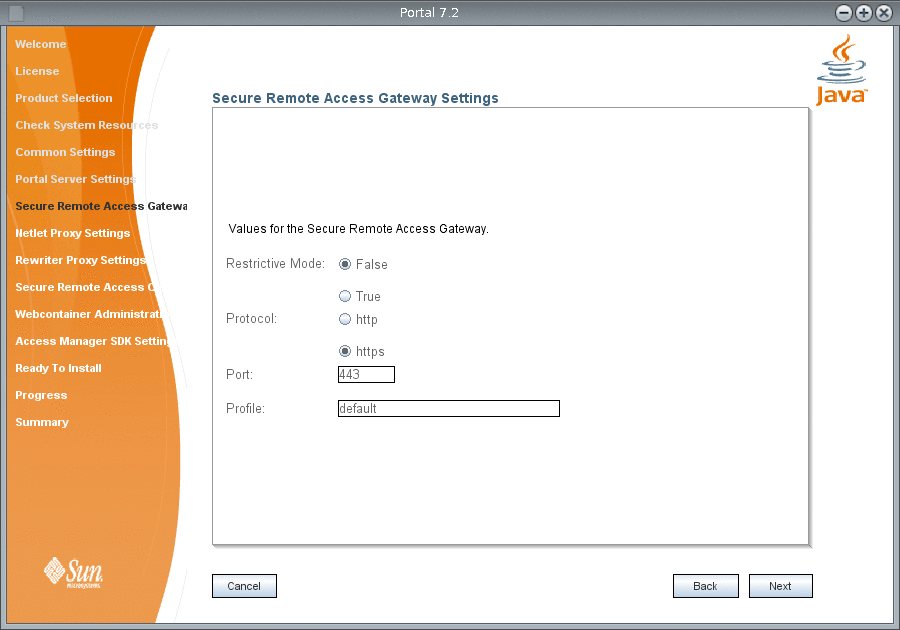
The Secure Remote Access Gateway Settings screen appears.
Figure 1–7 Portal Server 7.2 Installation Wizard Secure Remote Access Gateway Settings Screen
-
Type the following Gateway information for Secure Remote Access and click Next.
- Restrictive Mode
-
The default value is False. Set the Restrictive Mode option to True, if you want to start the Gateway without accessing Monitoring Framework in a remote machine.
- Gateway Protocol
-
The default value is https.
- Gateway Port
-
The default value is 443.
- Gateway Profile
-
The default value is default.
The Netlet Proxy Settings screen appears.
Figure 1–8 Portal Server 7.2 Installation Wizard Netlet Proxy Settings Screen

-
Type the proxy details for Netlet and click Next.
- Restrictive Mode
-
The default value is False. Set the Restrictive Mode option to True, if you want to start the Gateway without accessing Monitoring Framework in a remote machine.
- Netlet Proxy Port
-
The default value is 10555.
- Netlet Proxy Gateway Profile
-
The default value is default.
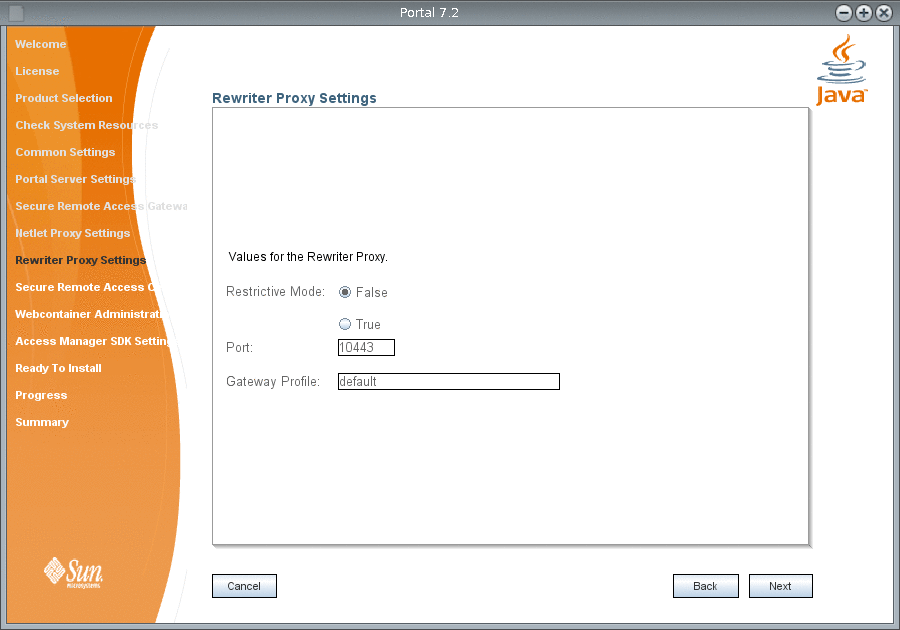
The Rewriter Proxy Settings screen appears.
Figure 1–9 Portal Server 7.2 Installation Wizard Rewriter Proxy Settings Screen
-
Type the proxy settings for Rewriter in the following options and click Next.
- Restrictive Mode
-
The default value is False. Set the Restrictive Mode option to True, if you want to start the Gateway without accessing Monitoring Framework in a remote machine.
- Rewriter Proxy Port
-
The default value is 10443.
- Rewriter Proxy Gateway Profile
-
The default value is default.
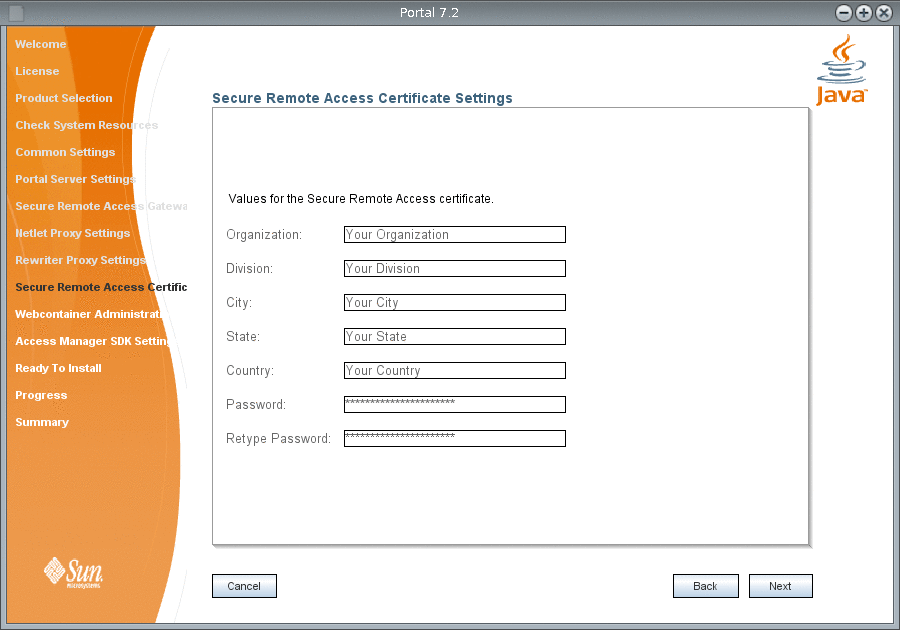
The Secure Remote Access Certificate Settings screen appears.
Figure 1–10 Portal Server 7.2 Installation Wizard Secure Remote Access Certificate Settings Screen
-
Type the following details for Secure Remote Access certificate and click Next.
- Organization
-
Type the name of your organization.
- Division
-
Type the name of your division.
- City
-
Type the name of your city.
- State
-
Type the name of your state.
- Country
-
Type the name of your country.
- Password
-
Type the password that you want to use for Secure Remote Access certificate.
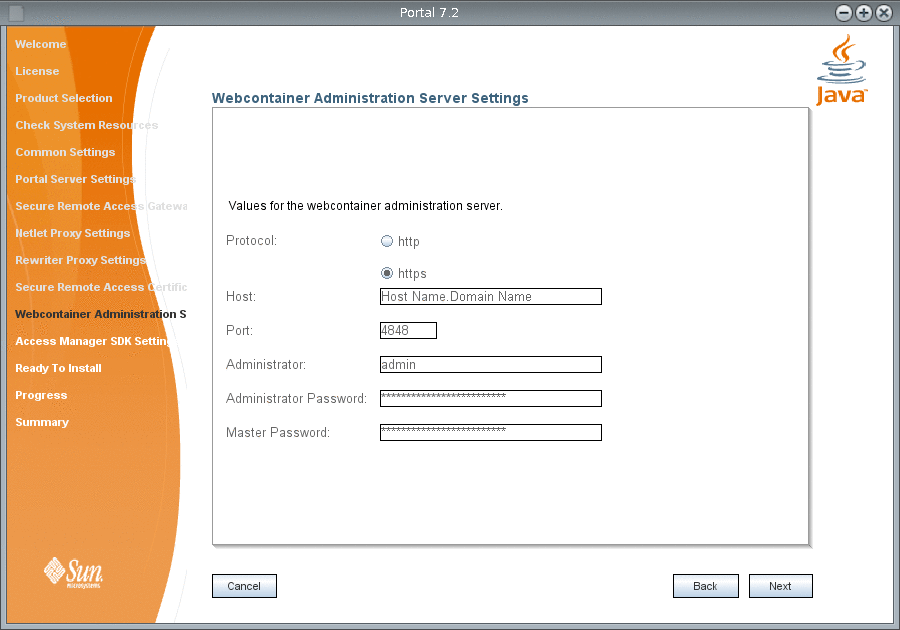
The Web Container Administration Server Settings screen appears.
Figure 1–11 Portal Server 7.2 Installation Wizard Web Container Administration Server Settings Screen
-
Type the values for the web container Administration Server on which, you want to install Portal Server and click Next.
- Protocol
-
Type the administration protocol for web container that you use. By default, Application Server 9.1 is considered as a web container and the corresponding protocol is https.
Note –If you install Portal Server 7.2 on GlassFish V2, the default Administration Protocol is http.
- Host
-
The default value is localhost. Type the fully qualified domain name of the machine where you installed Application Server 9.1. For example, machine1.country.sun.com
- Port
-
The default value is 4848.
- Administrator
-
Type the user name for Administrator. The default value is admin.
- Administrator Password
-
Type the administration password for web container server.
- Master Password
-
Type the administration master password for web container server.
Note –If you are installing Portal Server 7.2 with GlassFish V2, then you should set the Master Password to match the Administrator Password, using the command asadmin change-master-password.
The Portal Server 7.2 GUI installer displays the required configuration screens based on your installation setup. If you are installing Portal Server 7.2 with Access Manager installed on a separate machine, then you need to specify Directory Server settings .
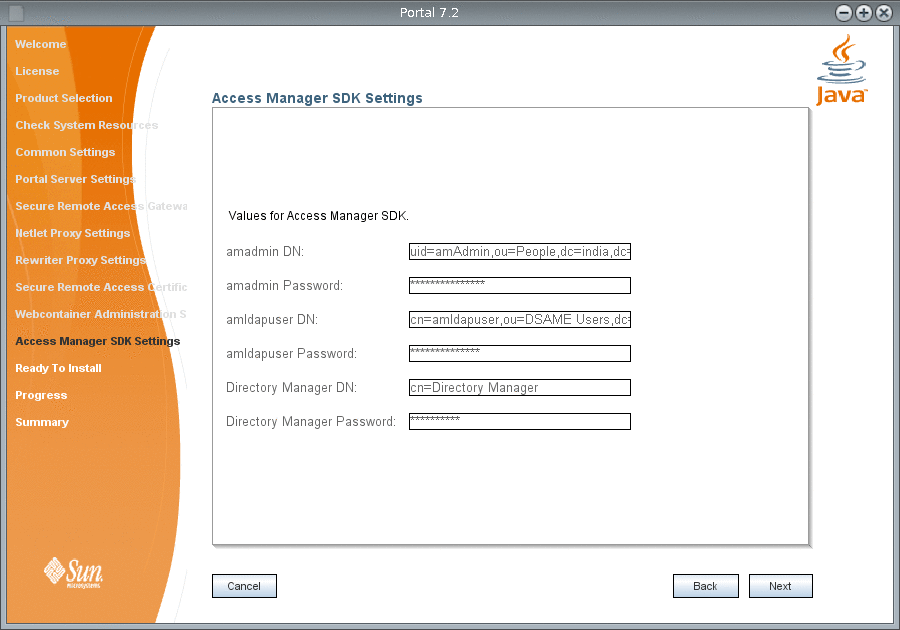
Access Manager SDK Settings screen appears.
Figure 1–12 Portal Server 7.2 Installation Wizard Access Manager SDK Settings Screen
-
Type the Access Manager SDK information in the following options and click Next.
- amadmin DN
-
The Access Manager Domain Name. The default value is uid=amAdmin,ou=People,dc=india,dc=sun,dc=com.
- amadmin Password
-
The Access Manager Administrator password.
- amldapuser DN
-
The Access Manager LDAP user Domain Name. The default value is cn=amldapuser,ou=DSAME Users,dc=india,dc=sun,dc=com.
- amldapuser User Password
-
The Access Manager LDAP user password.
- Directory Manager DN
-
The Directory Manager Domain Name. The default value is cn=Directory Manager.
- Directory Manager Password
-
The Directory Manager password.
The Ready to Install screen appears.
Figure 1–13 Portal Server 7.2 Installation Wizard Ready to Install Screen

-
Click Install to install Portal Server 7.2.
The Progress screen appears.
Figure 1–14 Portal Server 7.2 Installation Wizard Progress Screen

Note –The wizard may display INCOMPLETE or FAILED message, if the configuration of your machine does not meet the recommended software requirements. This is because, Portal Server 7.2 GUI installer is based on OpenInstaller framework that exits after 1000 seconds, assuming that the configurator is hanging. The psconfig process that runs in the background eventually completes the installation successfully. Therefore, tail the configuration logs and wait for psconfig completion.
Portal install logs are available at /var/opt/SUNWportal/logs/install
Portal configuration logs are available at /var/opt/SUNWportal/logs/config
-
After the installation progress reaches 100 %, click Next.
The Summary screen appears and displays that the installation is Complete. You can view the overall status of the products that are installed.
Figure 1–15 Portal Server 7.2 Installation Wizard Summary Screen

-
In the Summary screen, click the next steps URL.
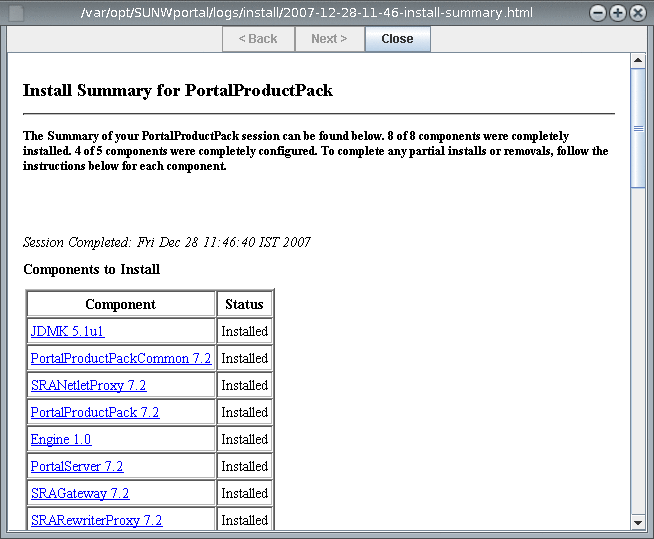
The Install Summary for PortalProductPack HTML page appears. You can also access this page from the /var/opt/SUNWportal/logs/install/ directory.
Figure 1–16 Portal Server 7.2 Install Summary for PortalProductPack Screen
-
Ensure that the Derby is up and running, using the netstat -an | grep -i 1527 and ps -aef | grep -i derby commands. If the Derby is not running, restart it using the ANT_HOME/bin/ant -DPS_CONFIG=/etc/opt/SUNWportal/PSConfig.properties -f /opt/SUNWportal/lib/derby.xml start-instance command, before you install sample portals.
-
Configure Enterprise, Sandbox, and Welcome sample portals manually. For more information on how to configure sample portals, see Configuring Sample Portals.
-
Restart the web container and access Portal desktop to access the latest sample portals at http://server:port/portal/dt.
-
Configure add-on features in Portal Server 7.2 such as Content Management System (CMS), Simple API for Workflow (SAW), and SharePoint portlets..
-
For more information on Installing and Configuring CMS Portlet, refer the article Adding the Content Management System Portlet to the Sun Java System Portal Server 7.2 Desktop.
-
For more information on how to create portlets using SAW plug-in in NetBeansTM IDE, refer the article Adding the Workflow Portlet to the Sun Java System Portal Server 7.2 Desktop.
-
For more information on Deploying SharePoint Membership Portlet, refer the article Adding the SharePoint Portlet to the Sun Java System Portal Server 7.2 Desktop.
-
- © 2010, Oracle Corporation and/or its affiliates
