Configuring Gateway During Installation
This section contains the following procedures:
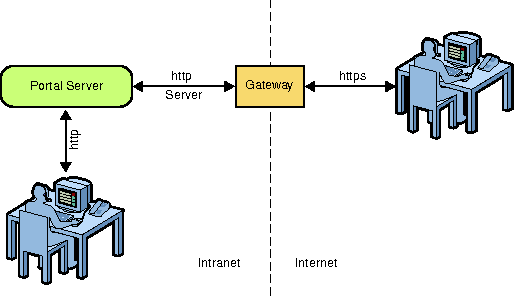
Figure 4–1 Portal Server with Gateway

Configuring a Portal Server and a Gateway on a Single Node
This section describes how to configure a Portal Server and a Gateway on a single node in the Configure Now and Configure Later modes. In practice, this configuration is not recommended as a Gateway is designed to work in a DMZ, which mandates that the Portal Server and Gateway are deployed on separate nodes.
Using the Configure Now mode, you can configure a Gateway while installing Portal Server, where the Gateway is configured with other components. You can also configure the Gateway using the Configure Later mode, where you need to manually configure Gateway using the psconfig command after installing Portal Server.
 To Configure Portal Server and Gateway on a Single
Node using the Configure Now Mode
-
Ensure that Directory Server and web container are running.
-
Select the Gateway and the PortalServer options, which are displayed in the Portal Server 7.2 GUI installer when you install Portal Server 7.2.
-
Enter Directory Server, Access Manager, and web container information in the specific installer screens.
-
Start the Gateway.
PortalServer_base/SUNWportal/bin/psadmin switch-sra-status -u admin-user-name -f password-file on
PortalServer_base/SUNWportal/bin/psadmin provision-sra -u admin-user-name -f password-file --gateway-profile gateway_profile -p portal-id --enable
PortalServer_base/SUNWportal/bin/psadmin start-sra-instance -u admin-user-name -f password-file -N default -t gateway
 To Configure Portal Server and Gateway on a Single
Node using the Configure Later Mode
-
Install Access Manager and Directory Server using the Java ES 5 Update1 installer on top of the Application Server 9.1.
-
Select the Gateway and PortalServer options, which are displayed in the Portal Server 7.2 GUI installer when you install Portal Server 7.2.
-
Install the selected components using the Portal Server 7.2 GUI installer in the Configure Later mode.
-
Ensure that Directory Server, web container instance, and web container Administration Server are running.
-
Modify the example17.xml file.
The example17.xml file is located in the PortalServer_base/SUNWportal/samples/psconfig directory.
You can use this sample to configure all the components in Portal Server such as Search Server, Portal Server, SRA Core, Gateway, Netlet Proxy, Rewriter Proxy on Application Server 9.1.
-
Configure Portal Server using the psconfig command.
PortalServer_base/SUNWportal/bin/psconfig --config example17.xml
-
Start the Gateway.
PortalServer_base/SUNWportal/bin/psadmin switch-sra-status -u admin-user-name -f password-file on
PortalServer_base/SUNWportal/bin/psadmin provision-sra -u admin-user-name -f password-file --gateway-profile gateway_profile -p portal-id --enable
PortalServer_base/SUNWportal/bin/psadmin start-sra-instance -u admin-user-name -f password-file -N default -t gateway
Configuring Portal Server and Gateway on Separate Nodes
This section describes how to configure Portal Server and Gateway on separate nodes in the Configure Now and Configure Later modes.
You can configure Gateway using the Configure Now or Configure Later options, where you need to manually configure Gateway using the psconfig command after installing Portal Server.
Ensure that the following ports are opened whenever you configure a Gateway or perform any Administration Console or command line operations that involve Gateway.
-
80 or 8080 : Portal Server Host or Portal Server Load Balancer
-
80 or 8080 : Access Manager Host or Access Manager Load Balancer (site id)
Note –80 or 8080 ports are default values. But, could be different depending on configuration.
-
11162 : JMX Port (TCP) — Preferred
-
11161 : SNMP Adapter Port (UDP) — Optional
-
11163 : Commandstream Adapter Port (TCP) — Optional
-
11164: RMI Connector Port (TCP) — Used outside of DMZ environment
 To Configure Portal Server and Gateway on Separate
Nodes in the Configure Now Mode
This procedure requires a minimum of two nodes: Node 1 and Node 2.
-
Install Portal Server 7.2 on Node 1 on top of Application Server 9.1 with Access Manager and Directory Server.
-
Set SRA status to Enabled on Node 1.
PortalServer_base/SUNWportal/bin/psadmin switch-sra-status -u admin_user -f password_file on
-
Invoke Portal Server 7.2 GUI installer on Node 2 and select Gateway to install. This will also install Access Manager SDK.
Note –Use the same password encryption key on both the nodes.
-
Provision profile on Node 1.
PortalServer_base/SUNWportal/bin/psadmin provision-sra -u admin_user -f password_file --gateway-profile gateway_profile -p portal-id --enable
-
Start Gateway on Node 2.
PortalServer_base/SUNWportal/bin/psadmin start-sra-instance -u admin-user-name -f password-file -N default -t gateway
 To Configure Portal Server and Gateway on Separate
Nodes in the Configure Later Mode
-
In the Configure Now mode, install Portal Server 7.2 on Node 1 on top of Application Server 9.1 with Access Manager and Directory Server.
-
Install Access Manager SDK on Node 2 in the Configure Now mode using the Java ES 5 installer.
Note –Use the same password encryption key on both the nodes.
-
Install Gateway on Node 2 in the Configure Later mode using the Portal Server 7.2 GUI installer.
-
Enable Gateway profile on Node 1.
PortalServer_base/SUNWportal/bin provision-sra -u admin_user -f password_file --gateway-profile gateway_profile -p portal-id --enable
-
On Node 2, modify the example10.xml file.
The example10.xml file is located in the PortalServer_base/SUNWportal/samples/psconfig directory.
-
On Node 2, Configure Gateway and Common Agent Container using the psconfig command.
PortalServer_base/SUNWportal/bin/psconfig --config example10.xml
-
Start the Gateway.
PortalServer_base/SUNWportal/bin/psadmin switch-sra-status -u admin-user-name -f password-file on
PortalServer_base/SUNWportal/bin/psadmin provision-sra -u admin-user-name -f password-file --gateway-profile gateway_profile -p portal-id --enable
PortalServer_base/SUNWportal/bin/psadmin start-sra-instance -u admin-user-name -f password-file -N default -t gateway
Installing the Gateway with Portal Server in the SSL Mode
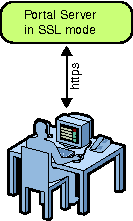
Installing the Gateway with Portal Server in SSL mode allows the user, in the same Intranet where Portal Server is installed, to access Portals through a secure protocol.
Figure 4–2 Portal Server in the SSL mode

 To Install Gateway with Portal Server in SSL
-
Install Portal Server 7.2 in SSL mode.
-
Import the root Certificate Authority (CA) to the certificate database of the Gateway.
cd /usr/jdk/entsys-j2se/jre/lib/security
/usr/jdk/entsys-j2se/jre/bin/keytool -keystore
cacerts -keyalg RSA -import -trustcacerts -alias
alias-name -storepass store-password -file
file-name-path
-
Invoke Portal Server 7.2 installer and install the Gateway. This will also install Access Manager SDK.
-
Create a certificate signing request.
-
Get this certificate signed by the Certificate Authority.
The Certificate Authority will be the Portal Server Administrator.
-
Create a file on the Gateway node, and paste the certificate response.
-
Add the signed certificate to the certificate database of Gateway.
-
Add the Root Certificate Authority to the certificate database.
-
Restart the Gateway.
PortalServer_base/SUNWportal/bin/psadmin switch-sra-status -u admin-user-name -f password-file on
PortalServer_base/SUNWportal/bin/psadmin provision-sra -u admin-user-name -f password-file --gateway-profile gateway_profile -p portal-id --enable
PortalServer_base/SUNWportal/bin/psadmin start-sra-instance -u admin-user-name -f password-file -N default -t gateway
Installing Gateway in DMZ
Installing Gateway in DMZ is similar to configuring Gateway on a remote node. However, all ports need not be opened while you install Gateway in DMZ. You can install using only the Access Manager Server port and the Portal Server port. You can install Gateway in DMZ, using both psconfig and psadmin. You cannot configure Gateway in DMZ using Portal Server console.
Follow these steps to install Gateway using psconfig and psadmin.
 To Install Gateway in DMZ Using psconfig
Before You Begin
Before you install Gateway in DMZ, configure Access Manager SDK. To do this:
-
Change to the directory /opt/SUNWam/bin/ that contains the amconfig input file template, amsamplesilent.
-
Copy the input template to a new file. For example, cp amsamplesilent new_inputfile.
-
Edit the new_inputfile to set the Access Manager SDK and set the following configuration parameters:
-
SERVER_NAME
-
SERVER_HOST
-
SERVER_PORT
-
DEPLOY_LEVEL=3 (If you want to configure only in Access Manager SDK)
-
DS_HOST
-
DS_DIRMGRPASSWD
-
ROOT_SUFFIX
-
ADMINPASSWD
-
AMLDAPUSERPASSWD
-
COOKIE_DOMAIN
-
-
Run the amconfig command using the newly created input file.
cd opt/SUNWam/bin ./amconfig -s new_inputfile
-
The amconfig script requires the JDK to be installed and linked to /usr/jdk/entsys-j2se.
-
Install Gateway in Configure Later mode.
-
Modify the attributes in example10.xml appropriately. Ensure that the RestrictiveMode attribute is set to true.
-
Run the ./psconfig --config example10.xml command to configure Gateway.
-
Run the ./psadmin start-sra-instance --user username --passwordfile passwordfile -N gatewayprofile -t gateway --restrictive to start the Gateway instance.
-
If you need to stop the Gateway instance, run the ./psadmin stop-sra-instance --user username --passwordfile passwordfile -N gatewayprofile -t gateway command.
Note –The --restrictive option in the above commands is necessary to start the Gateway.
 To Install Gateway in DMZ Using psadmin
-
Install Gateway in Configure Later mode.
-
Modify the attributes in example2.xml file appropriately and run the ./psconfig --config example2.xml command.
-
Copy the /opt/SUNWportal/template/sra/GWConfig.properties.template and modify the attributes appropriately.
-
Run the ./psadmin create-sra-instance --adminuser amadmin --passwordfile passwordfile -S GWConfig.properties -t gateway --restrictive command.
-
Run the ./psadmin start-sra-instance --user username --passwordfile passwordfile -N gatewayprofile -t gateway --restrictive command to start the Gateway instance created.
Creating a Gateway Instance
You can also create an instance of Gateway using the Portal Server console, as long as the Gateway instances are not to be deployed in a DMZ. This allows the user to contact any one of the Gateway instances and access Portals.
 To Create a Gateway Instance
-
Login to Portal Server Administration Console.
-
Click the Secure Remote Access tab.
-
Click New Profile.
-
Type the new profile name and select the Copy Profile Data From option. Click OK.
The following message is displayed: “New profile is successfully created. Please change the relevant ports in the new profile so that they do not clash with those in the existing profiles.”
-
Click OK.
The Profile screen is displayed.
-
Click the new profile created and change the port of the instance so that it does not clash with any ports that are in use.
You need to change both the http and https port numbers.
-
Click OK.
-
Modify the GWConfig-default.properties.template file available in the /etc/opt/SUNWportal/ location.
-
Run the PortalServer_base/psadmin create-sra-instance -u amadmin -f passwordfile --sraconfig templatefilelocation -t gateway command.
- © 2010, Oracle Corporation and/or its affiliates
