Chapter 3 Integrating Oracle Access Manager
Oracle Access Manager (previously known as Oblix NetPoint and Oracle COREid) is an enterprise single sign-on product with many of the same features as Sun OpenSSO Enterprise and CA SiteMinder (previously known as Netegrity SiteMinder). Oracle Access Manager is usually used for both single sign-on and delegated administration. Many companies have an existing Oracle Access Manager deployed to protect both internal and external applications. This chapter describes options for integrating Oracle Access Manager with OpenSSO Enterprise. The chapter also provides instructions for configuring end-to-end Oracle Access Manager single sign-on using OpenSSO Enterprise.
The following topics are included in this chapter:
-
Using OpenSSO Enterprise to Enable Oracle Federation in the Identity Provider Environment
-
Using OpenSSO Enterprise to Enable Oracle Federation in a Service Provider Environment
About Oracle Access Manager
Oracle has two solutions for web-based single sign-on. One solution is to use the legacy Oracle single sign-on product which is integrated in the Oracle Application Server. Another solution is to use the Oracle Access Manager product, previously known as Oblix Access, with Identity Server. The following major components comprise the Oracle Access System:
- Oracle Identity Server
-
Provides user management and delegated administration functionality and workflows.
- Oracle Policy Manager
-
Provides a web-based interface where administrators can create and manage access policies. The Policy Manager communicates with the directory server to write policy data, and communicates with the Access Server over the Oracle Access Protocol (OAP) to update the Access Server when certain policy modifications are made.
- Oracle Access Server
-
Provides centralized authentication, authorization, and auditing to enable single sign-on and secure access control across enterprise resources.
- Web Pass
-
An Oracle Access Manager web server plug-in (NSAPI filter). Web Pass passes information back and forth between a web server and the Identity Server. Depending upon its configuration, the Identity Server processes a request as either an XML or HTML file.
- WebGate
-
A web server plug-in access client analogous to Sun OpenSSO Enterprise Policy Agent. WebGate intercepts HTTP requests for Web resources and forwards them to the Access Server for authentication and authorization.
Overview of a Typical Oracle Access Manager Session
The Access Server generates a session token with a URL that contains the ObSSOCookie. When the cookie is generated, part of the cookie is used as an encrypted session token. The encrypted session token contains the following:
-
Distinguished name (DN) of the user
-
Level of the authentication scheme
-
IP address of the client to which the cookie was issued
-
Time the cookie was originally issued
-
Time the cookie was last updated
If the user has not been idle, the cookie is updated at a fixed interval to prevent the session from logout. The update interval is 1/4th of idle the session timeout parameter.
Unencrypted ObSSOCookie data includes the following:
-
Cookie expiration time
-
Domain in which the cookie is valid
-
Optional flag that determines if the cookie can only be sent over SSL
The ObSSOCookie is a secure mechanism for user authentication. When the Access System generates the cookie, an MD-5 hash is taken of the session token. When ObSSOCookie is used to authenticate a user, the MD-5 hash is compared with the original cookie contents to be sure no one has tampered with the cookie. MD-5 is a one-way hash, so it cannot be unencrypted. The Access Server does the comparison by hashing the session token again and comparing the output with the hash of the token already present in the Oracle Access Server cookie. If the two hashes do not match, the cookie is corrupt. The system relies on the fact that if someone tampers with the session token, the hashes will not match.
Understanding the Oracle Access Manager Use Cases
The following uses cases illustrate common Oracle Access Manager process flows:
Single logout for any these of these use cases can be implemented in many ways. The logout for federation use cases must have a link in the partner portal for the following URL:
http:<sphost>:<spport>/opensso/saml2/jsp/spSingleLogoutInit.jsp?metaAlias= <metaalias>&idpEntityID=<idp entityid>&RelayState=<integrated product logout url> |
Single logout can also be achieved using Identity Provider-initiated single logout.
Simple Single Sign-On Use Case
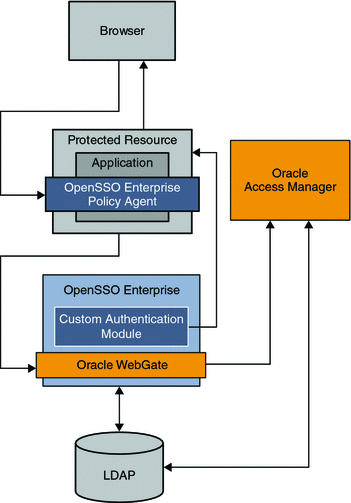
Simple single sign-on integration is useful when an Oracle Access Manager instance is already deployed and configured to protect intranet enterprise applications. Additionally, OpenSSO Enterprise is deployed to protect the same intranet applications by honoring the user session obtained by Oracle Access Manager. In the following illustration, both OpenSSO Enterprise and Oracle Access Manager share the same user repository for user profile verification. OpenSSO Enterprise can also be configured to use the Ignore Profile option if it relies on the Oracle Access Manager session for attributes.
The following figure illustrates architecture in the simple single sign-on use case.
Figure 3–1 Simple Oracle Access Manager Single Sign-On
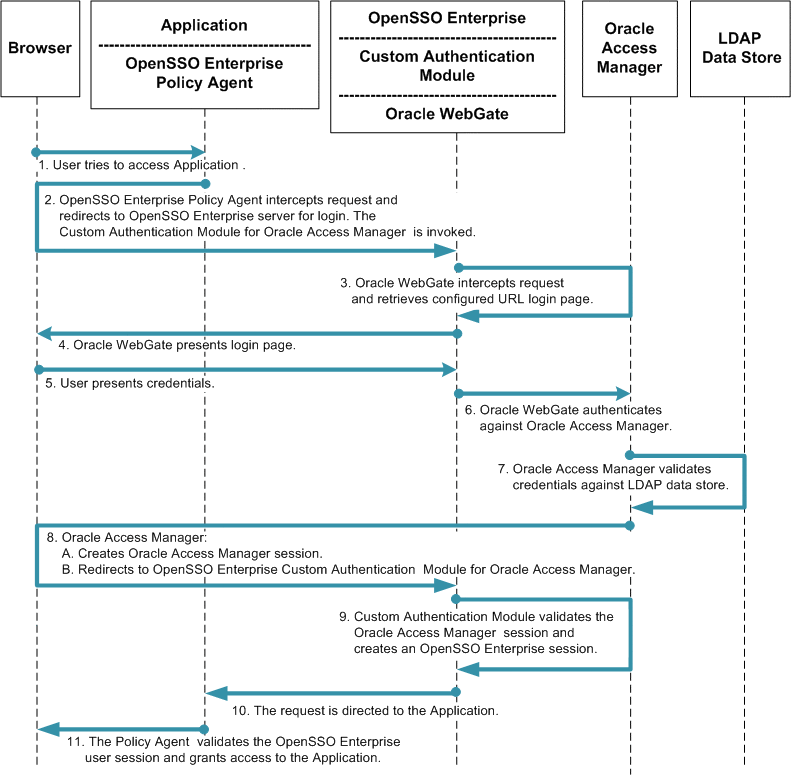
The following figure illustrates the process flow among components in the Identity Provider environment and Service Provider environment.
Figure 3–2 Process Flow for Simple Oracle Access Manager Single Sign-On
Federated Single Sign-On Use Cases
The SAML, ID-FF, and WS-Federation protocols provide cross-domain single sign-on among multiple trusted business entities. These protocols are also used in Identity Federation. Identity Federation involves an Identity Provider, also known as an authentication provider, and a Service Provider where the user authentication session at the Identity Provider is consumed. The following are common use cases in which Oracle Access Manager is enabled for federation protocols:
-
Enabling Oracle Access Manager for federation protocols in a Service Provider environment
-
Enabling Oracle Access Manager for federation protocols in an Identity Provider environment
The deployment examples in this chapter are built upon simple single sign-on integration. You must set up single sign-on before enabling federation. For more information about setting up simple single sign-on, see the Deployment Example: Single Sign-On. After setting up simple single sign-on, you can enable Oracle Access Manager for Federation in either the Identity Provider environment or in the Service Provider environment.
In the following examples, both Identity Provider and Service Provider are configured for transient federation. In most use cases, bulk federation is configured between the Identity Provider and Service Provider.
In transient federation, users exist only in the Identity Provider environment. The Service Provider honors the user authentication at the Identity Provider, and then creates an anonymous session. The anonymous session enables the Service Provider applications, protected by single sign-on, to be accessed. During SAML interactions, there is a possibility of exchanging user attribute information back to the Service Provider for authorization and other purposes. But that scenario is beyond the scope of this document.
Using OpenSSO Enterprise to Enable Oracle Federation in an Identity Provider Environment
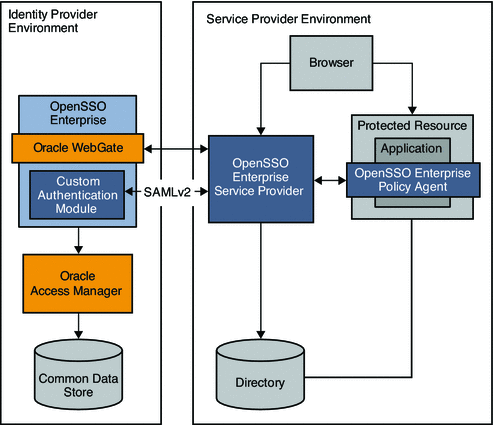
In this example, Oracle Access Manager is the authentication provider in an Identity Provider environment and protects some of the intranet applications. OpenSSO Enterprise in this deployment resolves the single sign-on issues among enterprise applications in partner environments while Oracle Access Manager provides authentication.
Figure 3–3 Oracle Access Manager Federation in an Identity Provider Environment
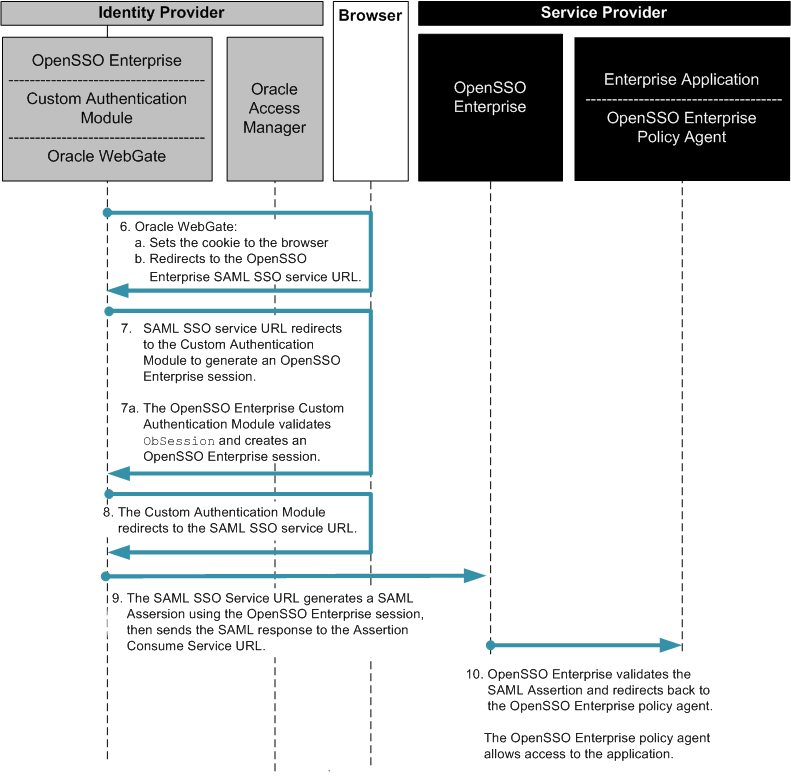
The following two figures illustrate the process flow among components in the Identity Provider environment and Service Provider environment.
Figure 3–4 Process flow for Oracle Access Manager Federation in an Identity Provider Environment
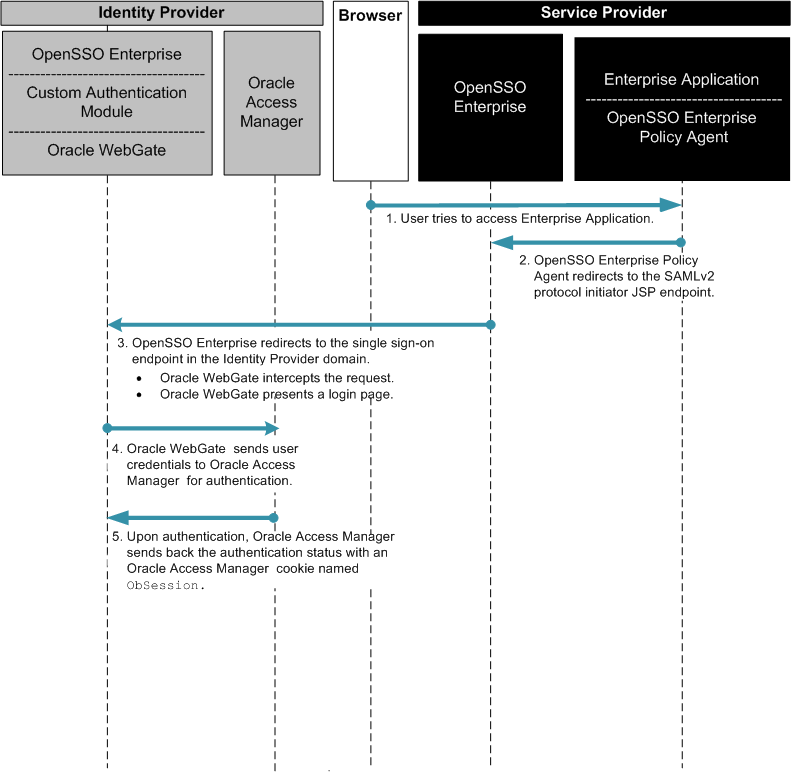
Figure 3–5 Process flow for Oracle Access Manager Federation in an Identity Provider Environment (continued)
Using OpenSSO Enterprise to Enable Oracle Federation in a Service Provider Environment
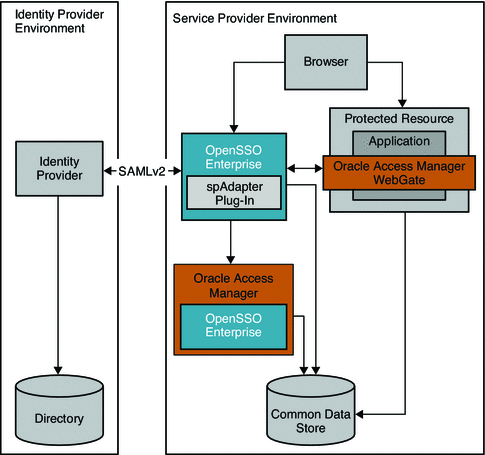
In this deployment, Oracle Access Manager is installed and configured in Service Provider Environment to protect legacy applications.
Figure 3–6 Oracle Access Manager Federation in a Service Provider Environment
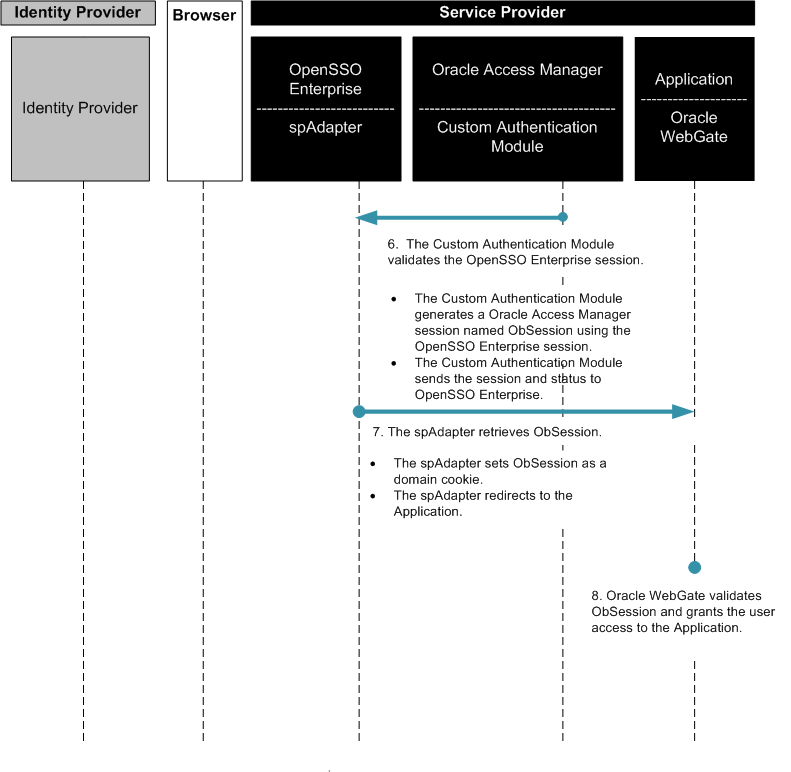
The following two figures illustrate the process flow among components in the Identity Provider environment and Service Provider environment.
Figure 3–7 Process Flow for Oracle Access Manager Federation in a Service Provider Environment
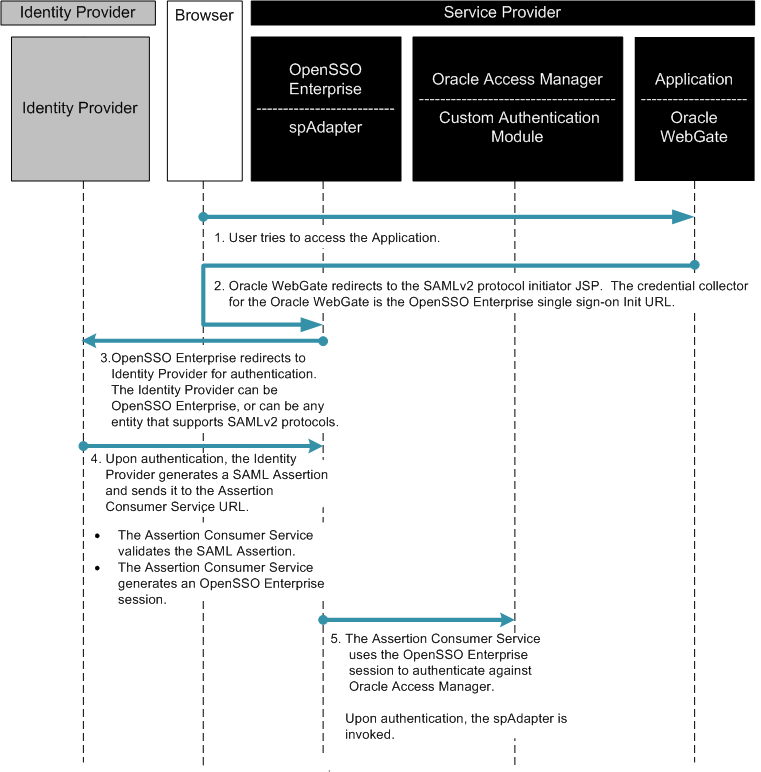
Figure 3–8 Process Flow for Oracle Access Manager Federation in a Service Provider Environment (continued)
Installing and Configuring Oracle Access Manager
To enable the legacy Oracle Access Manager single sign-on applications for SAML 2 federation protocols using OpenSSO Enterprise 8.0, follow these steps:
 To Install Oracle Access Manager and Oracle
Access Manager Web Policy Agent
-
Install Oracle Identity Server, and then install the Oracle Access Server component.
Obtain all required Oracle Access Manager components before you begin installation procedures. See Oracle Access Manager Installation Guidefor detailed installation instructions.
For the examples in this document, Solaris-based installation was conducted. The system was tested with Sun Web Server 6.1 SP5 as the Oracle Administration plug-in interface, and Sun Directory Server 6.3 as the user data and configuration repository.
-
After the successful installation, access the administration console.
Go to the URL http://host:port/access/oblix and log in using the following credentials:
- User Name:
-
oadmin
- Password:
-
password
The administrative interface for managing core access server components, policy manager, and identity console is displayed.
-
Install Oracle WebGate.
See the sectionInstalling the WebGate in the Oracle Access Manager Installation Guide.
 To Configure Oracle Access Manager
See the Oracle Access Manager Installation Guide for detailed configuration instructions. For the examples in this document, the Oracle Access and Policy Servers are tested using the configurations described below.
-
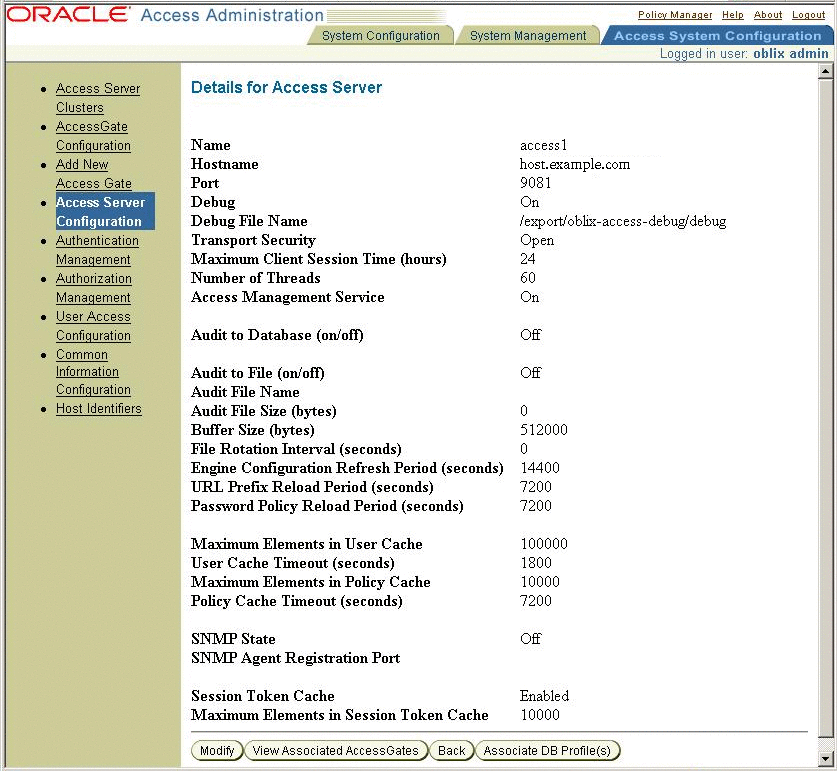
Create an Access Server Configuration named access1.
-
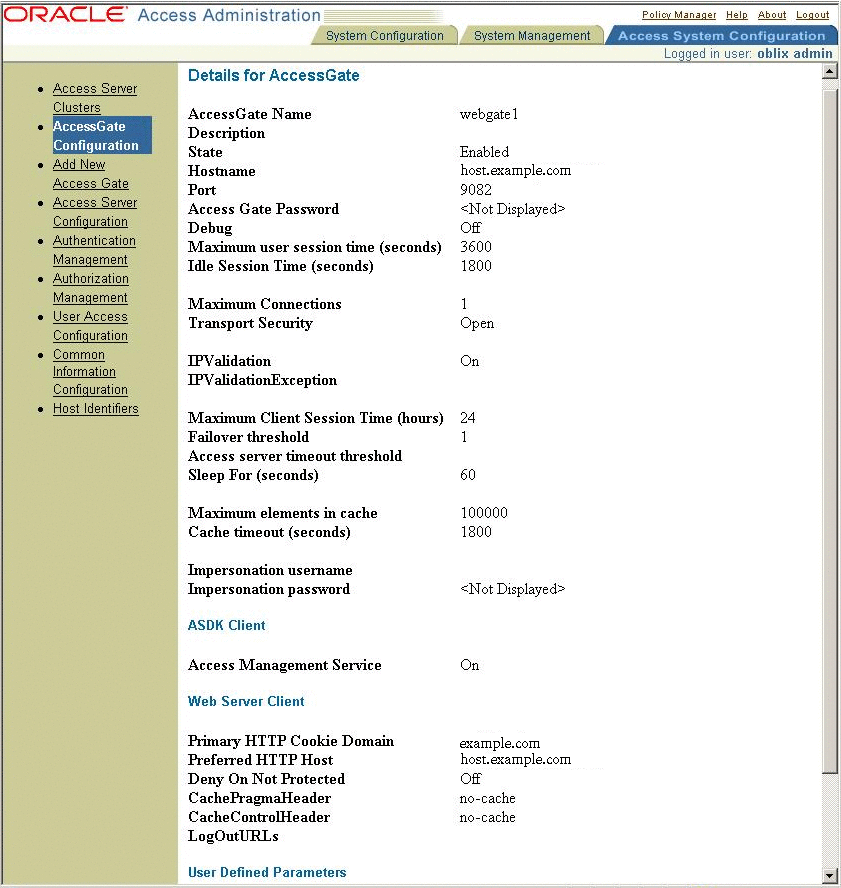
Create access gate configuration named webgate1.
-
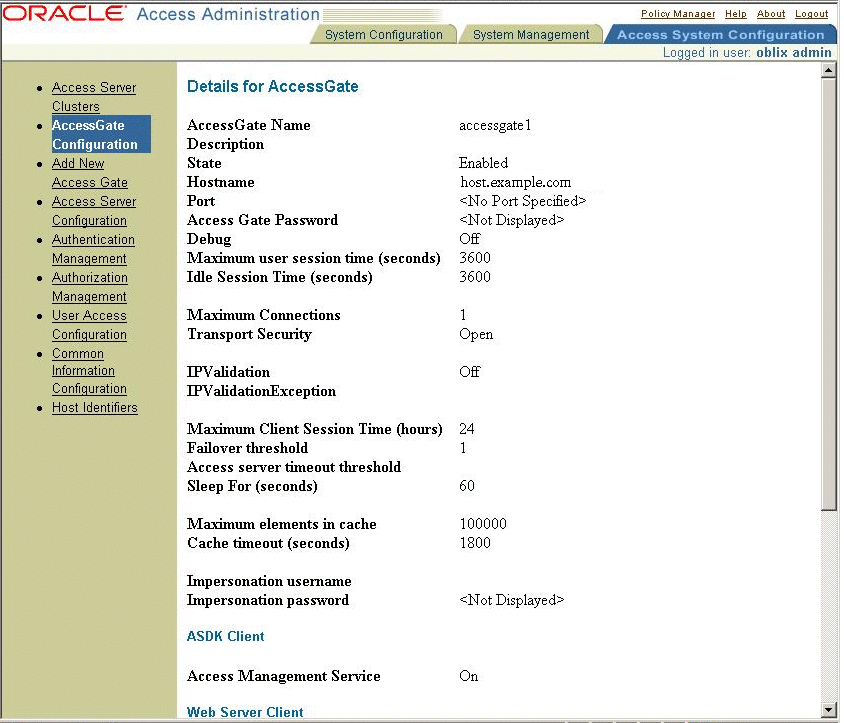
Create an access gate configuration for the SDK.
The SDK configuration is used for custom authentication modules and for other remote APIs.
-
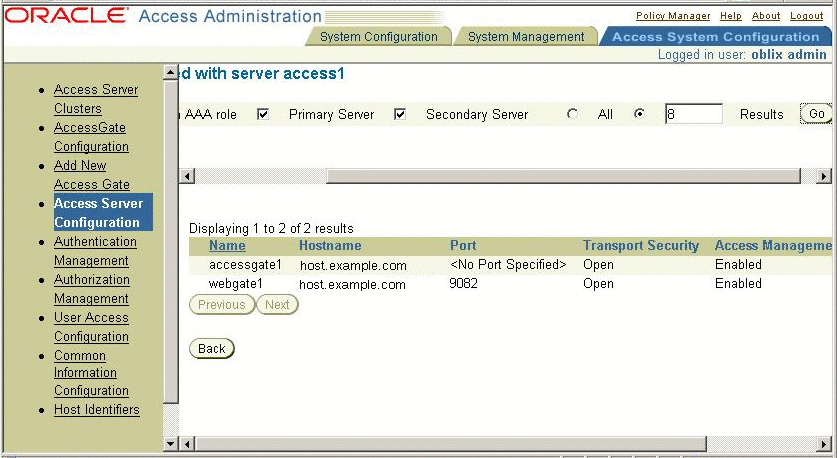
Associate the web gates with Oracle Access Server.
This establishes a trust relationship.
-
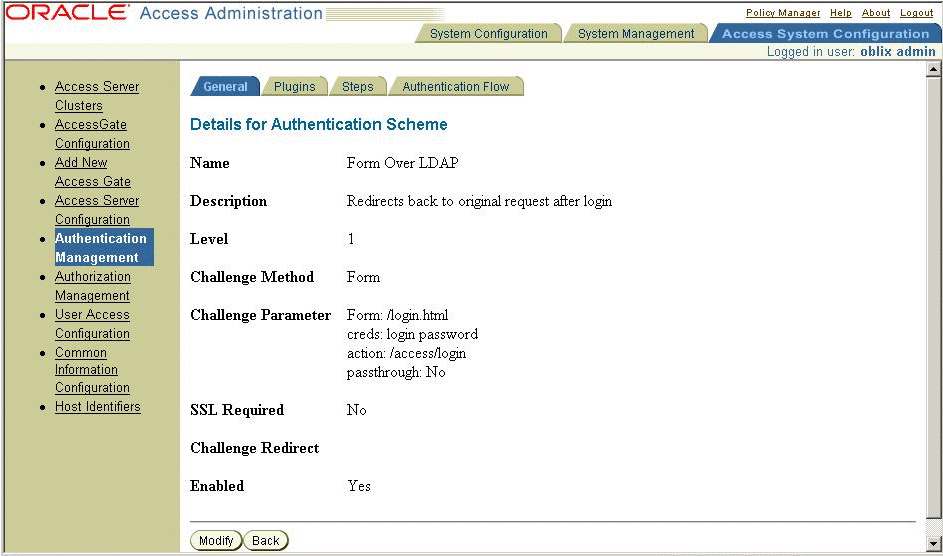
Create a form-based authentication scheme
By default, Oracle Access Manager provides a credential collector form you can use it. You can also customize the form. For the examples in this document, the following properties are used.
-
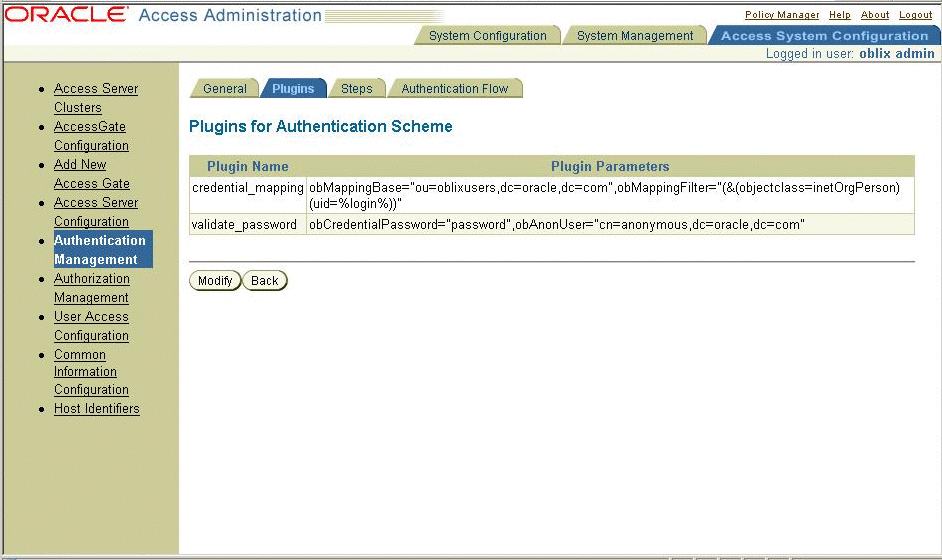
Configure the plug-ins.
-
Access the Policy Manager console (top-right link) and create a policy for your protected resource.
Protect the resource with the form-based authentication.
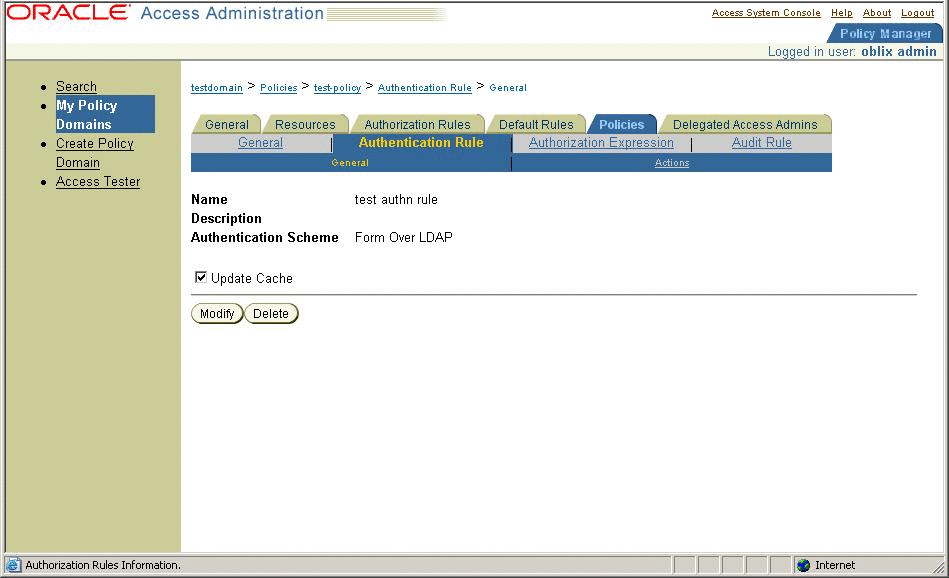
Accessing your protected application should redirect to the form login page. Upon successful authentication, the protected application will redirect to the protected resource with a valid Oracle Access Manager session.
Using OpenSSO Enterprise to Enable Oracle Federation in the Identity Provider Environment
To enable Oracle Access Manager for federation in the Identity Provider environment, follow these steps:
-
Install and configure OpenSSO Enterprise in the Identity Provider container.
-
Install and configure OpenSSO Enterprise in the Service Provider container.
-
Configure OpenSSO Enterprise for SAMLv2 Identity Provider protocols.
-
Configure Oracle Access Manager Agent to protect OpenSSO Enterprise URLs.
Installing and Configuring OpenSSO Enterprise in the Identity Provider Container
Follow the installation instructions in the Sun OpenSSO Enterprise 8.0 Installation and Configuration Guide. Make sure that the Identity Provider container is one of the supported Oracle Web Gate containers. Also make sure that the user repository is same as the Oracle Access Manager so that both OpenSSO Enterprise and Oracle Access Manager provide a session for the same user.
Installing and Configuring the Oracle WebGate
Follow the instructions in the section Installing the WebGate in the Oracle Access Manager Installation Guide.
Make sure that Oracle single sign-on is working for the protected URLs. Do not protect the OpenSSO Enterprise URLs yet because you must first configure OpenSSO Enterprise for authentication modules. For now, protect a temporary URL to ensure that Oracle WebGate is working properly. A temporary policy in Oracle Access Manager could be configured as in the following figure:
Figure 3–9 Configuring a temporary policy

Installing the Custom Oracle Authentication Module
In OpenSSO Enterprise, install a custom authentication module for Oracle Access Manager. After exploding the OpenSSO Enterprise WAR file, the custom authentication module is located under the directory base-dir/samples/thirdparty/oblix. Follow the instructions in the README.txt file for building and configuring a custom authentication module. Make sure that the custom authentication module is working before proceeding.
The custom authentication module implements the OpenSSO Enterprise pluggable interface AMLoginModule. The AMLoginModule interface validates the Oracle Access Manager session using the Oracle Access Manager SDK , and then creates an OpenSSO Enterprise session.
To configure the custom Oracle Authentication Module, provide the following information:
- OblixCookieName:
-
Name of the Oblix session cookie
- OblixSDKInstallDir:
-
Directory where the Oblix SDK is installed and configured. Make sure that ObAccessClient.xml is configured.
- RemoteUserHeaderName:
-
The name of the header for an authenticated user after successful authentication.
- CheckRemoteUserOnly:
-
If true, the authentication modules looks only for the remote user header name.
Installing and Configuring OpenSSO Enterprise in the Service Provider Container
Follow the installation instructions in the Sun OpenSSO Enterprise 8.0 Installation and Configuration Guide. A good practice is to install the Identity Provider and Server Provider in different domains. If that is not possible, make sure they use different cookie names or cookie domains. You do not have to install the OpenSSO Enterprise web policy agent to protect the OpenSSO Enterprise URLs at this time. First make sure that SAML2 is set up and working properly.
Setting Up SAML2
Before loading metadata, read the following sections and be sure you understand the changes that must be made to the metadata. The SAML2 samples contains instructions on how to setup SAML2.
In all, you must have Identity Provider metadata and extended metadata, as well as Service Provider metadata and extended metadata. In the Identity Provider, import Identity Provider metadata and extended metadata as hosted metadata. Import Service Provider metadata and extended metadata as remote entity metadata. To change the hosted or remote attributes, locate the extended metadata XML element <EntityConfig> which contains the following attribute with default value:
hosted=true |
Change the value to false.
 To Configure the Identity Provider OpenSSO
Enterprise for SAMLv2 Identity Provider Protocols
-
Generate the metadata templates on both Identity Provider and Service Provider environments.
You can use one of the following methods:
-
Use the famadm command.
-
Use a browser:
http:host:port/opensso/famadm.jsp
-
At the Identity Provider, run the following command:
famadm create-metadata-templ -y idp_entity_id -u amadmin
-f admin_password_file_name -m idp_standard_metadata
-x idp_extended_metadata -i idp_meta_alias
where idp_meta_alias is "/idp".
-
At the Service Provider, run the following command:
famadm create-metadata-templ -y sp_entity_id -u amadmin
-f admin_password_file_name -m sp_standard_metadata
-x sp_extended_metadata -s sp_meta_alias
where sp_meta_alias is "/sp".
-
-
Customize extended metadata.
Use one of the following options:
-
To the Identity Provider extended metadata, add an attribute named AuthUrl.
This URL attribute is used by the SAML protocols to redirect to an OpenSSO Enterprise authentication module. In this use case, the redirect is to the custom Oracle Authentication Module. Example:
<Attribute name="AuthUrl">
<Value>http://host:port/opensso/UI/Login?module=OAMAuth</Value>
</Attribute>
-
Make the custom Oracle authentication module as the default login module in OpenSSO Enterprise.
A consequence of using this option is that you have to specify an LDAP login module for logging in as adminstrator. The Service Provider extended metadata has an attribute named as transientUser. Set this value to your anonymous user. Example:
<Attribute name="transientUser">
   <Value>anonymous</Value>
</Attribute>
-
-
Change the hosted attribute in the Identity Provider and Service Provider extended metadata when loading remote metadata.
For a remote Identity Provider or Service Provider, set the value to "false" or "0".
-
Load the metadata.
-
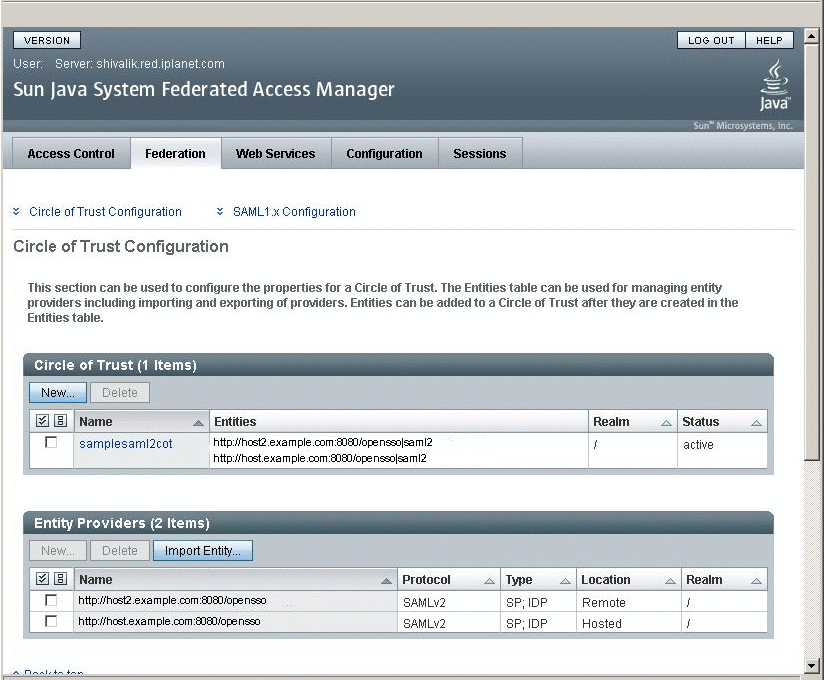
Create circle of trust.
Add the circle of trust to the extended metadata. In the extended template files, you will see a sample circle of trust. Edit the following to correspond to your circle of trust.
<Attribute name="cotlist">
<Value>samplesaml2cot</Value>
</Attribute>
-
Load the hosted metadata in both the Identity Provider and Service Provider.
You can use either the famadm command or the OpenSSO Enterprise console.
-
Exchange the metadata .
Import the Service Provider metadata into the Identity Provider, and import the Identity Provider metadata into the Service Provider.
-
Load the metadata.
-
-
After successfully exchanging the metadata, verify through the OpenSSO Enterprise administration console that the metadata has been configured correctly.
To Configure Oracle Access Manager Agent to protect OpenSSO Enterprise URLs
There are many different ways to configure Oracle Access Manager Policy to protect OpenSSO Enterprise URLs. At minimum, you must configure a policy to protect the SAML Single Sign-On Service URL. The real-time policy can be different based on other deployment requirements. The Oracle Access Manager session must be established before the SAML Assertion is generated.
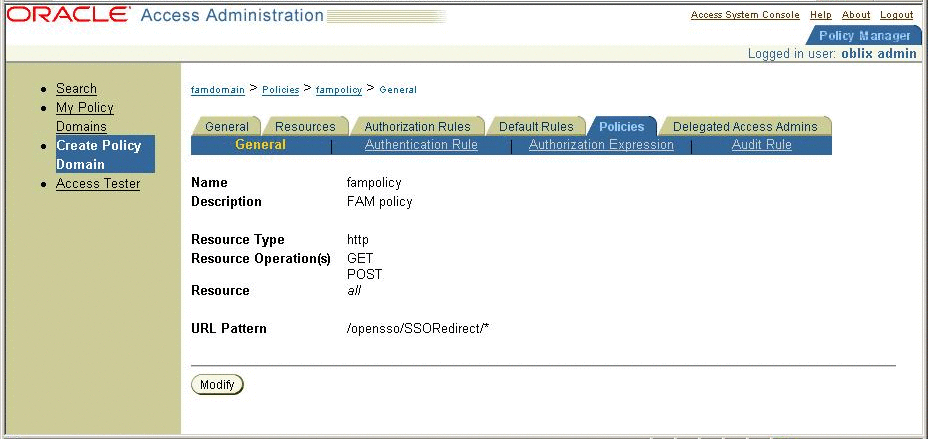
In Oracle Access Server Policy Console, create a policy domain named fampolicy to protect only the OpenSSO Enterprise Single Sign-On Service URL.
Figure 3–10 Creating a policy domain
 To Configure the Service Provider
-
Install the OpenSSO Enterprise web policy agent in the Service Provider environment to protect OpenSSO Enterprise Service Provider.
Follow the instructions in the Sun Java System Access Manager Policy Agent 2.2 Release Notes.
There is no restriction on the type of policy agent you use. However, be sure use an agent that is supported on the container where the application to be protected is deployed.
-
Change the policy agent login URL.
After verifying that simple single sign-on with the OpenSSO Enterprise works properly, change the policy agent login URL to the OpenSSO Enterprise SAML2 SP initiated Single Sign-on Service URL. Example:
http://<sphost>:<spport>/opensso/saml2/jsp/spSSOInit.jsp?metaAlias
=<SP MetaAlias>
&idpEntityID=<IDP Entity ID>&NameIDFormat=transient
 To Test the Single Sign-On
-
Authenticate at Oracle Access Manager with username and password.
-
Access the enterprise application protected by the OpenSSO Enterprise Service Provider policy agent in the Service Provider environment.
You should automatically be granted access to the protected application.
Using OpenSSO Enterprise to Enable Oracle Federation in a Service Provider Environment
To enable Oracle Access Manager for Federation in the Service Provider environment, follow these steps:
-
Install OpenSSO Enterprise in the Identity Provider environment.
-
Install OpenSSO Enterprise in the Service Provider environment.
-
Install Oracle Access Manager in the Service Provider domain.
-
Configure Oracle Access Manager for the OpenSSO Enterprise scheme.
-
Configure the OpenSSO Enterprise Identity Provider and Service Provider for SAML2 protocols.
Installing OpenSSO Enterprise in the Identity Provider Environment
The Identity Provider does not have to be an OpenSSO Enterprise deployment. But for optimum protocol interoperability, use OpenSSO Enterprise. See the Sun OpenSSO Enterprise 8.0 Installation and Configuration Guidefor detailed installation and configuration steps.
A good practice is to install the Identity Provider and Server Provider in different domains. If that is not possible, make sure they use different cookie names or cookie domains. This eliminates cookie validation inconsistency.
Installing OpenSSO Enterprise in the Service Provider Environment
See the Sun OpenSSO Enterprise 8.0 Installation and Configuration Guidefor detailed installation and configuration steps.
The OpenSSO Enterprise in the Service Provider environment initiates the SAML2 protocols. The Oracle Access Manager Agent can protect the enterprise application by redirecting to OpenSSO Enterprise for single sign-on purposes.
Installing Oracle Access Manager
Install Oracle Access Manager in the Service Provider domain where enterprise applications are protected by Oracle WebGate agents. See the Oracle Access Manager Installation Guide for detailed installation instructions.
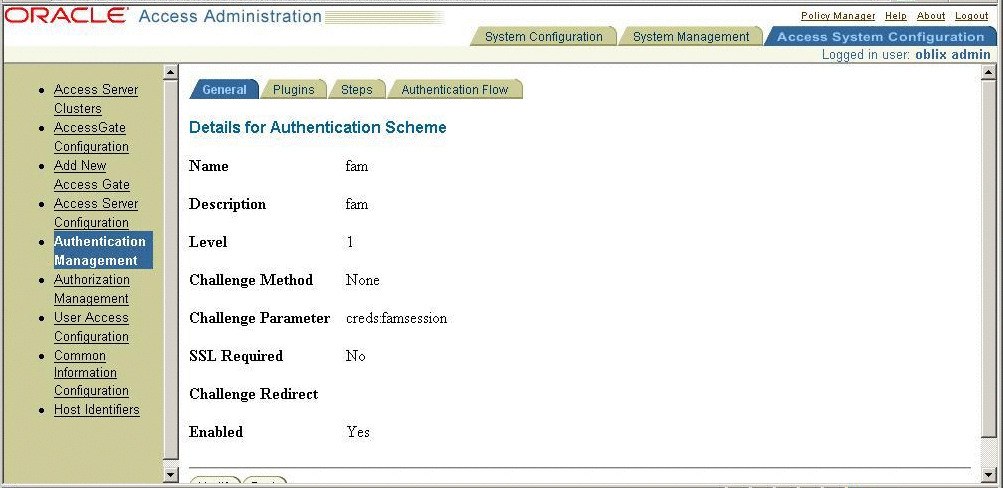
The plug-in name must be same as the name of the shared library.
Figure 3–11 The plug-in name must be same as the name of the shared library
Configuring Oracle Access Manager for an OpenSSO Enterprise Scheme
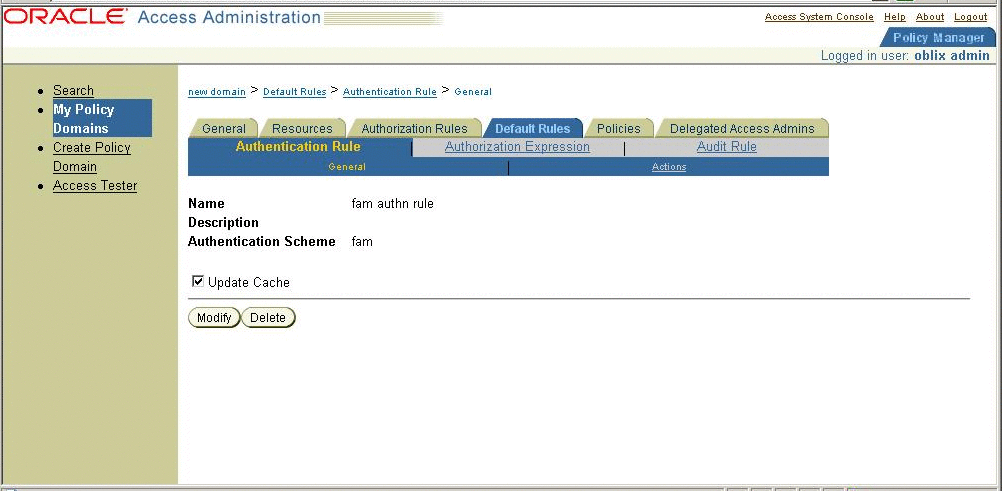
The custom authentication scheme for Oracle Access Manager is a C-based implementation, and the custom authentication scheme should be built like a shared library. The custom authentication scheme in this chapter is a Solaris-based shared library and can be ported onto other platforms with similar semantics. This custom authentication module also uses the OpenSSO Enterprise C-SDK for validating the OpenSSO Enterprise session. When an OpenSSO Enterprise WAR file is exploded, the custom authentication module is located under the base-dir/samples/thirdparty/oblix directory. The README.txt contains instructions for configuring the Oracle Access Manager authentication scheme. The following figure provides some details for configuring OpenSSO Enterprise AuthSchemein Oracle Access Manager.
Figure 3–12 Configuring OpenSSO Enterprise AuthSchemein Oracle Access Manager
Configuring a Resource
For detailed instructions, see the Oracle Containers for J2EE Security Guide
Later you will use the resource name you configure in Oracle Access Manager in the SAML Adapter configuration. The policy will trigger the OpenSSO Enterprise authentication module.
Setting Up SAMLv2
In all, you must have Identity Provider metadata and extended metadata, as well as Service Provider metadata and extended metadata. In the Identity Provider, import Identity Provider metadata and extended metadata as hosted metadata. Import Service Provider metadata and extended metadata as remote entity metadata. To change the hosted or remote attributes, locate the extended metadata XML element <EntityConfig> which contains the following attribute with default value:
hosted=true |
Change the value to false.
 To Configure the OpenSSO Enterprise Identity
and Service Providers for SAML2 Protocols
-
Generate the metadata templates on both Identity Provider and Service Provider environments.
Use the famadm command, or used use a browser to go to the following URL:
http:<host>:<port>/opensso/famadm.jsp
-
At the Identity Provider:
famadm create-metadata-templ -y idp_entity_id
-u amadmin -f admin_password_file_name -m idp_standard_metadata
-x idp_extended_metadata -i idp_meta_alias
where idp_meta_alias is /idp
-
At the Service Provider:
famadm create-metadata-templ -y sp_entity_id
-u amadmin -f admin_password_file_name -m sp_standard_metadata
-x sp_extended_metadata -s sp_meta_alias
where sp_meta_alias is /sp
-
-
Customize the Service Provider extended metadata.
Add the Service Provider extended metadata as an attribute named as spAdapter. This attribute is used by the SAML protocols to do any post single sign-on authentication processes. In the architecture diagram, this the Oracle Access Manager Plug-in. The OAMPlugin uses the OpenSSO Enterprise session to authenticate against Oracle Access Manager and establish ObSSOCookie. The Service Provider metadata must have the following attributes:
<Attribute name="spAdapter"> <Value>com.sun.identity.saml2.plugins.SMAdapter</Value> </Attribute> <Attribute name="spAdapterEnv"> <Value>FAMCookieName=iPlanetDirectoryPro</Value> <Value>OAMCookieName=ObSSOCookie</Value> <Value>CookieDomain=.red.example.com</Value> <Value>Resource=/test/index.html</Value> <Value>ObSDKInstallDir=/export/oam/AccessServerSDK</Value> </Attribute> -
Set the value for transientUser to the anonymous user.
The Service Provider extended metadata has an attribute named as transientUser. Make sure that the OpenSSO Enterprise Service Provider is enabled for Anonymous authentication.
<Attribute name="transientUser">
<Value>anonymous</Value>
</Attribute>
-
Create a circle of trust.
The circle of trust should also be added in your extended metadata.
-
Load the metadata.
-
Edit the following attribute to one of your circle of trust.
The extended template files contains a sample circle of trust.
<Attribute name="cotlist">
<Value>samplesaml2cot</Value>
</Attribute>
You can also add the circle of trust through the OpenSSO Enterprise administration console.
-
Load the hosted metadata in both the Identity Provider and Service Provider.
You can use the famadm command or the OpenSSO Enterprise administration console.
-
Exchange the metadata between Identity Provider and Service Provider.
and load the metadata.
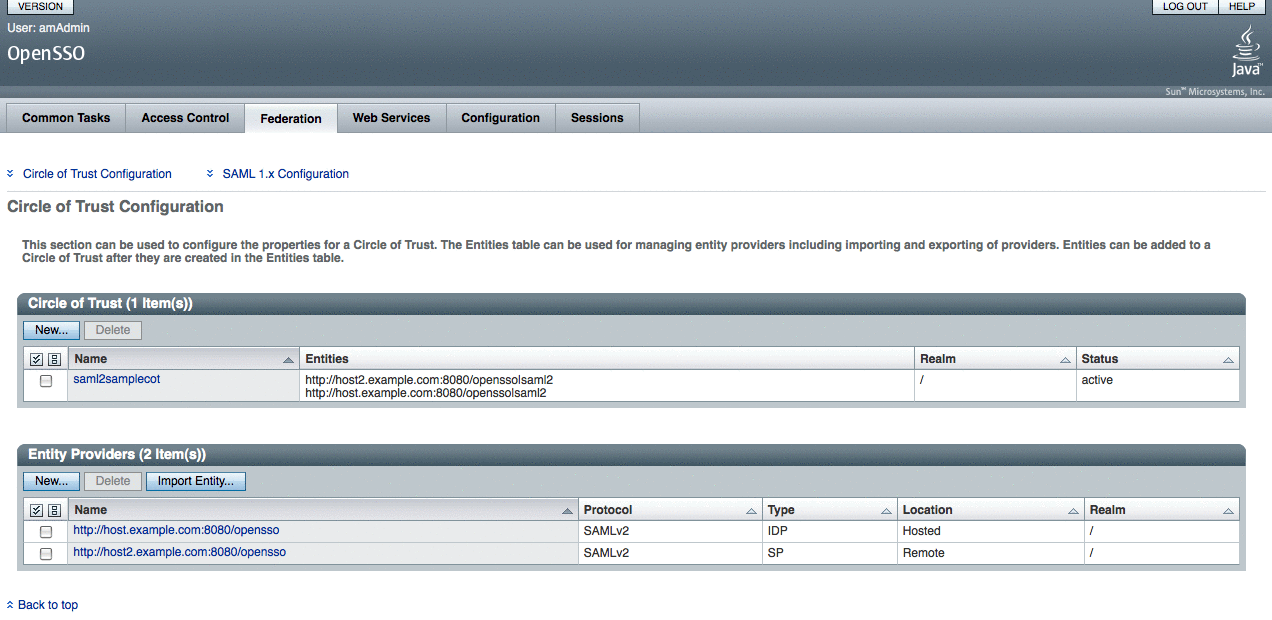
-
Verify through OpenSSO Enterprise administration console that the metadata is configured properly.
Verifying that Single Sign-On Works Properly
Access the enterprise application protected by Oracle WebGate. Oracle WebGate redirects to OpenSSO Enterprise for authentication where the SAML2 single sign-on is initiated.
- © 2010, Oracle Corporation and/or its affiliates
