Chapter 3 Using Sun GlassFish Web Space Server Software
This chapter explains the basics of using Sun GlassFish Web Space Server software, using as a basis the Example site included in the Web Space Server evaluation ZIP bundles. This example site includes several predefined sets of user accounts and bundled applications for you to experiment with.
The samples used in this chapter are only included in the Web Space Server evaluation bundles, and not in the integration or deployment bundles. See Getting Sun GlassFish Web Space Server Software for explanations of the different Web Space Server download bundles.
Note –
The instructions in this section are based on Sun GlassFish Enterprise Server v2.1 and Web Space Server 10.0, as installed using one of the webspace-gfv2-platform.zip packages described earlier in this document. This Example site is only available with the webspace-gfv2-platform.zip packages, and is not available with the version of Web Space Server installed through Update Tool or with the webspace-10–fcs-for-gfv2.zip (GlassFish not included) package.
This chapter includes instructions for the following topics:
Logging In
Web Space Server is based on users, user roles, user groups, and user communities, so the first thing you need to do is log in to some user account.
The Web Space Server Example site has four sets of sample users. Each user set is designed to demonstrate user interaction scenarios in various sample community environments. You can choose a sample user set from the drop-down list in the Sample Users portlet near the top left of the example site main screen.
Note –
This guide does not provide exhaustive explanations of each sample user set. You are encouraged to explore the various user sets to get practical experience with the features and capabilities of Web Space Server 10.0 software.
Figure 3–1 Sample User Set Drop-Down List

 To Log In to a Web Space Server Site
-
Go to the Example site start page, http://<server_name>:8080.
For example:
http://localhost:8080
Note –There may be a delay when the page loads for the first time after server start. Subsequent page loads should proceed more rapidly.
-
Select a sample user set from the Sample Users portlet near the top left of the Web Space Server Example site main page
-
Choose Sign in from the Welcome drop-down menu in the upper right corner of the page.
Alternatively, in the Web Space Server Example site, you can use one of the Express login links in the Sample Users portlet to bypass the Web Space Server Sign in screen. Note that in a “real life” Web Space Server production environment, it is likely that neither the sample user sets nor Express login links will be available, and you will need to use the Sign in item in the Welcome drop-down.
Tip –For the purposes of this example, choose the Paul Tester account from the Social Networking Sample Users set.
After logging in a with the Paul Tester user account, the My Profile page for the Paul Tester is displayed.
Taking the Quick Tour
Everything in Web Space Server is designed around the concept of portlets, portals and pages. Portlets are small applications that can be either standalone or shared among community members. Portals are custom collections of pages, and pages are containers into which applications or portlets are placed. A single portal can contain multiple pages, and a single page can contain multiple applications.
For example, after logging in using the Paul Tester account, the My Profile portal page for Paul Tester is displayed.
Figure 3–2 My Profile Page for Paul Tester

Looking at Figure 3–2, the main elements on Paul Tester's My Profile page are described below.
-
Page Bar
The Page Bar displays the topmost level of pages you have defined at any particular level in your portal. For example, for Paul Tester, there is a My Profile page, a Scrapbook page, a Friends page, and a Communities page. Each one of these pages can contain its own distinct set of applications, and be arranged with its own layout, permissions, and “look and feel.”
-
Applications
Applications in Web Space Server take the form of portlets or widgets, which are small, pluggable, typically network-based applications that can be displayed and moved around on a portal page. For example, Web Space Server 10.0 includes a number of sample applications, such as blog, wiki, and messaging tools, calendar and mail, friends, activities, tagging and social bookmarking, and content management, among many others. In this example, the Profile and My Activities applications are highlighted. Also available on this page are Friends, Friend's Activities, and Community Membership applications
-
Web Space Server Main Menu
The Web Space Server main menu displays various site-wide commands. Of particular interest here are
-
The Settings menu provides additional commands for things like adding applications to a page, managing pages, and access to the Web Space Server Control Panel.
-
The Add Page link enables you to add pages to the Page Bar. These links can point to any page you would like anywhere in your Web Space Server portal.
-
The Add Application link enables you to add applications to a page.
-
Accessibility Features
Web Space Server 10.0 software is designed to support a comprehensive range of United States and international accessibility standards and requirements. These requirements are designed to assure ease of use and full accessibility to all Web Space Server features for users with various visual and/or physical limitations.
The accessibility features built into and tested with Web Space Server software include the following:
-
All graphical interface elements, including the Navigation Dock, Action/Options menu, Add Applications menu, Control Panel, and all embedded forms are all fully navigable with the keyboard, including the Tab, arrow, and Enter keys.
-
All forms embedded in application pages are friendly to assistive technologies through various methods, such as attaching a label to each form field, or providing an appropriate title or other nonvisual text element to each element.
-
Alternative text strings are provided for all non-text elements, including icons, images, and logos.
-
All dynamic elements, including Javascript code and menus and pop-up menus with strings that are displayed when a mouse is hovered over them, have embedded text string identifiers that can be read by assistive technologies.
-
Product documentation, including PDF and HTML versions, have been written according to accessibility standards.
-
The product has been tested and is expected to work with a variety of assistive technologies for several operating environments, including:
-
Mac OS X: Universal Access
-
Solaris and OpenSolaris: Orca
-
Linux: Orca
-
Windows: JAWS, System Access
-
Joining a Community
One of Web Space Server's greatest strengths is how it enables collaborative environments, on both the business process and the social networking levels. At the heart of such collaboration is the concept of the community. A community is a group of users and/or user groups who share a common data space and set of applications.
For example, a community might have a wiki that is available only to members of the community and not to anyone outside the community. Similarly, content management systems or business process workflows can be developed for communities as a whole. Calendaring, email, and messaging can be specifically tailored to the needs of individual communities within a larger organization. The main idea behind Web Space Server is to enable the creation of virtual spaces where members of like-minded communities can meet, share ideas, and collaborate on projects.
 To Join a Web Space Server Community
This procedure assumes that you are still logged in to the Paul Tester account used in the previous sections in this chapter.
-
Starting from Paul Tester's My Profile page, choose Communties from the Page Bar.
The My Communities portlet is displayed.
-
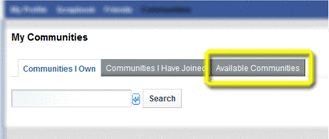
Click the Available Communities entry.

A list of communities Paul Test can join is displayed.
-
Click Available Communities tab in the My Communities application you just added to the page.
A list of available communities is displayed.
-
Click the Join link for the cms community.
This is an Open community, so your join request is sent to the community owner. If this was not an open community, your join request would have been sent to the community owner for approval.
-
Click the Communities I Have Joined tab in the My Communities application.
The cms Sample community is displayed in the list of communities you have joined.
Creating a Community
Creating communities is a super user role; that is, it typically cannot be done by regular users unless specific permissions have been explicitly granted to allow it.
 To Create a Community
For the purposes of this example, the Admin user account will be used.
-
Choose Sign Out from the Welcome menu to log out of the Paul Tester account, if you are still logged in to it.
-
Log in using the Admin User account.
This account provides full super user permissions for the Web Space Server example site.
-
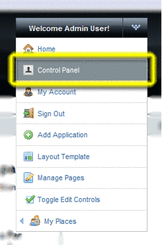
Open the Control Panel from the Welcome menu.

The Control Panel for the Admin user is displayed. Note that there are many more controls available in the Admin Control Panel than there are for regular users.
-
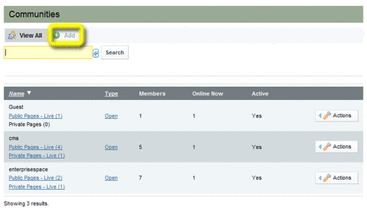
Scroll down to the Portal section in the pane on the right, and click Communities.
The Communities portlet is displayed.

-
Click Add to create a new community.
The Communities properties page is displayed.
-
Enter a name and description for the community.
-
Select a community Type.
-
Open — Authenticated users can join the community without explicit permission. Users logged in with a guest account can view the community but cannot join it.
-
Restricted — Anyone can request to join, but the community owner must approve the request.
-
Private — Only those users specifically added by the community owner can be members; no specific join request from the user is required or permitted.
-
-
Check Active to enable the community.
-
Click Save to return to the Community portal page in Control Panel.
-
Log out of the Admin User account and log back in to the Paul Tester account.
You are returned to Paul Tester's Home page.
-
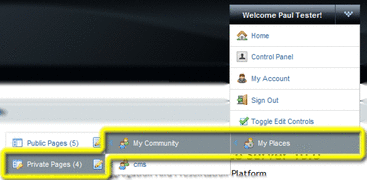
From the Welcome menu, choose My Places->My Community->Private Pages.

-
Click the Communities link on the Page Bar.
The new community is displayed in the available communities list.
-
Click the Available Communities tab.
The new community is displayed in the Available Communities list.
- © 2010, Oracle Corporation and/or its affiliates
