Getting the OpenSSO Add-On
As with all Web Space Server Add-On packages, the OpenSSO Add-On is downloaded using the Sun GlassFish Update Tool.
Note –
The version of Update Tool included with some versions of GlassFish is not compatible with the Web Space Server Add-On package repositories. You must use the version of Update Tool that comes with Web Space Server 10.0 software.
Update Tool also includes a command-line (CLI) Image Packaging System (IPS) utility, called pkg, which provides the same core functionality as its GUI-based counterpart. This IPS tool is started with the webspace_dir/bin/pkg command. See the Update Center wiki for complete information about Update Tool and the pkg command.
 To Get the OpenSSO Add-On Using
the GUI-Based Update Tool
Before You Begin
Make sure that Sun GlassFish Enterprise Server v2 or later and Sun GlassFish Web Space Server 10.0 are both installed and running on your system, as described in System Requirements.
In these instructions, the root Web Space Server server installation directory is referred to as webspace_dir, and the Sun GlassFish Enterprise Server root directory is referred to as glassfish_dir.
-
In a command shell for your operating system, change to the webspace_dir/bin directory and run the updatetool command.
If this is the first time you have launched updatetool, the full Update Tool product will not yet be installed, and you are prompted to allow installation to proceed.
-
Type y when prompted to install Update Tool.
The installer downloads and installs the full Update Tool product and then exits.
-
Enter the updatetool command again to launch Update Tool.
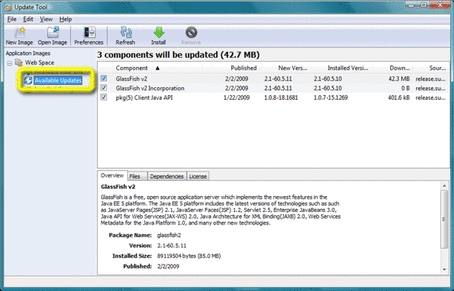
The Update Tool main window is displayed, with Available Updates highlighted.
-
-
(Optional) You can choose at this time to install any available updates.
Note that if you choose to install updates at this time, you will in most cases need to restart GlassFish and Web Space Server before proceeding with the remainder of OpenSSO Add-On installation.
-
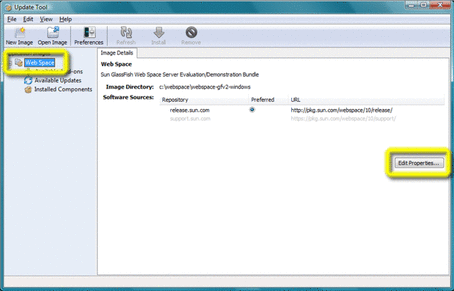
Click the Web Space node in the Application Images pane on the left in Update Tool.
Details about the currently selected software repositories are displayed. To get the Web Space Server Add-On, a restricted-access repository must be added to this list.
-
Click Edit Properties on the right side of the Image Details pane.
The Image Properties window is displayed.
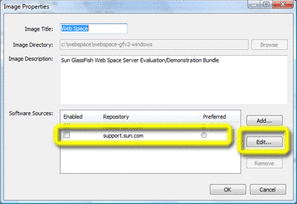
Note that the repository named support.sun.com is not enabled.
-
Select the checkbox next to the support.sun.com repository, and then click Edit.
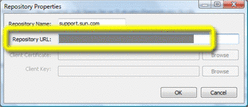
The Repository Properties window is displayed.
-
Ask your SunSolve service representative for the correct URL to use, enter the URL here, and then click OK.
-
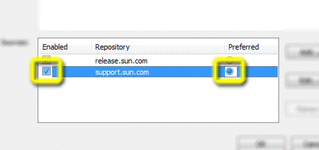
Verify that the support.sun.com repository is now Enabled and selected as Preferred, and then click OK.
-
Back in the Update Tool main window, choose the Available Add-Ons node in the Application Images pane to display the list of available Add-On packages.
-
Select the packages you want, and then click Install.
-
Proceed to Installing the OpenSSO Add-On for the remaining installation instructions.
 To Get the OpenSSO Add-On Using
the CLI-Based pkg Tool
Before You Begin
Make sure that Sun GlassFish Enterprise Server v2 or later and Sun GlassFish Web Space Server 10.0 are both installed and running on your system, as described in System Requirements.
In these instructions, the root Web Space Server server installation directory is referred to as webspace_dir, and the Sun GlassFish Enterprise Server root directory is referred to as glassfish_dir.
-
In a command shell for your operating system, change to the webspace_dir/bin directory and run the updatetool command.
If this is the first time you have launched updatetool, the full Update Tool product will not yet be installed, and you are prompted to allow installation to proceed.
-
Type y when prompted to install Update Tool.
The installer downloads and installs the full Update Tool product and then exits.
-
Change to the webspace_dir/pkg/bin directory.
-
Enter the following command to download the OpenSSO Add-On:
pkg set-authority -P --enable -O http://pkg.sun.com/webspace/10/<repository_name>
Ask your SunSolve service representative for the correct <repository_name>to use, enter the URL here, and then click OK.
-
Enter the following command to perform the base OpenSSO Add-On installation:
pkg install webspace-opensso-addon
-
Proceed to Installing the OpenSSO Add-On for the remaining installation instructions.
- © 2010, Oracle Corporation and/or its affiliates
