Chapter 3 Getting and Installing the OpenOffice Add-On
This chapter explains how to download and install the OpenOffice Add-On for Web Space Server.
Before You Begin
This section explains some basic requirements and concepts you should review before proceeding with OpenOffice Add-On for Web Space Server 10.0 software installation.
System Requirements
The OpenOffice Add-On for Web Space Server 10.0 requires the following:
-
Sun GlassFish Web Space Server 10.0 software
The Web Space Server software should be installed as described in the Sun GlassFish Web Space Server 10.0 Getting Started Guide. Note that the requirements listed in Software and Hardware Requirements in Sun GlassFish Web Space Server 10.0 Getting Started Guide also apply to the OpenOffice Add-On.
While any of the Web Space Server 10.0 packages will work with the OpenOffice Add-On, the recommended Web Space Server package for production environments is webspace-10-fcs-for-gfv2.zip, which is the standalone Web Space Server package that includes neither GlassFish nor the Web Space Server sample site and user sets. See the Sun GlassFish Web Space Server page or Getting Sun GlassFish Web Space Server Software in Sun GlassFish Web Space Server 10.0 Getting Started Guide for information about the different Web Space Server 10.0 downloads.
-
OpenOffice
The OpenOffice Add-On works with OpenOffice 2.x software.
Installation Directories
The directories in which Web Space Server and Sun GlassFish Enterprise Software may vary, so throughout these installation instructions, the root Web Space Server server installation directory is referred to as webspace_dir, and the Sun GlassFish Enterprise Server root directory is referred to as glassfish_dir.
Platform-Specific Path Separators
The instructions and examples in this document use UNIX-style forward slash (/) path separators in file and command names. If Web Space Server and Sun GlassFish Enterprise Server are installed on a Windows system, be sure to use backslashes (\) instead of forward slashes; for example:
-
UNIX systems or Linux systems — glassfish_dir/bin/asadmin
-
Windows systems — glassfish_dir\bin\asadmin
Getting the OpenOffice Add-On
As with all Web Space Server Add-On packages, the OpenOffice Add-On is downloaded using the Sun GlassFish Update Tool.
Note –
The version of Update Tool included with some versions of GlassFish is not compatible with the Web Space Server Add-On package repositories. You must use the version of Update Tool that comes with Web Space Server 10.0 software.
Update Tool also includes a command-line (CLI) Image Packaging System (IPS) utility, called pkg, which provides the same core functionality as its GUI-based counterpart. This IPS tool is started with the webspace_dir/bin/pkg command. See the Update Center wiki for complete information about Update Tool and the pkg command.
 To Get the OpenOffice Add-On Using
the GUI-Based Update Tool
Before You Begin
Make sure that Sun GlassFish Enterprise Server v2 or later and Sun GlassFish Web Space Server 10.0 are both installed and running on your system, as described in System Requirements.
In these instructions, the root Web Space Server server installation directory is referred to as webspace_dir, and the Sun GlassFish Enterprise Server root directory is referred to as glassfish_dir.
-
In a command shell for your operating system, change to the webspace_dir/bin directory and run the updatetool command.
If this is the first time you have launched updatetool, the full Update Tool product will not yet be installed, and you are prompted to allow installation to proceed.
-
Type y when prompted to install Update Tool.
The installer downloads and installs the full Update Tool product and then exits.
-
Enter the updatetool command again to launch Update Tool.
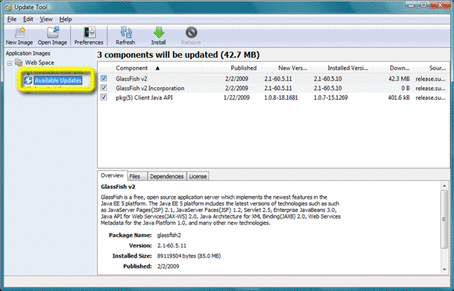
The Update Tool main window is displayed, with Available Updates highlighted.
-
-
(Optional) You can choose at this time to install any available updates.
Note that if you choose to install updates at this time, you will in most cases need to restart GlassFish and Web Space Server before proceeding with the remainder of OpenOffice Add-On installation.
-
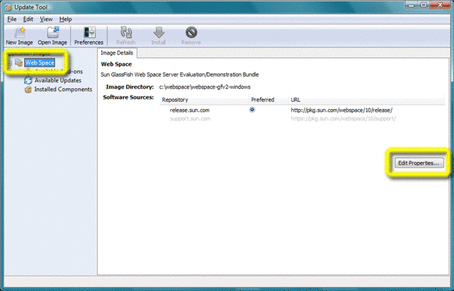
Click the Web Space node in the Application Images pane on the left in Update Tool.
Details about the currently selected software repositories are displayed. To get the Web Space Server Add-On, a restricted-access repository must be added to this list.
-
Click Edit Properties on the right side of the Image Details pane.
The Image Properties window is displayed.
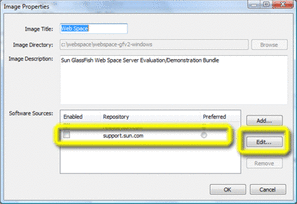
Note that the repository named support.sun.com is not enabled.
-
Select the checkbox next to the support.sun.com repository, and then click Edit.
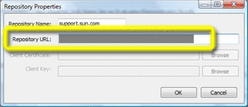
The Repository Properties window is displayed.
-
Ask your SunSolve service representative for the correct URL to use, enter the URL here, and then click OK.
-
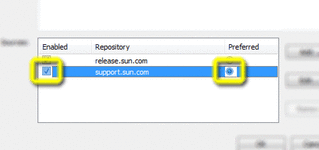
Verify that the support.sun.com repository is now Enabled and selected as Preferred, and then click OK.
-
Back in the Update Tool main window, choose the Available Add-Ons node in the Application Images pane to display the list of available Add-On packages.
-
Select the packages you want, and then click Install.
-
Proceed to Installing the OpenOffice Add-On for the remaining installation instructions.
 To Get the OpenOffice Add-On Using
the CLI-Based pkg Tool
Before You Begin
Make sure that Sun GlassFish Enterprise Server v2 or later and Sun GlassFish Web Space Server 10.0 are both installed and running on your system, as described in System Requirements.
In these instructions, the root Web Space Server server installation directory is referred to as webspace_dir, and the Sun GlassFish Enterprise Server root directory is referred to as glassfish_dir.
-
In a command shell for your operating system, change to the webspace_dir/bin directory and run the updatetool command.
If this is the first time you have launched updatetool, the full Update Tool product will not yet be installed, and you are prompted to allow installation to proceed.
-
Type y when prompted to install Update Tool.
The installer downloads and installs the full Update Tool product and then exits.
-
Change to the webspace_dir/pkg/bin directory.
-
Enter the following command to download the OpenOffice Add-On:
pkg set-authority -P --enable -O http://pkg.sun.com/webspace/10/<repository_name>
Ask your SunSolve service representative for the correct <repository_name>to use, enter the URL here, and then click OK.
-
Enter the following command to perform the base OpenOffice Add-On installation:
pkg install webspace-openoffice-addon
-
Proceed to Installing the OpenOffice Add-On for the remaining installation instructions.
Installing the OpenOffice Add-On
After using Update Tool to get the OpenOffice Add-On package, as described in Getting the OpenOffice Add-On, installing the package involves using the OpenOffice Extension Manager.
 To Install the OpenOffice Add-On
Before You Begin
Make sure that the Web Space Server 10.0 site to which you want to connect is running and available. In these instructions, the GlassFish installation directory is referred to as glassfish_dir.
-
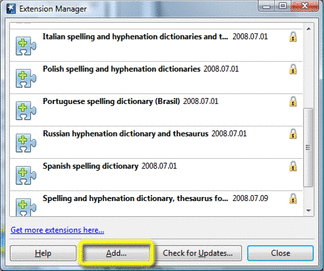
Start any OpenOffice application and click Tools->Extension Manager on the OpenOffice main menu to open Extension Manager.
Figure 3–1 OpenOffice Extension Manager With Add Button Highlighted
-
Click Add in Extension Manager, navigate to the websynergy/openoffice directory, select the Glassfish-Web-Space-DL-Plugin.oxt Add-On file, and then click Open.
You are returned to the Extension Manager window and the OpenOffice Add-On is installed.
-
Click Close to exit Extension Manager.
-
Exit and restart OpenOffice.
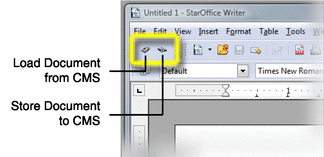
The two OpenOffice Add-On buttons are now displayed on a mew OpenOffice Web Space Document Library toolbar.
Figure 3–2 OpenOffice Add-On Buttons
 To Remove the OpenOffice Add-On
-
Start any OpenOffice application and click Tools->Extension Manager on the OpenOffice main menu to open Extension Manager.
-
Navigate to the Glassfish-Web-Space-DL-Plugin.oxt extension, and then click Remove.
-
When removal is complete, close the Extension Manager window and then exit and restart OpenOffice.
The OpenOffice Add-On, including the OpenOffice Web Space Document Library toolbar, are removed.
Configuring the OpenOffice Add-On
Once a user account and one ore more relevant Communities and Document Libraries have been created in Web Space Server, all configuration settings for the OpenOffice Add-On are made in a single configuration window within OpenOffice.
 To Configure the OpenOffice Add-On
Before You Begin
Make sure the Web Space Server site to which you want to connect is up and running.
-
Start an OpenOffice application, if one is not already running.
-
Open the OpenOffice Add-On configuration window.
The OpenOffice Add-On configuration window can be accessed from either of two ways:
-
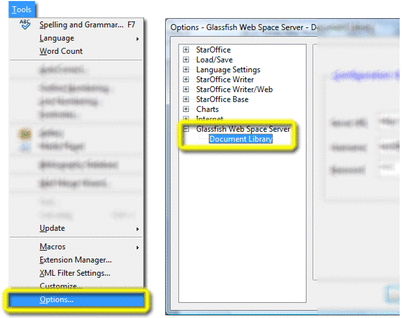
From the OpenOffice main menu, choose Tools->Options, and then navigate to the GlassFish Web Space Server node.
-
From the OpenOffice main menu, choose Tools->Extension Manager, locate the Glassfish-Web-Space-DL-Plugin.oxt entry, and then choose Options.
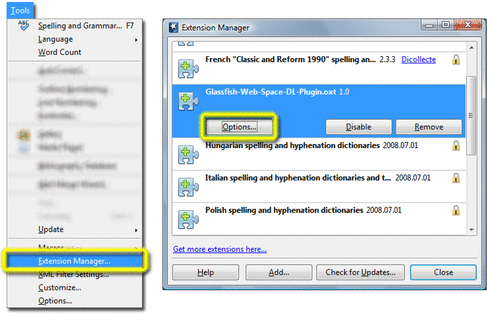
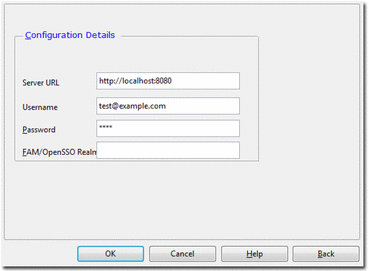
Whichever method you use, the OpenOffice Add-On Configuration window is displayed.
Figure 3–3 OpenOffice Add-On Configuration Window
-
-
Specify the URL for the server to which you want to connect, your Web Space Server user name, and password.
Specify only the root URL for the server; that is, do not specify the direct URL to any Document Library to which you may eventually connect.
-
(Optional) If connecting through an OpenSSO server, specify the OpenSSO realm or realm alias used for your account.
You may need to ask your Web Space Server site administrator for the realm name you should use.
 To Configure the OpenOffice Add-On
for an HTTPS Connection
You may need to perform additional configuration steps If the Web Space Server to which you are connecting with the OpenOffice Add-On is accessed by means of an HTTPS URL rather than an HTTP URL. For example, if you access your server with an address like:
https://fooserver:8181 |
instead of:
http://fooserver:8080 |
you may need to perform the steps in this procedure.
Note –
You do not need to perform these steps if the Web Space Server site you want to access does not use an HTTPS address, but instead uses a more common HTTP address.
-
Use your Web browser to import the certificate for the Web Space Server site.
Please refer to your browser documentation for specific instructions. In many cases, it is simply a matter of viewing the server certificate and storing it locally.
-
Create a local keystore.
You can do this by running the following command from a command shell for your operating environment:
$JAVA_HOME/bin/keytool -import -v -alias s1as -file <imported-certificate> \
-keystore <keystorename.jks> -storepass <password>
-
Start OpenOffice and navigate to the Tools->Options->OpenOffice.org->Java configuration pane.
-
Make sure the active JRE is highlighted, and then click Parameters.
-
Enter the following in the Java start parameter field:
-Djavax.net.ssl.trustStore=<complete_path_to_created_keystore>
-
Click Assign and then OK.
-
Restart OpenOffice.
-
Enter the HTTPS URL for your Web Space Server site.
- © 2010, Oracle Corporation and/or its affiliates
