Chapter 2 Installation and Configuration
This chapter explains how to install and use the Call Add-On for Sun GlassFish Web Space Server software. The Call feature makes use of the RUON API. The Call Add-On enables portal users to establish voice communication based on the SIP protocol.
RUON enables presence functionality in Web Space Server. The Presence infrastructure shows the presence of a user on a network. The infrastructure is always present in portal, but the network need to push data and inform RUON that the user is present in that particular network. Web Space Server includes ruon-web.war by default, and RUON is deployed on Web Space Server by default. For more information, see the RUON home page at https://ruon.dev.java.net/.
This chapter includes the following sections:
Before You Begin
This section explains the basic requirements and concepts you should review before proceeding with the installation of the Call Add-On for Web Space Server.
System Requirements
The Web Space Server software should be installed as described in Chapter 2, Web Space Server Installation Instructions, in Sun GlassFish Web Space Server 10.0 Administration Guide. Note that the requirements listed in Software and Hardware Requirements in Sun GlassFish Web Space Server 10.0 Installation Guide also apply to the Call Add-On.
If you are installing the Call Add-On on a Web Space Server 10.0 update version, make sure that you are using a compatible version. For example, the Call Add-On for Web Space Server 10.0 Update 6 should be installed only on a Web Space Server 10.0 Update 6 installation.
In addition, the following software is required:
- SailFin
-
The JSR 289 compliant scalable SIP (Session Initiation Protocol) servlets technology on top of a deployment-quality, Java EE based GlassFish. SailFin is an open-source implementation of Sun GlassFish Communications Server. This distribution is available as a JAR file from https://sailfin.dev.java.net.
- CounterPath X-Lite for Windows
-
Windows-compatible version of X-Lite from CounterPath is the preferred SIP client for making calls using the Call feature.
You should install SailFin on a machine separate from the machine on which Web Space Server is installed. Default port numbers for the admin port, instance port, and many other ports on SailFin are the same as the corresponding ports for GlassFish. If Web Space Server is running on GlassFish on the same machine, while trying to install SailFin, you see a message saying “port 4848 is in use”, and the installation fails. As a workaround for installing SailFin on the same machine on which Web Space Server is running, you can change the port numbers for SailFin in the setup.xml file.
Installation Directories
The name of the core Web Space Server bundle is webspace-version-for-glassfish.zip. When you unzip this file, a webspace-for-glassfish directory is created. Throughout the installation instructions, this directory is referred to as webspace-dir. You can install and configure Web Space Server from this directory.
Similarly, the directory that contains the unzipped bundle of GlassFish is referred to as glassfish-root.
Platform-Specific Path Separators
The instructions and examples in this document use UNIX-style forward slash (/) path separators in file and command names. If Web Space Server and Sun GlassFish Enterprise Server are installed on a Windows system, be sure to use backslashes (\) instead of forward slashes. For example:
-
UNIX systems or Linux systems: glassfish/bin/asadmin
-
Windows systems: glassfish\bin\asadmin
Overview of Installing the Call Add-On
The Call add-on is available with Sun GlassFish Web Space Server 10.0 Update 6 release. Call add-on allows portal users to call each other depending on their presence status on the portal. Call functionality is based on SIP (Session Initiation Protocol). The current version of Call add-on is tested for Windows version of X-Lite, and it is the recommended SIP client. For a Web Space Server user to use the Call feature, his/her user account need to be configured with the SIP client.
The Call Add-On includes two components, i.e., when you download the Call Add-On, it includes the following two components:
-
call
-
call-registrar
The call Component
Install call on Web Space Server. When you run the install script for call, it generates the call-web.war file.
In the example discussed in this guide, Web Space Server is installed on the machine example113.com. This machine is used for installing call.
The call-registrar Component
You need to deploy call-registrar on SailFin. When you run the install script for call-registrar, it generates the call-registrar.war file.
You need to register Web Space Server with call-registrar. After deploying call-registrar on SailFin, access the SailFin call-registrar at http://machine-name:8080/callregistrar/, where machine-name is the machine on which SailFin is installed. Here you need to specify the host name of the machine running Web Space Server.
As a first step in deploying call-registrar on SailFin, you need to install SailFin. Download SailFin compatible with your OS from https://sailfin.dev.java.net/. For the instructions to install SailFin, refer Sun GlassFish Communications Server documentation. Navigate to SailFin/bin folder and run asadmin start-domain command to start SailFin.
For installing SailFin, use a machine separate from the machine on which Web Space Server is installed. In the example discussed in this guide, the machine example132.com is used for this. Download a FCS bundle of Sun GlassFish Web Space Server 10.0 on the same machine, from https://webspace.dev.java.net/download.html. Use the Update Tool to upgrade the downloaded bundle from Web Space Server 10.0 to Web Space Server 10.0 Update 6, along with downloading call-registrar shipped with Update 6. After the download, call-registrar is placed inside the webspace-dir/webspace folder. You do not need to install Web Space Server here, but you need this for deploying call-registrar on SailFin.
Overview of Using the Call Add-On
Install the SIP client, and configure the SIP client with the SIP address of your Web Space Server user account. Some of the collaboration portlets such as, Recent Bloggers and Message Boards that show the user profile can be used to initiate the call. A call link that appears next to the users who are online, provided they are logged into a SIP client on their machine. You can make calls by clicking the call link against a user. Call link appears only when the user who is being called is logged into his/her SIP client.
For the details of using the Call Add-On, see, Chapter 3, Using the Call Feature.
Downloading call-registrar Using the Update Tool
The version of Update Tool included with some versions of GlassFish Enterprise Server is not compatible with the Web Space Server add-on package repositories. You must use the version of Update Tool that comes with the Web Space Server 10.0 software.
Update Tool also includes a command-line (CLI) Image Packaging System (IPS) utility called pkg, which provides the same core functionality as its GUI-based counterpart.
 To Download call-registrar Using
the GUI-Based Update Tool
If you are running Update Tool for the first time, you will have to install the interface before proceeding.
-
Start Update Tool by changing to the webspace-dir/bin directory and typing updatetool.
-
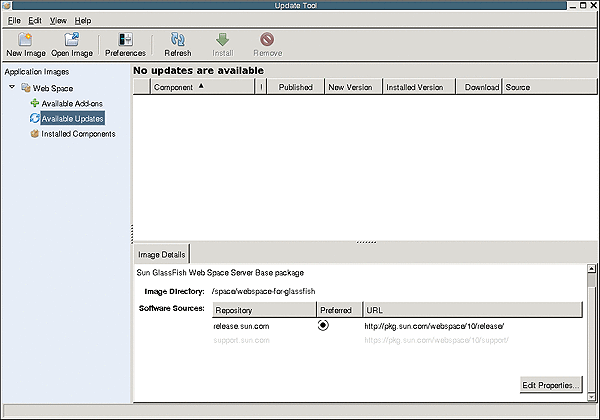
Expand Web Space under the Application Images pane, and choose Available Updates.
Figure 2–1 Update Tool

-
Click the Edit Properties button.
The Image Properties window is displayed.
-
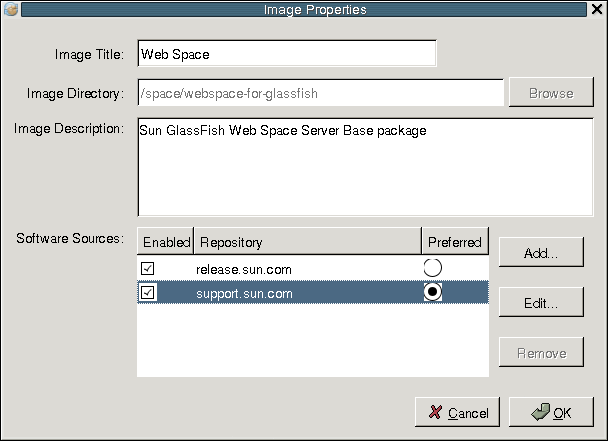
Select the option support.sun.com repository, and choose Preferred.
The Repository Properties window appears.
-
Provide the appropriate repository URL provided by Sun support, and click OK.
The support.sun.com repository is highlighted.
Figure 2–2 Selecting the support.sun.com Repository

-
Click OK again to enable the support.sun.com repository.
The Update Tool main window is displayed.
-
Expand Web Space under the Application Images pane, and choose Available add-ons.
-
Select the Web Space for GlassFish V2 component, and click Install.
-
Select the call-registrar component.
Next Steps
Proceed to Deploying call-registrar on SailFin for the remaining installation instructions.
 To Download the Call Add-On Using the CLI-Based pkg Tool
-
Start Update Tool by changing to the webspace-dir/bin directory and typing updatetool.
-
Change to the webspace-dir/pkg/bin directory.
-
Type the following command to download the Call Add-On:
pkg set-authority -P --enable -O http://pkg.sun.com/webspace/10/ repository-name
Ask your SunSolve service representative for the correct repository name to use.
-
Type the following command to install the base Call Add-On.
pkg install Call-registrar-addon
Next Steps
Proceed to Deploying call-registrar on SailFin for the remaining installation instructions.
Deploying call-registrar on SailFin
When you download call-registrar using the Update Tool, it is placed inside the webspace-dir/webspace directory.
 To Deploy call-registrar on SailFin
You need to have SailFin installed and running before you run the script for deploying call-registrar on SailFin. You need to specify the path for the SailFin directory, and the SailFin Administrator Password file. In this example, space/SailFin is the path for the SailFin directory and sfpasswd is the SailFin Administrator Password file. If you do not have a SailFin administrator password file, you need to create a SailFin administrator password file in plain text format, with the SailFin administrator password. The default SailFin administrator password is adminadmin.
-
In a terminal window, change to the webspace-dir/webspace/call-registrar directory.
-
Run ant -f install-SailFin.xml.
Buildfile: install-SailFin.xml

check-ant:

check-last-install:

set-last-install:

set-SailFin-properties:
    [input] Enter SailFin Directory  [/opt/SailFin]
/space/SailFin
    [input] Enter SailFin Domain (include full path to domain)  [/space/SailFin/domains/domain1]

    [input] Enter SailFin Target  [server]

    [input] Enter SailFin Administrator [admin]

    [input] Enter SailFin Administrator Password File (include full path to file)  [//asadmin-password]
/sfpasswd
    [input] Enter SailFin Administration Port  [4848]

    [input] Can installer deploy wars?  [true]
Installing call on Web Space Server
If you have Web Space Server installed and running, you need to upgrade it to Web Space Server 10.0 Update 6 using the Update Tool. See, Downloading call-registrar Using the Update Tool for the instructions on downloading updates from the Update Tool. Download the call folder. When you install call, it deploys call-web.war on Web Space Server.
 To Install call on Web Space Server
You need to specify the GlassFish directory and the GlassFish Administrator Password file while installing the call-web.war file. In this example, space/glassfish is the path for the GlassFish directory and gfpasswd is the GlassFish Administrator Password file. If you do not have a GlassFish administrator password file, you need to create a GlassFish administrator password file in plain text format, with the GlassFish administrator password. The default GlassFish administrator password is adminadmin.
-
In a terminal window, change to the webspace-dir/webspace/call directory.
-
Run ant -f install-glassfish.xml.
Buildfile: install-glassfish.xml check-ant: check-last-install: set-last-install: show-user-warning: [input] JAVA_HOME must be set to JDK 1.5 or greater and java must be available in the execution path. GlassFish must be running. [RETURN to continue or CONTROL-C to stop] set-glassfish-properties: [input] Enter GlassFish Directory [/opt/glassfish] /space/glassfish [input] Enter GlassFish Domain (include full path to domain) [/space/glassfish/domains/domain1] [input] Enter GlassFish Target [server] [input] Enter GlassFish Administrator [admin] [input] Enter GlassFish Administrator Password File (include full path to file) [/root/asadmin-password] /gfpasswd [input] Enter GlassFish Administration Port [4848] [input] Can installer deploy wars? [true] -
Restart GlassFish.
Verifying the Functioning of call-web and RUON
This section details the tasks for verifying the functioning of presence feature.
 To Verify Whether the call-web Component
is Successfully Installed on Web Space Server
You need to verify the functioning of call-web after installing call-web.war on Web Space Server.
-
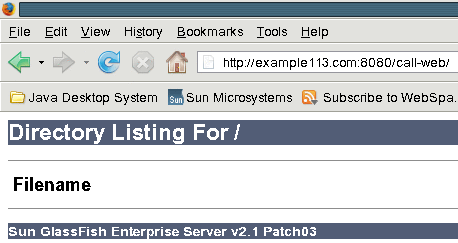
To verify whether the call WAR is successfully installed on Web Space Server, type http://machine-name:8080/call-web/ in a browser, where machine-name is the machine on which you installed the call WAR on Web Space Server.
In this example, example113.com is the machine name.
-
On successful installation of the call WAR, the Directory Listing For page is displayed.
Figure 2–3 Verifying if the call WAR is deployed successfully

 To Verify Whether the RUON API for Web Space Server
is Working
RUON API enables the presence functionality in Web Space Server. It is a part of Web Space Server by default. However, it is desirable to check its functionality.
-
To verify whether the RUON API for Web Space Server is working, type http://machine-name:8080/ruon-web/ in a browser. If the RUON API is functioning, the Directory Listing For page is displayed.
Configuring Web Space Server to Use the Call Feature
This section provides the procedure to verify the working of call-registrar, and to register Web Space Server with it.
 To verify the Working of call-registrar and
to Configure the Portal
-
To verify whether SailFin is successfully deployed on call-registrar, type http://machine-name:8080/callregistrar/ in a browser, where machine-name is the machine on which SailFin is installed.
In this example, example132.com is the machine name.
-
Login to the call-register. By default, the username and password for the call-register are the same as the username and password of SailFin admin console, which are admin and adminadmin respectively.
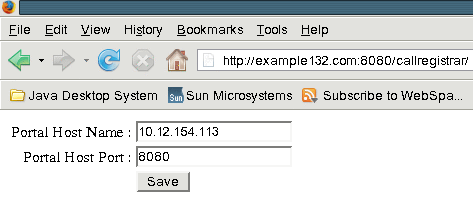
On successful login, the browser page displays fields for the portal host name and port.
-
Specify the Portal Host Name and Portal Host Port. Portal Host Name is the same as the IP address of the machine on which the portal (Web Space Server) is installed.
In this example, 10.12.154.113 is the Portal Host Name, 8080 is the default Portal Host Port.
Figure 2–4 Specifying the portal host name and the port number in the call-registrar

-
Click Save to save the configuration. A message saying Successfully Saved the properties is displayed.
-
Check if the tables USER and SUPERGROUP exist in the lportal database.
- © 2010, Oracle Corporation and/or its affiliates
