Viewing PostScript Files
With Image Viewer you can view and manipulate PostScript files as well as image files. (See "Viewing Images" to learn how to view image files.)
To Open a PostScript File from the File Menu
-
To navigate among and display the contents of folders, choose a folder from the Folders list.
-
Choose a PostScript file from the Files list or type the PostScript file name in the Enter file name field.
-
Click OK to open the PostScript file.
The PostScript file is displayed in Image Viewer's View window.
To Open a PostScript File Using Drag and Drop
If Image Viewer is already running, drop a PostScript file icon on an open Image Viewer window.
If Image Viewer is not running:
-
Drag a PostScript file icon from File Manager and drop it on the Workspace.
-
Press or click mouse button 3 over the PostScript file icon on the workspace and choose Open from the Workspace Object menu.
Image Viewer is started up and the PostScript file is displayed in Image Viewer's View window.
-
To remove the icon from the Workspace when you are finished with it, click mouse button 3 on the icon and select Remove From Workspace from the popup menu.
To View a PostScript File in Black and White or Color
To Page through a PostScript File
Use the Page slider or the arrow buttons.
Using your keyboard, you can view:
-
The first page by pressing Home
-
The next page by pressing PgDn or Return
-
The previous page by pressing PgUp, Back Space, or Del[ete]
-
The last page by pressing End
To View a Specific Page of a PostScript File
-
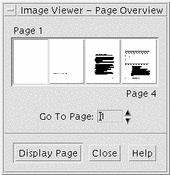
Choose Page Overview from the View menu.
The Page Overview window uses thumbnail page buttons to show simple renderings of the pages in a document. Up to 16 thumbnail page buttons are displayed in a set. Clicking the scroll bar displays up to 12 new thumbnail page buttons.

Note -If the Page Overview menu item is unavailable, Image Viewer is loading the information for the Page Overview dialog box. For a long document, this may take a while.
-
Determine the page you want to view.
-
Double-click the thumbnail page button.
-
Or, type the page number in the text field and click Display Page.
-
To Reverse Page Order
The page order of a document is often reversed when the file is prepared for printing; this is a convenient way to collate a document on printers that produce pages printed side up. To reverse the page order of a document you are viewing:
-
Choose Page Viewing Controls from the View menu.
The Page Viewing Controls dialog box appears.
-
Select the order in which you want the pages of the current document displayed (First Page First or Last Page First).
-
Click OK to apply your choices and close the dialog box.
To Change the Size of the Displayed Page
The page description language used to create some documents may not include page size information. This can cause page boundaries to display incorrectly. To change the displayed page size:
-
Choose Page Viewing Controls from the View menu.
The Page Viewing Controls dialog box appears.
-
Select the size of the page you want for displaying the current document.
-
Click OK to apply your choices and close the dialog box.
See "Print Dialog Box" for information on changing the size of the printed page.
To Save a PostScript Page as a Bitmap Image
-
Choose Save Page As Image from the File menu.
The Save Page As Image dialog box appears.
-
Select the file you want to save.
If you do not specify a file, Image Viewer saves the page currently displayed in the View window.
You can filter the Files list by typing a file-name condition in the Filter field and clicking Update. For example, typing *.ps will list only the files ending in .ps in the Files list.
-
Select the format in which you want to save the page from the File Format list.
See Table 14-2 for a list of file formats in which Image Viewer can save an image.
-
(Optional) Set a compression type through the Compression button menu.
-
(Optional) Choose the number of colors for the image from the Colors button menu.
The default is 256.
-
Type the name under which you want to save the file in the Enter file name field.
-
Click OK.
- © 2010, Oracle Corporation and/or its affiliates
