Part II NIS+ Introduction and Overview
This part describes NIS+.
Chapter 3 Introduction to NIS+
This chapter provides an overview of the Network Information Service Plus (NIS+)
Directions for setting up NIS+ and DNS namespaces are contained in Solaris Naming Setup and Configuration Guide. See Glossaryfor definitions of terms and acronyms you don't recognize.
About NIS+
NIS+ is a network name service similar to NIS but with more features. NIS+ is not an extension of NIS. It is a new software program.
The NIS+ name service is designed to conform to the shape of the organization that installs it, wrapping itself around the bulges and corners of almost any network configuration.
NIS+ enables you to store information about workstation addresses, security information, mail information, Ethernet interfaces, and network services in central locations where all workstations on a network can have access to it. This configuration of network information is referred to as the NIS+ namespace.
The NIS+ namespace is hierarchical, and is similar in structure to the UNIX directory file system. The hierarchical structure allows an NIS+ namespace to be configured to conform to the logical hierarchy of an organization. The namespace's layout of information is unrelated to its physical arrangement. Thus, an NIS+ namespace can be divided into multiple domains that can be administered autonomously. Clients may have access to information in other domains in addition to their own if they have the appropriate permissions.
NIS+ uses a client-server model to store and have access to the information contained in an NIS+ namespace. Each domain is supported by a set of servers. The principal server is called the master server and the backup servers are called replicas. The network information is stored in 16 standard NIS+ tables in an internal NIS+ database. Both master and replica servers run NIS+ server software and both maintain copies of NIS+ tables. Changes made to the NIS+ data on the master server are incrementally propagated automatically to the replicas.
NIS+ includes a sophisticated security system to protect the structure of the namespace and its information. It uses authentication and authorization to verify whether a client's request for information should be fulfilled. Authentication determines whether the information requester is a valid user on the network. Authorization determines whether a particular user is allowed to have or modify the information requested.
Solaris clients use the name service switch (/etc/nsswitch.conf file) to determine from where a workstation will retrieve network information. Such information may be stored in local /etc files, NIS, DNS, or NIS+. You can specify different sources for different types of information in the name service switch.
What NIS+ Can Do for You
NIS+ has some major advantages over NIS:
-
Secure data access
-
Hierarchical and decentralized network administration
-
Very large namespace administration
-
Access to resources across domains
-
Incremental updates
With the security system described in "NIS+ Security", you can control a particular user's access to an individual entry in a particular table. This approach to security helps to keep the system secure and administration tasks to be more broadly distributed without risking damage to the entire NIS+ namespace or even to an entire table.
The NIS+ hierarchical structure allows for multiple domains in one namespace. Division into domains makes administration easier to manage. Individual domains can be administered completely independently, thereby relieving the burden on system administrators who would otherwise each be responsible for very large namespaces. As mentioned above, the security system in combination with decentralized network administration allows for a sharing of administrative work load.
Even though domains may be administered independently, all clients can be granted permission to access information across all domains in a namespace. Since a client can only see the tables in its own domain, the client can only have access to tables in other domains by explicitly addressing them.
Incremental updates mean faster updates of information in the namespace. Since domains are administered independently, changes to master server tables only have to be propagated to that master's replicas and not to the entire namespace. Once propagated, these updates are visible to the entire namespace immediately.
How NIS+ Differs From NIS
The Network Information Service Plus (NIS+) differs from the Network Information Service (NIS) in several ways. NIS+ has many new features, and the terminology it uses for concepts similar to NIS is different. Look in the Glossaryif you see a term you don't recognize. Table 3-1 gives an overview of the major differences between NIS and NIS+.
Table 3-1 Differences Between NIS and NIS+|
NIS |
NIS+ |
|---|---|
|
Flat domains--no hierarchy |
Hierarchical layout--data stored in different levels in the namespace |
|
Data stored in two column maps |
Data stored in multi-column tables |
|
Uses no authentication |
Uses DES authentication |
|
Single choice of network information source |
Name service switch--lets client choose information source: NIS, NIS+, DNS, or local /etc files |
|
Updates delayed for batch propagation |
Incremental updates propagated immediately |
NIS+ was designed to replace NIS. NIS addresses the administration requirements of client-server computing networks prevalent in the 1980s. At that time client-server networks did not usually have more than a few hundred clients and a few multipurpose servers. They were spread across only a few remote sites, and since users were sophisticated and trusted, they did not require security.
However, client-server networks have grown tremendously since the mid-1980s. They now range from 100-10,000 multi-vendor clients supported by 10-100 specialized servers located in sites throughout the world, and they are connected to several "untrusted" public networks. In addition, the information client-server networks store changes much more rapidly than it did during the time of NIS. The size and complexity of these networks required new, autonomous administration practices. NIS+ was designed to address these requirements.
The NIS namespace, being flat, centralizes administration. Because networks in the 1990s require scalability and decentralized administration, the NIS+ namespace was designed with hierarchical domains, like those of DNS.
For example, Figure 3-1, shows a sample company with a parent domain named doc, and two subdomains named sales and manf.
Figure 3-1 Example of Hierarchical Domains
This design enables NIS+ to be used in a range of networks, from small to very large. It also allows the NIS+ service to adapt to the growth of an organization. For example, if a corporation splits itself into two divisions, its NIS+ namespace could be divided into two domains that could be administered autonomously. Just as the Internet delegates administration of domains downward, NIS+ domains can be administered more or less independently of each other.
Although NIS+ uses a domain hierarchy similar to that of DNS, an NIS+ domain is much more than a DNS domain. A DNS domain only stores name and address information about its clients. An NIS+ domain, on the other hand, is a collection of information about the workstations, users, and network services in a portion of an organization.
Although this division into domains makes administration more autonomous and growth easier to manage, it does not make information harder to access. Clients have the same access to information in other domains as they would have had under one umbrella domain. A domain can even be administered from within another domain.
The principal NIS+ server is called the master server, and the backup servers are called replicas. Both master and replica servers run NIS+ server software and both maintain copies of NIS+ tables. Tables store information in NIS+ the way maps store information in NIS. The principal server stores the original tables, and the backup servers store copies.
However, NIS+ uses an updating model that is completely different from the one used by NIS. Since at the time NIS was developed, the type of information it would store changed infrequently, NIS was developed with an update model that focused on stability. Its updates are handled manually and, in large organizations, can take more than a day to propagate to all the replicas. Part of the reason for this is the need to remake and propagate an entire map every time any information in the map changes.
NIS+, however, accepts incremental updates. Changes must still be made on the master server, but once made they are automatically propagated to the replica servers and immediately made available to the entire namespace. You don't have to "make" any maps or wait for propagation.
Details about NIS+ domain structure, servers, and clients, are provided in Chapter 4, The NIS+ Namespace.
An NIS+ domain can be connected to the Internet through its NIS+ clients, using the name service switch (see "NIS+ and the Name Service Switch"). The client, if it is also a DNS client, can set up its switch configuration file to search for information in either DNS zone files or NIS maps--in addition to NIS+ tables.
NIS+ stores information in tables instead of maps or zone files. NIS+ provides 16 types of predefined, or system, tables:
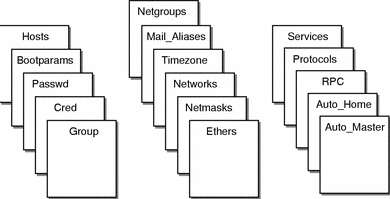
Each table stores a different type of information. For instance, the hosts table stores information about workstation addresses, while the passwd table stores information about users of the network.
NIS+ tables provide two major improvements over the maps used by NIS. First, you can search an NIS+ table by any column, not just the first column (sometimes referred to as the "key"). This eliminates the need for duplicate maps, such as the hosts.byname and hosts.byaddr maps used by NIS. Second, you can access and manipulate the information in NIS+ tables at three levels of granularity: the table level, the entry level, and the column level. NIS+ tables--and the information stored in them--are described in Chapter 5, NIS+ Tables and Information.
You can use NIS in conjunction with NIS+ under the following principles and conditions:
-
Servers within a domain. While you can have both NIS and NIS+ servers operating in the same domain, doing so is not recommended for long periods. As a general rule, using both services in the same domain should be limited to a relatively short transition period from NIS to NIS+.
-
Subdomains. If the master server of your root domain is running NIS+, you can set up subdomains whose servers are all running NIS. (If your root domain master server is running NIS, you cannot have subdomains.)
-
Workstations within a domain.
-
If a domain's servers are running NIS+, individual workstations within that domain can be set up to use either NIS+, NIS, or /etc files for their name service information. In order for an NIS+ server to supply the needs of an NIS client, the NIS+ server must be running in NIS-Compatibility mode.
-
If a domain's servers are running NIS, individual workstations within that domain can be set up to use either NIS or /etc files for name services (they cannot use NIS+).
The service a workstation uses for various name services is controlled by the workstation's nsswitch.conf file. This file is called the switch file. See Chapter 2, The Name Service Switch for further information.
-
NIS+ Security
NIS+ protects the structure of the namespace, and the information it stores, by the complementary processes of authorization and authentication.
-
Authorization. Every component in the namespace specifies the type of operation it will accept and from whom. This is authorization.
-
Authentication. NIS+ attempts to authenticate every request for access to the namespace. Requests come from NIS+ principals. An NIS+ principal can be a process, machine, root, or a user. Valid NIS+ principals possess an NIS+ credential. NIS+ authenticates the originator of the request (principal) by checking the principal's credential.
If the principal possesses an authentic (valid) credential, and if the principal's request is one that the principal is authorized to perform, NIS+ carries out the request. If either the credential is missing or invalid, or the request is not one the principal is authorized to perform, NIS+ denies the request for access. An introductory description of the entire NIS+ security system is provided in Chapter 6, Security Overview.
NIS+ and the Name Service Switch
NIS+ works in conjunction with a separate program called the name service switch. The name service switch, sometimes referred to as "the switch," enables Solaris 2.6 releasebased workstations to obtain their information from more than one name service; specifically, from local or /etc files, NIS maps, DNS zone files, or NIS+ tables. The switch not only offers a choice of sources, but allows a workstation to specify different sources for different types of information. A complete description of the switch software and its associated files is provided in Chapter 2, The Name Service Switch.
Solaris 1.x Releases and NIS-Compatibility Mode
NIS+ can be used by workstations running NIS with Solaris 1x or 2x Release software. In other words, machines within an NIS+ domain can have their nsswitch.conf files set to nis rather than nisplus. To access NIS+ service on machines running NIS, you must run the NIS+ servers in NIS-compatibility mode.
NIS-compatibility mode enables an NIS+ server running Solaris 2.6 release to answer requests from NIS clients while continuing to answer requests from NIS+ clients. NIS+ does this by providing two service interfaces. One responds to NIS+ client requests, while the other responds to NIS client requests.
This mode does not require any additional setup or changes to NIS clients. In fact, NIS clients are not even aware that the server that is responding isn't an NIS server--except that an NIS+ server running in NIS-compatibility mode does not support the ypupdate and ypxfr protocols and thus it cannot be used as a replica or master NIS server. For more information on NIS-compatibility mode, see NIS+ Transition Guide.
Two more differences need to be pointed out. First, instructions for setting up a server in NIS-compatibility mode are slightly different than those used to set up a standard NIS+ server. For details, see Solaris Naming Setup and Configuration Guide. Second, NIS-compatibility mode has security implications for tables in the NIS+ namespace. Since the NIS client software does not have the capability to provide the credentials that NIS+ servers expect from NIS+ clients, all their requests end up classified as unauthenticated. Therefore, to allow NIS clients to access information in NIS+ tables, those tables must provide access rights to unauthenticated requests. This is handled automatically by the utilities used to set up a server in NIS-compatibility mode, as described in Part 2. However, to understand more about the authentication process and NIS-compatibility mode, see Chapter 6, Security Overview.
NIS+ Administration Commands
NIS+ provides a full set of commands for administering a namespace. Table 3-2, below, summarizes them.
Table 3-2 NIS+ Namespace Administration Commands|
Command |
Description |
|---|---|
|
nisaddcred |
Creates credentials for NIS+ principals and stores them in the cred table. |
|
nisaddent |
Adds information from /etc files or NIS maps into NIS+ tables. |
|
nisauthconf |
Optionally configure Diffie-Hellman key length. |
|
nisbackup |
Backs up NIS directories. |
|
nis_cachemgr |
Starts the NIS+ cache manager on an NIS+ client. |
|
niscat |
Displays the contents of NIS+ tables. |
|
nis_checkpoint |
Forces service to checkpoint data that has been entered in the log but not checkpointed to disk. |
|
nischgrp |
Changes the group owner of an NIS+ object. |
|
nischmod |
Changes an object's access rights. |
|
nischown |
Changes the owner of an NIS+ object. |
|
nischttl |
Changes an NIS+ object's time-to-live value. |
|
nisclient |
Initializes NIS+ principals. |
|
nisdefaults |
Lists an NIS+ object's default values: domain name, group name, workstation name, NIS+ principal name, access rights, directory search path, and time-to-live |
|
nisgrep |
Searches for entries in an NIS+ table. |
|
nisgrpadm |
Creates or destroys an NIS+ group, or displays a list of its members. Also adds members to a group, removes them, or tests them for membership in the group. |
|
nisinit |
Initializes an NIS+ client or server. |
|
nisln |
Creates a symbolic link between two NIS+ tables. |
|
nislog |
Displays the contents of NIS+ transaction log. |
|
nisls |
Lists the contents of an NIS+ directory. |
|
nismatch |
Searches for entries in an NIS+ table. |
|
nismkdir |
Creates an NIS+ directory and specifies its master and replica servers. |
|
nispasswd |
Changes password information stored in the NIS+ passwd table. (Rather than using nispasswd, you should use passwd or passwd -r nisplus.) |
|
nis_ping |
Forces a replica to update its data from the master server. |
|
nispopulate |
Populates the NIS+ tables in a new NIS+ domain. |
|
nisprefadm |
Specifies the order in which clients are to seek NIS+ information from NIS+ servers. |
|
nisrestore |
Restores previously backed up NIS+ directories and can also be used to quickly bring online new NIS+ replica servers. |
|
nisrm |
Removes NIS+ objects (except directories) from the namespace. |
|
nisrmdir |
Removes NIS+ directories and replicas from the namespace. |
|
nisserver |
Shell script used to set up a new NIS+ server. |
|
nissetup |
Creates org_dir and groups_dir directories and a complete set of (unpopulated) NIS+ tables for an NIS+ domain. |
|
nisshowcache |
Lists the contents of the NIS+ shared cache maintained by the NIS+ cache manager. |
|
nisstat |
Reports statistics and other information about an NIS+ server. |
|
nistbladm |
Creates or deletes NIS+ tables, and adds, modifies or deletes entries in an NIS+ table. |
|
nistest |
Reports the current state of the NIS+ namespace. |
|
nisupdkeys |
Updates the public keys stored in an NIS+ object. |
|
passwd |
Changes password information stored in the NIS+ Passwd table. Also administers password aging and other password-related parameters. |
NIS+ API
The NIS+ application programmer's interface (API) is a group of functions that can be called by an application to access and modify NIS+ objects. The NIS+ API has 54 functions that fall into nine categories:
-
Object manipulation functions (nis_names())
-
Table access functions (nis_tables())
-
Local name functions (nis_local_names())
-
Group manipulation functions (nis_groups())
-
Application subroutine functions (nis_subr())
-
Miscellaneous functions (nis_misc())
-
Database access functions (nis_db())
-
Error message display functions (nis_error())
-
Transaction log functions (nis_admin())
Chapter 4 The NIS+ Namespace
This chapter describes the structure of the NIS+ namespace, the servers that support it, and the clients that use it.
NIS+ Files and Directories
Table 4-1 lists the UNIX directories used to store NIS+ files.
Table 4-1 Where NIS+ Files are Stored|
Directory |
Where |
Contains |
|---|---|---|
|
/usr/bin |
All machines |
NIS+ user commands |
|
/usr/lib/nis |
All machines |
NIS+ administrator commands |
|
/usr/sbin |
All machines |
NIS+ daemons |
|
/usr/lib/ |
All machines |
NIS+ shared libraries |
|
/var/nis/data |
NIS+ server |
Data files used by NIS+ server |
|
/var/nis |
NIS+ server |
NIS+ working files |
|
/var/nis |
NIS+ client machines |
Machine-specific data files used by NIS+ |
Do not rename the /var/nis or /var/nis/data directories or any of the files in these directories that were created by nisinit or any of the other NIS+ setup procedures. In Solaris Release 2.4 and earlier versions, the /var/nis directory contained two files named hostname.dict and hostname.log. It also contained a subdirectory named /var/nis/hostname. Starting with Solaris Release 2.5, the two files were named trans.log and data.dict, and the subdirectory was named /var/nis/data. The content of the files was also changed and they are not backward compatible with Solaris Release 2.4 or earlier. Thus, if you rename either the directories or the files to match the Solaris Release 2.4 patterns, the files will not work with either the Solaris 2.4 Release or the current version of rpc.nisd. Therefore, you should not rename either the directories or the files.
Note -
With the Solaris 2.6 release, the NIS+ data dictionary (/var/nis/data.dict) is now machine independent. This allows you to easily change the name of an NIS+ server. You can also now use the NIS+ backup and restore capabilities to transfer NIS+ data from one server to another. See .
Structure of the NIS+ Namespace
The NIS+ namespace is the arrangement of information stored by NIS+. The namespace can be arranged in a variety of ways to suit the needs of an organization. For example, if an organization had three divisions, its NIS+ namespace would likely be divided into three parts, one for each division. Each part would store information about the users, workstations, and network services in its division, but the parts could easily communicate with each other. Such an arrangement would make information easier for the users to access and for the administrators to maintain.
Although the arrangement of an NIS+ namespace can vary from site to site, all sites use the same structural components: directories, tables, and groups. These components are called NIS+ objects. NIS+ objects can be arranged into a hierarchy that resembles a UNIX file system. For example, the illustration below shows, on the left, a namespace that consists of three directory objects, three group objects, and three table objects; on the right it shows a UNIX file system that consists of three directories and three files:
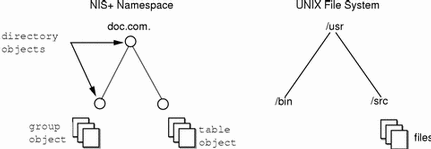
Although an NIS+ namespace resembles a UNIX file system, it has five important differences:
-
Although both use directories, the other objects in an NIS+ namespace are tables and groups, not files.
-
The NIS+ namespace is administered only through NIS+ administration commands or graphical user interfaces designed for that purpose, such as the Solstice AdminSuite tools; it cannot be administered with standard UNIX file system commands or GUIs.
-
The names of UNIX file system components are separated by slashes (/usr/bin), but the names of NIS+ namespace objects are separated by dots (doc.com.).
-
The "root" of a UNIX file system is reached by stepping through directories from right to left (/usr/src/file1), while the root of the NIS+ namespace is reached by stepping from left to right (sales.doc.com.).
-
Because NIS+ object names are structured from left to right, a fully qualified name always ends in a dot. Any NIS+ object ending in a dot is assumed to be a fully qualified name. NIS+ object names that do not end in a dot are assumed to be relative names.
Directories
Directory objects are the skeleton of the namespace. When arranged into a tree- like structure, they divide the namespace into separate parts. You may want to visualize a directory hierarchy as an upside-down tree, with the root of the tree at the top and the leaves toward the bottom. The topmost directory in a namespace is the root directory. If a namespace is flat, it has only one directory, but that directory is nevertheless the root directory. The directory objects beneath the root directory are simply called "directories":

A namespace can have several levels of directories:

When identifying the relation of one directory to another, the directory beneath is called the child directory and the directory above is called the parent directory.
Whereas UNIX directories are designed to hold UNIX files, NIS+ directories are designed to hold NIS+ objects: other directories, tables and groups. Each NIS+ domain-level directory contains the following sub-directories:
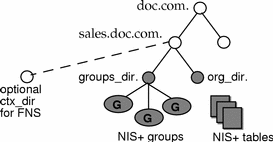
Technically, you can arrange directories, tables, and groups into any structure that you like. However, NIS+ directories, tables, and groups in a namespace are normally arranged into configurations called domains. Domains are designed to support separate portions of the namespace. For instance, one domain may support the Sales Division of a company, while another may support the Manufacturing Division.
Domains
An NIS+ domain consists of a directory object, its org_dir directory, its groups_dir directory, and a set of NIS+ tables.
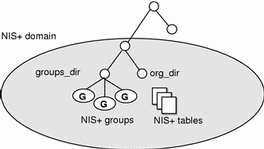
NIS+ domains are not tangible components of the namespace. They are simply a convenient way to refer to sections of the namespace that are used to support real-world organizations.
For example, suppose the DOC company has Sales and Manufacturing divisions. To support those divisions, its NIS+ namespace would most likely be arranged into three major directory groups, with a structure that looked like this:
Figure 4-1 Example NIS+ Directory Structure
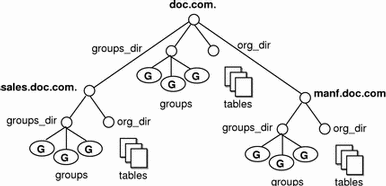
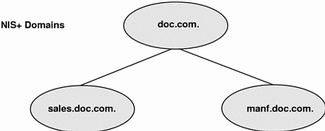
Instead of referring to such a structure as three directories, six subdirectories, and several additional objects, referring to it as three NIS+ domains is more convenient:
Figure 4-2 Example NIS+ Domains
Servers
Every NIS+ domain is supported by a set of NIS+ servers. The servers store the domain's directories, groups, and tables, and answer requests for access from users, administrators, and applications. Each domain is supported by only one set of servers. However, a single set of servers can support more than one domain:

Remember that a domain is not an object but only refers to a collection of objects. Therefore, a server that supports a domain is not actually associated with the domain, but with the domain's main directory:
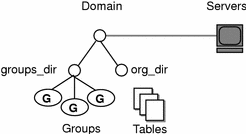
This connection between the server and the directory object is established during the process of setting up a domain. Although instructions are provided in Part 2, one thing is important to mention now: when that connection is established, the directory object stores the name and IP address of its server. This information is used by clients to send requests for service, as described later in this section.
Any Solaris 2.6 release based workstation can be an NIS+ server. The software for both NIS+ servers and clients is bundled together into the release. Therefore, any workstation that has the Solaris Release 2 software installed can become a server or a client, or both. What distinguishes a client from a server is the role it is playing. If a workstation is providing NIS+ service, it is acting as an NIS+ server. If it is requesting NIS+ service, it is acting as an NIS+ client.
Because of the need to service many client requests, a workstation that will act as an NIS+ server might be configured with more computing power and more memory than the average client. And, because it needs to store NIS+ data, it might also have a larger disk. However, other than hardware to improve its performance, a server is not inherently different from an NIS+ client.
Two types of servers support an NIS+ domain: a master and its replicas:

The master server of the root domain is called the root master server. A namespace has only one root master server. The master servers of other domains are simply called master servers. Likewise, there are root replica servers and regular replica servers.
Both master and replica servers store NIS+ tables and answer client requests. The master, however, stores the master copy of a domain's tables. The replicas store only duplicates. The administrator loads information into the tables in the master server, and the master server propagates it to the replica servers.
This arrangement has two benefits. First, it avoids conflicts between tables because only one set of master tables exists; the tables stored by the replicas are only copies of the masters. Second, it makes the NIS+ service much more available. If either the master or a replica is down, another server can act as a backup and handle the requests for service.
How Servers Propagate Changes
An NIS+ master server implements updates to its objects immediately; however, it tries to "batch" several updates together before it propagates them to its replicas. When a master server receives an update to an object, whether a directory, group, link, or table, it waits about two minutes for any other updates that may arrive. Once it is finished waiting, it stores the updates in two locations: on disk and in a transaction log (it has already stored the updates in memory).
The transaction log is used by a master server to store changes to the namespace until they can be propagated to replicas. A transaction log has two primary components: updates and time stamps.

An update is an actual copy of a changed object. For instance, if a directory has been changed, the update is a complete copy of the directory object. If a table entry has been changed, the update is a copy of the actual table entry. The time stamp indicates the time at which an update was made by the master server.
After recording the change in the transaction log, the master sends a message to its replicas, telling them that it has updates to send them. Each replica replies with the time stamp of the last update it received from the master. The master then sends each replica the updates it has recorded in the log since the replica's time stamp:
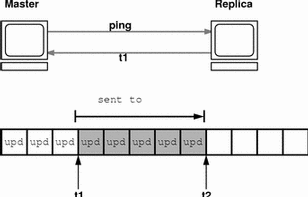
When the master server updates all its replicas, it clears the transaction log. In some cases, such as when a new replica is added to a domain, the master receives a time stamp from a replica that is before its earliest time stamp still recorded in the transaction log. If that happens, the master server performs a full resynchronization, or resync. A resync downloads all the objects and information stored in the master down to the replica. During a resync, both the master and replica are busy. The replica cannot answer requests for information; the master can answer read requests but cannot accept update requests. Both respond to requests with a Server Busy - Try Again or similar message.
NIS+ Clients and Principals
NIS+ principals are the entities (clients) that submit requests for NIS+ services.
Principal
An NIS+ principal may be someone who is logged in to a client machine as a regular user or someone who is logged in as superuser (root). In the first instance, the request actually comes from the client user; in the second instance, the request comes from the client workstation. Therefore, an NIS+ principal can be a client user or a client workstation.
(An NIS+ principal can also be the entity that supplies an NIS+ service from an NIS+ server. Since all NIS+ servers are also NIS+ clients, much of this discussion also applies to servers.)
Client
An NIS+ client is a workstation that has been set up to receive NIS+ service. Setting up an NIS+ client consists of establishing security credentials, making it a member of the proper NIS+ groups, verifying its home domain, verifying its switch configuration file and, finally, running the NIS+ initialization script. (Complete instructions are provided in Part 2.)
An NIS+ client can access any part of the namespace, subject to security constraints. In other words, if it has been authenticated and has been granted the proper permissions, it can access information or objects in any domain in the namespace.
Although a client can access the entire namespace, a client belongs to only one domain, which is referred to as its home domain. A client's home domain is usually specified during installation, but it can be changed or specified later. All the information about a client, such as its IP address and its credentials, is stored in the NIS+ tables of its home domain.
There is a subtle difference between being an NIS+ client and being listed in an NIS+ table. Entering information about a workstation into an NIS+ table does not automatically make that workstation an NIS+ client. It simply makes information about that workstation available to all NIS+ clients. That workstation cannot request NIS+ service unless it is actually set up as an NIS+ client.
Conversely, making a workstation an NIS+ client does not enter information about that workstation into an NIS+ table. It simply allows that workstation to receive NIS+ service. If information about that workstation is not explicitly entered into the NIS+ tables by an administrator, other NIS+ clients will not be able to get it.
When a client requests access to the namespace, it is actually requesting access to a particular domain in the namespace. Therefore, it sends its request to the server that supports the domain it is trying to access. Here is a simplified representation:


How does the client know which server that is? By trial and error. Beginning with its home server, the client tries first one server, then another, until it finds the right one. When a server cannot answer the client's request, it sends the client information to help locate the right server. Over time, the client builds up its own cache of information and becomes more efficient at locating the right server. The next section describes this process.
The Cold-Start File and Directory Cache
When a client is initialized, it is given a cold-start file. The cold-start file gives a client a copy of a directory object that it can use as a starting point for contacting servers in the namespace. The directory object contains the address, public keys, and other information about the master and replica servers that support the directory. Normally, the cold-start file contains the directory object of the client's home domain.
A cold-start file is used only to initialize a client's directory cache. The directory cache, managed by an NIS+ facility called the cache manager, stores the directory objects that enable a client to send its requests to the proper servers.
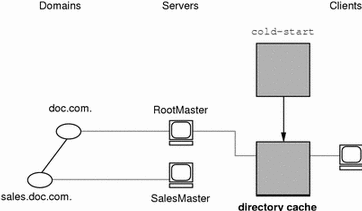
By storing a copy of the namespace's directory objects in its directory cache, a client can know which servers support which domains. (To view the contents of a client's cache, use the nisshowcache command, described in "The nisshowcache Command ".) Here is a simplified example:
|
Domain Name and Directory Name are the same |
Supporting Server |
IP Address |
|---|---|---|
|
doc.com. |
rootmaster |
123.45.6.77 |
|
sales.doc.com. |
salesmaster |
123.45.6.66 |
|
manf.doc.com. |
manfmaster |
123.45.6.37 |
|
int.sales.doc.com. |
Intlsalesmaster |
111.22.3.7 |
To keep these copies up-to-date, each directory object has a time-to-live (TTL) field. Its default value is 12 hours. If a client looks in its directory cache for a directory object and finds that it has not been updated in the last 12 hours, the cache manager obtains a new copy of the object. You can change a directory object's time-to-live value with the nischttl command, as described in "The nischttl Command". However, keep in mind that the longer the time-to-live, the higher the likelihood that the copy of the object will be out of date; and the shorter the time to live, the greater the network traffic and server load.
How does the directory cache accumulate these directory objects? As mentioned above, the cold-start file provides the first entry in the cache. Therefore, when the client sends its first request, the request goes to the server specified by the cold-start file. If the request is for access to the domain supported by that server, the server answers the request.
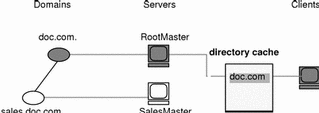
If the request is for access to another domain (for example, sales.doc.com.), the server tries to help the client locate the proper server. If the server has an entry for that domain in its own directory cache, it sends a copy of the domain's directory object to the client. The client loads that information into its directory cache for future reference and sends its request to that server.
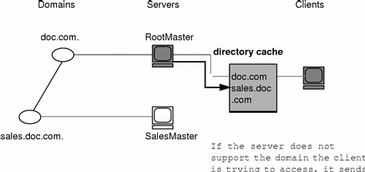

In the unlikely event that the server does not have a copy of the directory object the client is trying to access, it sends the client a copy of the directory object for its own home domain, which lists the address of the server's parent. The client repeats the process with the parent server, and keeps trying until it finds the proper server or until it has tried all the servers in the namespace. What the client does after trying all the servers in the domain is determined by the instructions in its name service switch configuration file. See Chapter 2, The Name Service Switch
Over time, the client accumulates in its cache a copy of all the directory objects in the namespace and thus the IP addresses of the servers that support them. When it needs to send a request for access to another domain, it can usually find the name of its server in its directory cache and send the request directly to that server.
An NIS+ Server Is Also a Client
An NIS+ server is also an NIS+ client. In fact, before you can set up a workstation as a server (as described in Part 2), you must initialize it as a client. The only exception is the root master server, which has its own unique setup process.
This means that in addition to supporting a domain, a server also belongs to a domain. In other words, by virtue of being a client, a server has a home domain. Its host information is stored in the Hosts table of its home domain, and its DES credentials are stored in the cred table of its home domain. Like other clients, it sends its requests for service to the servers listed in its directory cache.
An important point to remember is that--except for the root domain--a server's home domain is the parent of the domain the server supports:
In other words, a server supports clients in one domain, but is a client of another domain. A server cannot be a client of a domain that it supports, with the exception of the root domain. Because they have no parent domain, the servers that support the root domain belong to the root domain itself.
For example, consider the following namespace:

The chart lists which domain each server supports and which domain it belongs to:
|
Server |
Supports |
Belongs to |
|---|---|---|
|
RootMaster |
doc.com. |
doc.com. |
|
SalesMaster |
sales.doc.com. |
doc.com. |
|
IntlSalesMaster |
intl.sales.doc.com. |
sales.doc.com. |
|
ManfMaster |
manf.doc.com. |
doc.com. |
Naming Conventions
Objects in an NIS+ namespace can be identified with two types of names: partially-qualified and fully qualified. A partially qualified name, also called a simple name, is simply the name of the object or any portion of the fully qualified name. If during any administration operation you type the partially qualified name of an object or principal, NIS+ will attempt to expand the name into its fully qualified version. For details, see "NIS+ Name Expansion".
A fully qualified name is the complete name of the object, including all the information necessary to locate it in the namespace, such as its parent directory, if it has one, and its complete domain name, including a trailing dot.
This varies among different types of objects, so the conventions for each type, as well as for NIS+ principals, is described separately. This namespace will be used as an example:
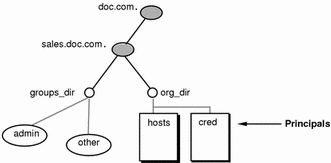
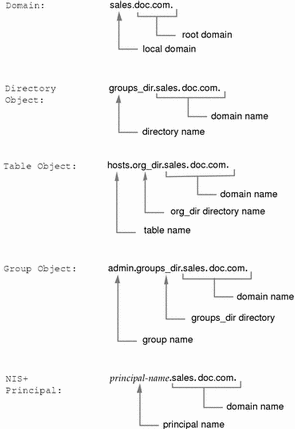
The fully qualified names for all the objects in this namespace, including NIS+ principals, are summarized in Figure 4-3.
Figure 4-3 Fully qualified Names of Namespace Components
NIS+ Domain Names
A fully qualified NIS+ domain name is formed from left to right, starting with the local domain and ending with the root domain:
doc.com. (root domain)
sales.doc.com. (subdomain)
intl.sales.doc.com. (a third level subdomain)
The first line above shows the name of the root domain. The root domain must always have at least two elements (labels) and must end in a dot. The last (right most) label may be anything you want, but in order to maintain Internet compatibility, the last element must be either an Internet organizational name (as shown in Table 4-2), or a two or three character geographic identifier such as .jp. for Japan.
Table 4-2 Internet Organizational Domains|
Domain |
Purpose |
|---|---|
|
com |
Commercial organizations |
|
edu |
Educational institutions |
|
gov |
Government institutions |
|
mil |
Military groups |
|
net |
Major network support centers |
|
org |
Nonprofit organizations and others |
|
int |
International organizations |
The second and third lines above show the names of lower-level domains.
Directory Object Names
A directory's simple name is simply the name of the directory object. Its fully qualified name consists of its simple name plus the fully qualified name of its domain (which always includes a trailing dot):
groups_dir (simple name)
groups_dir.manf.doc.com. (fully qualified name)
If you set up an unusual hierarchy in which several layers of directories do not form a domain, be sure to include the names of the intermediate directories. For example:
lowest_dir.lower_dir.low_dir.mydomain.com.
The simple name is normally used from within the same domain, and the fully qualified name is normally used from a remote domain. However, by specifying search paths in a domain's NIS_PATH environment variable, you can use the simple name from remote domains (see "NIS+ Name Expansion").
Tables and Group Names
Fully qualified table and group names are formed by starting with the object name and appending the directory name, followed by the fully qualified domain name. Remember that all system table objects are stored in an org_dir directory and all group objects are stored in a groups_dir directory. (If you create your own NIS+ tables, you can store them anywhere you like.) Here are some examples of group and table names:
admin.groups_dir.doc.com. admin.groups_dir.doc.com. admin.groups_dir.sales.doc.com. admin.groups_dir.sales.doc.com. hosts.org_dir.doc.com. hosts.org_dir.doc.com. hosts.org_dir.sales.doc.com. hosts.org_dir.sales.doc.com. |
Table Entry Names
To identify an entry in an NIS+ table, you need to identify the table object and the entry within it. This type of name is called an indexed name. It has the following syntax:
[column=value,column=value,...],tablename |
Column is the name of the table column. Value is the actual value of that column. Tablename is the fully qualified name of the table object. Here are a few examples of entries in the hosts table:
[addr=129.44.2.1,name=pine],hosts.org_dir.sales.doc.com. [addr=129.44.2.2,name=elm],hosts.org_dir.sales.doc.com. [addr=129.44.2.3,name=oak],hosts.org_dir.sales.doc.com. |
You can use as few column-value pairs inside the brackets as required to uniquely identify the table entry.
Some NIS+ administrative commands accept variations on this syntax. For details, see the nistbladm, nismatch, and nisgrep commands in Part 2.
Host Names
Host names may contain up to 24 characters. Letters, numbers, the dash (-) and underscore (_) characters are allowed in host names. Host names are not case sensitive (that is, upper and lower case letters are treated as the same). The first character of a host name must be a letter of the alphabet. Blank spaces are not permitted in host names.
Note -
Dots (.) are not permitted in host names. For example, a host name such as myco.2 is not permitted. Dots are not allowed in host names even if they are enclosed in quotes. For example, `myco.2' is not permitted. Dots are only used as part of a fully qualified host name to identify the domain components. For example, myco-2.sales.doc.com is a correct fully qualified host name.
Domains and hosts should not have the same name. For example, if you have a sales domain you should not have a machine named sales. Similarly, if you have a machine named home, you do not want to create a domain named home. This caution applies to subdomains, for example if you have a machine named west you don't want to create a sales.west.myco.com subdomain.
NIS+ Principal Names
NIS+ principal names are sometimes confused with Secure RPC netnames. Both types of names are described in the security chapters of Part--2. However, one difference is worth pointing out now because it can cause confusion: NIS+ principal names always end in a dot and Secure RPC netnames never do:
Table 4-3 NIS+ Principal Names|
olivia.sales.doc.com. |
NIS+ principal name |
|
unix.olivia@sales.doc.com |
Secure RPC netname |
Also, even though credentials for principals are stored in a cred table, neither the name of the cred table nor the name of the org_dir directory is included in the principal name.
Accepted Name Symbols
You can form namespace names from any printable character in the ISO Latin 1 set. However, the names cannot start with these characters: @ < > + [ ] - / = . , : ;
To use a string, enclose it in double quotes. To use a quote sign in the name, quote the sign too (for example, to use o'henry, type o"'"henry). To include white space (as in John Smith), use double quotes within single quotes, like this:
`"John Smith"`
See "Host Names" for restrictions that apply to host names.
NIS+ Name Expansion
Entering fully qualified names with your NIS+ commands can quickly become tedious. To ease the task, NIS+ provides a name-expansion facility. When you enter a partially qualified name, NIS+ attempts to find the object by looking for it under different directories. It starts by looking in the default domain. This is the home domain of the client from which you type the command. If it does not find the object in the default domain, NIS+ searches through each of the default domain's parent directories in ascending order until it finds the object. It stops after reaching a name with only two labels. Here are some examples (assume you are logged onto a client that belongs to the software.big.sales.doc.com. domain).

NIS_PATH Environment Variable
You can change or augment the list of directories NIS+ searches through by changing the value of the environment variable NIS_PATH. NIS_PATH accepts a list of directory names separated by colons:
setenv NIS_PATH directory1: directory2: directory3 ... |
or
NIS_PATH=directory1: directory2: directory3 ...;export NIS_PATH |
NIS+ searches through these directories from left to right. For example:
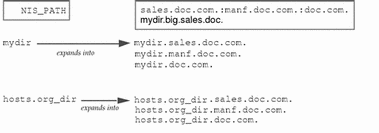
Like $PATH and $MANPATH, the NIS_PATH variable accepts the special symbol, $. You can append the $ symbol to a directory name or add it by itself. If you append it to a directory name, NIS+ appends the default directory to that name. For example:
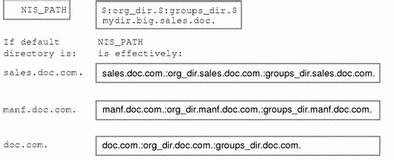
If you use the $ sign by itself (for example, org_dir.$:$), NIS+ performs the standard name expansion described earlier: it starts looking in the default directory and proceeds through the parent directories. In other words, the default value of NIS_PATH is $,
Note -
Keep in mind that additions and changes to your NIS_PATH may increase the number of lookups that NIS+ has to perform and thus slow down performance.
Chapter 5 NIS+ Tables and Information
This chapter describes the structure of NIS+ tables and provides a brief overview of how they can be set up.
NIS+ Table Structure
NIS+ stores a wide variety of network information in tables. NIS+ tables provide several features not found in simple text files or maps. They have a column-entry structure, they accept search paths, they can be linked together, and they can be set up in several different ways. NIS+ provides 16 preconfigured system tables, and you can also create your own tables. Table 5-1 lists the preconfigured NIS+ tables.
Table 5-1 NIS+ Tables|
Table |
Information in the Table |
|---|---|
|
hosts |
Network address and host name of every workstation in the domain |
|
bootparams |
Location of the root, swap, and dump partition of every diskless client in the domain |
|
passwd |
Password information about every user in the domain. |
|
cred |
Credentials for principals who belong to the domain |
|
group |
The group name, group password, group ID, and members of every UNIX group in the domain |
|
netgroup |
The netgroups to which workstations and users in the domain may belong |
|
mail_aliases |
Information about the mail aliases of users in the domain |
|
timezone |
The time zone of every workstation in the domain |
|
networks |
The networks in the domain and their canonical names |
|
netmasks |
The networks in the domain and their associated netmasks |
|
ethers |
The Ethernet address of every workstation in the domain |
|
services |
The names of IP services used in the domain and their port numbers |
|
protocols |
The list of IP protocols used in the domain |
|
RPC |
The RPC program numbers for RPC services available in the domain |
|
auto_home |
The location of all user's home directories in the domain |
|
auto_master |
Automounter map information |
Because it contains only information related to NIS+ security, the Cred table, is described in Chapter 7, Administering NIS+ Credentials.
These tables store a wide variety of information, ranging from user names to Internet services. Most of this information is generated during a setup or configuration procedure. For instance, an entry in the passwd table is created when a user account is set up. An entry in the hosts table is created when a workstation is added to the network. And an entry in the networks table is created when a new network is set up.
Since this information is generated from such a wide field of operations, much of it is beyond the scope of this manual. However, as a convenience, Appendix C, Information in NIS+ Tables, summarizes the information contained in each column of the tables, providing details only when necessary to keep things from getting confusing, such as when distinguishing groups from NIS+ groups and netgroups. For thorough explanations of the information, consult Solaris system and network administration manuals.
Note -
You can create more automounter maps for a domain, but be sure to store them as NIS+ tables and list them in the auto_master table. When creating additional automount maps to supplement auto_master (which is created for you), the column names must key and value. For more information about the automounter consult books about the automounter or books that describe the NFS file system.
Note -
As a naming service, NIS+ tables are designed to store references to objects, not the objects themselves. For this reason, NIS+ does not support tables with large entries. If a table contains excessively large entries, rpc.nisd may fail.
Columns and Entries
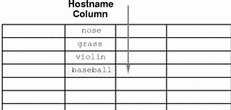
Although NIS+ tables store different types of information, they all have the same underlying structure; they are each made up of rows and columns (the rows are called "entries" or "entry objects"):
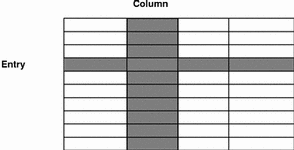
A client can access information by a key, or by any column that is searchable. For example, to find the network address of a workstation named baseball, a client could look through the hostname column until it found baseball.
It then would move along the baseball entry to find its network address:
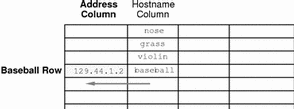
Because a client can access table information at any level, NIS+ provides security mechanisms for all three levels. For instance, an administrator could assign read rights to everyone for a table at the object level, modify rights to the owner at the column level, and modify rights to the group at the entry level. Details about table security are provided in Chapter 10, Administering NIS+ Access Rights.
Search Paths
A table contains information only about its local domain. For instance, tables in the doc.com. domain contain information only about the users, clients, and services of the doc.com. domain. The tables in the sales.doc.com. domain store information only about the users, clients, and services of the sales.doc.com. domain. And so on.
If a client in one domain tries to find information that is stored in another domain, it has to provide a fully qualified name. As described in "NIS+ Name Expansion" if the NIS_PATH environment variable is set up properly, the NIS+ service will do this automatically.
Every NIS+ table can also specify a search path that a server will follow when looking for information. The search path is an ordered list of NIS+ tables, separated by colons:
table:table:table... |
The table names in the search path don't have to be fully qualified; they can be expanded just like names entered at the command line. When a server cannot find information in its local table, it returns the table's search path to the client. The client uses that path to look for the information in every table named in the search path, in order, until it finds the information or runs out of names.
Here is an example that demonstrates the benefit of search paths. Assume the following domain hierarchy:

The hosts tables of the lower two domains have the following contents:
Table 5-2 Example Hosts Table|
sales.doc.com. |
manf.doc.com. |
||
|---|---|---|---|
|
127.0.0.1 |
localhost |
127.0.0.1 |
localhost |
|
111.22.3.22 |
luna |
123.45.6.1 |
sirius |
|
111.22.3.24 |
phoebus |
123.45.6.112 |
rigel |
|
111.22.3.25 |
europa |
123.45.6.90 |
antares |
|
111.22.3.27 |
ganymede |
123.45.6.101 |
polaris |
|
111.22.3.28 |
mailhost |
123.45.6.79 |
mailhost |
Assume now that a user logged onto the luna machine in the sales.doc.com. domain wants to log in remotely to another client. Without providing a fully qualified name, that user can only remotely log on to five workstations: localhost, phoebus, europa, ganymede, and the mailhost.
Now assume that the search path of the hosts table in the sales.doc.com. domain listed the hosts table from the manf.doc.com. domain:
hosts.org_dir.manf.doc.com. |
Now a user in the sales.doc.com. domain can enter something like rlogin sirius, and the NIS+ server will find it. It will first look for sirius in the local domain, but when it does not find a match, it will look in the manf.doc.com. domain. How does the client know how to find the manf.doc.com. domain? As described in Chapter 4, The NIS+ Namespace, the information is stored in its directory cache. If it is not stored in its directory cache, the client will obtain the information by following the process described in Chapter 4, The NIS+ Namespace.
There is a slight drawback, though, to specifying a search path. If the user were to enter an incorrect name, such as rlogin luba (rather than "luna"), the server would need to look through three tables--instead of just one--before returning an error message. If you set up search paths throughout the namespace, an operation may end up searching through the tables in 10 domains instead of just 2 or 3. Another drawback is a performance loss from having many clients contact more than one set of servers when they need to access NIS+ tables.
You should also be aware that since "mailhost" is often used as an alias, when trying to find information about a specific mailhost, you should use its fully qualified name (for example, mailhost.sales.doc.com.), or NIS+ will return all the mailhosts it finds in all the domains it searches through.
You can specify a table's search path by using the -p option to the nistbladm command, as described in "The nistbladm Command ".
Ways to Set Up Tables
Setting up NIS+ tables involves three or four tasks:
-
Creating the org_dir directory
-
Creating the system tables
-
Creating non-system tables (optional)
-
Populating the tables with information
As described in Chapter 4, The NIS+ Namespace, NIS+ system tables are stored under an org_dir directory. So, before you can create any tables, you must create the org_dir directory that will hold them. You can do this in three ways.
-
Use the nisserver script. The nisserver script creates the appropriate directories and a full set of system tables. Running the nisserver script is the recommended method.
-
Use the nismkdir command. The nismkdir command simply creates the directory.
-
Use the /usr/lib/nis/nissetup utility. The nissetup utility creates the org_dir and groups_dir directories and a full set of system tables.
The nisserver script and the nissetup and nismkdir utilities are described in Solaris Naming Setup and Configuration Guide. Additional information on the nismkdir command can be found in "The nismkdir Command ".
A benefit of the nissetup utility is its capability to assign the proper access rights to the tables of a domain whose servers are running in NIS-compatibility mode. When entered with the -Y flag, it assigns read permissions to the nobody class of the objects it creates, allowing NIS clients, who are unauthenticated, to get information from the domain's NIS+ tables.
The 16 NIS+ system tables and the type of information they store are described in Appendix C, Information in NIS+ Tables. To create them, you could use one of the three ways mentioned above. The nistbladm utility also creates and modifies NIS+ tables. You could conceivably create all the tables in a namespace with the nistbladm command, but you would have to type much more and you would have to know the correct column names and access rights. A much easier way is to use the nisserver script.
To create a non-system table--that is, a table that has not been preconfigured by NIS+--use the nistbladm command. (Note that if you are creating additional automount maps, the first column must be named key and the second column named value.)
You can populate NIS+ tables in three ways: from NIS maps, from ASCII files (such as /etc files), and manually.
If you are upgrading from the NIS service, you already have most of your network information stored in NIS maps. You don't have to re-enter this information manually into NIS+ tables. You can transfer it automatically with the nispopulate script or the nisaddent utility.
If you are not using another network information service, but maintain network data in a set of /etc files, you don't have to re-enter this information, either. You can transfer it automatically, also using the nispopulate script or the nisaddent utility.
If you are setting up a network for the first time, you may not have much network information stored anywhere. In that case, you'll need to first get the information and then enter it manually into the NIS+ tables. You can do this with the nistbladm command. You can also do it by entering all the information for a particular table into an input file--which is essentially the same as an /etc file--and then transferring the contents of the file with the nispopulate script or the nisaddent utility.
How Tables Are Updated
When a domain is set up, its servers receive their first versions of the domain's NIS+ tables. These versions are stored on disk, but when a server begins operating, it loads them into memory. When a server receives an update to a table, it immediately updates its memory-based version of the table. When it receives a request for information, it uses the memory-based copy for its reply.
Of course, the server also needs to store its updates on disk. Since updating disk-based tables takes time, all NIS+ servers keep log files for their tables. The log files are designed to temporarily store changes made to the table, until they can be updated on disk. They use the table name as the prefix and append .log. For example:
hosts.org_dir.log bootparams.org_dir.log password.org_dir.log |
You should update disk-based copies of a table on a daily basis so that the log files don't grow too large and take up too much disk space. This process is called checkpointing. To do this, use the nisping -C command.
Chapter 6 Security Overview
This chapter describes the NIS+ security system and how it affects the entire NIS+ namespace.
Solaris Security--Overview
In essence, Solaris security is provided by gates that users must pass through in order to enter the Solaris environment, and permission matrixes that determine what they are able to do once inside. (See Figure 6-1 for a schematic representation of this system.)
Figure 6-1 Solaris Security Gates and Filters
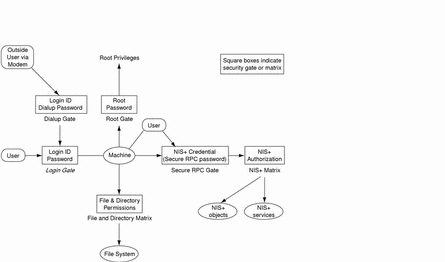
As you can see in Figure 6-1, the overall system is composed of four gates and two permission matrixes:
-
Dialup gate. To access a given Solaris environment from the outside through a modem and phone line, you must provide a valid Login ID and Dialup password.
-
Login gate. To enter a given Solaris environment you must provide a valid login ID and user password.
-
File and Directory Matrix. Once you have gained access to a Solaris environment, your ability to read, execute, modify, create, and destroy files and directories is governed by the applicable permissions matrix.
-
Root gate. To gain access to root privileges, you must provide a valid super user (root) password.
-
Secure RPC gate. In an NIS+ environment running at security level 2 (the default), when you try to use NIS+ services and gain access to NIS+ objects (servers, directories, tables, table entries, and so forth.) your identity is confirmed by NIS+ using the Secure RPC process.
Consult your Solaris documentation for detailed descriptions of the Dialup, Login, and Root gates, and the File and Directory permissions matrix.
To enter the Secure RPC gate requires presentation of a Secure RPC password. (In some contexts Secure RPC passwords have been referred to as network passwords.) Your Secure RPC password and your login password normally are identical and when that is the case you are passed through the gate automatically without having to re-enter your password. (See "Secure RPC Password versus Login Password Problem" for information regarding cases where the two passwords are not the same.)
A set of credentials are used to automatically pass your requests through the Secure RPC gate. The process of generating, presenting, and validating your credentials is called authentication because it confirms who you are and that you have a valid Secure RPC password. This authentication process is automatically performed every time you request an NIS+ service.
In an NIS+ environment running in NIS-compatibility mode (also known as YP-compatibility mode), the protection provided by the Secure RPC gate is significantly weakened because everyone has read rights for all NIS+ objects and modify rights for those entries that apply to them regardless of whether or not they have a valid credential (that is, regardless of whether or not the authentication process has confirmed their identity and validated their Secure RPC password). Since that allows anyone to have read rights for all NIS+ objects and modify rights for those entries that apply to them, an NIS+ network running in compatibility mode is less secure than one running in normal mode.
For details on how to create and administer NIS+ authentication and credentials, see Chapter 7, Administering NIS+ Credentials.
-
NIS+ objects matrix. Once you have been properly authenticated to NIS+ your ability to read, modify, create, and destroy NIS+ objects is governed by the applicable permissions matrix. This process is called NIS+ authorization.
For details NIS+ permissions and authorization, see Chapter 10, Administering NIS+ Access Rights.
NIS+ Security--Overview
NIS+ security is an integral part of the NIS+ namespace. You cannot set up security and the namespace independently. For this reason, instructions for setting up security are woven through the steps used to set up the other components of the namespace. Once an NIS+ security environment has been set up, you can add and remove users, change permissions, reassign group members, and all other routine administrative tasks needed to manage an evolving network.
The security features of NIS+ protect the information in the namespace, as well as the structure of the namespace itself, from unauthorized access. Without these security features, any NIS+ client could obtain and change information stored in the namespace or even damage it.
NIS+ security does two things:
-
Authentication. Authentication is used to identify NIS+ principals. Every time a principal (user or machine) tries to access an NIS+ object, the user's identity and Secure RPC password is confirmed and validated.
-
Authorization. Authorization is used to specify access rights. Every time NIS+ principals try to access NIS+ objects, they are placed in one of four authorization classes (owner, group, world, nobody). The NIS+ security system allows NIS+ administrators to specify different read, modify, create, or destroy rights to NIS+ objects for each class. Thus, for example, a given class could be permitted to modify a particular column in the passwd table but not read that column, or a different class could be allowed to read some entries of a table but not others.
In essence, then, NIS+ security is a two-step process:
-
Authentication. NIS+ uses credentials to confirm that you are who you claim to be.
-
Authorization. Once your identity is established by the authentication process, NIS+ determines your class. What you can do with a given NIS+ object or service depends on which class you belong to. This is similar in concept to the standard UNIX file and directory permissions system. (See "Authorization Classes" for more information on classes.)
This process, for example, prevents someone with root privileges on machine A from using the su command to assume the identity of a second user and then accessing NIS+ objects with the second user's NIS+ access privileges.
Note, however, that NIS+ cannot prevent someone who knows another user's login password from assuming that other user's identity and NIS+ access privileges. Nor can NIS+ prevent a user with root privileges from assuming the identity of another user who is logged in from the same machine.
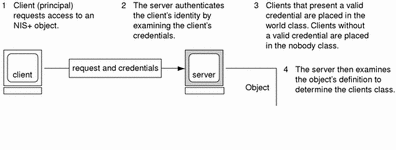
Figure 6-2 details this process:
Figure 6-2 Summary of the NIS+ Security Process
NIS+ Principals
NIS+ principals are the entities (clients) that submit requests for NIS+ services. An NIS+ principal may be someone who is logged in to a client machine as a regular user, someone who is logged in as superuser, or any process that runs with superuser permission on an NIS+ client machine. Thus, an NIS+ principal can be a client user or a client workstation.
An NIS+ principal can also be the entity that supplies an NIS+ service from an NIS+ server. Since all NIS+ servers are also NIS+ clients, much of this discussion also applies to servers.
NIS+ Security Levels
NIS+ servers operate at one of two security levels. These levels determine the type of credential principals that must submit for their requests to be authenticated. NIS+ is designed to run at the most secure level, which is security level 2. Level 0 is provided only for testing, setup, and debugging purposes. These security levels are summarized in Table 6-1.
Table 6-1 NIS+ Security Levels|
Security Level |
Description |
|---|---|
|
0 |
Security level 0 is designed for testing and setting up the initial NIS+ namespace. An NIS+ server running at security level 0 grants any NIS+ principal full access rights to all NIS+ objects in the domain. Level 0 is for setup purposes only and should only be used by administrators for that purpose. Level 0 should not be used on networks in normal operation by regular users. |
|
1 |
Security level 1 uses AUTH_SYS security. This level is not supported by NIS+ and should not be used. |
|
2 |
Security level 2 is the default. It is the highest level of security currently provided by NIS+. It authenticates only requests that use DES credentials. Requests with no credentials are assigned to the nobody class and have whatever access rights that have been granted to that class. Requests that use invalid DES credentials are retried. After repeated failure to obtain a valid DES credential, requests with invalid credentials fail with an authentication error. (A credential might be invalid for a variety of reasons such as the principal making the request is not keylogged in on that machine, the clocks are out of synch, there is a key mismatch, and so forth.) |
Security Levels and Password Commands
In Solaris releases 2.0 through 2.4, you used the nispasswd command to change your password. However, nispasswd could not function without credentials. (In other words, it could not function under security level 0 unless there were credentials existing from some previous higher level.) Starting with Solaris Release 2.5, the passwd command should now be used to change your own password regardless of security level or credential status.
NIS+ Authentication and Credentials--Introduction
The purpose of NIS+ credentials is to authenticate (confirm) the identity of each principal requesting an NIS+ service or access to an NIS+ object. In essence, the NIS+ credential/authorization process is an implementation of the Secure RPC system.
The credential/authentication system prevents someone from assuming some other user's identity. That is, it prevents someone with root privileges on one machine from using the su command to assume the identity of a second user who is not logged in and then accessing NIS+ objects with the second user's NIS+ access privileges.
Once a server authenticates a principal, the principal is placed in one of four authorization classes. The server then checks the NIS+ object that the principal wants to access to see what activities that class of principal is authorized to perform. (See "NIS+ Authorization and Access--Introduction " for further information on authorization.)
User and Machine Credentials
There are two basic types of principal, users and machines, and thus two different types of credentials:
-
User credentials. When someone is logged in to an NIS+ client as a regular user, requests for NIS+ services include that person's user credentials.
-
Machine credentials. When a user is logged in to an NIS+ client as superuser, request for services use the client workstation's credentials.
DES versus LOCAL Credentials
NIS+ principals can have two types of credential: DES and LOCAL.
DES Credentials
Note -
DES credentials are only one method of achieving authentication. In the future, other methods may be available. Thus, do not equate DES credentials with NIS+ credentials.
In this document, the term DES credentials is used generically to denote a Diffie-Hellman key based authentication, regardless of key length. The system allows you to specify the key length from a pre-determined set. Use nisauthconf(1M) to set or display the Diffie-Hellman key length.
DES (Data Encryption Standard) credentials are the type of credential that provide secure authentication. When this guide refers to NIS+ checking a credential to authenticate an NIS+ principal, it is the DES credential that NIS+ is validating.
Each time a principal requests an NIS+ service or access to an NIS+ object, the software uses the credential information stored for that principal to generate a credential for that principal. DES credentials are generated from information created for each principal by an NIS+ administrator, as explained in Chapter 7, Administering NIS+ Credentials.
-
When the validity of a principal's DES credential is confirmed by NIS+, that principal is authenticated.
-
A principal must be authenticated in order to be placed in the owner, group, or world authorization classes. In other words, you must have a valid DES credential in order to be placed in one of those classes. (Principals who do not have a valid DES credential are automatically placed in the nobody class.)
-
DES credential information is always stored in the cred table of the principal's home domain, regardless of whether that principal is a client user or a client workstation.
LOCAL Credentials
LOCAL credentials are simply a map between a user's User ID number and NIS+ principal name which includes their home domain name. When users log in, the system looks up their LOCAL credential, which identifies their home domain where their DES credential is stored. The system uses that information to get the user's DES credential information.
When users log in to a remote domain, those requests use their LOCAL credential which points back to their home domain; NIS+ then queries the user's home domain for that user's DES credential information. This allows a user to be authenticated in a remote domain even though the user's DES credential information is not stored in that domain.
Figure 6-3 Credentials and Domains

LOCAL credential information can be stored in any domain. In fact, in order to log into a remote domain and be authenticated, a client user must have a LOCAL credential in the cred table of the remote domain. If a user does not have a LOCAL credential in a remote domain the user is trying to access, NIS+ will be unable to locate the user's home domain to obtain the user's DES credential. In such a case the user would not be authenticated and would be placed in the nobody class.
User Types and Credential Types
A user can have both types of credentials, but a machine can only have DES credentials.
Root cannot have NIS+ access, as root, to other machines because the root UID of every machine is always zero. If root (UID=0) of machine A tried to access machine B as root, that would conflict with machine B's already existing root (UID=0). Thus, a LOCAL credential doesn't make sense for a client workstation; so it is allowed only for a client user.
Table 6-2 Types of Credentials|
Type of Credential |
Client User |
Client Workstation |
|---|---|---|
|
DES |
Yes |
Yes |
|
LOCAL |
Yes |
No |
NIS+ Authorization and Access--Introduction
The basic purpose of NIS+ authorization is to specify the access rights that each NIS+ principal has for each NIS+ object and service.
Once the principal making an NIS+ request is authenticated, NIS+ places them in an authorization class. The access rights (permissions) that specify which activities a principal may do with a given NIS+ object are assigned on a class basis. In other words, one authorization class may have certain access rights while a different class has different rights.
-
Authorization classes. There are four authorization classes: owner, group, world, and nobody. (See "Authorization Classes" below for details.)
-
Access rights. There are four types of access rights (permissions): create, destroy, modify, and read. (See " NIS+ Access Rights" for details.)
Authorization Classes
NIS+ objects do not grant access rights directly to NIS+ principals. Instead, they grant access rights to four classes of principal:
-
Owner. The principal who happens to be the object's owner gets the rights granted to the owner class.
-
Group. Each NIS+ object has one group associated with it. The members of an object's group are specified by the NIS+ administrator. The principals who belong to the object's group class get the rights granted to the group class. (In this context, group refers to NIS+ groups, not UNIX or net groups.)
-
World. The world class encompasses all NIS+ principals that a server has been able to authenticate. (That is, everyone who has been authenticated but who is not in either the owner or group classes.)
-
Nobody. Everyone belongs to the nobody class even those who are not authenticated.
Figure 6-4 Authorization Classes
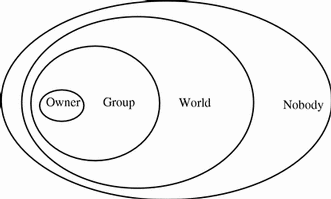
For any NIS+ request, the system determines which class the requesting principal belongs to and the principal then can use whatever access rights belonging to that class.
An object can grant any combination of access rights to each of these classes. Normally, however, a higher class is assigned the same rights as all the lower classes, plus possible additional rights.
For instance, an object could grant read access to the nobody and world classes; both read and modify access to the group class; and read, modify, create, and destroy access to the owner class.
The four classes are described in detail below.
The Owner Class
The owner is a single NIS+ principal.
A principal making a request for access to an NIS+ object must be authenticated (present a valid DES credential) before being granted owner access rights.
By default, an object's owner is the principal that created the object. However, an object's owner can cede ownership to another principal in two ways:
-
One way is for the principal to specify a different owner at the time the object is created (see "Specifying Access Rights in Commands").
-
A second way is for the principal to change the ownership of the object after it is created (see "Changing Ownership of Objects and Entries").
Once a principal gives up ownership, that principal gives up all owner's access rights to the object and keeps only the rights the object assigns to either the group, the world, or nobody.
The Group Class
The object's group is a single NIS+ group. (In this context, group refers to NIS+ groups, not UNIX or net groups.)
A principal making a request for access to an NIS+ object must be authenticated (present a valid DES credential) and belong to the group before being granted group access rights.
An NIS+ group is a collection of NIS+ principals, grouped together as a convenience for providing access to the namespace. The access rights granted to an NIS+ group apply to all the principals that are members of that group. (An object's owner, however, does not need to belong to the object's group.)
When an object is created it may be assigned a default group. A nondefault group can be specified for an object when it is created or later. An object's group may be changed at any time.
Note -
Information about NIS+ groups is not stored in the NIS+ group table. The group table stores information about UNIX groups. Information about NIS+ groups is stored in the appropriate groups_dir directory object.
Information about NIS+ groups is stored in NIS+ group objects, under the groups_dir subdirectory of every NIS+ domain:
Figure 6-5 NIS+ Directory Structure
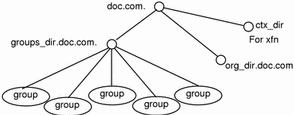
Instructions for administering NIS+ groups are provided in Chapter 12, Administering NIS+ Groups.
The World Class
The world class contains all NIS+ principals that are authenticated by NIS+. In other words, the world class includes everyone in the owner and group class, plus everyone else who presents a valid DES credential.
Access rights granted to the world class apply to all authenticated principals.
The Nobody Class
The nobody class is composed of anyone who is not properly authenticated. In other words, the nobody class includes everyone who does not present a valid DES credential.
Authorization Classes and the NIS+ Object Hierarchy
There is a hierarchy of NIS+ objects and authorization classes that can apply independently to each level. The standard default NIS+ directory hierarchy is:
-
Directory level. In each NIS+ domain there are two NIS+ directory objects: groups_dir and org_dir. Each groups_dir directory object contains various groups. Each org_dir directory object contains various tables.
-
Group level or table level. Groups contain individual entries and possibly other groups. Tables contain both columns and individual entries.
-
Column level. A given table will have one or more columns.
-
Entry (row) level. A given group or table will have one or more entries.
The four authorization classes apply at each level. Thus, a directory object will have its own owner and group. The individual tables within a directory object will have their own individual owners and groups which may be different than the owner and group of the directory object. Within a table, an entry (row) may have its own individual owner or group which may be different than the owner and group of the table as a whole or the directory object as a whole. Within a table, individual columns have the same owner and group as the table as a whole.
NIS+ Access Rights
NIS+ objects specify their access rights as part of their object definitions. (You can examine these by using the niscat -o command, described on page 172.)
NIS+ objects specify access rights for NIS+ principals in the same way that UNIX files specify permissions for UNIX users. Access rights specify the types of operations that NIS+ principals are allowed to perform on NIS+ objects.
NIS+ operations vary among different types of objects, but they all fall into one of the four access rights categories: read, modify, create, and destroy.
-
Read A principal with read rights to an object can view the contents of that object.
-
Modify. A principal with modify rights to an object can change the contents of that object.
-
Destroy. A principal with destroy rights to an object can destroy or delete the object.
-
Create. A principal with create rights to a higher level object can create new objects within that level. In other words, if you have create rights to an NIS+ directory object, you can create new tables within that directory. If you have create rights to an NIS+ table, you can create new columns and entries within that table.
Every communication from an NIS+ client to an NIS+ server is, in effect, a request to perform one of these operations on a specific NIS+ object. For instance, when an NIS+ principal requests the IP address of another workstation, it is effectively requesting read access to the hosts table object, which stores that type of information. When a principal asks the server to add a directory to the NIS+ namespace, it is actually requesting modify access to the directory's parent object.
Keep in mind that these rights logically evolve down from directory to table to table column and entry levels. For example, to create a new table, you must have create rights for the NIS+ directory object where the table will be stored. When you create that table, you become its default owner. As owner, you can assign yourself create rights to the table which allows you to create new entries in the table. If you create new entries in a table, you become the default owner of those entries. As table owner, you can also grant table-level create rights to others. For example, you can give your table's group class table-level create rights. In that case, any member of the table's group can create new entries in the table. The individual member of the group who creates a new table entry becomes the default owner of that entry.
The NIS+ Administrator
An NIS+ administrator is anyone who has administrative rights over an NIS+ object. For the purpose of this discussion, administrative rights are defined as create, destroy, and for some objects, modify rights. (See " NIS+ Access Rights" for a description of NIS+ access rights.)
Whoever creates an NIS+ object sets the initial access rights to that object. If the creator restricts administrative rights to the object's owner (initially the creator), than only the owner has administrative power over that object. On the other hand, if the creator grants administrative rights to the object's group, then everyone in that group has administrative power over that object.
Thus, who ever has administrative rights over an object is considered to be an NIS+ administrator for that object.
In other words, the NIS+ software does not enforce any requirement that there be a single NIS+ administrator.
Theoretically, you could grant administrative rights to the world class, or even the nobody class. The software allows you to do that. But granting administrative rights beyond the group class effectively nullifies NIS+ security. Thus, if you grant administrative rights to either the World or the nobody class you are, in effect, defeating the purpose of NIS+ security.
NIS+ Password, Credential, and Key Commands
Use the following commands to administer passwords, credentials, and keys (see the appropriate man pages for a full description of each command):
-
chkey. Changes a principal's Secure RPC key pair. Do not use chkey unless necessary, use passwd instead. See "Changing Keys for an NIS+ Principal" for more information.
-
keylogin. Decrypts and stores a principal's secret key with the keyserv.
-
keyserv. Enables the server for storing private encryption keys. See "Keylogin" for more information.
-
nisaddcred. Creates credentials for NIS+ principals. See "Creating Credential Information" and "Administering NIS+ Credential Information" for more information.
-
nisupdkeys. Updates public keys in directory objects. See "Updating Public Keys" for more information.
-
passwd. Changes and administers principal's password. See Chapter 11, Administering Passwords for more information.
- © 2010, Oracle Corporation and/or its affiliates
