Chapter 2 Personal Digital Assistant (PDA) Synchronization
Note -
For the most up-to-date man pages, use the man command. The Solaris 7 11/99 man pages include new feature information not found in the Solairs 7 Reference Manual Collection.
This functionality is new in the Solaris 7 11/99 release. Information regarding your CDE desktop is available in the Solaris Common Desktop Environment: User's Guide.
The Personal Digital Assistant synchronization (PDA sync) application enables you to synchronize data from applications, such as Calendar Manager, with data in a similar application on your PDA. It also enables you to install applications and databases from your workstation or server to your PDA.
For example, applications that have been downloaded from the web can be copied to your PDA using PDA sync. All illustrations in this document depict the software interacting with a PDA.
The applications correlate as Calendar Manager/Date Book, Address Manager/Address Book, Desktop Mail/Mail, and Text Note/Memo Pad. PDA sync supports most Palm Pilot Computing platform hand held devices, including the Palm V, Palm III, and PalmPilot Professional Edition.
Getting Started
The PDA sync application is available as an icon on the Common Desktop Environment (CDE) desktop. It will be activated when you first log in. When you exit the application, you will need to restart it manually in order to perform synchronization again.
If you are synchronizing for the first time after installing PDA sync, a dialog box will appear asking you to name your organizer. If your organizer already has a name, this dialog box will not appear.
If your organizer has a password, a dialog will ask you for it every time you run the application. If your organizer does not have a password, this dialog will not appear.
Installing PDA Sync
Before starting your PDA sync installation, you must become superuser.
If there is a previous version of the PDA sync software installed, remove the SUNWpdas package: # pkgrm SUNWpdas.
To install PDA sync:
-
Change directories to the directory on the CD-ROM that contains the PDA Sync packages and install the updated version SUNWpdas: # pkgadd -d . SUNWpdas
Synchronizing
If you are synchronizing a new organizer (or one that has been hard reset) for the first time after installing PDA sync, a dialog box will appear asking for a name for your organizer. Refer to your organizer documentation for the procedure to follow to perform a hard reset. The dialog box will not appear if your organizer already has a name.
Note -
Your UNIX\256 user name is what you use to log in to your workstation and your organizer user name is the name that appears in the upper right corner of the PDA screen during a HotSync operation. You can choose to have identical user names or different user names.
Setting the Port
When the Synchronization window appears, the first thing you must do is establish the port setting.
-
Click the button with a checkmark on it on the lower left side of the Synchronization tab.
-
Select the port (A, B, or C) to which you connected the PDA.
-
Press the Sync button on the PDA device.
Accessing the PDA Sync Software
Access the PDA sync software in one of two ways.
The first way to access is by using the following procedure.
-
Using the desktop icon, open the Applications pull-down menu from the Control Panel (typically at the bottom of your screen).
-
Click on Applications to open Application Manager.
-
Click on Desktop_Apps to locate the PDA sync icon.
-
Click on PDA sync.
Note -In order to make the PDA sync icon more accessible in the future, drag and drop the PDA sync icon from the Desktop_Apps screen into the Install area of the Application pull down menu or into your user space.
The second way to access the PDA sync software is by typing /usr/dt/bin/stdpdasync on the command line.
For more information on the PDA sync application, see the Help information on the PDA sync software.
Default Tab Synchronization
The application opens by default to the Synchronization tab. The following illustration shows that the application is ready to synchronize, as indicated by the status line. At this point, you may press the sync button on your organizer's cradle.
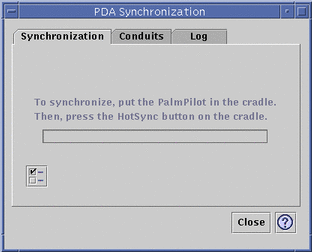
The application will then begin a synchronization operation using current or default configurations on the currently active or default conduits, as defined on the Conduits tab.
The Status Area
The status area underneath the button contains information about the current operation including status or prompt text, an animated graphic indicating that an operation is in progress, and a progress bar that shows estimated progress during a sync operation. The progress bar is not displayed unless a sync or install operation is in progress. Choosing Cancel Synchronization pauses the sync operation and brings up a confirmation dialog box. If you choose the Cancel button, the sync is aborted. If you choose Continue, the sync operation continues.
Completion of a sync operation is indicated by an audio signal. If the "Iconify application window after synchronization" option is checked in Application Properties, the window will minimize to an icon upon completion of sync.
Setting Application Properties
Clicking properties on the Synchronization tab brings up the application properties dialog. This dialog contains all of the PDA sync options that are not directly related to specific conduits and therefore do not belong in the conduit configuration dialog boxes. The options in this dialog box are not likely to require changing.
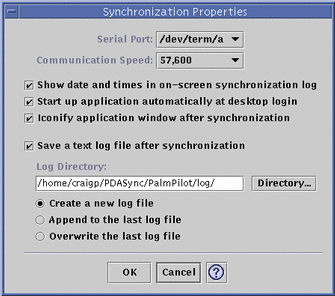
Use the Synchronization Properties dialog box to:
-
Set the serial port.
-
Set the port speed. The default is "As fast as possible," which is automatically negotiated between the application and the serial port. The fixed choices in this pull-down menu are whatever speeds are supported by the API.
-
"Start up application automatically at desktop login" is ON by default. If it is turned OFF, you will have to start the application manually.
-
"Iconify application window after synchronization" is ON by default. The window will minimize to an icon upon completion of sync. If it is turned OFF, the window will remain open after the sync is completed.
-
Set log file properties. A log file will be saved by default.
-
"Show debugging information in log" is OFF by default but may be useful when troubleshooting a problem with tech support.
The default directory for log files is /home/user/PDASync/PalmPilot/log.
Using the Directory Chooser
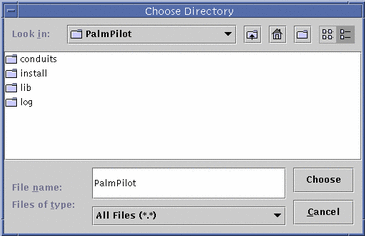
Wherever there is a Directory button in the conduit dialogs, the application uses the standard JLF Directory chooser. This dialog filters out files and enables you to navigate and choose directories to set as defaults for PDA operations.
Configuring Conduits
The Conduits tab contains a list of all the conduits that are available to the PDA sync application. This is not a fixed list, as conduits can be added and removed. Active conduits are indicated with a check mark. A Synchronize operation runs all of the active conduits ONLY, as specified in the following figure.
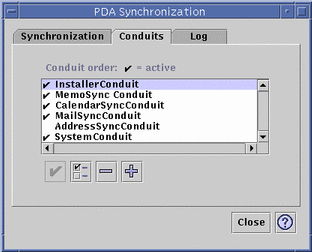
The buttons underneath the scrolling list represent actions you can take on the selected conduit in the list (except the last button, Add Conduit). When the pointer is over one of the buttons, the button name is displayed in a small Button Tag that appears near the button. The button names in the toolbar, from left to right, are:
-
Activate Conduit - Either activates or deactivates the conduit. When a conduit is active, it will be executed in the next synchronization.
-
Change Conduit - Brings up the configuration dialog for the selected conduit and is disabled if more than one item is selected.
-
Remove Conduit - Removes the conduit from the list, after a confirmation dialog.
-
Add Conduit - Brings up a file selection dialog that enables you to add new conduits.
Using the Calendar Conduit
The CalendarSyncConduit "Change conduit settings" window enables you to determine how appointments will be synchronized between calendar applications. Refer to the following figure.
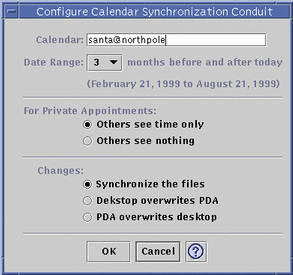
In this window you can:
-
Change the host name. The default is user@host.
-
Specify the base calendar on the workstation or server.
-
Determine a rolling date range to synchronize. The default range is six months.
-
Determine what information is displayed for others to see on private appointments.
If the PalmPilot calendar records have attached notes, a pointer is displayed in the Calendar manager What field in the form: <*** /home/username/PDASync/PalmPilot/calendar/notes/12345.txt ***>
-
Change the data synchronization direction to:
-
Synchronize the files (this is the default).
-
Merge the calendar information on your desktop and your PDA.
-
Desktop overwrites PDA.
-
Replace PDA calendar information with the calendar information on your workstation.
-
PDA overwrites desktop.
-
Replace desktop calendar information with the calendar information on your PDA.
-
Using the Memo Conduit
The Configure Memo Synchronization Conduit (MemoSyncConduit) window enables you to synchronize text files between the desktop and the PDA as shown in the following figure.
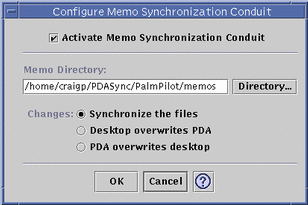
You change the data synchronization direction to:
-
Synchronize the files (this is the default).
-
Merge the memo information on your desktop and your PDA.
-
Desktop overwrites PDA.
-
Replace PDA memo information with the memo information on your workstation.
-
PDA overwrites desktop.
-
Replace desktop memo information with the memo information on your PDA.
In the memos directory, separate directories can be created for different categories of memos, such as Business and Personal. These become categories on your PDA when synchronized. Conversely, new categories on your PDA become directories in the memo folder on your file system when synchronized.
Using the Address Conduit
The Address Synchronization Conduit (AddressSyncConduit) dialog enables you to determine how entries are synchronized between address applications.
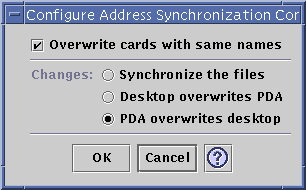
In this window you can:
-
Give an option to overwrite files currently on your PDA (OFF by default).
Note -If you choose to turn this ON, no confirmation dialog box will appear at the time the files are overwritten.
-
Define a mapping between disparate fields in Address Manager and your PDA Address Book. For a more detailed explanation, see Address Synchronization.
-
Select the data synchronization direction. The default is to merge the data.
Using the System Conduit
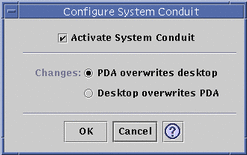
The Configure System Conduit (SystemConduit) backs up all system information, graffiti shortcuts, and any .pdbs and .prcs that are not already associated with other applications. The default is that your PDA overwrites the desktop. Refer to the following figure.
Note -
You should choose "Desktop overwrites PDA" only if everything on your PDA has been corrupted or lost.
Using the Mail Conduit
The Configure Mail Synchronization Conduit Mail (SyncConduit) window tells your PDA your INBOX location. Refer to the following figure.
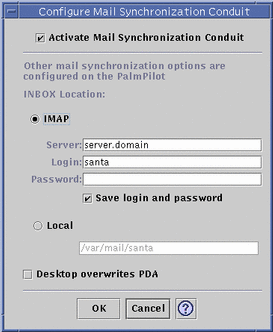
In Mail Synchronization Conduit dialog you can:
-
Define the IMAP location of the INBOX (server.domain) or the local location of the INBOX (path and filename).
In addition, the IMAP choice requires that you submit a login ID and password. You may save the login and password to avoid retyping. If the ID and password are not saved, synchronization is interrupted every time with this dialog. You can choose to have the desktop mailbox overwrite your PDA mailbox. This is OFF by default.
Note -This option should only be used if your PDA INBOX folder is not in sync with your desktop.
All other setup for mail synchronization is done on your PDA. When you synchronize, your PDA automatically:
-
Sends mail from the Outbox.
-
Destroys the deleted mail in the Deleted folder.
-
Does the things you have defined in the options.
In the Mail synchronization options on the PDA, you can tell your PDA to:
-
Synchronize mailbox state both ways (for example, make the two Inboxes identical, given the constraints, which include no attachments and truncation of messages. This is the same as setting the PDA parm option to All.
-
Send mail from the Outbox only and retrieve nothing. This is the same as setting the PDA parm option to Send Only.
-
Synchronize mail according to a filter. This is the same as setting the PDA parm option to Filter. The messages are truncated to a specified length; the range is: 250, 500, 1000, 2000, 4000, 6000, 8000. The filter can operate two ways:
-
Ignore messages with a certain criteria and retrieve all others.
-
Retrieve messages with a certain criteria and ignore all others.
-
Using the Installer Conduit
The Configure Installer Conduit (InstallerConduit) window allows you to determine which files (applications or databases) to install on your PDA.
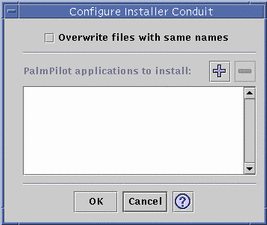
In this window you can:
-
Give an option to overwrite files currently on your PDA (OFF by default). If you choose to turn this ON, no confirmation dialog will appear at the time the files are overwritten.
-
Display all the files that are available for installation to your PDA. These are all the files currently in the default install directory. Use the Add PalmPilot Applications window to add files (refer to the following figure). To delete files from the list, click the minus (-) symbol. All files in the list will be installed on the next sync operation.
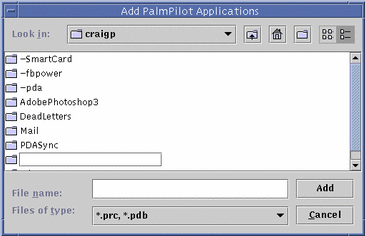
The default directory is /home/user/PDASync/PalmPilot/install.
Adding a Conduit
The Add Conduit window enables you to add new conduits to PDA sync. The available conduits come from one of three categories, represented in the pull-down menu:
-
Personal Conduits (default) -- Conduits that you may have obtained from the Web or elsewhere.
-
System Default -- The default set that the PDA sync application comes with (for example, Calendar, Memo, Address). You should use conduits from this category to replace any defaults that have been deleted.
-
System Additions -- Any third-party conduits added automatically through packages. The following default directory is a repository for your personal conduits (/home/user/PDASync/PalmPilot/conduits). The Add button adds the selected file(s) to the list of conduits on the Conduits tab. The choices under the File Type pull-down menu are:
-
All Files.
-
.JAR files -- This file type is the most likely option for a conduit.
-
.ZIP files -- This file type is a less likely option for a conduit.
-
.CLASS files -- Load files of this type only if your conduit vendor explicitly advises you to do so.
-
Viewing the Activity Log
The third tab in the PDA sync application lets you view the activity log for each synchronization. This area consists of a vertical and horizontal scrolling read-only text field, which displays a real-time log of a sync or install operation.
By default, the top of the log is displayed at the top of the data window. Because the log file can be appended (see Application Properties dialog), the top of the current log may be at the bottom of the file. This means that the scroll bar may be at the bottom of the window when the log is displayed and scrolling up will reveal previous logs.
By default, the date on which the sync operation is performed is displayed at the top and bottom of the current log. Time stamp information is added as appropriate. You can also choose to show full debugging information in the log through an option on the Application Properties dialog.
The log is saved to disk as a text file. This option can be turned off in the Application Properties dialog. The log file can also be printed.
The only time the log is displayed without you explicitly showing it is if a failure occurs during a sync operation. If a failure occurs, the system beeps and the log shows where the failure occurred, and the sync operation is aborted. These entries should give as much information as is reasonable to provide. You may also turn on debugging information in the Application Properties dialog in order to troubleshoot. After a failure occurs, the application should not minimize itself, regardless of the "Iconify application window after synchronization" setting in the Application Properties dialog.
- © 2010, Oracle Corporation and/or its affiliates
