Chapter 2 Installing and Configuring the Terminal Concentrator
This chapter provides the hardware and software procedures for installing and configuring a terminal concentrator as a console access device in a Sun Cluster environment. This chapter also includes information on how to use a terminal concentrator.
This chapter contains the following procedures:
-
How to Establish a Default Route for the Terminal Concentrator
-
How to Connect to a Node's Console Through the Terminal Concentrator
For conceptual information on console access devices, see your Sun Cluster concepts documentation.
Installing the Terminal Concentrator
This section describes the procedure for installing the terminal concentrator hardware and for connecting cables from the terminal concentrator to the administrative console and to the cluster nodes.
 How to Install the Terminal Concentrator in a Cabinet
This procedure provides step-by-step instructions for rack-mounting the terminal concentrator in a cabinet. For convenience, you can rack-mount the terminal concentrator even if your cluster does not contain rack-mounted nodes.
-
To rack-mount your terminal concentrator, go to the first step of the following procedure.
-
If you do not want to rack-mount your terminal concentrator, place the terminal concentrator in its standalone location, connect the unit power cord into a utility outlet, and go to How to Connect the Terminal Concentrator.
-
Install the terminal concentrator bracket hinge onto the primary cabinet:
-
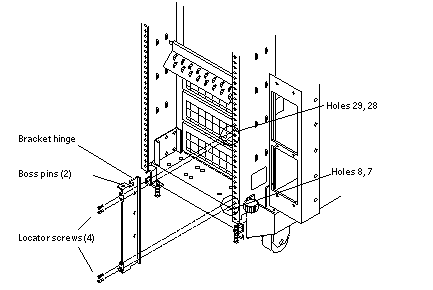
Locate the bracket hinge portion of the terminal concentrator bracket assembly (see Figure 2–1).
-
Loosely install two locator screws in the right-side rail of the rear of the cabinet.
Thread the screws into holes 8 and 29, as shown in Figure 2–1. The locator screws accept the slotted holes in the hinge piece.
-
Place the slotted holes of the hinge over the locator screws, and let the hinge drop into place.
-
Install the screws into holes 7 and 28.
Tighten these screws, and the screws in holes 8 and 29, as shown in Figure 2–1.
Figure 2–1 Installing the Terminal Concentrator Bracket Hinge to the Cabinet
-
-
Install the terminal concentrator into the bracket.
-
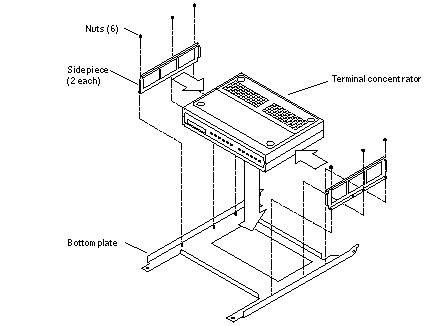
Place the side pieces of the bracket against the terminal concentrator, as shown in Figure 2–2.
-
Lower the terminal concentrator (with side pieces) onto the bottom plate, aligning the holes in the side pieces with the threaded studs on the bottom plate.
-
Install and tighten three nuts on the three threaded studs that penetrate through each side plate.
Figure 2–2 Installing the Terminal Concentrator Into the Bracket
-
-
Install the terminal concentrator bracket onto the bracket hinge that is already installed on the cabinet.
-
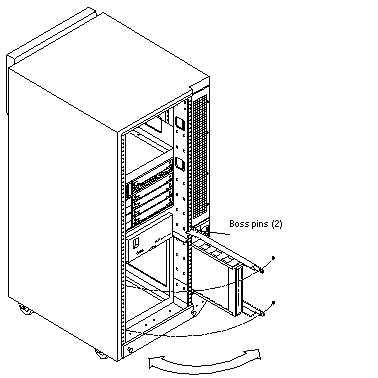
Turn the terminal concentrator bracket on its side so the hinge holes and cable connectors face toward the bracket hinge (see Figure 2–3).
-
Align the bracket holes with the boss pins on the bracket hinge and install the bracket onto the hinge.
-
Install the keeper screw in the shorter boss pin to ensure the assembly cannot be accidentally knocked off the hinge.
Figure 2–3 Terminal Concentrator Bracket Installed on the Hinge
-
-
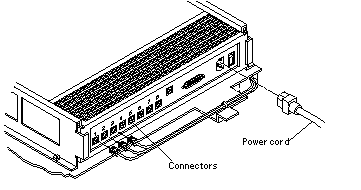
Connect one end of the power cord to the terminal concentrator, as shown in Figure 2–4. Connect the other end of the power cord to the power distribution unit.
Figure 2–4 Terminal Concentrator Cable Connector Locations
See Also
To cable the terminal concentrator, go to How to Connect the Terminal Concentrator.
 How to Connect the Terminal Concentrator
-
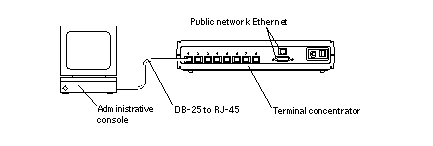
Connect a DB-25 to RJ-45 serial cable (part number 530-2152-01 or 530-2151-01) from serial port A on the administrative console to serial port 1 on the terminal concentrator, as shown in Figure 2–5.
This cable connection from the administrative console enables you to configure the terminal concentrator. You can remove this connection after you set up the terminal concentrator.
Figure 2–5 Connecting the Administrative Console
-
Connect the cluster nodes to the terminal concentrator by using serial cables.
The cable connections from the concentrator to the nodes enable you to access the ok prompt or OpenBootTM PROM (OBP) mode by using the Cluster Console windows from the Cluster Control Panel (CCP). For more information on how to use the CCP, see your Sun Cluster system administration documentation.
-
Connect the public network Ethernet cable to the appropriate connector on the terminal concentrator.
Note –The terminal concentrator requires a 10-Mbit/sec Ethernet connection.
-
Close the terminal concentrator bracket, and install screws in holes 8 and 29 on the left-side rear rail of the cabinet (see Figure 2–3).
Next Steps
Go to Configuring the Terminal Concentrator.
Configuring the Terminal Concentrator
This section describes the procedure for configuring the terminal concentrator's network addresses and ports.
 How to Configure the Terminal Concentrator
-
From the administrative console, add the following entry to the /etc/remote file.
tc:\
:dv=/dev/term/a:br#9600:
-
Verify that the server and the terminal concentrator are powered on and that the cabinet keyswitch (if applicable) is in the ON position.
-
Establish a connection to the terminal concentrator's serial port:
# tip tc
-
Hold down the terminal concentrator Test button (Figure 2–6) until the power LED flashes (about three seconds), then release the Test button.
-
Hold down the terminal concentrator Test button again for one second, then release it.
The terminal concentrator performs a self-test, which lasts about 30 seconds. Messages display on the administrative console. If the network connection is not found, press the Q key to stop the message.
Figure 2–6 Terminal Concentrator Test Button and LEDs

-
Observe the terminal concentrator front-panel LEDs and use the information in the following table to decide your course of action.
Power (Green)
Unit (Green)
Net (Green)
Attn (Amber)
Load (Green)
Active (Green)
Test (Orange)
ON
ON
ON
ON
OFF
Intermittent blinking
ON
-
If the front-panel LEDs light up as shown in the table above and the administrative console displays a monitor:: prompt, go to Step 7.
-
If the front-panel LEDs do not light up as shown in the table above, or the administrative console does not display a monitor:: prompt, use the following table and the documentation that shipped with your terminal concentrator to troubleshoot the problem.
Mode
Power (Green)
Unit (Green)
Net (Green)
Attn (Amber)
Load (Green)
Active (Green)
Hardware failure
ON
Blinking
OFF
Blinking
OFF
OFF
Network test failure
ON
ON
Blinking
OFF
OFF
Intermittent blinking
Network test aborted, or net command failed
ON
ON
OFF
Blinking
OFF
Intermittent blinking
Booted wrong image
ON
ON
ON
Blinking
OFF
OFF
Other failure
One or more Status LEDs (1-8) are ON
-
-
Use the addr command to assign an IP address, subnet mask, and network address to the terminal concentrator.
In the following example (Class B network, Class C subnet), the broadcast address is the terminal concentrator's address with the host portion set to 255 (all binary 1's).
monitor:: addr Enter Internet address [<uninitialized>]:: 172.25.80.6 Internet address: 172.25.80.6 Enter Subnet mask [255.255.0.0]:: 255.255.255.0 Subnet mask: 255.255.255.0 Enter Preferred load host Internet address [<any host>]:: 172.25.80.6 *** Warning: Load host and Internet address are the same *** Preferred load host address: 172.25.80.6 Enter Broadcast address [0.0.0.0]:: 172.25.80.255 Broadcast address: 172.25.80.255 Enter Preferred dump address [0.0.0.0]:: 172.25.80.6 Preferred dump address: 172.25.80.6 Select type of IP packet encapsulation (ieee802/ethernet) [<ethernet>]:: Type of IP packet encapsulation: <ethernet> Load Broadcast Y/N [Y]:: n Load Broadcast: N -
After you finish the addr session, power-cycle the terminal concentrator.
The Load and Active LEDs should briefly blink, then the Load LED should turn off.
-
Use the ping(1M) command to confirm that the network connection works.
-
Exit the tip utility by pressing Return and typing a tilde, followed by a period.
<Return>~.
~
[EOT]
#
Next Steps
Go to How to Set Terminal Concentrator Port Parameters.
 How to Set Terminal Concentrator Port Parameters
This procedure explains how to determine if the port type variable must be set and how to set this variable.
The port type parameter must be set to dial_in. If the parameter is set to hardwired, the cluster console might be unable to detect when a port is already in use.
-
Locate the Sun serial number label on the top panel of the terminal concentrator (Figure 2–7).
-
Check if the serial number is in the lower serial-number range. The serial number consists of 7 digits, followed by a dash and 10 more digits.
-
If the numbers after the dash start with 9520 or higher, the port type variable is set correctly. Go to Step 4.
-
If the numbers after the dash start with 9519 or lower, you must change the port type variable. Go to Step 3.
Figure 2–7 Determining the Version From the Serial Number Label

-
-
Use the administrative console to change the port type variable to dial_in by setting the port parameters, then reboot the terminal concentrator as shown in the following example.
The boot command causes the changes to take effect. The terminal concentrator is unavailable for approximately one minute.
admin-ws# telnet tc_name
Trying terminal concentrator IP address
Connected to tc_name
Escape character is "^]".
Rotaries Defined:
    cli                              -
Enter Annex port name or number: cli
Annex Command Line Interpreter  *  Copyright 1991 Xylogics, Inc.
annex: su
Password: password
(The default password is the terminal concentrator IP address)
annex# admin
Annex administration MICRO-XL-UX R7.0.1, 8 ports
admin : set port=1-8 type dial_in imask_7bits Y
  You may need to reset the appropriate port, Annex subsystem or
        reboot the Annex for changes to take effect.
admin : set port=1-8 mode slave
admin : quit
annex# boot
bootfile:  <return>
warning:   <return>
Note –Ensure that the terminal concentrator is powered on and has completed the boot process before you proceed.
-
Verify that you can log in from the administrative console to the consoles of each node.
For information on how to connect to the nodes' consoles, see How to Connect to a Node's Console Through the Terminal Concentrator.
 How to Correct a Port Configuration Access Error
A misconfigured port that does not accept network connections might return a Connect: Connection refused message when you use telnet(1). Use the following procedure to correct the port configuration.
-
Connect to the terminal concentrator without specifying a port.
# telnet tc_name
- tc_name
-
Specifies the hostname of the terminal concentrator
-
Press Return again after you make the connection, then specify the port number.
Trying ip_address .. Connected to 192.9.200.1 Escape character is "^]". ... [RETURN] Rotaries Defined: cli - Enter Annex port name or number: 2-
If you see a Port(s) busy, do you wish to wait? (y/n) message, answer N and go to How to Reset a Terminal Concentrator Port.
-
If you see an Error: Permission denied message, the port mode is configured incorrectly to the command-line interface and must be set to slave. Go to Step 3.
-
-
Select the terminal concentrator's command-line interface.
...
Enter Annex port name or number: cli
annex:
-
Type the su command and password.
The default password is the terminal concentrator's IP address.
annex: su
Password:
-
Reset the port.
annex# admin
Annex administration MICRO-XL-UX R7.0.1, 8 ports
admin: port 2
admin: set port mode slave
	You may need to reset the appropriate port, Annex subsystem or
	reboot the Annex for changes to take effect.
admin: reset 2
Example 2–1 Correcting a Terminal Concentrator Port Configuration Access Error
The following example shows how to correct an access error on the terminal concentrator port 4.
admin-ws# telnet tc1 Trying 192.9.200.1 ... Connected to 192.9.200.1. Escape character is '^]'. [Return] Enter Annex port name or number: cli ... annex: su Password: root_password annex# admin Annex administration MICRO-XL-UX R7.0.1, 8 ports admin: port 4 admin: set port mode slave You may need to reset the appropriate port, Annex subsystem or reboot the Annex for changes to take effect. admin: reset 4 |
 How to Establish a Default Route for the Terminal Concentrator
Note –
This procedure is optional. By setting a default route, you prevent possible problems with routing table overflows (see the following paragraphs). Routing table overflow is not a problem for connections that are made from a host that resides on the same network as the terminal concentrator.
A routing table overflow in the terminal concentrator can cause network connections to be intermittent or lost altogether. Symptoms include connection timeouts and routes that are reestablished, then disappear, even though the terminal concentrator itself has not rebooted.
The following procedure fixes this problem by establishing a default route within the terminal concentrator. To preserve the default route within the terminal concentrator, you must also disable the routed feature.
-
Connect to the terminal concentrator.
# telnet tc_name
- tc_name
-
Specifies the name of the terminal concentrator
-
Press Return again after you make the connection, then select the command-line interface to connect to the terminal concentrator.
...
Enter Annex port name or number: cliannex:
-
Type the su command and password.
The default password is the terminal concentrator's IP address.
annex: su
Password:
-
Start the editor to change the config.annex file.
annex# edit config.annex
Note –The keyboard commands for this editor are Control-W: save and exit, Control-X: exit, Control-F: page down, and Control-B: page up.
The config.annex file, which is created in the terminal concentrator's EEPROM file system, defines the default route. The config.annex file can also define rotaries that enable a symbolic name to be used instead of a port number.
-
Add the following lines to the file.
Substitute the appropriate IP address for your default router.
%gateway
net default gateway 192.9.200.2 metric 1 active ^W
-
Disable the local routed feature.
annex# admin set annex routed n
-
Reboot the terminal concentrator.
annex# boot
bootfile: <reboot>
warning: <return>
While the terminal concentrator is rebooting, you cannot access the node consoles.
Example 2–2 Establishing a Default Route for the Terminal Concentrator
The following example shows how to establish a default route for the terminal concentrator.
admin-ws# telnet tc1 Trying 192.9.200.1 ... Connected to 192.9.200.1. Escape character is '^]'. [Return] Enter Annex port name or number: cli ... annex: su Password: root_password annex: edit config.annex (Editor starts) Ctrl-W:save and exit Ctrl-X:exit Ctrl-F:page down Ctrl-B:page up %gateway net default gateway 192.9.200.2 metric 1 active ^W annex# admin set annex routed n You may need to reset the appropriate port, Annex subsystem or reboot the Annex for changes to take effect. annex# boot |
Using the Terminal Concentrator
This section describes the procedures about how to use the terminal concentrator in a cluster.
Table 2–1 Task Map: Using the Terminal Concentrator|
Task |
For Instructions |
|---|---|
|
Connect to a node's console through the terminal concentrator |
How to Connect to a Node's Console Through the Terminal Concentrator |
|
Reset a terminal concentrator port |
 How to Connect to a Node's Console Through the Terminal
Concentrator
The following procedure enables remote connections from the administrative console to a cluster node's console by first connecting to the terminal concentrator.
-
Connect to a node by starting a session with the terminal concentrator port that the node is cabled to.
# telnet tc_name tc_port_number
- tc_name
-
Specifies the name of the terminal concentrator.
- tc_port_number
-
Specifies the port number on the terminal concentrator. Port numbers are configuration dependent. Typically, ports 2 and 3 (5002 and 5003) are used for the first cluster that is installed at a site.
Note –If you set up node security, you are prompted for the port password.
-
Log in to the node's console.
After establishing the telnet connection, the system prompts you for the login name and password.
-
Set the terminal type, based on the type of window that was used in Step 1.
# TERM=xterm
# export TERM
Example 2–3 Connecting to a Node's Console Through the Terminal Concentrator
The following example shows how to connect to a cluster node in a configuration that uses a terminal concentrator. A Shell tool has already been started by using an xterm window.
admin-ws# telnet tc1 5002 Trying 192.9.200.1 ... Connected to 192.9.200.1. Escape character is '^]'. [Return] pys-palindrome-1 console login: root password: root_password (for sh or ksh) phys-palindrome-1# TERM=xterm; export TERM (for csh) phys-palindrome-1# set term=xterm |
 How to Reset a Terminal Concentrator Port
When a port on the terminal concentrator is busy, you can reset the port to disconnect its user. This procedure is useful if you need to perform an administrative task on the busy port.
A busy port returns the following message when you try to connect to the terminal concentrator.
telnet: Unable to connect to remote host: Connection refused |
If you use the port selector, you might see a port busy message. See How to Correct a Port Configuration Access Error for details on the port busy message.
-
Connect to the terminal concentrator port.
# telnet tc_name
- tc_name
-
Specifies the name of the terminal concentrator
-
Press Return again after you make the connection and select the command-line interface to connect to the terminal concentrator.
Enter Annex port name or number: cli
annex:
-
Type the su command and password.
The default password is the terminal concentrator's IP address.
annex: su
Password:
-
Determine which port to reset.
The who command shows ports that are in use.
annex# who
-
Reset the port that is in use.
annex# admin reset port_number
-
Disconnect from the terminal concentrator.
annex# hangup
You can now connect to the port.
Example 2–4 Resetting a Terminal Concentrator Connection
The following example shows how to reset the terminal concentrator connection on port 2.
admin-ws# telnet tc1 Trying 192.9.200.1 ... Connected to 192.9.200.1. Escape character is '^]'. [Return] ... Enter Annex port name or number: cli ... annex: su Password: root_password annex: who Port What User Location When Idle Address 2 PSVR --- --- --- 1:27 192.9.75.12 v1 CLI --- --- --- 192.9.76.10 annex# admin reset 2 annex# hangup |
- © 2010, Oracle Corporation and/or its affiliates
