Chapter 5 Deployment Design with Access Manager
During the deployment design phase of the solution life cycle, you design a high-level deployment architecture and a low-level implementation specification, and prepare a series of plans and specifications necessary to implement the solution. Project approval occurs in the deployment design phase. This chapter includes the following sections about deployment design with Sun JavaTM System Access Manager:
Using a Load Balancer
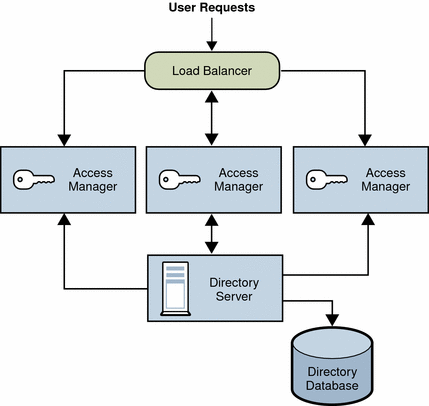
In most deployments, Access Manager is configured with a load balancer to distribute user requests between two or more Access Manager instances. The load balancer can be implemented with hardware, software, or a combination of both. The following figure shows an Access Manager deployment with a load balancer.
Figure 5–1 Access Manager Configuration With a Load Balancer

Configuring the Load Balancer for Sticky Sessions
A load balancer deployed with Access Manager must support sticky sessions. A sticky session specifies that once a session is created by a specific Access Manager instance, subsequent requests from the user will continue to be routed to that same instance, in order to preserve session information. Because Access Manager uses cookies to relay session information, the load balancer must redirect the request to the Access Manager instance that created the session. Without sticky sessions, all Access Manager instances would have to be trusted and performance could be impaired. You can implement sticky sessions using either the setcookie function or load balancer cookies.
For more information, see Using a Load Balancer With Access Manager.
Multiple JVM Environment
Access Manager services are supported in multiple Java Virtual Machine (JVM) environments. That is, an instance of Sun Java System Application Server can be configured to have multiple JVMs with Access Manager services running in all of them. The Access Manager architecture imposes no restrictions on the deployment with regards to the number of Sun Java System Application Server instances within a machine, the number of Access Manager services across multiple machines, or the number of JVMs that a single Application Server can have.
For more information about the multiple JVM environment, see the Sun Java System Application Server documentation: http://docs.sun.com/coll/1310.1.
Directory Server Replication Considerations
Two methods to improve Access Manager performance and response time are using load balancing across replicated Directory Servers and locating replicated servers closer to users. Directory Server can be set up in single-supplier or multi-supplier configurations. Load-balancing applications such as Sun Java System Directory Proxy Server can also be used. Directory Proxy Server dynamically performs proportional load balancing of LDAP operations across a set of configured Directory Servers. If one or more Directory Server instances become unavailable, the load is proportionally redistributed among the remaining servers. When the server comes back on line, the load is proportionally and dynamically reallocated.
Directory Server replication must be configured before installing Access Manager. This configuration ensures that the supplier and consumer databases are synchronized correctly, allowing time to verify that referrals and updates are synchronized properly.
When Access Manager is installed for replication purposes, each instance of Directory Server and each instance of Access Manager, must be configured with the same values for the following:
-
Directory Manager
-
Directory Manager Password
-
Directory Server Administrator ID
-
Server Administrator Password
-
Base suffix
-
Default organization
Configuring For Replication
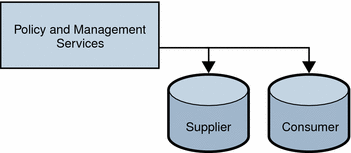
Access Manager can be configured to work with single-supplier or multiple-supplier replication. The following figure shows a single-supplier configuration where the consumer is a read-only database. Requests for write operations are referred to the supplier database. This configuration provides some measure of enhanced server performance by distributing the workload to more than one directory.
Figure 5–2 Single-Supplier Directory Server Replication

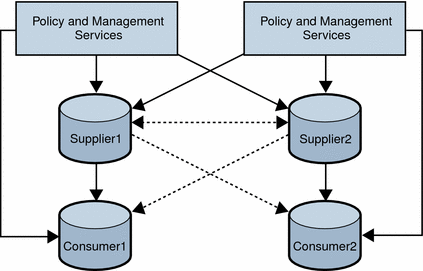
The following figure shows a multiple-supplier configuration, or multi-master replication (MMR), using multiple instances of Access Manager. This configuration provides failover protection as well as high availability, resulting in further enhanced server performance.
Figure 5–3 Multiple-Supplier Directory Server Configuration

Follow these steps to configure replication at the root or top level of the Access Manager directory tree when Access Manager has not yet been installed or to configure replication at the default organization level:
-
Install the supplier and consumer Directory Server instances.
See the Sun Java Enterprise System 2005Q4 Installation Guide for UNIX for detailed instructions.
-
Set up replication agreements between the supplier and consumer and verify that the directory referrals and updates are working properly.
You might need to migrate existing Directory Server data to work with this version of Access Manager. For information, see the Sun Java System Access Manager 6 2005Q1 Migration Guide.
-
If you are deploying Access Manager and Directory Server for the first time, or if there is no plan to use existing user data, run the Java ES installation program to install Access Manager.
During installation, answer yes when asked if there is an existing Directory Server, and specify the host name and port number for a supplier Directory Server you installed in Configuring For Replication.
-
On the host server where Access Manager is installed, modify the AMConfig.properties file in the following directory, depending on your platform:
-
Solaris systems: /etc/opt/SUNWam/config
-
Linux systems: /etc/opt/sun/identity/config
-
-
Modify the following properties to reflect the host and port number of a consumer Directory Server installed in Configuring For Replication .
-
com.iplanet.am.directory.host
-
com.iplanet.am.directory.port
-
-
Modify the following property to reflect the number of times Access Manager should continue to make the same request when the requested entry is not found.
com.iplanet.am.replica.retries
-
Modify the following property to reflect the number of milliseconds Access Manager should allow to elapse between retries.
com.iplanet.am.replica.delay.between.retries
-
In each Access Manager Authentication module enabled, use the Access Manager Console to specify the consumer directory installed in Configuring For Replication:
-
For the first LDAP server and port, specify the host name and port number for the primary (consumer) Directory Server. For example: consumer1.example.com:389.
-
For the second LDAP server and port, specify the host name and port number for the secondary (or supplier) Directory Server. For example, supplier1.example.com:389.
-
-
In the serverconfig.xml file, specify the host name and port number of the consumer directory installed in Configuring For Replication, as shown in the following example for the serverconfig.xml file.
-
Restart Access Manager by restarting the web container.
Example of the serverconfig.xml File
The following example shows the serverconfig.xml replication modification.
<iPlanetDataAccessLayer>
<ServerGroup name="default" minConnPool="1"
maxConnPool="10">
<Server name="Server1"
host="consumer1.example.com" port="389"
type="SIMPLE" />
Configuring With a Load Balancer
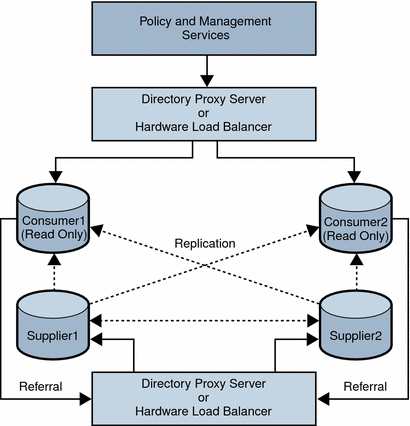
The following figure shows a multiple-supplier configuration that includes Directory Proxy Server or a hardware load balancer. This configuration takes advantage of Access Manager support for failover, high availability, and managed load-balancing.
Figure 5–4 Multiple-Supplier Configuration With a Load Balancer

Using LDAP load balancers adds a layer of high availability and directory failover protection beyond the level that is available with Access Manager. For example, Directory Proxy Server can specify the percentage of the load that gets redistributed to each server. And, if all back-end LDAP servers become unavailable, Directory Proxy Server continues to manage requests, rejecting client queries. If you install a load balancer, Access Manager must be configured to recognize the application.
-
Before configuring Access Manager, Set up the Directory Servers for replication. For information about directory replication and for detailed setup instructions, see the Sun Java System Directory Server documentation: http://docs.sun.com/coll/1316.1.
-
Install and configure the LDAP load balancer. Follow the instructions in the documentation that comes with the load balancer you are using.
-
In the AMConfig.properties file, modify the com.iplanet.am.directory.host and com.iplanet.am.directory.port properties to point to the load balancer host and port number of a consumer Directory Server.
-
For each Access Manager Authentication module enabled, use the Access Manager Console to specify the consumer Directory Server. In the following steps, the LDAP Authentication module is used as an example:
-
For the first LDAP server and port, type the host name and port number for the primary (consumer) Directory Server using the form proxyhostname:port.
-
Do not enter anything for the second LDAP Server and Port.
-
-
In the serverconfig.xml file, specify the host name and port number of the consumer Directory Server, as shown in the following example for the serverconfig.xml file.
-
Restart Access Manager by restarting the web container.
Load Balancer Modification to the serverconfig.xml File
The following example shows the load balancer modification to the serverconfig.xml file.
<iPlanetDataAccessLayer>
<ServerGroup name="default" minConnPool="1"
maxConnPool="10">
<Server name="Server1"
host="idar.example.com" port="389"
type="SIMPLE"
Directory Server With a Firewall
If your deployment is configured with a firewall between Access Manager and Directory Server, Access Manager connections can time out if the firewall idle connection timeout value is less than the Directory Server idle connection timeout value (nsslapd-idletimeout attribute). This problem usually occurs during non-peak usage hours when the load on Access Manager is low.
When Directory Server connections are dropped by the firewall, Access Manager does not recognize that the connections have been dropped and then goes through the pool of LDAP connections until all connections are exhausted. Access Manager must be restarted to create a fresh pool of LDAP connections. To prevent this problem, consider the following solutions:
Setting the Global Timeout Attribute
You might be able to set the Directory Server global nsslapd-idletimeout attribute to a value less than the firewall idle connection timeout value. However, this solution might not be acceptable because nsslapd-idletimeout is a global configuration attribute that affects applications other than Access Manager.
Setting the Timeout Value for Individual Client Connections
Directory Server allows you to set specific attributes for individual client connections. The nsIdleTimeout attribute specifies the idle connection timeout value for individual clients. This value takes precedence over the nsslapd-idletimeout value set for the global Directory Server configuration.
Set the nsIdleTimeout attribute for the Access Manager user that binds to the LDAP directory, which by default is amldapuser. This attribute also applies to the dsameuser and puser users.
To add the nsIdleTimeout attribute for amldapuser, use either the Directory Server Console or the ldapmodify tool. For example:
ldapmodify -h host-name -p port
-D "cn=Directory Manager" -w password
dn: cn=amldapuser,ou=DSAME Users, dc=example,dc=com
changetype: modify
add: nsIdleTimeout
nsIdleTimeout: timeout-value
For timeout-value, specify a value less than the connection idle timeout value set for the firewall. Thus Directory Server will close the Access Manager connections for amldapuser before they are closed by the firewall.
To add the timeout for dsameuser or puser, use the above syntax, except set the dn option to the dsameuser or puser user.
The com.sun.am.event.connection.idle.timeout property in the AMConfig.properties file specifies the timeout value in minutes after which persistent searches will be restarted. This property ensures that persistent searches are restarted when the connections are dropped. Ideally, this value should be lower than the load balancer or firewall TCP timeout value, to make sure that persistent searches are restarted before the connections are dropped. A default value of zero (0) specifies that these searches will not be restarted.
For information about the Directory Server attributes and the ldapmodify tool, see the Sun Java System Directory Server documentation: http://docs.sun.com/coll/1316.1.
- © 2010, Oracle Corporation and/or its affiliates
