 To Specify Installation Directories and Initiate the System
Check
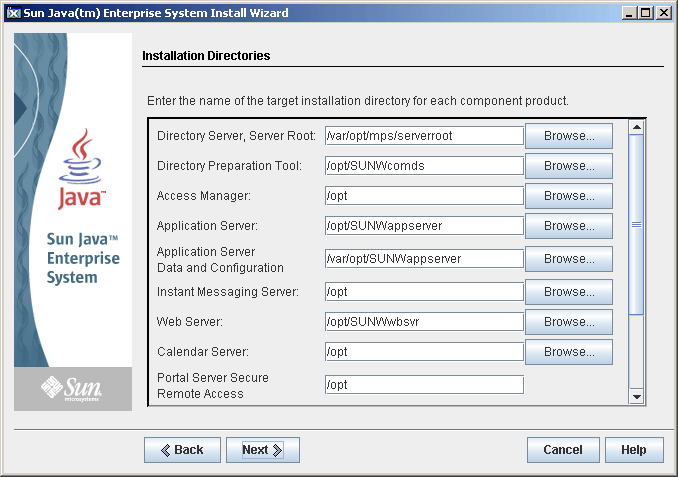
The Installation Directories page displays the default installation directories for the components you have selected. For example:

Steps
-
Examine the default installation directories.
To see a list of all the default directories and ports, refer to Chapter 3, Default Installation Directories and Ports, in Sun Java Enterprise System 2005Q4 Installation Reference.
-
Verify that the directories are correct for your deployment.
-
If the default directories are not acceptable, browse for alternative paths and change as needed.
-
-
Click Next to initiate the system check.
The installer checks for disk space, memory, operating system patches and operating system resources based on the installation directories provided. The left column of the following table lists the possible results of the system check. The right column specifies what action you should take for each result.
Message Displayed
Your Action
System ready for installation
Click Next to continue.
System ready for installation Includes a warning that memory is not at the recommended level.
Click Next to continue, but add memory when installation is complete. If you do not add memory, performance might be seriously affected.
System not ready for installation
Click View Report for information on the problems that the installer found. If any patches are missing, the patch numbers appear in this report.
If you can fix the reported problems without stopping the installer, do so and then click Check Again to recheck the system.
Solaris 10. If the installer is running in a non-global zone, you will receive a message telling you that memory information is not available.
Note –To install any missing operating system patches, do the following:
-
Go to the Sunsolve site: http://sunsolve.sun.com
-
Click Patch Portal.
-
Enter the patch number in the PatchFinder text box, and click Find Patch.
-
Download the zip file for the patch.
-
Expand the zip file. For example: unzip 112785-44.zip
-
A directory is created for the patch files.
-
Apply the patch. For example: patchadd 117885-44
-
Back in the Java ES installer, click Check Again. All system requirements are rechecked.
-
-
When the system check is complete and you are satisfied with the state of the system, click Next.
- © 2010, Oracle Corporation and/or its affiliates
