10.1 Installing Two Message Queue Instances
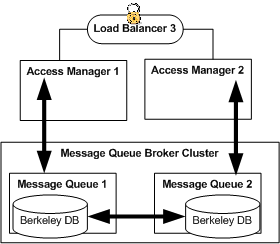
When session failover is implemented for Access Manager, session information is replicated in two backend session store databases. This ensures that when one Access Manager fails or stops, the information stored in the backend session databases can be used to keep the user continuously authenticated. If session failover is not implemented, when one Access Manager fails, if the user's session was created in the failed Access Manager server, the next time the user performs an operation that requires a session token, the user will have to use a login page to re-authenticate.
Use the following as your checklist for installing the Message Queue instances:
Figure 10–1 Session Failover

Access Manager provides a web container-independent session failover feature that uses Sun Java System Message Queue (Message Queue). Message Queue is a messaging middleware product that enables distributed applications to communicate and exchange data by sending and receiving messages. In this Deployment Example, Access Managers uses Message Queue as a communications broker, and uses the Berkeley DB by Sleepycat Software, Inc. for the backend session store databases.
For detailed information about how Access Manager and Message Queue interact, see Implementing Access Manager Session Failover in Sun Java System Access Manager 7 2005Q4 Deployment Planning Guide in the Access Manager Deployment Planning Guide.
 To Install Message Queue 1
Before You Begin
The Java ES installer must be mounted on the host computer system where you will install Message Queue. See the section “To Download and Unpack the Java Enterprise System 2005Q4 Installer”3.2 Downloading and Mounting the Java Enterprise System 2005Q4 Installer in this document.
-
Log in as a root user to the host MessageQueue–1.
-
Start the installer with -nodisplay option. Example:
# cd /mnt/Solaris_sparc
# ./installer -nodisplay
-
When prompted, provide the following information:
 Welcome to the Sun Java(TM)
Enterprise System;
serious software made simple...
<Press ENTER to Continue>
Press Enter.
Before you install this product,
you must read and accept the entire
Software License Agreement under which
this product is licensed for your
use.
<Press ENTER to display the
Software License Agreement>
Press Enter.
Language Support
Please enter a comma separated list
of languages you would like supported
with this installation [8]
Enter 8 for English.
The following component products
are detected on this system. They will
appear disabled, "* *", in the following
Component Selection Main Menu
<Press ENTER to continue>
Press Enter.
Component Selection - Main Menu
Enter a comma separated list of
products to install, or press R to
refresh the list  []:
Enter 12 for Message Queue.
Based on product dependencies for
your selections,the installer will install:
[X] 12. Sun Java(TM) System
Message Queue 3 2005Q4
Enterprise Edition (10.06 MB)
Press "Enter" to Continue...
Press Enter.
Shared Component Upgrades Required
Enter 1 to upgrade these shared
components and 2 to cancel  [1]:
Accept the default value.
System Ready for Installation.
Memory detectionis disabled in a local
zone. Enter 1 to continue [1]
Accept the default value.
Screen for selecting Type of
Configuration
1. Configure Now - Selectively
override defaults or
express through  2. Configure Later -
Manually configure following
installation
Select Type of Configuration [1]
Enter 1 for Configure Now.
Sun Java(TM) System Message
Queue 3 2005Q4 Enterprise Edition
1. Install
2. Start Over
3. Exit Installation.
What would you like to do [1]
First, see the following (Optional) Step 4. When you're ready to install, press Enter to accept the default value.
Installation Complete
Enter 1 to view installation
summary and Enter 2 to view
installation logs [1]
Enter ! when you're ready to exit the installer program.
-
(Optional) Monitor the log files and watch for installation errors.
# cd /var/sadm/install/logs
# tail -f Java_Enterprise_System_install.B10110830
 To Install Message Queue 2
-
Log in as a root user to the host MessageQueue–2.
-
Start the installer with -nodisplay option. Example:
# cd /mnt/Solaris_sparc
# ./installer -nodisplay
-
When prompted, provide the following information:
 Welcome to the Sun Java(TM)
Enterprise System;
serious software made simple...
<Press ENTER to Continue>
Press Enter.
Before you install this product,
you must read and accept the entire
Software License Agreement under which
this product is licensed for your
use.
<Press ENTER to display the
Software License Agreement>
Press Enter.
Language Support
Please enter a comma separated list
of languages you would like supported
with this installation [8]
Enter 8 for English.
The following component products
are detected on this system. They will
appear disabled, "* *", in the following
Component Selection Main Menu
<Press ENTER to continue>
Press Enter.
Component Selection - Main Menu
Enter a comma separated list of
products to install, or press R to
refresh the list  []:
Enter 12 for Message Queue.
Based on product dependencies for
your selections,the installer will install:
[X] 12. Sun Java(TM) System
Message Queue 3 2005Q4
Enterprise Edition (10.06 MB)
Press "Enter" to Continue...
Press Enter.
Shared Component Upgrades Required
Enter 1 to upgrade these shared
components and 2 to cancel  [1]:
Accept the default value.
System Ready for Installation.
Memory detectionis disabled in a local
zone. Enter 1 to continue [1]
Accept the default value.
Screen for selecting Type of
Configuration
1. Configure Now - Selectively
override defaults or
express through  2. Configure Later -
Manually configure following
installation
Select Type of Configuration [1]
Enter 1 for Configure Now.
Sun Java(TM) System Message
Queue 3 2005Q4 Enterprise Edition
1. Install
2. Start Over
3. Exit Installation.
What would you like to do [1]
First, see the following (Optional) Step 4. When you're ready to install, press Enter to accept the default value.
Installation Complete
Enter 1 to view installation
summary and Enter 2 to view
installation logs [1]
Enter ! when you're ready to exit the installer program.
-
(Optional) Monitor the log files and watch for installation errors.
# cd /var/sadm/install/logs
# tail -f Java_Enterprise_System_install.B10110830
- © 2010, Oracle Corporation and/or its affiliates
