Part I About This Deployment Example
Chapter 1 Key Features, System Architecture, and Process Flow
This document provides detailed instructions for enabling Security Assertion Markup Language (SAML) version 2 in a federated environment. You can adapt these instructions to suit your company's needs.
Sun JavaTM System Access Manager and Federation Manager implement two important sets of standards: Identity Federation Framework (ID-FF) , adopted by the Liberty Alliance Project, and SAML specifications adopted by the OASIS committee. These implementations enable business partners to form a Circle of Trust. The Circle of Trust enables individuals and organizations to easily conduct network transactions while protecting the individual's identity. For detailed information about the Liberty Alliance Project and about Access Manager implementations of federated identity and SAML protocols, see Sun Java System Access Manager 7 2005Q4 Federation and SAML Administration Guide.
1.1 Key Features
The setup instructions contained in this document use a specific environment to illustrate how to set up federation and SAMLv2 protocols. This environment is designed to highlight the following key features:
-
Access Manager servers are deployed in high-availability mode.
-
Federation Managers are deployed in high-availability mode and configured to with work with Sun Java System Directory Server instead of the default flat files.
-
XML Signing is enabled for all SAMLv2 protocols.
-
SAML2 URL end points are exposed through load balancers with SSL termination.
-
Web Policy Agents and J2EE Policy Agents are deployed in front of the Federation Manager instances, and the policy agents work only in single sign-on (SSO) mode .
1.2 System Architecture
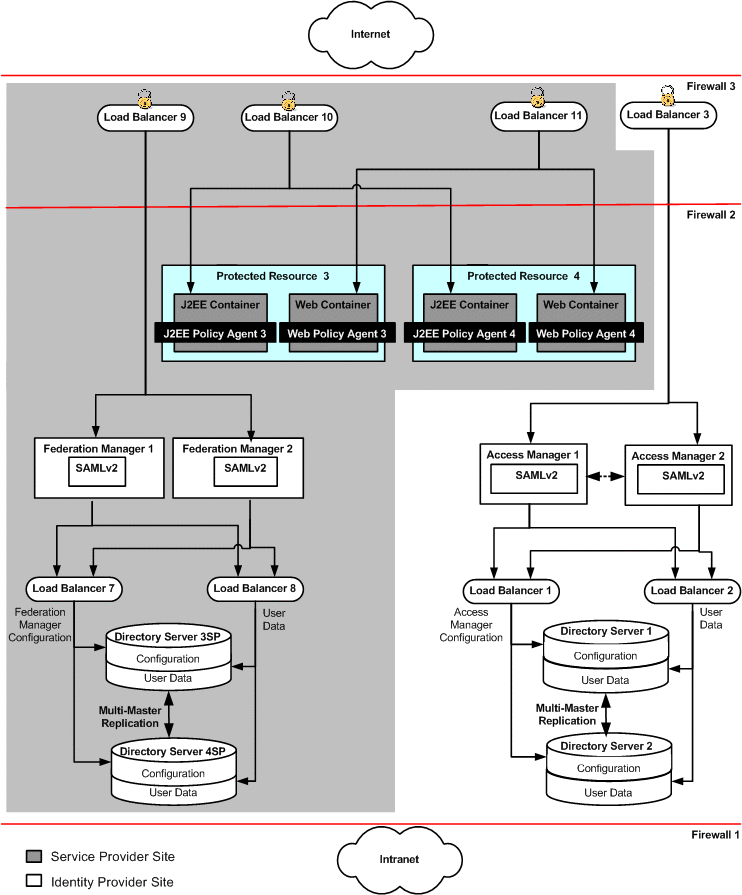
In this system architecture, a Service Provider and a Identity Provider form a circle of trust in order to exchange user authentication information using SAMLv2. For these instructions, the circle of trust contains one identity provider, a service that maintains and manages identity information. Once the circle of trust is established, single sign-on is enabled between both providers.
The Service Provider domain is siroe.com. In this deployment, two Federation Managers are load-balanced for high availability, and each is configured for the SAMLv2 protocol. Each Federation Manager server uses a Directory Server user instance for user data.
The Identity Provider domain is example.com. Two Access Manager servers are configured for the SAMLv2 protocol and load-balanced for high availability.
Table 1–1 Software Products Used in Examples|
Component |
Versions |
|---|---|
|
Sun Java Access Manager |
7.0 JES 2005Q4 |
|
Sun Java Access Manager Patch |
7.0_Patch_5 |
|
Sun Java Directory Server |
5.2 JES 2005Q4 |
|
Sun Java Directory Server Patch |
5.2_Patch_4 |
|
Sun Java System Federation Manager |
7.0 |
|
Sun Java Web Server |
6.1SP5 JES 2005Q4 |
|
Web Policy Agent (for Sun Java WebServer v6.1) |
2.2 |
|
Web Policy Agent Patch |
HotPatch_5 |
|
Sun Java Application Server |
8.1 JES 2005Q4 |
|
Sun Java Application Server Patch |
Enterprise Ed 8.1 2005Q1 |
|
J2EE Policy Agent (for Sun Java Application server 8.1 2005Q1) |
2.2 |
|
SAML plug-in |
2 |
|
SAML v2 plug-in Patch |
2 |
|
Sun Solaris |
10, Update 5 |
Figure 1–1 on the next page illustrates the Service Provider Site described in this document, Deployment Example 2: Federation Using SAMLv2.
Figure 1–1 Physical Architecture for Federation Using SAMLv2

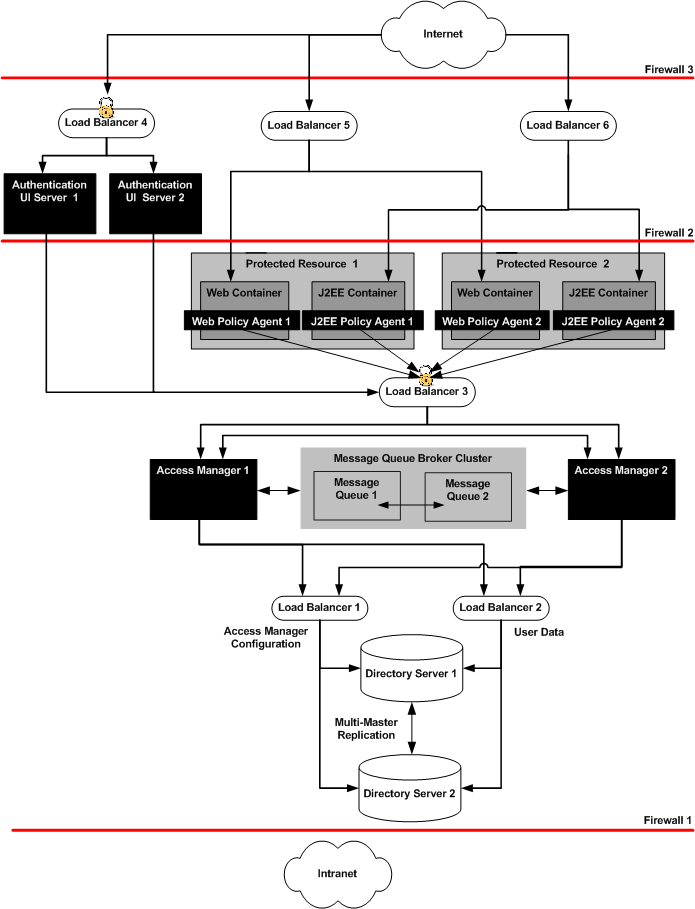
The Identity Provider Site shown here is a subset of a larger deployment example described in a companion document, Deployment Example: Access Manager Load Balancing, Distributed Authentication, and Session Failover. Use the two companion documents together to build both the Service Provider Site and the Identity Provider Site. See 2.12 Obtaining Instructions for Deploying the Identity Provider Site.
Figure 1–2 From Access Manager Load Balancing, Distributed Authentication UI, and Session Failover

To set up the Identity Provider Site, see Deployment Example: Access Manager Load Balancing, Distributed Authentication, and Session Failover. Follow the detailed instructions for setting up the Directory Servers, the Access Manager Servers, their respective load balancers, and session failover. For the Federation Using SAMLv2 deployment example, it is not necessary to implement the Distributed Authentication UI or the Protected Resources and policy agents pictured here.
1.3 Illustrated Protocol Flows
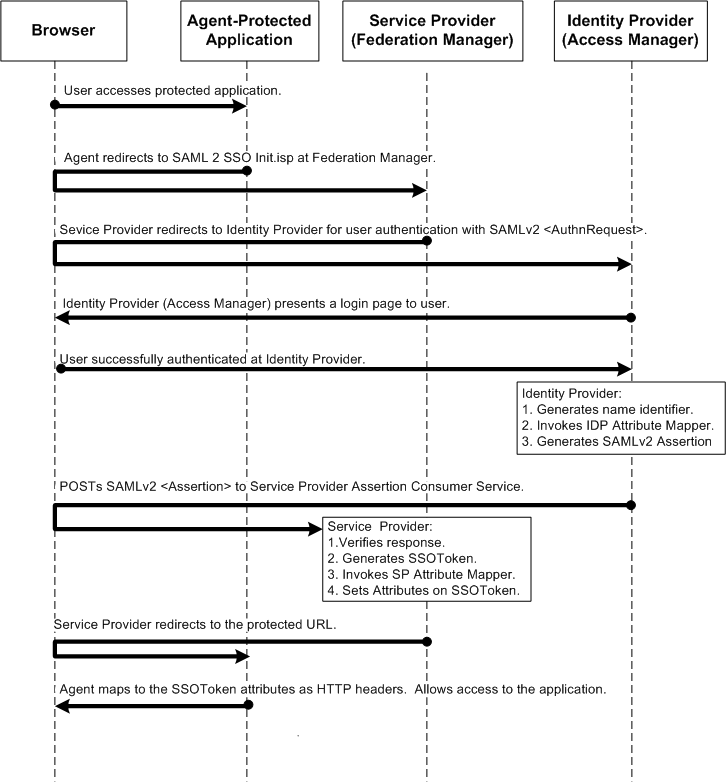
The following figure describes one possible SAMLv2 transaction.
Figure 1–3 SSO Protocol Flow

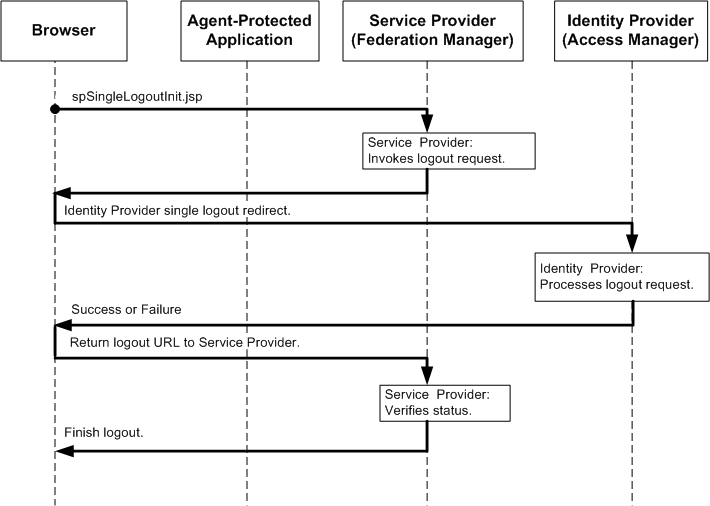
The following figure describes the component interactions in an HTTP redirect-based single logout transaction.
Figure 1–4 Single Logout Protocol Flow

1.4 Firewall Rules
Set up firewalls to allow traffic to flow as described in the following table.
Table 1–2 Firewall Rules|
From |
To |
Protocol |
Traffic Type |
|---|---|---|---|
|
Internet User |
LoadBalancer-9:3443 |
HTTPS |
Internet metadata URLs access and user authentication at the Service Provider site |
|
Internet User |
LoadBalancer-10:4443 |
HTTPS |
Service Provider application access |
|
Internet User |
LoadBalancer-11:6443 |
HTTPS |
Service Proivder application access |
|
Internet User |
LoadBalancer-3:9443 |
HTTPS |
Internet metadata URLs access and user authentication at the Identity Provider site |
|
LoadBalancer-10:4080 |
ProtectedResource-3:1080 |
HTTP |
Service Provider application access by user |
|
LoadBalancer-10:4080 |
ProtectedResource-4:1080 |
HTTP |
Service Provider application access by user |
|
LoadBalancer-11:5080 |
ProtectedResource-3:2080 |
HTTP |
Service Provider application access by user |
|
LoadBalancer-11:5080 |
ProtectedResource-4:2080 |
HTTP |
Service Provider application access by user |
|
Load Balancer-3:7070 |
AccessManager-1:8080 |
HTTP |
Load balancer redirection to Access Manager |
|
Load Balancer-3:7070 |
AccessManager-2:1080 |
HTTP |
Load balancer redirection to Access Manager |
|
LoadBalancer-9:1080 |
FederationManager-1:8080 |
HTTP |
Load balancer redirection to Federation Manager |
|
LoadBalancer-9:1080 |
FederationManager-2:8080 |
HTTP |
Load balancer redirection to Federation Manager |
Chapter 2 Before You Begin
This chapter provides the information about obtaining necessary software, tools, and third-party resources you'll need when implementing Federation using SAMLv2. The chapter also provides information about instructions that are outside the scope of this document, and how to obtain those instructions. You may want to resolve the issues described in this chapter before you begin building the Federation environment.
The following topics are discussed in this chapter:
-
2.2 Downloading and Mounting the Java Enterprise System 2005Q4 Installer
-
2.6 Obtaining the Application Server Enterprise Ed 8.1 2005Q1 Patch
-
2.10 Obtaining Certificates for SSL and for XML Signing and Encryption
-
2.12 Obtaining Instructions for Deploying the Identity Provider Site
2.1 Using This Manual
This manual provides instructions for building a Federation environment using SAMLv2. These instructions were used to build, deploy and test this deployment example in a lab facility. When using this manual, you'll obtain the best results if you perform the tasks in the exact sequence in which they are presented. Use the Table of Contents which begins on page 3 as a master task list. Groups of tasks are numbered for your convenience.
The last step in each task is a verification procedure. Be sure to verify the success of each task before moving on to the next task in the sequence.
This manual is designed to demonstrate just one way to implement Federation using SAMLv2. Although these instructions incorporate many recommended or “best practices,” and may be suitable in many different scenarios, this is not the only way to achieve the same results.
If you do plan to deviate from the task sequence or details described in this manual, you should refer to the relevant product documentation for information on differences in platforms, software versions or other requirement constraints.
2.1.1 Using the Companion Manual
This manual, Deployment Example 2: Federation Using SAMLv2, is designed to be used with its companion manual, Deployment Example 1: Access Manager Load Balancing, Distributed Authentication UI, and Session Failover. Use the Deployment Example 1 manual to set up the Identity Provider Site, and use this Deployment Example 2 manual to set up the Service Provider Site. For more information, see 1.2 System Architecture and 2.12 Obtaining Instructions for Deploying the Identity Provider Site in this manual.
2.1.2 Host Names and Functions Used in Examples
The following table lists naming conventions used in this manual.
Table 2–1 Naming Conventions Used in This Manual|
Host Name :Port Number |
Main Service URL |
|
|---|---|---|
|
Directory Servers |
||
|
DirectoryServer–3SP:1391 |
ldap://DirectoryServer-3SP.siroe.com:1391 |
|
|
DirectoryServer–4SP:1391 |
ldap://DirectoryServer-4SP.siroe.com:1391 |
|
|
Access Managers |
||
|
AccessManager–1:58080 |
http://AccessManager-1. example.com:58080/amserver |
|
|
AccessManager–2:58080 |
http://AccessManager-1. example.com:58080/amserver |
|
|
Federation Managers |
||
|
FederationManager–1:8080 |
http://FederationManager-1.siroe.com:8080 |
|
|
FederationManager–1:8080 |
http://FederationManager-2.siroe.com:8080 |
|
|
Protected Resources — Application Servers |
||
|
ProtectedResource–3:8888 |
http://LoadBalancere-10.siroe.com:1080 |
|
|
ProtectedResource–4:8888 |
http://LoadBalancer-.10.siroe.com:1080 |
|
|
Protected Resources — Web Servers |
||
|
ProtectedResource–3:8888 |
http://LoadBalancer-11.siroe.com:2080 |
|
|
ProtectedResource–4:8888 |
http://LoadBalancer-11.siroe.com:2080 |
|
|
Load Balancer for Access Manager-Servers |
||
|
LoadBalancer–3:9443 |
http://LoadBalancer-3.example.com:9443 |
|
|
Load Balancers for DirectoryServers |
||
|
LoadBalancer–7 |
http://LoadBalancer-7.siroe.com |
|
|
LoadBalancer–8 |
http://LoadBalancer-8.siroe.com |
|
|
Load Balancer for Federation Manager Servers |
||
|
LoadBalancer–9 |
http://LoadBalancer-9.siroe.com |
|
|
Load Balancer for J2EE Policy Agents |
||
|
LoadBalancer–10 |
http://LoadBalancer-10.siroe.com |
|
|
Load Balancer for Web Policy Agents |
||
|
LoadBalancer–11 |
http://LoadBalancer-11.siroe.com |
|
2.1.3 Related Third-Party Web Site References
Third-party URLs are referenced in this document and provide additional, related information.
Note –
Sun is not responsible for the availability of third-party web sites mentioned in this document. Sun does not endorse and is not responsible or liable for any content, advertising, products, or other materials that are available on or through such sites or resources. Sun will not be responsible or liable for any actual or alleged damage or loss caused or alleged to be caused by or in connection with use of or reliance on any such content, goods, or services that are available on or through such sites or resources.
2.1.4 Typographic Conventions
The following table describes the typographic conventions that are used in this book.
Table 2–2 Typographic Conventions|
Typeface |
Meaning |
Example |
|---|---|---|
|
AaBbCc123 |
The names of commands, files, and directories, and onscreen computer output |
Edit your .login file. Use ls -a to list all files. machine_name% you have mail. |
|
AaBbCc123 |
What you type, contrasted with onscreen computer output |
machine_name% su Password: |
|
aabbcc123 |
Placeholder: replace with a real name or value |
The command to remove a file is rm filename. |
|
AaBbCc123 |
Book titles, new terms, and terms to be emphasized |
Read Chapter 6 in the User's Guide. A cache is a copy that is stored locally. Do not save the file. Note: Some emphasized items appear bold online. |
2.1.5 Shell Prompts in Command Examples
The following table shows the default UNIX® system prompt and superuser prompt for the C shell, Bourne shell, and Korn shell.
Table 2–3 Shell Prompts|
Shell |
Prompt |
|---|---|
|
C shell |
machine_name% |
|
C shell for superuser |
machine_name# |
|
Bourne shell and Korn shell |
$ |
|
Bourne shell and Korn shell for superuser |
# |
2.2 Downloading and Mounting the Java Enterprise System 2005Q4 Installer
Installation as described in this document includes the installation and basic configuration of a Java Enterprise System (Java ES) solution. Installation, as used in this document, means using the Java ES 2004Q5 installer to copy the files for Java ES components to computer systems. You can download and unpack the installer zip files onto one host computer system, and then mount the cd image on any remote host computer systems where you must install Directory Server, Access Manager, Web Server, or Application Server.
 To Download and Mount the Java Enterprise
System 2005Q4 Installer
-
Download the Java ES installer zip files.
-
Start a browser, and go to http://www.sun.com/software/javaenterprisesystem/getit.jsp.
-
Choose Java Enterprise System.
Follow the instructions for downloading two zip files that together will form the CD image.
-
-
Log in as a root user to a host computer system where you want to run the installer.
-
Copy the Java Enterprise System installer zip files to this host computer system.
-
Unzip each zipped file. Example:
#ls
java_es_05Q4-ga-solaris-sparc-1-iso.zip
java_es_05Q4-ga-solaris-sparc-2-iso.zip
# unzip java_es_05Q4-ga-solaris-sparc-1-iso.zip
inflating: java_es_05Q4-ga-solaris-sparc-1.iso...

# unzip java_es_05Q4-ga-solaris-sparc-2-iso.zip
inflating: java_es_05Q4-ga-solaris-sparc-2.iso...
-
Create three directories for mounting the .iso files. Example:
# mkdir /mnt
# mkdir /mnt2
# mkdir /jes-complete
-
Mount the .iso files.
In the following examples, replace /download-directory/ with the path to your .iso file:
# lofiadm -a /download-directory/java_es_05Q4-ga-solaris-sparc-1.iso /dev/lofi/1
 # mount -F hsfs -o ro /dev/lofi/1 /mnt
Tip –If the /dev/lofi/1 device is already in use, run this command:
# lofiadm —d /dev/lofi/1
and then retry using the lofiad -a command.
To mount the second iso file:
# lofiadm -a /download-directory/java_es_05Q4-ga-solaris-sparc-2.iso /dev/lofi/2
# mount -F hsfs -o ro /dev/lofi/2 /mnt2
# lofiadm
Block Device             File
dev/lofi/1              /export/temp/java_es_05Q4-ga-solaris-sparc-1.iso
/dev/lofi/2             /export/temp/java_es_05Q4-ga-solaris-sparc-2.iso
-
Copy both mounted .iso files to the same directory.
The two .iso files together form the complete JES package, so you must copy both files into the same directory. As an alternative, you can burn each ISO onto a CD, and then run the installer from a CD drive.
# cd /mnt1
# cp -r * /jes-complete
# cd /mnt2
# cp -r * /jes-complete
Next Steps
After you mount the .iso files, the installer is located in the following directory:
/jes-complete/Solaris_sparc
In this Deployment Example, you start the installer with the -nodisplay option:
# /jes-complete/Solaris_sparc/installer —nodisplay
2.3 Obtaining the Federation Manager Program
Download the Sun Java System Federation Manager program onto the Federation Manager 1 host and onto the Federation Manager 2 host. You can download the software from the following page on the Sun Microsystems website: http://www.sun.com/download/products.xml?id=44a5bbb5
2.4 Obtaining the SAMLv2 Plug-In
Download the Sun Java System SAMLv2 Plug-in for Federation Services 1.0 onto the Federation Manager 1 host, the Federation Manager 2 host, the Access Manager 1 host, and the Access Manager 2 host. You can download the software from the following page on the Sun Microsystems website: http://www.sun.com/download/products.xml?id=43e00414
2.5 Obtaining the SAMLv2 Patch 2
Download the Sun Java System SAMLv2 Plug-in Patch 2 for Federation Services 1.0 onto the Federation Manager 1 host, the Federation Manager 2 host, the Access Manager 1 host, and the Access Manager 2 host. You can download the software using one of the following URLs:
- Solaris (sparc) 122983-02
-
http://sunsolve.sun.com/search/document.do?assetkey=1-21-122983-02-1
- Solaris (x86) 122984-02
-
http://sunsolve.sun.com/search/document.do?assetkey=1-21-122984-02-1
- Linux 122985-02
-
http://sunsolve.sun.com/search/document.do?assetkey=1-21-122985-02-01
2.6 Obtaining the Application Server Enterprise Ed 8.1 2005Q1 Patch
A known problem exists that causes Application Server to replace the https string in URLs to http during redirection. You can eliminate this problem by installing this patch.
Download the Sun Java System Application Server Enterprise Ed 8.1 2005Q1 Patch onto the Application Server 3 host and onto the Application Server 4 host. You can download the software using one of the following URLs:
- Solaris (sparc) 119166-22
-
http://sunsolve.sun.com/search/document.do?assetkey=1-21-119166
- Solaris (x86) 119170-14
-
http://sunsolve.sun.com/search/document.do?assetkey=1-21-119170-14
- Linux 119171-14
-
http://sunsolve.sun.com/search/document.do?assetkey=1-21-119171-14
2.7 Obtaining Policy Agents Software
-
Download the Sun Java System Access Manager Policy Agent 2.2 for Sun Java System Application Server 8.1 onto the Protected Resource 3 host and onto the Protected Resource 4 host. You can download the software from the following Sun Microsystems website: http://www.sun.com/download/products.xml?id=43543381
-
Download the Sun Java System Access Manager Policy Agent 2.2 for Sun Java System Web Server 6.1 onto the Protected Resource 3 host and onto the Protected Resource 4 host. You can download the software from the following Sun Microsystems website: http://www.sun.com/download/products.xml?id=434ed995
2.8 Resolving Host Names
There are many ways to resolve host names used in this deployment. For example, you can use a DNS naming service, or you can include the following DN entries in a DNS database. For this particular deployment, the following entries were added to the local host file on all Unix hosts. The entries were also added to equivalent files on Windows hosts, and on client machines for where browsers are used.
Table 2–4 Local host File for Resolving Host Names
| |||||||
| |||||||
|
|
|
|||||
|
|
|
|||||
|
|
|
|||||
|
|
|
|||||
|
|
|
|||||
|
|
|
|||||
| |||||||
| |||||||
|
|
|
|||||
|
|
|
|||||
|
|
|
|||||
|
|
|
|||||
|
|
|
|||||
|
|
|
2.9 Setting Up Load Balancer Hardware and Software
All load balancers in this deployment example are BIG-IP load balancers made by f-5 Networks. If you are using BIG-IP load balancer hardware, use the documentation that comes with the product for the initial hardware setup. See http://f5.com/products/bigip/#. If you are using a load balancer made by another manufacturer, use the documentation that comes with that product.
2.10 Obtaining Certificates for SSL and for XML Signing and Encryption
For this deployment example, all SSL certificates were obtained from an internal certificate server. You may obtain SSL certificates from a recognized Certificate Authority (CA) such as VeriSign or Thawte. Follow the instructions provided by the certificate issuer. Be sure that you are familiar with SSL certificates and the procedures for requesting and obtaining certificates from your root Certificate Authority. The following groups of tasks require you to obtain SSL certificates:
2.11 Obtaining and Using the Certificate Database Tool
For this deployment example, you must have access to the Certificate Database Tool certutil utility. You need the certutil utility for setting up the SSL Client handshake on the J2EE Policy Agents. Use certutil to create and modify the Application Server trust database files. You can also use certutil to list, generate, modify, or delete certificates within the cert8.db file and to create or change the password, generate new public and private key pairs, display the contents of the key database, or delete key pairs within the key3.db file.
For information about obtaining and using the certutil utility, see the following URL on the Mozilla website: http://www.mozilla.org/projects/security/pki/nss/tools/certutil.html.
2.12 Obtaining Instructions for Deploying the Identity Provider Site
In this manual, Part III Setting Up the Identity Provider Site is designed to build upon the instructions provided in another document, Deployment Example 1: Access Manager Load Balancing, Distributed Authentication, and Session Failover. Download this document from the following Sun Microsystems website: http://docs.sun.com/app/docs/doc/819-6258
The deployment described in Deployment Example: Access Manager Load Balancing, Distributed Authentication, and Session Failover is similar to the Identity Provider Site described in this document, Deployment Example 2: Federation Using SAMLv2. See 1.2 System Architecture in this manual.
2.13 Finding Help for SAMLv2 CLI Commands
When you need onscreen information for SAMLv2 commands, you can use the following saml2meta commands:
- Syntax
-
saml2meta commandName -–help
- Usage
-
saml2meta commandName
- © 2010, Oracle Corporation and/or its affiliates
