Data Views With Hierarchy and a Distribution Algorithm
This section describes how to configure a data view to combine hierarchy with distribution algorithms. For information about this type of deployment, see Data Views With Hierarchy and a Distribution Algorithm in Oracle Fusion Middleware Reference for Oracle Directory Server Enterprise Edition.
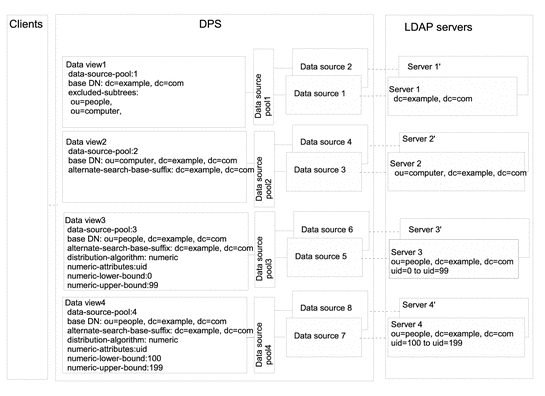
The example in this section contains four data views. The base DN of data view 1 is superior to the base DNs of the other data views. Data view 3 and data view 4 have the same base DN, but a numeric distribution algorithm separates the entries into different data views.
Directory Proxy Server automatically excludes a subordinate branch of a subtree from a data view when the subordinate branch is configured as the base DN of a separate data view. A numeric distribution algorithm separates entries from the same subtree into different data views. A data source pool is configured for each set of data-equivalent data sources.
The following figure shows the example deployment.
Figure 21–2 Sample Data View With Hierarchy and a Distribution Algorithm

 To Configure Data Views With Hierarchy and a Distribution
Algorithm
You cannot use DSCC to perform this task. Use the command line, as described in this procedure.
-
Create a data source for each LDAP server as described in Creating and Configuring LDAP Data Sources.
-
Create four data source pools as described in Creating and Configuring LDAP Data Source Pools.
-
Attach the data sources to the data source pools by following the instructions in Attaching LDAP Data Sources to a Data Source Pool.
-
Attach the data sources that contain dc=example,dc=com to data-source-pool-1.
-
Attach the data sources that contain ou=computer,dc=example,dc=com to data-source-pool-2.
-
Attach the data sources that contain entries in ou=people,dc=example,dc=com with uid between 0 and 99 to data-source-pool-3.
-
Attach the data sources that contain entries in ou=people,dc=example,dc=com with uid between 100 and 199 to data-source-pool-4.
-
-
(Optional) Configure load balancing.
For information, see Configuring Load Balancing.
-
Create a data view with a base DN at dc=example,dc=com, that refers to data-source-pool-1.
$ dpconf create-ldap-data-view -h host1 -p 1389 dataview-1 \
 data-source-pool-1 dc=example,dc=com
-
Create a data view with a base DN at ou=computer,dc=example,dc=com that refers to data-source-pool-2.
$ dpconf create-ldap-data-view -h host1 -p 1389 dataview-2 \
 data-source-pool-2 ou=computer,dc=example,dc=com
-
Create a data view with a base DN at ou=people,dc=example,dc=com that refers to data-source-pool-3. Configure a distribution algorithm on the data view to select entries with uid between 0 and 99.
$ dpconf create-ldap-data-view -h host1 -p 1389 dataview-3 \
 data-source-pool-3 ou=people,dc=example,dc=com
$ dpconf set-ldap-data-view-prop dataview-3 distribution-algorithm:numeric \
 numeric-attrs:uid numeric-lower-bound:0 numeric-upper-bound:99
-
Create a data view with a base DN at ou=people,dc=example,dc=com that refers to data-source-pool-4, and configure a distribution algorithm on the data view to select entries with uid between 100 and 199.
$ dpconf create-ldap-data-view -h host1 -p 1389 dataview-4 \
 data-source-pool-4 ou=people,dc=example,dc=com
$ dpconf set-ldap-data-view-prop dataview-4 distribution-algorithm:numeric \
 numeric-attrs:uid numeric-lower-bound:100 numeric-upper-bound:199
-
Verify that the subtrees ou=computer,dc=example, dc=com and ou=people,dc=example, dc=com have been excluded from dataview-1 by looking at the excluded-subtrees parameter.
$ dpconf get-ldap-data-view-prop -h host1 -p 1389 dataview-1 excluded-subtrees
The list of excluded subtrees is returned.
-
Restart the instance of Directory Proxy Server for the changes to take effect.
For information about restarting Directory Proxy Server, see To Restart Directory Proxy Server.
- © 2010, Oracle Corporation and/or its affiliates
