Chapter 21 Using Hotkey Editor
Use the Hotkey Editor to create, modify, or delete CDE hotkeys. Hotkey is a general term used to show the association between a specific key and a specified event (target event). For example, choosing Alt+Left will move the workspace to the left. The target event could be a CDE action, an application, a document, a workspace management function, or a multiple monitor management function.
To Start Hotkey Editor
The first time the Hotkey Editor is started, the display area is populated with the currently defined hotkeys. These keys are the default keys which are presented as pre-defined keys. The Hotkey Editor application has two screens, the main Hotkey Editor window and the Edit Key dialog box. You can start Hotkey Editor from:
-
Application Manager
-
The front panel
-
The command line
To start Hotkey Editor from Application Manager:
The Hotkey Editor window is displayed.
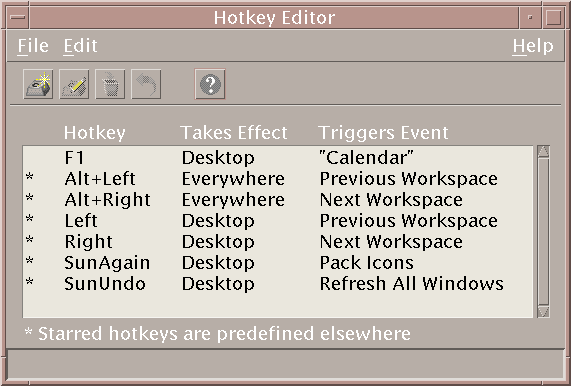
You can only bring up one instance of the Hotkey Editor. The buttons on the toolbar can be used for creating, editing, and deleting hotkeys. Alternatively, right-click the mouse button over the display area for a drop-down list of the same menu options. At the bottom of the window is an explanation of what the starred items mean, as well as an update of the most recently executed action on a hotkey.
Click on a hotkey to select it. Double-clicking a hotkey opens the Edit Key dialog box and populates it with that hotkey's current data. Use the Edit Key dialog box to create and edit hotkeys.
To start Hotkey Editor from the front panel:
To start Hotkey Editor from the command line, type sdthotkey.
Creating a Hotkey
Hotkey Editor does not permit you to create duplicate hotkeys. You can create single letter hotkeys (for example “a”) . However, this is not recommended due to the probability of accidentally triggering a target event. Hotkey Editor is not case-sensitive, for example, “A” is the same as “a”.
You can create or edit hotkeys to affect the following targets:
-
An application, action, or document
-
A workspace management function
-
A multi-monitor management function
To Create a Hotkey for an Application, Action, or Document
-
From the Hotkey Editor window, click New.
-
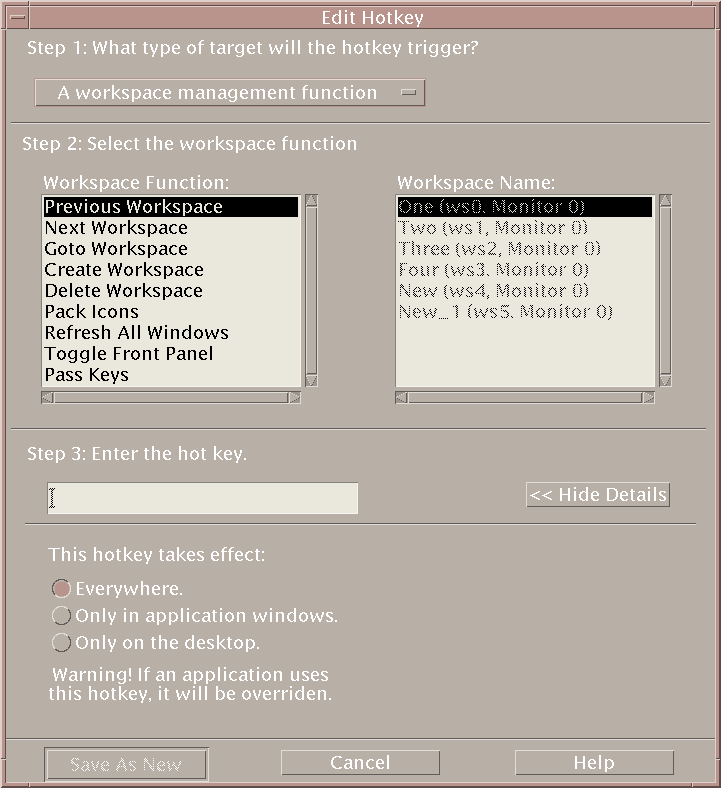
For Step 1, from the pull-down menu, select An application, action, document.
-
In Step 2, establish the target that the hotkey will affect.
-
Under Step 3, in the text field, type the keystrokes of your choice that will act as the hotkey.
To determine where the hotkey will be effective, click Show Details.
-
(Optional) Modify where the target event will be active and the path to the target event.
Unless specified the hotkey will be effective everywhere. You can also modify the hotkey's target name or path if no drag and drop option exists for the target.
-
Specify where the hotkey will be active.
-
Everywhere - The created hotkey takes precedence over an application assigned hotkey
-
Only in application windows - The hotkey is effective only in an application window
-
Only on the desktop - Hotkey is effective only on the backdrop of the monitor
-
-
Type the path to the target event that the hotkey will affect.
You may also click Browse to navigate to the target event directory.
-
Enter the command-line argument.
This permits you to have extra command line arguments associated with the target.
-
-
Click Save As New.
-
Click Cancel to close the dialog box.
-
In the main Hotkey Editor window, choose Save from the File menu.
This will activate the hotkey.
Once you have completed creating a hotkey, you can begin creating another new hotkey without exiting the current Edit Key dialog box.
To Create a Hotkey for a Workspace Management Function
-
From the Hotkey Editor window, click New.
-
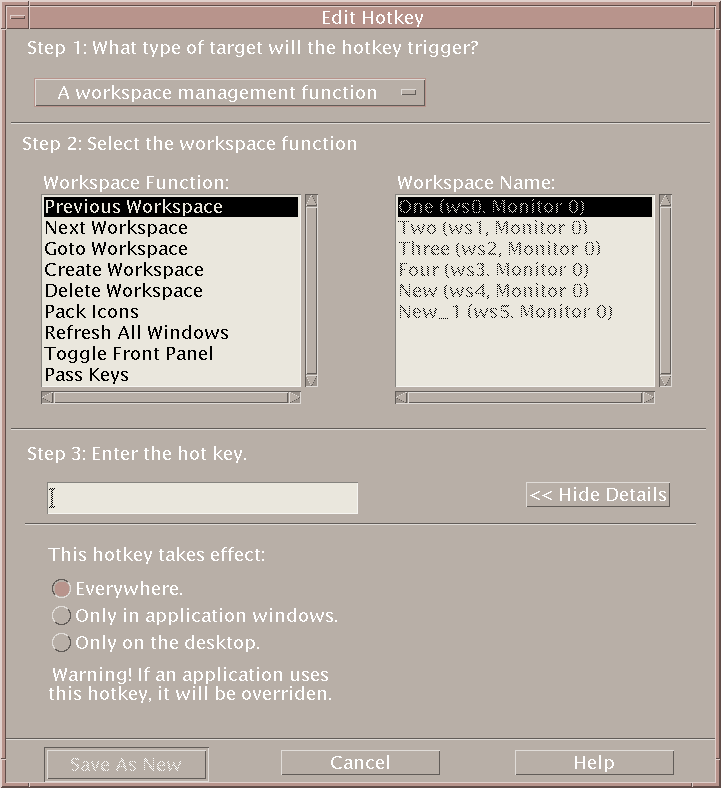
For Step 1, from the pull-down menu, select A workspace management function.
-
In Step 2, select an option under Workspace Function:
-
Previous Workspace - Moves you to the previous workspace
-
Next Workspace - Moves you to the next workspace
-
Goto Workspace - Moves you to a specified workspace
-
Create Workspace - Creates a new workspace
-
Delete Workspace - Deletes a workspace
-
Pack Icons - Packs the icons in the workspace
-
Refresh All Windows - Updates all windows with any changes you made
-
Toggle Front Panel - Switches the front panel between the open and close state
-
Pass Keys - The defined pass key will override all existing hotkeys. Toggle the pass key hotkey to switch between the on/off modes.
The Workspace Name listbox contains the workspace names as shown on the front panel. It also contains a system identifier in case duplicate names are created. The Workspace Name listbox is enabled only if the workspace function list on the left requires a workspace argument. If you are creating a new hotkey, the first option in the Workspace Function listbox is already selected.
-
-
Under Step 3, in the text field, type the keystrokes of your choice that will act as the hotkey.
To determine where the hotkey will be effective, click Show Details.
-
(Optional) Specify where the hotkey will be active.
-
Everywhere - The created hotkey takes precedence over an application assigned hotkey
-
Only in application windows - The hotkey is effective only in an application window
-
Only on the desktop - Hotkey is effective only on the backdrop of the monitor
-
-
Click Save As New.
-
Click Cancel to close the dialog box.
-
In the main Hotkey Editor window, choose Save from the File menu.
This will activate the hotkey.
Once you have completed creating a hotkey, you can begin creating another new hotkey without exiting the current Edit Key dialog box.
To Create a Hotkey for a Multi-Monitor Management Function
-
From the Hotkey Editor window, click New.
-
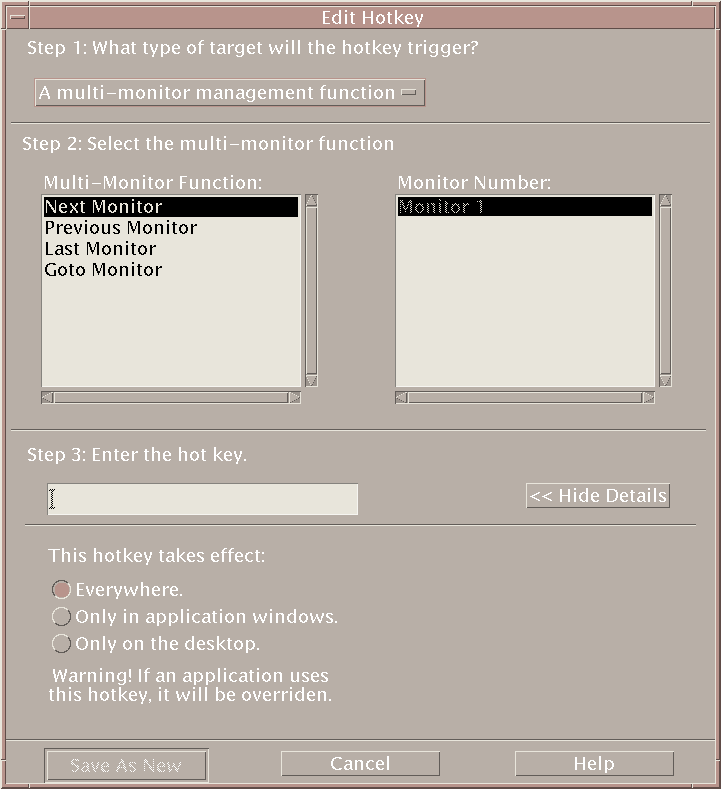
For Step 1, from the pull-down menu, select A multi-monitor management function.
-
In Step 2, select an option under Multi-Monitor Function:
-
Next Monitor - Moves to the next monitor
-
Previous Monitor - Moves to the previous monitor
-
Last Monitor - Moves to the last monitor
-
Goto Monitor - Moves to a specified monitor
The Multi-Monitor Function listbox contains the monitor function. The Monitor Number listbox contains a list of monitors available on your desktop.
If you are creating a new hotkey, the first option in the Multi-Monitor Function listbox is already selected.
-
-
Under Step 3, in the text field, type the keystrokes of your choice that will act as the hotkey.
To determine where the hotkey will be active, click Show Details.
-
(Optional) Specify where the hotkey will be active.
-
Everywhere - The created hotkey takes precedence over an application assigned hotkey
-
Only in application windows - The hotkey is effective only in an application window
-
Only on the desktop - Hotkey is effective only on the backdrop of the monitor
-
-
Click Save As New.
-
Click Cancel to close the dialog box.
-
In the main Hotkey Editor window, choose Save from the File menu.
This will activate the hotkey.
Once you have completed creating a hotkey, you can begin creating another new hotkey without exiting the current Edit Key dialog box.
Editing a Hotkey
You can edit a hotkey to change or modify its target event. An edited hotkey will replace the currently defined hotkey. Hotkey Editor will not warn you prior to overriding existing hotkeys.
To Edit a Hotkey for an Application, Action, or Document
-
In the Hotkey Editor window, double-click a hotkey.
Alternatively, select a hotkey and click Open.
The Edit Key dialog box opens with the specifics for that hotkey.
-
For Step 1, from the pull-down menu, select An application, action, document.
To change the type of target that the hotkey will trigger, select the appropriate option from the pull-down menu.
-
In Step 2, establish the target that the hotkey will affect.
-
Under Step 3, in the text field, type the keystrokes of your choice that will replace the currently defined hotkey
To determine where the hotkey will be effective, click Show Details.
-
(Optional) Modify where the target event will be active and the path to the target event.
Unless specified the hotkey will be effective everywhere. You can also modify the hotkey's target name or path if no drag and drop option exists for the target.
-
Specify where the hotkey will be active.
-
Everywhere - The created hotkey takes precedence over an application assigned hotkey
-
Only in application windows - The hotkey is effective only in an application window
-
Only on the desktop - Hotkey is effective only on the backdrop of the monitor
-
-
Type the path to the target event that the hotkey will affect.
You can also click Browse to navigate to the target event directory.
-
Enter the command-line argument.
This permits you to have extra command line arguments associated with the target.
-
-
Click Update.
-
Click Cancel to close the dialog box.
-
In the main Hotkey Editor window, choose Save from the File menu.
This will activate the hotkey.
You cannot edit multiple hotkeys in the same Edit Key dialog box. You will have to complete the edits on the current hotkey, close the Edit Key dialog box, and then select and open the next hotkey to be edited.
To Edit a Hotkey for a Workspace Management Function
-
In the Hotkey Editor window, double-click a hotkey.
Alternatively, select a hotkey and click Open.
The Edit Key dialog box displays with the specifics for that hotkey.
-
For Step 1, from the pull-down menu, select A workspace management function.
To change the type of target that the hotkey will trigger, select the appropriate option from the pull-down menu.
-
In Step 2, select an option under Workspace Function:
-
Previous Workspace - Moves you to the previous workspace
-
Next Workspace - Moves you to the next workspace
-
Goto Workspace - Moves you to a specified workspace
-
Create Workspace - Creates a new workspace
-
Delete Workspace - Deletes a workspace
-
Pack Icons - Packs the icons in the workspace
-
Refresh All Windows - Updates all windows with any changes you made
-
Toggle Front Panel - Toggles the front panel between the open and close state
-
Pass Keys - The defined pass key will override all existing hotkeys. Toggle the pass key hotkey to switch between the on/off modes.
The Workspace Name listbox contains the workspace names as shown on the front panel. The Workspace Name listbox contains a system identifier in case duplicate names are created. The Workspace Name listbox is enabled only if the workspace function list on the left requires a workspace argument.
-
-
Under Step 3, in the text field, type the keystrokes of your choice that will replace the currently defined hotkey.
-
(Optional) Specify where the hotkey will be active.
-
Everywhere - The created hotkey takes precedence over an application assigned hotkey
-
Only in application windows - The hotkey is effective only in an application window
-
Only on the desktop - Hotkey is effective only on the backdrop of the monitor
-
-
Click Update.
-
Click Cancel to close the dialog box.
-
In the main Hotkey Editor window, choose Save from the File menu.
This will activate the hotkey.
You cannot edit multiple hotkeys in the same Edit Key dialog box. You will have to complete the edits on the current hotkey, close the Edit Key dialog box, and then select and open the next hotkey to be edited.
To Edit a Hotkey for a Multi-Monitor Management Function
-
In the Hotkey Editor window, double-click a hotkey.
Alternatively, select a hotkey and click Open.
The Edit Key dialog box displays with the specifics for that hotkey.
-
For Step 1, from the pull-down menu, select A multi-monitor management function.
To change the type of target that the hotkey will trigger, select the appropriate option from the pull-down menu.
-
In Step 2, select the target that the hotkey will affect:
-
Next Monitor - Moves you to the next monitor
-
Previous Monitor - Moves you to the previous monitor
-
Last Monitor - Moves you to the last monitor
-
Goto Monitor - Moves to a specified monitor
The Multi-Monitor Function listbox contains the monitor function. The Monitor Number listbox contains a list of monitors available from your desktop.
-
-
Under Step 3, in the text field, type the keystrokes of your choice that will replace the currently defined hotkey.
-
(Optional) Specify where the hotkey will be active.
-
Everywhere - The created hotkey takes precedence over an application assigned hotkey
-
Only in application windows - The hotkey is effective only in an application window
-
Only on the desktop - Hotkey is effective only on the backdrop of the monitor
-
-
Click Update.
-
Click Cancel to close the dialog box.
-
In the main Hotkey Editor window, choose Save from the File menu.
This will activate the hotkey.
You cannot edit multiple hotkeys in the same Edit Key dialog box. You will have to complete the edits on the current hotkey, close the Edit Key dialog box, and then select and open the next hotkey to be edited.
Deleting and Recovering Hotkeys
You can delete and recover hotkeys. You can also choose to revert to the original settings of an edited hotkey.
To Delete a Hotkey
-
Click on a hotkey in the main Hotkey Editor window.
-
From the Edit menu select Delete.
Alternatively, click on the delete button from the tool bar. The status bar at the bottom of the window will indicate which hotkey was deleted.
To Undo the Previous Action
To Redo the Previous Action
-
Click on a hotkey in the main Hotkey Editor window.
-
From the Edit menu select Redo.
The status bar at the bottom of the window will indicate which hotkey was redone.
To Revert to a Previous Hotkey
-
Click on a hotkey in the main Hotkey Editor window.
-
Click on the Revert button from the tool bar.
This option does not activate a modified and saved hotkey, instead, it reverts to the previously defined fields for that hotkey. The status bar at the bottom of the window will indicate the hotkey to which it was reverted.
- © 2010, Oracle Corporation and/or its affiliates


