Chapter 7 Fonts
About This Chapter
This chapter describes the PostScript fonts included in the Simplified Chinese Solaris operating environment, what you need to use them, and how to edit them.
Display PostScript System (DPS)
The Simplified Chinese Solaris operating environment provides PostScript fonts in the Display PostScript System (DPS). This section describes what you need to use DPS in Simplified Chinese Solaris software. For further details, see Programming the Display PostScript System with X, published by Adobe® Systems.
Using Simplified Chinese PostScript Fonts and DPS Facilities
The Simplified Chinese Solaris operating environment includes the fonts listed in the following table. You can use any of the Simplified Chinese fonts just as you would use Roman fonts.
Table 7-1 Simplified Chinese Solaris Operating Environment PostScript Fonts|
Font Name |
Description |
|---|---|
|
Song-Medium |
Alias of Song-Medium-EUC; can be used like a Roman font. |
|
Song-Medium-EUC |
Song-Medium font, EUC encoding, horizontal display; can be used like a Roman font. |
|
Kai-Medium |
Alias of Kai-Medium-EUC; can be used like a Roman font. |
|
Kai-Medium-EUC |
Kai-Medium font, EUC encoding, horizontal display; can be used like a Roman font. |
|
FangSong-Medium |
Alias of FangSong-Medium-EUC; can be used like a Roman font. |
|
FangSong-Medium-EUC |
FangSong-Medium font, EUC encoding, horizontal display; can be used like a Roman font. |
|
Hei-Medium |
Alias of Hei-Medium-EUC; can be used like a Roman font. |
|
Hei-Medium-EUC |
Hei-Medium font, EUC encoding, horizontal display; can be used like a Roman font. |
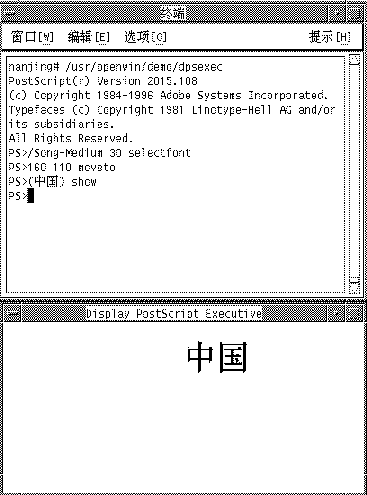
The following figure shows a sample of Song-Medium.
Figure 7-1 Sample Simplified Chinese Text Display PostScript Output
Creating Composite Roman and Simplified Chinese Fonts
You can create composite fonts using any one Roman font and the Simplified Chinese fonts. For example, the following PostScript code defines a composite font, Times-Italic+Kai-Medium, which uses Times-Italic for ASCII characters and Kai-Medium font for Simplified Chinese characters:
/makeEUCfont {
        /AsianFont exch def
        /WestFont  exch def
        /NewFont   exch def

        /CIDInit /ProcSet findresource
        begin
          NewFont [ AsianFont WestFont ]
          beginrearrangedfont
            1 usefont
            1 beginbfrange
              <00> <7e>  <00>
            endbfrange
          endrearrangedfont
        end
  } bind def

  /LC_Times-Roman /Times-Roman /Kai-Medium makeEUCfont
Using Simplified Chinese Fonts in DPS Programming
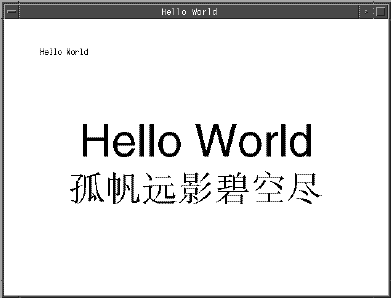
You can use Simplified Chinese fonts just as you use Roman fonts in DPS wrap definitions. The following code sample creates the display in the next figure.
	defineps PSWDisplayText(char *text)
        	/pointSize 50 def
        	/Helvetica pointSize selectfont
        	(Hello World) stringwidth pop 2 div neg 0 moveto
        	(Hello World) show

        	/cpSize 40 def
        	/Song-Medium cpSize selectfont
        	(text) stringwidth pop 2 div neg pointSize neg moveto
        	(text) show
	endps
You can call PSWDisplayText(Chinese text) in a C program to display the designated Chinese text. For an example see the following figure.
Figure 7-2 Using Simplified Chinese Solaris Operating Environment DPS
Simplified Chinese Solaris software provides TrueType support in DPS.
Converting BDF to PCF Format
Before applications can use the modified BDF file, it must be converted to a PCF format file.
Make the edited font usable by the Simplified Chinese Solaris operating environment by converting to X11 PCF format as follows:
system% bdftopcf -o myfont14.pcf myfont.bdf |
For more information, see the bdftopcf(1) man page.
Installing and Checking the Edited Font
-
To add a new bitmap, move the .pcf font file into your font directory. You may compress the .pcf font file before moving it to your font directory:
system% compress myfont14.pcf
-
Run the following commands in your font directory.
The .bdf file should not be in the font directory.
system% cat >> fonts.alias
-new-myfont-medium-r-normal--16-140-75-75-c-140-gb2312.1980-0
Myfont-Medium14'
^D
system% mkfontdir
system% xset +fp `pwd`
-
You can view your font using the X Font Displayer (xfd) by typing:
system% xfd -fn Myfont-Medium14
All Simplified Chinese fonts have XLFD font names, and you can use the xlsfonts utility to display these names as follows:
system% xlsfonts | grep gb2312 |
Creating Characters With sdtudctool
You can create new characters using the drawing tools in the sdtudctool utility. (For information on modifying a font, see Editing Fonts With fontedit on page 83.) Following is the user defined characters code range for different SCH locales:
Table 7-2 Code Points for locales|
zh |
0xD7FA-0xD7FE |
|
zh.GBK |
0xAAA1-0xAFFE |
|
zh_CN.GB18030 |
0xAAA1-0xAFFE |
|
zh.UTF-8 |
0xAAA1 - 0xAFFE |
The sdtudctool utility supports bitmap, Type 1, and CID fonts. You can also specify a font size for the new characters. This section contains procedures for using sdtudctool.
Using sdtudctool
This section contains instructions for creating, inputing and printing new characters with the sdtudctool utility and other tools. For example inzh locale, use the following procedure.
-
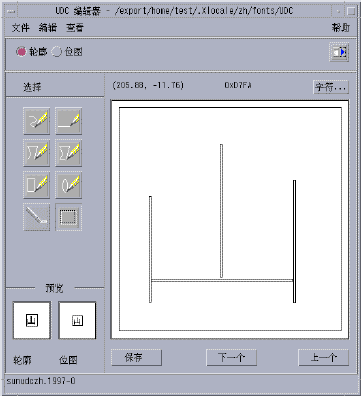
To start the utility, type the following command:
system% sdtudctool
The following window appears.
-
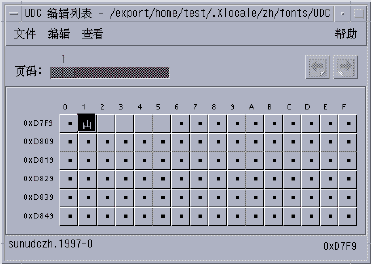
Click the Character button.
The following dialog box appears:
-
Specify the code position of the new character.
-
Create the outline or bitmap for the character using the drawing tools.
-
Click Save to save the character.
-
Continue creating new characters.
-
When you are finished, choose Save from the File menu to save the changes to your environment.
The new character(s) are saved in $HOME/.Xlocale/{locale}/fonts/UDC.. .
Specifying Options
-
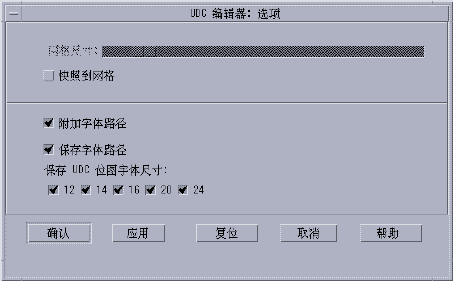
Choose Options from the File menu.
The Options dialog box appears.
-
Turn on Append Font Path to append the UDC font aliases to your font path.
-
Turn on Save Font Path to add the font files to the system font path.
The new font files (located in $HOME/.Xlocale/{locale}/fonts/UDC) will be listed in the $HOME/.OWfontpath file and made available to the X server the next time you log in.
If Save Font Path is off, the font files will still be saved in $HOME/.Xlocale/{locale}/fonts/UDC, but will not be added to the system fontpath the next time you log in.
-
Choose one or more of the following font sizes (in points) for the bitmap fonts: 12, 14, 16, 20, 24.
Viewing the Character Reference
-
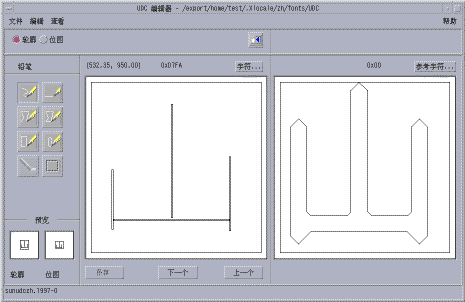
To view the character reference, click the icon below the Help menu.
The following window appears.
-
To close the window, click the icon again.
Register the UDC to NewPinYin input method
-
Choose Save from the File menu or choose "Open dictionary tool" from the File menu. The sdtudc_register tool will be invoked.
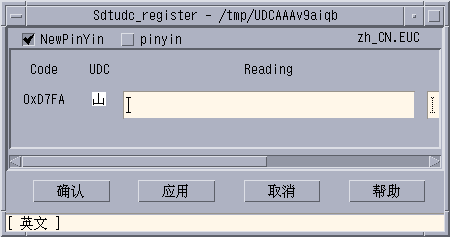
-
Input the pinyin in "reading" column. Please note that the only the valid pinyin can be registered to NewPinyin input method.
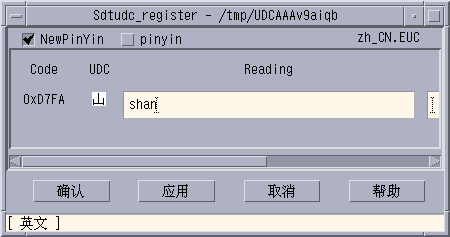
-
Click "Confirm" button
Following dialog is displayed.
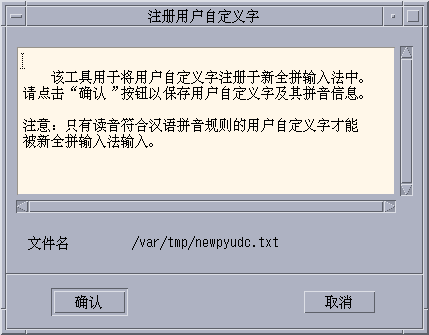
-
The UDC and its pinyin will be registered in /var/tmp/newpyudc.txt. Click "OK" in the dialog to confirm
Typing the New Characters
To type the characters you created, use the NewPinyin input method with the UDC's pinyin or use Neima input method.
Printing the New Characters
You can use "mp" utility to print the characters you created.
- © 2010, Oracle Corporation and/or its affiliates

