|
Since the application server is not automatically started during installation,
you need to start the application server environment and verify that it
is running properly before deploying and exercising the sample application.
Before starting the application server, you will first be introduced to
the Administrative Domains feature and then given a brief overview of
the processes that make up an application server environment.
Administrative Domains
Sun ONE Application Server 7 introduces a feature named Administrative
Domains that enables you to define multiple, completely separate application
server runtime configurations that reuse the same installation image.
Each administrative domain is represented by an administrative server
which in turn controls one or more application server instances. The configuration
of an administrative domain can reside anywhere on the machine.
Although developers using their own workstations will likely use a single
administrative domain for day-to-day development, both shared development
servers and operational environments will greatly benefit from using multiple
administrative domains. On shared development servers, creation of an
administrative domain for each developer provides a compartmentalized
area or "sandbox" for each developer on a shared server machine.
In operational environments, administrative domains enable systems administrators
to define separate secure runtime configurations without requiring multiple
installations of the product.
In the following exercises you will be working with a single administrative
domain that has been either preconfigured during installation of the product
or configured as a post installation task after the application server
has been installed as part of a Solaris 9 installation.
Application Server Processes
Before starting the application server, take a few moments to familiarize
yourself with the processes that will be running behind the scenes in
each administrative domain.
| |
»
Application Server Daemon |
| |
»
Application Server Watchdog Process |
| |
»
Message Queue Broker Process |
| |
»
Message Queue Broker Wrapper Process |
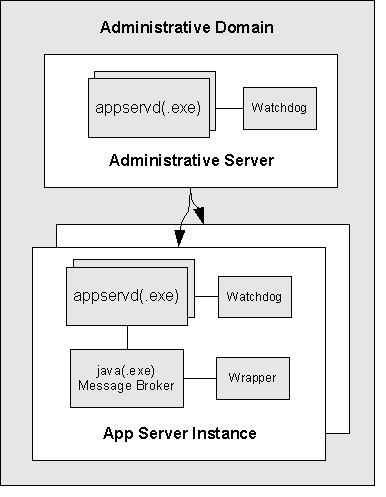
Application Server Daemon
The Application Server Daemon process, appservd,
forms the core of the application server runtime. It houses the embedded
HTTP Server, ORB, J2EE[tm] Containers and supporting subsystems such as
the Transaction Manager and Persistence Managers. Each appservd
process houses a Java[tm] Virtual Machine (JVM[tm]).
In each administrative domain, there is an appservd
process that houses the administrative server for the domain. This process
is referred to as the Administrative Server Instance. The administrative
server controls and manages a number of additional appservd
processes that represent individual application server instances.
|
 appservd
Processes on UNIX Platforms: Although you will notice that there
is a single appservd
process started for each application server instance on Windows,
there are two appservd
processes started per application server instance on UNIX systems. appservd
Processes on UNIX Platforms: Although you will notice that there
is a single appservd
process started for each application server instance on Windows,
there are two appservd
processes started per application server instance on UNIX systems.
On UNIX, one appservd
process is referred to as the "primordial" process while
the second appservd
process is referred to as the "worker" process. The worker
process is the process that carries out the actual processing of
application requests while the primordial process acts as an overarching
controller. In a future release of the application server, you will
have the option to define the number of worker processes for each
application server instance. In the initial release of the product,
only one worker process is supported per application server instance.
|
Application Server Watchdog
The Application Server Watchdog processes, appservd-wdog,
are native language processes monitor the application server daemon processes.
In case of a daemon failure, the companion watchdog restarts the failed
application server daemon process. Each application server daemon has
a companion watchdog process.
Message Queue Broker
By default, each application server instance includes a companion Sun
ONE Message Queue Message Broker process. The message broker process is
the core of the Java Message Service (JMS) of the application server.
Since there is only one application server instance created during installation,
initially there is only a single message broker process started during
application server startup.
As you define new application server instances, new companion message
broker processes are created automatically. After creating an application
server instance, you have the option of disabling the companion message
broker process to support cases in which your applications either do not
use the Java Message Service (JMS) facilities or use a message service
that is not part of the application server.
Message Queue Broker Wrapper
This process is simply a lightweight wrapper around the message broker
process. The wrapper process manages restart of the message broker process.
The relationships amongst the application server processes is depicted
in the following diagram:
Now that you have been introduced to the processes that make up an administrative
domain, your next step is to learn about the installation directory structure
prior to starting the application server.
Installation Directory Structure
Depending on the distribution used to install the application server
product on your system, your application server installation may either
be installed under a single root directory path or be spread across several
root directory paths.
Bundled Installation on Solaris 9
On Solaris, when using the Solaris package-based installation of the
product and when installing the application server as part of a Solaris
9 installation, the application server installation is spread across several
root directories.
The application server included in a Solaris 9 installation is installed
in the following locations:
/usr/appserver - Contains
static portion of the installation image. All utilities, executables
and libraries that make up the application server reside in this location.
Only product patches and upgrades affect this area. Subdirectories in
this location include:
bin/ - Executables
and utilities. Some of which are symbolically linked from /usr/bin.
include/ - Legacy
header files.
lib/ - Native and
Java libraries.
/etc/appserver - Contains
installation wide configuration information such as licenses and the
master list of administrative domains configured for this installation.
/var/appserver/domains
- This location is the default area under which administrative domains
are created. Since installation of the application server as part of
a Solaris 9 installation does not entail initial domain creation, this
directory does not exist until the user create an initial domain. As
administrative domains are created, they can be placed in any location
on the system. This area acts only as the default location in which
domains are created.
Package-based Installation on Solaris 8 and 9
By default, when using the Solaris package-based installation of the
application server, the installation locations are spread across three
directory roots in a similar fashion to the bundled installation case.
/opt/SUNWappserver7
- Contains static portion of the installation image. All utilities,
executables and libraries that make up the application server reside
in this location. Only product patches and upgrades affect this area.
/etc/opt/SUNWappserver7 -
Contains installation wide configuration information such as licenses
and the master list of administrative domains configured for this installation.
/var/opt/SUNWappserver7/domains
- This location is the default area under which administrative domains
are created. Since installation of the application server as part of
a Solaris 9 installation does not entail initial domain creation, this
directory does not exist until the user create an initial domain. As
administrative domains are created, they can be placed in any location
on the system. This area acts only as the default location in which
domains are created.
Windows and Evaluation Installations
On Windows, and in the case of installing the evaluation distribution
of the application server without Solaris packages, the application server
installation is rooted under a single directory path. For example:
c:\Sun\AppServer7 -
Windows installation example.
<home_dir>/sun/appserver7
- Evaluation installation on Solaris without the use of Solaris
packages.
In these cases, the config/
and domains/ directories
are positioned under the installation directory root.
Conventions for Referring to Directories
This guide uses the following conventions when referring to key locations
within an application server installation:
<install_dir>
- Refers to the static portion of the install image that contains utilities,
executables and libraries that make up the application server. This
area of the filesystem may be read only. Only patches and upgrades to
the product affect this area of the installation. Examples of this directory
include:
/usr/appserver
/opt/SUNWappserver7
<home_dir>/sun/appserver7/
c:\Sun\AppServer7
<install_config_dir>
- Refers to the location in which the license and the master list of
administrative domains is managed. Examples of this directory include:
/etc/appserver
/etc/opt/SUNWappserver7
<home_dir>/sun/appserver7/config
c:\Sun\AppServer7\config
<domain_config_dir>
- Refers to the location in which administrative domains are created.
Examples of this directory include:
/var/appserver/domains
/var/opt/SUNWappserver7/domains
<home_dir>/sun/appserver7/domains
c:\Sun\AppServer7\domains
Tools for Starting and Stopping the Application
Server
In the following exercises, "starting" the application server
entails starting the administrative server and the initially configured
application server instance defined in the administrative domain.
To start the application server, you can use any of the following facilities:
Using the Command Line
On all OS platforms, you can use the asadmin
command line utility to start and stop the entire application server,
a specific administrative domain and individual application server instances.
In terms of start and stop operations, the following subcommands of asadmin
are of interest:
| Subcommand |
Description |
| start-domain |
Starts the administrative server and application server instances
of the specified administrative domain.
|
| stop-domain |
Stops the administrative server and the
application server instances of the specified administrative domain.
|
| start-instance |
Starts the specified application server instance. Can
be run in either a local or remote mode. In local mode, execution
of this subcommand does not require the administrative server to be
running. |
| stop-instance |
Stops the specified application server instance. Similar
in operation to start-instance. |
Using start-domain and stop-domain
If the application server is running, use the following command to start
both the administrative server as well as the application server instance
of the initially configured domain:
asadmin start-domain --domain
domain1
Where "domain1"
is the name of the administrative domain defined during installation of
the application server.
As the command completes, you should observe the following results:
asadmin start-domain --domain
domain1
Instance domain1:admin-server started
Instance domain1:server1 started
Domain domain1 Started.
|
Windows
Platforms: On Windows platforms, a command window appears on
your desktop as you start the domain. This command window is a read
only representation of the application server instance's event log
file content. It will remain on your desktop as long as the associated
application server instance is running. As the initially configured
server starts, you will see event messages appearing in the second
command window. After a few seconds, you will see a message confirming
that the server instance has started successfully:
Command Window with Startup Message Does Not Appear? Since
some Windows 2000 environments do not properly include the Windows
net command in the
environment, ensure that your system's environment has access to
this command. If you cannot run the net
command at a command prompt, then see the directions in Setting
Up Your Environment for details on correcting this problem.
|
Likewise, you can stop the initially configured administrative domain
by executing the following command:
asadmin stop-domain --domain
domain1
As the command completes, you should observe the following results:
asadmin stop-domain --domain
domain1
Instance domain1:admin-server stopped
Instance domain1:server1 stopped
Domain domain1 Stopped.
|
Local
Mode of asadmin:
For most subcommands, the asadmin
utility requires you to specify a target administrative server as
well as the appropriate administrative user name and password. However,
there are several subcommands that run either in a local mode only
or in either a local or remote mode.. The start-domain
subcommand does not rely on an administrative server since it responsible
for starting the administrative server and starting all of the application
server instances defined for the specified administrative domain.
The start-instance
and stop-instance
subcommands can run in either local or remote modes. If you do not
specify a --user and
--password options
for commands that can be used in a remote manner, the subcommand
defaults to a local mode of operation.
You can also explicitly force a given subcommand to run in local
mode by specifying either the --local=true
option or simply --local.
|
Since there is rarely a reason to start and stop the administrative server
repeatedly in day-to-day operations of the application server, you are
likely to use the instance level start and stop subcommands more frequently
than the overall start|stop-domain
commands. The next section introduces you to starting and stopping individual
application server instances from the command line.
Using start-instance and stop-instance
To stop a specific application server instance without relying on the
presence of an administrative server, you can use the following command:
asadmin stop-instance server1
where server1 is the name
of the application server instance. If your environment contains more
than one administrative domain, then you need to specify the administrative
domain name when invoking the stop-instance command. For example:
asadmin stop-instance --domain
domain1 server1
To start a specific application server instance in local mode, you can
use the following command:
asadmin start-instance server1
If you wish to start or stop an instance on a remote system, you can
specify the target administrative server and administrative user name
and password on the start-instance
and stop-instance commands.
Execute either of these subcommands without parameters to see usage information.
Alternatively, you can issues the subcommands followed by the --help
option to obtain complete usage information.
|
Underlying
Instance Level Start and Stop Scripts: On both UNIX and Windows
platforms, instance level start and stop scripts exist under the
directory <domain_config_dir>/domain1/<instance
name>/bin/. These scripts are named startserv(.bat)
and stopserv(.bat).
On UNIX platforms, these scripts start the application server processes
directly whereas on Windows, these scripts simply start and stop
the corresponding Windows services. Since the asadmin
command is likely already available via your environment's PATH
setting, you will most likely find the use of the asadmin
start-instance and stop-instance
subcommands as a more convenient means of starting and stopping
instances than the underlying instance level scripts.
|
|
Relationship
Between Administrative Server and Application Server Instances:
Although it may not be obvious, you can start an application
server instance without first starting the administrative server.
There is no startup dependency between the administrative server
and the associated instances. However, without the presence of the
administrative server, you will not be able to perform administrative
tasks against the application server instances. Nonetheless, the
application server instances will correctly load applications and
process requests without the presence of a running administrative
server.
|
After launching the processes, you can perform several other checks to
determine whether or not the application server has started successfully.
Normally, the successful startup message displayed in the application
server's event log window is an indication of a proper startup. However,
it is a useful initial exercise to try out several additional methods
of checking the status of an application server startup. In addition to
monitoring the server instance event log on the desktop, you can also
use either of the following approaches to determine if the server started
properly:
| |
»
Access
the Server Event Log Files |
| |
»
Access
the HTTP Server of the Initially Configured Application Server Instance
|
Accessing the Server Event Log Files
Although the application server instance event log files are displayed
on the desktop by default, the event log of the administrative server
is not displayed to the desktop by default. Normally, you won't need to
monitor the output of the administrative server. However, if you need
to troubleshoot a problem, you can follow these instructions to access
the administrative server's event log.
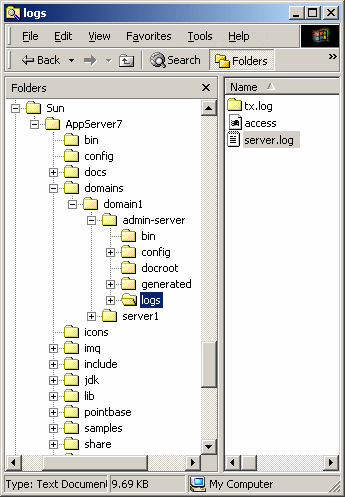
1. Using Windows Explorer, navigate to the area in which the administrative
server's event log files are held:
<domain_config_dir>\domain1\admin-server\logs\
For example:
c:\Sun\AppServer7\domains\domain1\admin-server\logs\
2. Double click the file named server.log
to open the file in an editor. You should find a "successful
server startup" message at the end of the log file.
If you don't see the startup successful message, you may have opened
the event log file prior to the administrative server completing its startup
procedures. Close the log file and open it again to see the very latest
event messages.
In day-to-day use of the application server, you will not need to constantly
check to see if the administrative server has started successfully. Rather,
you will be working primarily with application server instances that are
the target of your J2EE development activities.
|
Domain
and Instance Directories: As you navigated to the administrative
server log file, you might have noticed the domains/
directory and the associated domains1/
directory. The domains1/
directory houses the administrative domain created during product
installation. Later in this guide, as you create a new administrative
domain, the new domain configuration will be created by default
under the domains/
directory.
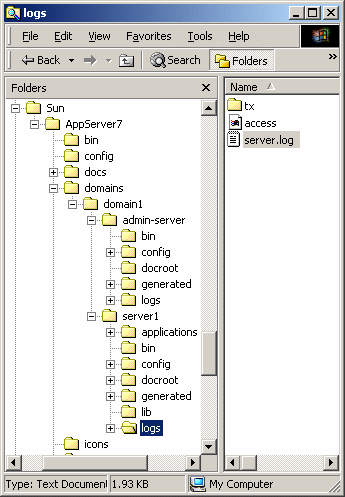
Under the <domain_config_dir>/domain1/
directory, there is a directory named server1/
at the same level as the admin-server/
directory. The server1/
directory contains the configuration information, deployed applications
and log data for the application server instance configured during
product installation. Later in this guide, as you create additional
application server instances, you will see that new directories
parallel to server1/
and admin-server/
will appear under the domain1/
directory. You will be able to assign the name of new instances
as they are created.
|
Although the application server instance event log files are displayed
to the desktop by default, it is useful for you to know the location of
these event log files.
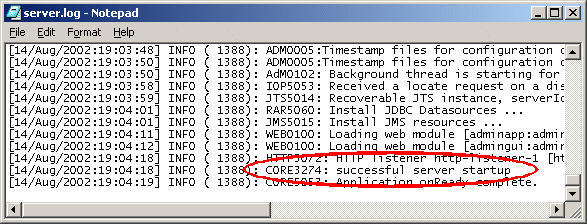
Navigate to the application server instance's log directory and open
the server.log file:
<domain_config_dir>/domain1/server1/logs/server.log
As you open the application server instance's log file, you should see
the same messages that appeared the event log window on the desktop.
| Event
Log Attributes: As you view the event log file content, note the
structure of the log records. In each record, you will always see
a severity level followed by a unique message ID comprised of an abbreviated
subsystem ID and message number. This information will help you lookup
more detailed information in the log reference documentation. |
| HTTP
Server Access Logs: By default, the built in HTTP server's access
log file is located in the same directory as the server's event log
file. You will find the content of this file useful as you troubleshoot
HTTP serving problems and/or as you want to trace the activity of
HTTP requests entering the application server instances. Although
the administrative server also maintains an HTTP access log file,
you probably won't need to open it during normal development activities. |
Accessing HTTP Server of Application Server Instance
A simple means of determining whether or not an application server instance
has started is to access the instance's HTTP server listener through a
web browser. After creation of a new application server instance, you
will typically use this approach to quickly determine that the application
server has started successfully.
Using a browser, access the following location:
http://<host name>:<port
number>
Where <port number>
is the HTTP server port number specified during installation. The default
HTTP server port number is 80, but it may be different based on the ports
in use during installation.
|
 Forgot
the Port Number? If you do not remember the HTTP server port
number of your server, you can inspect the application server instance's
configuration file to determine the HTTP server port number. Forgot
the Port Number? If you do not remember the HTTP server port
number of your server, you can inspect the application server instance's
configuration file to determine the HTTP server port number.
1. Navigate to the <domain_config_dir>/domain1/server1/config/
directory and open the server.xml
file in your favorite editor.
2. Look for the following element:
<http-listener id="http-listener-1"
address="0.0.0.0" port="80"...
In this case, port 80 is the HTTP port number in use.
After you become familiar with using the application server's administrative
console, you will be able to determine the HTTP listener port numbers
through the administrative console.
|
If the application server instance is up and running normally, you should
see the following default HTTP server welcome page in your browser:
| HTTP
Server Welcome Page: The HTTP server welcome page is simply an
HTML page named index.html
that resides under the application server instance's default document
directory. The application server instance's server.xml
configuration file contains the setting for the default document root
of the instance. After installation, the document root for the instance
named "server1" is set to <domain_config_dir>/domain1/server1/docroot/.
You can find the welcome page at that location. Since the application
server instance is also a full featured HTTP server, you can configure
the server to serve static content and to support dynamic content
generated by CGI executables and/or server side include files. Consult
the Administrator's Guide for more information. |
In the next section, you will use the application server's administrative
console to start and stop the application server.
Using the Administrative Console
As long as the administrative server is running, you can also use the
web-based administrative console to start and stop application server
instances.
1. Start the Administrative Console
|
Compatible
Browsers: Netscape 4.79 and Internet Explorer 5.5 or higher
are the officially supported browsers to access the administrative
console.
Some installations of Solaris include either Netscape 4.78 or prior
versions as the default browser. The netscape
command is executed to start the Netscape 4 browser on these systems.
On Solaris 9, you can start Netscape 6, a compatible browser, by
executing the following command:
/usr/dt/bin/netscape6
Although other popular browsers such as Mozilla work with the administrative
console, execution of the administrative console is officially supported
only with the browsers listed above.
|
On Windows, the easiest means of starting the web-based administrative
console is to simply use the Windows desktop to select:
Start -> Programs- > Sun Microsystems -> Sun ONE Application
Server 7 -> Start Admin Console
After selecting Start Admin Console, a window of your default browser
will be displayed with the appropriate location of the administrative
server's console as set during installation of the product.
On UNIX, open a browser window and specify the location of your the administrative
server's console application. During installation, the default port number
for the administrative server is set to 4848, if this port was already
in user or you selected another port number, then specify that port number.
For example:
http://localhost:4848
2. Sign in to the administrative console using the administrative user
name and password supplied during product installation.
|
Forgot
the Admin Server Port Number? If you do not remember the HTTP
server port number of the administrative server, you can inspect
the administrative server's configuration file to determine the
HTTP server port number.
1. Navigate to the <domain_config_dir>/domain1/admin-server/config/
directory.
2. Open the server.xml file in your favorite editor. Look for the
element:
<http-listener id="http-listener-1"
address="0.0.0.0" port="4848"...
In this case, port 4848 is the HTTP port number in use.
|
|
Forgot
the Username or Password? If you do not remember the administrative
user name that was supplied during installation, try the user name
"admin". This is the default user name specified in the
server configuration dialog during installation. If you still cannot
determine the user name, look in the following file:
<domain_config_dir>/domain1/admin-server/config/admpw
This file contains the administrator's user name followed by the
encrypted form of the administrative user's password.
If you do not remember the administrator's password, then you can
delete the administrative domain using the delete-domain
subcommand of asadmin
and create a new domain with a new administrative password.
|
|
Port
Not Accessible? If the connection was refused when attempting
to contact the administrative server's admin console application,
it is likely that the administrative server is not running. Go back
to the beginning of this section and double check the your startup
procedures and the content of the administrative server's log file
to determine the reason why the server is not running.
|
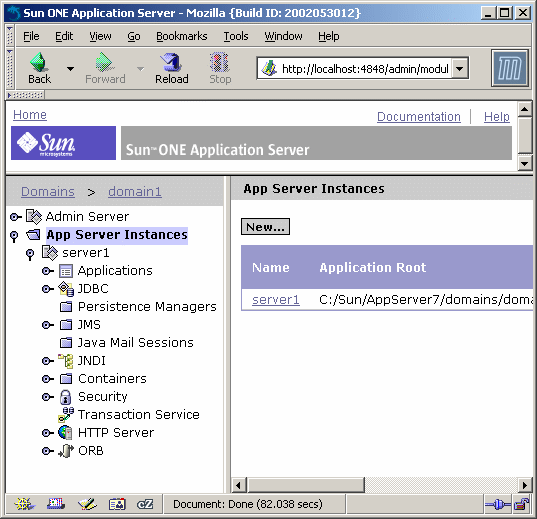
Once you've authenticated successfully, the initial screen of the administrative
console will appear:
|
Admin
Server and App Server Instance Nodes: In the administrative
console, note the presence of an Admin Server node and an application
server instance node named "server1". These two nodes
correspond to the two directories under the directory <domain_config_dir>/domain1/.
The administrative console's main function is to provide you with
an easy-to-use means of managing server configuration information
as maintained in each of the instance's config/server.xml
file.
|
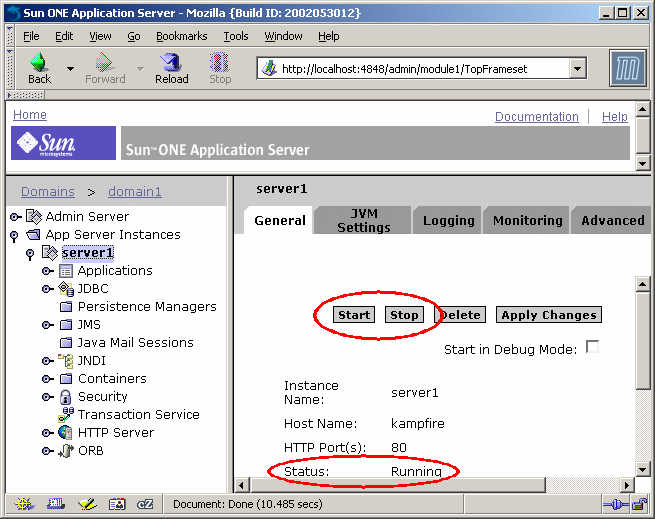
3. Select the server1 node in order to access the start and stop functions.
Note the status of the application server instance. It is either in a
"running" or "not running" state.
4. Depending on the server instance's state, click either the Start
or Stop button to either start or stop the application server instance.
If you are accessing an application server instance running a UNIX system,
you will also see a Restart button.
If you are using a UNIX system, proceed to Becoming
Familiar with the Sample Application for a brief introduction to
the sample application prior to deploying and exercising it.
If you are using Windows, review the following sections to see how to
start the application server using Windows program groups and services.
Using Windows Program Group Items
On Windows, the easiest means of starting the entire application server
is to use the Start button on the Windows desktop.
1. Access the following program group item to start the application server:
Start -> Programs -> Sun Microsystems -> Sun ONE Application
Server 7 -> Start Application Server
After selecting Start Application Server, you will first see a
command window in which the status of the startup process is displayed.
A second command window also appears on your desktop. This command window
is a read only representation of the application server instance's event
log file content. It will remain on your desktop as long as the associated
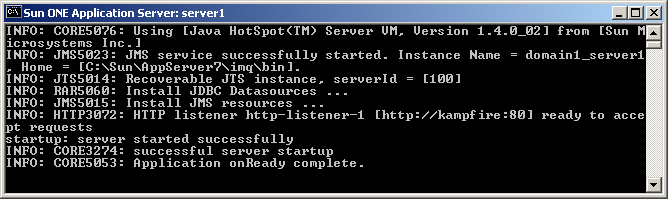
application server instance is running. As the initially configured server
starts, you will see event messages appearing in the second command window.
After a few seconds, you will see a message confirming that the server
instance has started successfully:
INFO: CORE3274: successful
server startup
| Second
Window with Startup Message Does Not Appear? Since some Windows
2000 environments do not properly include the Windows net
command in the environment, ensure that your system's environment
has access to this command. If you cannot run the net
command at a command prompt, then see the directions in Setting
Up Your Environment for details on correcting this problem. |
The application server instance command window resembles the following
image. Note the "server1" designation in the title of the window.
This is the name of the application server instance.
 |
|
Behind
the Scenes: Selecting Start Application Server results
in the execution of the asadmin
command line utility with the subcommand "start-appserv".
This subcommand attempts to start both the administrative server
and the application server instances of all administrative domains
defined in your application server installation. Since your environment
is initially configured with a single administrative domain that
contains a single application server instance, only one administrative
server and one application server instance will be started when
you select the Start Application Server program group item.
As you work with the application server and create new application
server instances within the domain "domain1", Start
Application Server will also start the newly defined instances.
Since the start-appserv
and stop-appserv
subcommands attempt to start and stop all of the domains
on the system, use these subcommands with caution. For example,
as you create new domains, the Start Application Server program
group item will start all of the administrative domains defined
in your application server installation. Given the overhead involved
in starting and stopping multiple administrative domains, in your
day-to-day use of the product, you are likely to find that the more
specific start-domain,
stop-domain, start-instance
and stop-instance
subcommands help you manage your environment more efficiently than
use of the start-appserv
and stop-appserv
subcommands.
As the initially configured server named "server1" starts,
it displays its event log content to a command window on your desktop.
Whether or not an application server instance displays its event
log information to the Windows desktop is configurable on an instance-by-instance
basis. You will learn how to disable this feature later in this
guide.
|
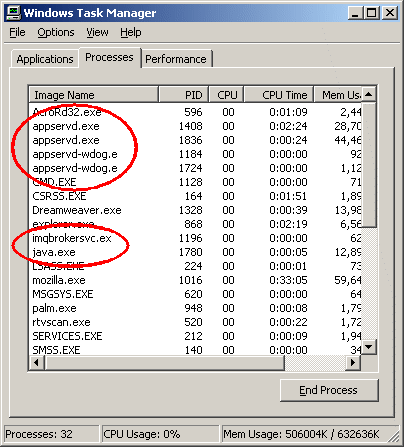
2. As the application server is starting up, start the Windows Task Manager
to see the processes as they complete their startup sequence. You do not
need to perform this task in the course of your everyday interaction with
the application server. This exercise is presented only to help you understand
the behind the scenes operation of the application server.
To start and view the Windows Task Manager, perform the following steps:
2a. Right-click an empty area of the taskbar, and then click Task Manager.
You can also start Task Manager by either pressing CTRL+ALT+DELETE and
then clicking Task Manager or by pressing CTRL+SHIFT+ESC.
2b. Once Task Manager starts, select the Processes tab to view
all processes running on the system.
2c. Then click on the column title Image Name to sort the list
of processes in alphabetical order. In the following window, note the
six processes that make up the initially configured application server
environment.
To completely stop the application server, access the following program
group item:
Start -> Programs -> Sun Microsystems -> Sun ONE Application
Server 7 -> Stop Application Server
This action will stop both the administrative server and the configured
application server instances.
|
Behind
the Scenes: Selecting Stop Application Server results
in the execution of the asadmin
command line utility with the subcommand "stop-appserv".
This subcommand attempts to stop both the administrative server
and the application server instances for all administrative domains
on the machine.
|
In the next section you will be introduced to the use of Windows services
as a means of starting the application server.
Using Windows Services
After installation of the application server, several Windows services
are defined to enable you to control startup and shutdown of the administrative
server and the initially defined "server1" application server
instance. In this section you will use these services to control the application
server processes.
1. From the Windows desktop, access Start -> Settings -> Control
Panel.
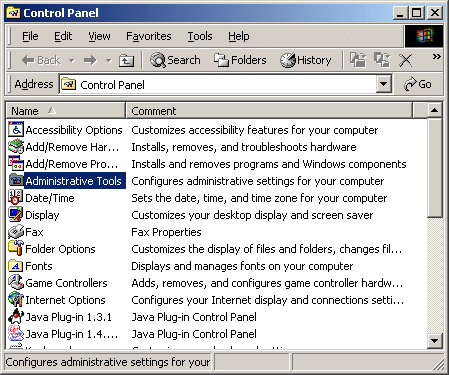
2. As the Control Panel is displayed, double click Administrative
Tools .
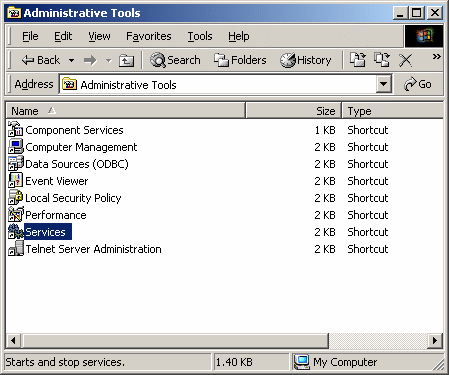
3. Double click Services to view the services installed on your
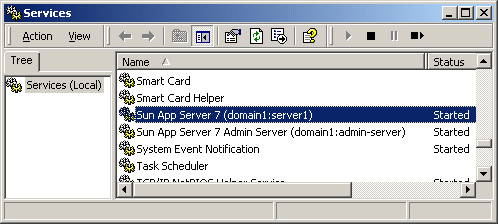
system.
4. The complete list of services defined on your system is displayed.
Scroll down to view the Sun Application Server entries.
Note that there are separate Windows services for the administrative
server and the initially configured application server instance ("server1").
As long as the administrative server and application server instance are
still running from the previous exercises, the Status column of each service
entry should be represented as "Started".
5. As an exercise, start the Windows Task Manager to view the currently
executing processes on your system.
6. Within the Services window, select the Sun Application Server
7 Admin Server entry, right click, and select Stop.
Now monitor the Task Manager Windows to see the underlying processes
terminate.
7. Follow the same procedure for the application server instance named
"server1".
As you stop the "server1" application server instance, the
event log window will disappear from the desktop.
8. Once the administrative server and application server instance have
been stopped, start them again by using the Windows services. Instead
of using the Stop command when right clicking on a service, use
the Start command.
You may find it useful initially to monitor the startup of the underlying
processes via the Windows Task Manager.
Note that the event log window for the "server1" application
server instance appears on the desktop as soon as the corresponding service
is started.
|
Creation
of Windows Services: Each time you create or delete an application
server instance, a corresponding Windows service is also created
or deleted. After creation, these Windows services are always set
to the Manual Startup Type. This means that after restart of Windows,
these services will not be automatically started. Depending on your
needs you may see fit to change the Startup Type to Automatic such
that the underlying application server processes are started during
restart of Windows. To do so, simply select one of the services,
right click, and select Properties. Under Startup type:, select
Automatic and then click on Close.
|
Proceed to Becoming Familiar
with the Sample Application for a brief introduction to the sample
application prior to deploying and exercising it.
|