Using a Netlet Proxy
Netlet packets are decrypted at the Gateway and sent to the destination servers. However, the Gateway needs to access all Netlet destination hosts through the firewall between the demilitarized zone (DMZ) and the intranet. This requires opening a large number of ports in the firewall. The Netlet proxy can be used to minimize the number of open ports in the firewall.
The Netlet proxy enhances the security between the Gateway and the intranet by extending the secure tunnel from the client, through the Gateway to the Netlet proxy that resides in the intranet. With the proxy, Netlet packets are decrypted by the proxy and then sent to the destination.
The advantages of using Netlet proxy are:
-
To add an additional layer of security.
-
To minimize the use of extra IP addresses and ports from the Gateway through an internal firewall in a significantly sized deployment environment.
-
To restrict the number of open ports between the Gateway and the Portal Server to 1. This port number can be configured during installation.
-
To extend the secure channel between the client and the Gateway, up to the Portal Server as shown in the "With a Netlet Proxy Configured" section of Using a Netlet Proxy. The Netlet proxy offers improved security benefits through data encryption but may increase the use of system resources. See the Sun Java System Installation Guide for information on installing the Netlet proxy.
You can:
-
Choose to install the Netlet proxy on the Portal Server node or on a separate node.
-
Install multiple Netlet proxies and configure them for a single Gateway using the administration console. This is useful in load balancing.
-
Configure multiple instances of the Netlet proxy on a single machine.
-
Point multiple instances of the Gateway to a single installation of the Netlet proxy.
-
Tunnel Netlet through a web proxy.
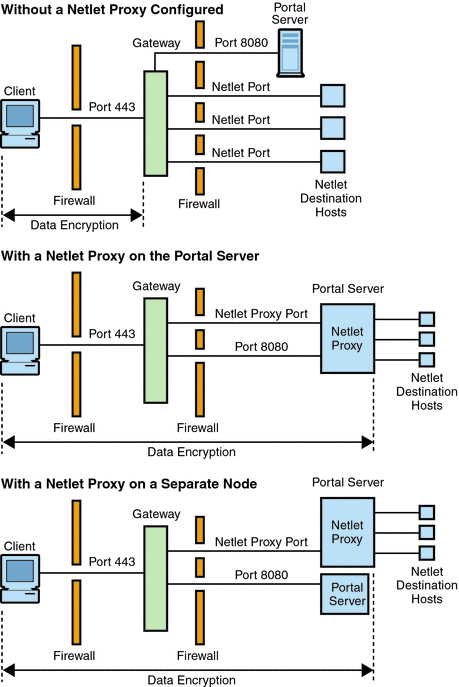
Using a Netlet Proxy shows three sample implementations of the Gateway and the Portal Server with and without a Netlet proxy installed. The components include a client, two firewalls, the Gateway that resides between the two firewalls, Portal Server, and Netlet destination servers.
The first scenario shows the Gateway and Portal Server without a Netlet proxy installed. Here the data encryption extends only from the client to the Gateway. A port is opened in the second firewall for each Netlet connection request.
The second scenario shows the Gateway and Portal Server with a Netlet proxy installed on Portal Server. In this case, the data encryption extends from the client all the way to the Portal Server. Since all Netlet connections are routed through a Netlet proxy, only one port needs to be opened in the second firewall for Netlet requests.
The third scenario shows the Gateway and the Portal Server with a Netlet proxy installed on a separate node. Installing a Netlet proxy on a separate node reduces the load on the Portal Server node. Here again, only two ports need to be opened in the second firewall. One port services requests to the Portal Server, and the other port routes Netlet requests to the Netlet proxy server.
Figure 2–1 Implementation of Netlet Proxy

Creating Instances of a Netlet Proxy
 To create a Netlet Proxy instance
-
Telnet to the machine where the instance needs to be created. The default gateway instance is up and running at this machine.
-
Copy the /opt/SUNWportal/template/sra/NLPConfig.properties.template file to a temporary location . For example, /tmp.
-
Modify the values as required in the file for the new profile.
-
Once complete, run the following command:
./psadmin create-sra-instance -u amadmin -f <passwordfile> -S <template file location>.template -t nlproxy
-
Start the new instance of the Netlet proxy with the required gateway profile name to ensure that the changes take effect:
./psadmin start-sra-instance –u amadmin – f <password file> –N <profile name>– t nlproxy
Enabling a Netlet Proxy
You enable a Netlet proxy through the Gateway service using the Portal Server administration console. .
Restarting a Netlet Proxy
You can configure a Netlet proxy to restart whenever the proxy is killed accidentally. You can schedule a watchdog process to monitor a Netlet proxy and restart it if it goes down.
You can also restart a Netlet proxy manually.
 To Restart a Netlet Proxy
-
In a terminal window, connect as root and do one of the following:
-
Start the watchdog process:
psadmin sra-watchdog -u uid -f password-filename -t instance-type on
Enter nlproxy in place of the instance-type. For more information on this command, see the Sun Java Portal Server Command Line Reference Guide.
This creates an entry in the crontab utility and the watchdog process is now active. The watchdog monitors the Netlet proxy port and brings up the proxy if it goes down.
-
Start a Netlet proxy manually:
psadmin start-sra-instance -u uid -f password-filename -N sra-instance-name -t instance-type
Enter nlproxy in place of the instance-type. This the profile name corresponding to the required Netlet Proxy instance. For more information on this command, see the Sun Java Portal Server Command Line Reference Guide.
-
To Configure a Netlet Proxy Watchdog
You can configure the time interval at which the watchdog monitors the status of a Netlet proxy. This time interval is set to 60 seconds by default. To do this, edit the following line in the crontab utility:
0-59 * * * * netlet-install-dir/bin/checkgw /var/opt/SUNWportal/.gw 5 > /dev/null 2>&1
- © 2010, Oracle Corporation and/or its affiliates
