Propagating User Attributes Between Systems
After you create and map the user attributes you want to synchronize, you must tell Identity Synchronization for Windows how to propagate (flow) the attribute creations, modifications, and deletions between your Directory Server and Windows Systems.
By default, Identity Synchronization for Windows:
-
Synchronizes from Windows to Directory Server only
-
Synchronizes the password attribute only (unless you specified significant attributes in the previous section)
-
Does not synchronize the creation or deletion of entries
This section explains how to configure attribute synchronization between systems. The information is organized as follows:
Specifying How Object Creations Flow
 To Specify How Object Creations Should Flow Between Directory
Server and Active Directory Systems
-
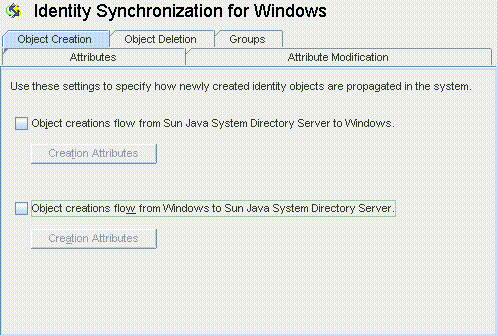
Click the Object Creation tab.
Figure 8–33 Selecting and Propagating Creations
-
You can enable or disable the flow of creations as follows:
-
Enable Object creations flow from Sun Java System Directory Server to Windows to propagate creations from the Directory Server environment to your Windows servers.
-
Enable Object creations flow from Windows to Sun Java System Directory Server to propagate creations from the Windows environment to your Directory Servers.
-
Enable both options for bidirectional flow.
-
Disable both options to prevent user creations from propagating from one system to the other. (Default).
-
-
To add, edit, or delete creation attributes to synchronize between systems, click the Creation Attributes button located under the selected option(s).
The Creation Attribute Mappings and Values dialog box displays.
Figure 8–34 Creation Attributes Mappings and Values: Directory Server to Windows
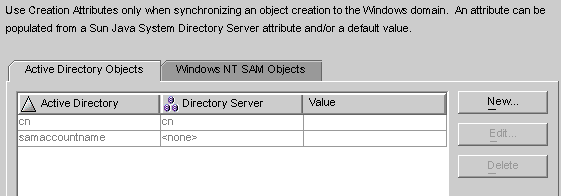
Figure 8–35 Creation Attributes Mappings and Values: Windows to Directory Server

You can use either of the dialog boxes to specify new creation attributes, edit, or delete existing attributes. For more information, see Specifying New Creation Attributes.
Note –To satisfy schema constraints regarding required attributes for user object classes, you may have to specify additional attributes to flow through the system during a user creation.
Additional attributes are not necessary if you specified the required attributes as modification attributes (as described in Selecting and Mapping User Attributes).
Specifying New Creation Attributes
The following instructions explain how to add and map creation attributes from Active Directory to Directory Server. (The procedure for adding and mapping creation attributes flowing from Directory Server to Windows and from Windows to Directory Server is similar.)
 To Specify New Creation Attributes
-
Click the New button in the Creation Attribute Mappings and Values dialog box.
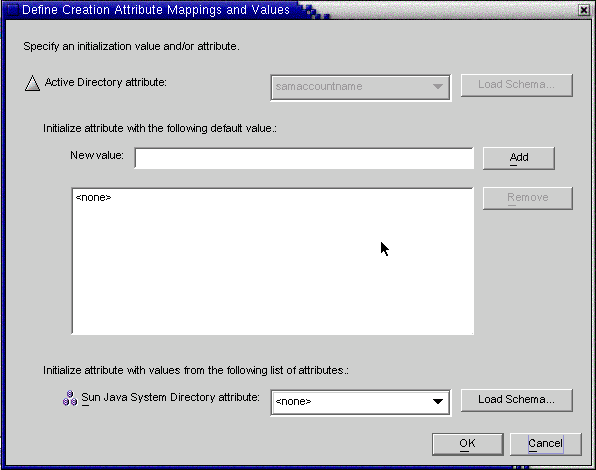
The Define Creation Attribute Mappings and Values dialog box is displayed.
Figure 8–36 Defining Creation Attribute Mappings and Values
-
Select an attribute value from the Active Directory attribute drop-down list.
Figure 8–37 Selecting a New Active Directory Attribute

Identity Synchronization for Windows allows you to initialize an attribute with multiple values— if the attribute itself accepts multiple values.
For example, if your company has three fax telephone numbers, you can specify the facsilimiletelephonenumber attribute for both Sun Java System Directory Server and Active Directory, and specify the three numbers.
You must know which attributes will accept multiple values. If you try adding multiple values to an attribute that does not accept them, an error will result during runtime when the program attempts to create the object.
-
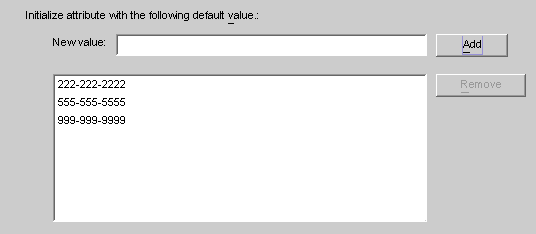
Enter a value in New value field and click Add.
The program adds the attribute value to the list pane. Repeat this step as many times as necessary to add multiple attribute values.
Figure 8–38 Specifying Multiple Values for a Creation Attribute
-
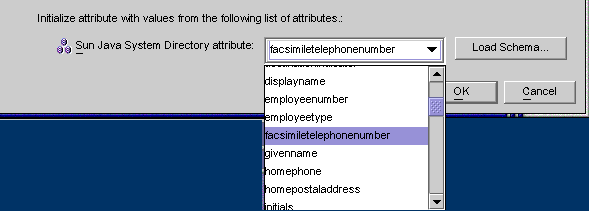
To map the attribute to Directory Server, select an attribute name from the Directory Server attribute drop-down list.
Figure 8–39 Mapping the Directory Server Attribute
-
When you are finished, click OK.
Based on the example, the finished Creation Attributes and Mappings table would look like the one in the following figure.
Figure 8–40 Completed Creation Attributes and Mappings Table

-
To designate additional attributes, repeat these steps.
Editing Existing Attributes
 To Edit Creation Attributes Mapping or Values
-
Select the Object Creation tab, and click on the Creation Attributes button located under the selected creation option.
-
When the Creation Mappings and Values dialog box is displayed, select the attribute from the table, and then click the Edit button.
The Define Creation Mappings and Values dialog box is displayed.
-
Use the drop-down menus to change the existing mapping between Directory Server and Active Directory (or Windows NT).
For example, if you have Sun Java System Directory Server’s homephone attribute mapped to Active Directory’s othertelephone attribute. You could use the Active Directory attributes drop-down list to change the mapping to homephone.
-
You can also add or remove attribute values:
-
When you are done, click OK to apply your changes and close the Define Creation Mappings and Values dialog box.
-
Click OK again to close the Creation Mappings and Attributes dialog box.
Removing Attributes
 To Remove Creation Attributes Mapping or Values
-
Select the Object Creation tab, and click the Creation Attributes button located under the selected creation option.
-
When the Creation Mappings and Values dialog box is displayed, select the attribute from the table, and then click the Delete button.
The attribute is removed from the table immediately.
-
When you are done, click OK to close the Creation Mappings and Attributes dialog box.
Specifying How Object Modifications Flow
Use the Attribute Modification tab to control how modifications made to user attributes and passwords will be propagated (flow) between your Sun and Windows systems.
Figure 8–41 Attribute Modification Tab
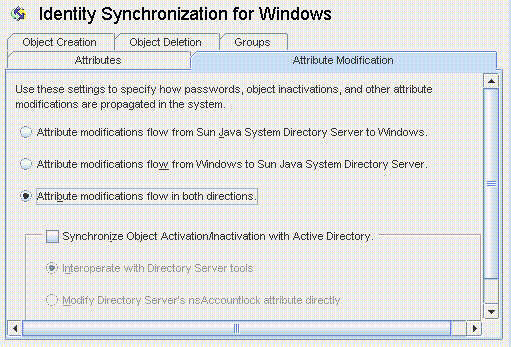
You use this tab to configure the following:
-
Specify the direction in which modifications flow between Directory Server and Windows directory sources.
-
Control whether object activations and inactivations ( enables and disables on Active Directory) will be synchronized between Directory Server and Active Directory sources, and specify the method in which user accounts are activated and inactivated.
Note –
You cannot synchronize account statuses with Windows NT directory sources.
Specifying Direction
Select one of the following buttons to control how changes made in the Directory Server and Windows environments will be propagated between systems.
-
Attribute modifications flow from Sun Java System Directory Server to Windows: Propagates changes made in the Directory Server environment to your Windows servers.
-
Attribute modifications flow from Windows to Sun Java System Directory Server (Default): Propagates changes made in the Windows environment to your Directory Servers.
-
Attribute modifications flow in both directions : Propagates changes bidirectionally (from one environment to the other environment).
Configuring and Synchronizing Object Activations and Inactivations
If you enable the Synchronize Object Activations/Inactivations with Active Directory box you can synchronize object activations and inactivations (known as enables and disables on Active Directory) between Directory Server and Active Directory sources.
Note –
You cannot synchronize activations and inactivations with Windows NT directory sources.
Figure 8–42 Synchronizing Object Activations and Inactivations

 To Synchronize Object Activations/Inactivations:
-
Enable the Synchronize Object Inactivations between Directory Server & Active Directory box.
-
Enable one of the following buttons to specify how Identity Synchronization for Windows will detect and synchronize object activations and inactivations:
-
Modifying Directory Server’s NsAccountLock Attribute Directly
Note –These options are mutually exclusive.
Interoperating with Directory Server Tools
Select this option if you use the Directory Server Console or command line tools to activate/inactivate an object. With this option selected Identity Synchronization for Windows cannot set or remove the nsAccountLock attribute directly. In addition, the program cannot detect objects that have been inactivated using other roles such as cn=nsdisabledrole, database suffix or roles that nest within other roles, such as cn=nsdisabledrole, database suffix or cn=nsmanageddisabledrole, database suffix .
-
To activate objects, Identity Synchronization for Windows will remove the cn=nsmanageddisabledrole, database suffix value from the nsroledn attribute.
-
To inactivate objects, Identity Synchronization for Windows will add the cn=nsmanageddisabledrole, database suffix value to the nsroledn attribute.
Note –
If you enable the Interoperate with Directory Server Tools option, Identity Synchronization for Windows cannot set or remove the nsAccountLock attribute directly. In addition, Identity Synchronization for Windows cannot detect objects have been inactivated using other roles.
For example, cn=nsdisabledrole, database suffix or roles that nest within other roles such as cn=nsdisabledrole, database suffix or cn=nsmanageddisabledrole, database suffix.
Interoperating with Directory Server Tools describes how Identity Synchronization for Windows detects and synchronizes object activations/inactivations when you enable the Interoperate with Directory Server Tools option.
Table 8–1 Interoperating with Directory Server Tools|
Activations |
Inactivations |
|
Identity Synchronization for Windows detects an activation only when the cn=nsmanageddisabledrole, database suffix role is removed from the object. |
Identity Synchronization for Windows detects an inactivation only when the entry’s nsroledn attribute includes the cn=nsmanageddisabledrole, database suffix role. |
|
When synchronizing an object activation from Active Directory, Identity Synchronization for Windows activates the object by removing the cn=nsmanageddisabledrole,database suffix role from the object. |
When synchronizing an object inactivation from Active Directory, Identity Synchronization for Windows inactivates the object by adding the cn=nsmanageddisabledrole, database suffix role to the object. |
Modifying Directory Server’s NsAccountLock Attribute Directly
Use this method when Directory Server activations and inactivations are based on Directory Server’s operational attribute, nsAccountLock.
Note –
When the Modify Directory Server’s nsAccountLock attribute option is enabled, Identity Synchronization for Windows will not detect objects that are activated/inactivated using the Directory Server Console or command line utilities.
This attribute controls object states as follows:
-
When nsAccountLock=true, the object is inactivated and the user cannot log in.
-
When nsAccountLock=false (or has no value), the object is activated.
Modifying Directory Server’s NsAccountLock Attribute Directly describes how Identity Synchronization for Windows detects and synchronizes object activations/inactivations when you enable the Modify Directory Server’s nsAccountLock Attribute Directly option.
|
Activation |
Inactivation |
|
Identity Synchronization for Windows detects an inactivated object only when the nsAccountLock attribute is set to true. |
Identity Synchronization for Windows detects an activated object only when the nsAccountLock attribute is absent or set to false. |
|
When synchronizing an object inactivation from Active Directory, Identity Synchronization for Windows removes the nsAccountLock attribute. |
When synchronizing an object activation from Active Directory, Identity Synchronization for Windows sets the nsAccountLock attribute to true. |
Using a Custom Method for Directory Server
Use this method when Directory Server activations and inactivations are controlled exclusively by an external application such as Sun Java System Access Manager (formerly Sun JES Identity Server).
When you configure a custom method for Directory Server, you must specify the following:
-
How Identity Synchronization for Windows will detect that the external application has activated or inactivated an object in Directory Server.
-
How Identity Synchronization for Windows will activate or inactivate the object when synchronizing from Active Directory to Directory Server.
Note –
If you enable the Use custom method for Directory Server option, Identity Synchronization for Windows cannot lock objects out of the directory unless access to the directory is controlled by an external application, such as Access Manager.
To configure a Custom method for activations and inactivations, click the Configure button and the Configure Custom Method for Directory Server dialog box is displayed.
Figure 8–43 Configuring a Custom Method for Activations and Inactivations
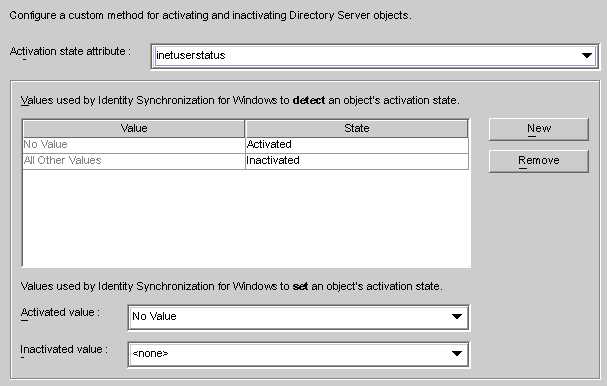
This dialog contains the following features:
-
Activation state attribute drop-down list : Use this list to specify an attribute that Identity Synchronization for Windows will use to synchronize activations and inactivations between Directory Server and Active Directory.
The list contains all attributes in the schema for the currently selected Directory Server structural and auxiliary objectclasses.
-
Value and State table: Use this table to specify when values associated with the selected attribute are activated or inactivated.
-
Value column: Use this column (in conjunction with the New and Remove buttons) to specify attribute values that will be used to indicate active or inactive states.
The program automatically provides two values in this column:
-
No Value: Where the Activation state attribute has no value.
-
All Other Values: Where the Activation state attribute has a value, but that value is not specified in this Value and State table.
-
-
State column: Use this column to specify whether the Value entry (in the same row) corresponds to an object that is activated or inactivated.
Value
State
Result
No Value
Activated
If the attribute is missing or does not have a value, Identity Synchronization for Windows detects the object as activated.
Inactivated
If the attribute is missing or does not have a value, Identity Synchronization for Windows detects the object as inactivated.
user-definedvalues
Activated
If the attribute has the user-defined attribute, Identity Synchronization for Windows detects the object as activated.
Inactivated
If the attribute has the user-defined attribute, Identity Synchronization for Windows detects the object as inactivated.
All Other Values
Activated
If the attribute has a value, but that value is not specified in the table, Identity Synchronization for Windows detects the object as activated.
Inactivated
If the attribute has a value, but that value is not specified in the table, Identity Synchronization for Windows detects the object as inactivated.
-
-
New button: Click this button to add new entries to the Value column.
-
Remove button: Select an entry in the Value column, and then click this button to remove that entry.
-
Activated value and Inactivated value drop-down lists: Use these two lists to specify values that Identity Synchronization for Windows will use to set an object’s state.
Synchronizing Activations and Inactivations
 To Configure Identity Synchronization for Windows to Detect and Synchronize Object States
between Directory Server and Active Directory
-
Select an attribute from the Activation state attribute drop-down list.
-
Click the New button to add attribute values to the Value column of the table.
-
Click in the State column next to each of the Value entries and when the drop-down list is displayed, select Activated or Inactivated.
Figure 8–44 Selecting a State

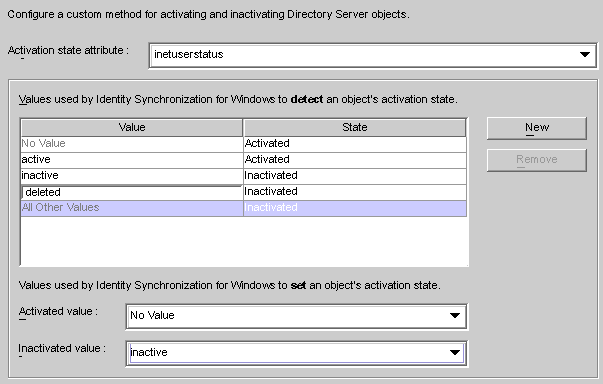
For example, if you were using Access Manager:
-
Select the inetuserstatus attribute from the Activation state attribute drop-down list.
-
Click the New button and enter active, inactive, and deleted attribute values to the Value column of the table.
-
Click in the State column and select Activated or Inactivated for each value as follows:
-
No Value: Activated
-
active: Activated
-
inactive: Inactivated
-
deleted: Inactivated
-
All Other Values: Inactivated
Based on this example, Using a Custom Method for Directory Server describes how Identity Synchronization for Windows will detect and synchronize activations/inactivations when you enable the Use Custom Method for Directory Server option (using the inetuserstatus example).
Value
State
Result
No Value
Activated
If the inetuserstatus attribute is missing or does not have a value, Identity Synchronization for Windows detects the object as activated.
active
Activated
If the attribute is active Identity Synchronization for Windows detects the object as activated.
inactive
Inactivated
If the attribute value is inactive Identity Synchronization for Windows detects the object as inactivated.
deleted
Inactivated
If the attribute value is deleted Identity Synchronization for Windows detects the object as inactivated.
All Other Values
Inactivated
If the attribute has a value, but that value is not specified in the table, Identity Synchronization for Windows detects the object as inactivated.
Setting Activations and Inactivations
As you populate the Value and State table with entries, Identity Synchronization for Windows automatically populates the Activated value and Inactivated value drop-down lists as follows:
-
The Activated value list contains all values with an Activated status (for example No Value and active).
-
The Inactivated value list contains all values with an Inactivated status (for example inactive and deleted).
-
Neither list will contain the All Other Values value.
Select a value from the Activated value and/or the Inactivated value drop-down lists to specify how Identity Synchronization for Windows will activate and/or inactivate an object when synchronizing from Active Directory.
-
Activated value: Controls the object’s active state.
-
No Value: If the object contains the active value, Identity Synchronization for Windows will set the state to activated in Directory Server.
-
active: If the object contains the active value, Identity Synchronization for Windows will set the state to activated in Directory Server.
-
-
Inactivated value: Controls the object’s active state.
-
inactive or deleted: Identity Synchronization for Windows will set the object’s state to inactive in Directory Server.
-
none: Not a valid setting. You must select a value.
Note –You must specify an Inactivated value or your configuration will be invalid.
Using a Custom Method for Directory Server illustrates a completed Configure Custom Method for Directory Server dialog box.
-
Figure 8–45 Example: Completed Dialog
-
Specifying Configuration Settings for Group Synchronization
If you enable Group Synchronization between Directory Server and Active Directory, you can synchronize the creation of groups, deletion of groups, and the membership changes within that group .
Note –
Group Synchronization is not supported on Windows NT directory sources.
 To Synchronize Groups:
-
Under the Groups tab, select the Enable Group Synchronization check box.
-
Select one of the following Group Synchronization methods to specify how Identity Synchronization for Windows will detect and synchronize various groups:
-
Domain Global Security
-
Domain Global Distribution
Figure 8–46 Enable Group Synchronization
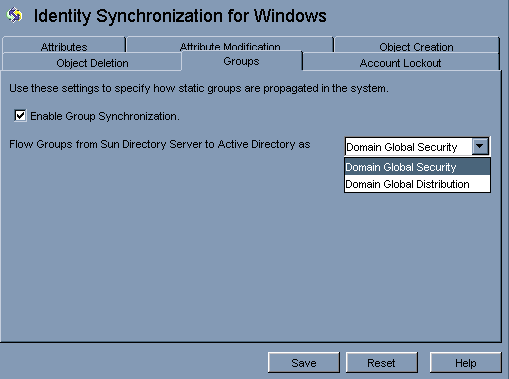
Note –For more information about Domain Global Security, Domain Global Distribution, and Active Directory; see the Microsoft Active Directory documentation.
-
Configure Identity Synchronization for Windows to Detect and Synchronize Groups Related Changes between Directory Server and Active Directory
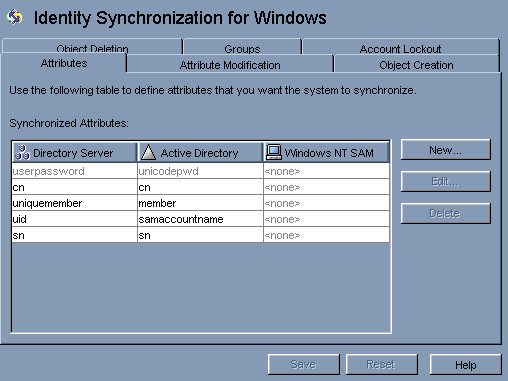
You do not need to map any attribute manually for the group synchronization. When you press Save, Identity Synchronization for Windows maps the attributes automatically.
Figure 8–47 Attribute Mapping for Group Synchronization
Note –
-
Do not modify the mapping between the userpasswordand unicodepwd attributes.
-
To disable the group synchronization, deselect the Disable Group Synchronization check box.
-
Alternatively, you can enable or disable group synchronization using command line idsync groupsync. For more information, see Appendix A, Using the Identity Synchronization for Windows Command Line Utilities.
Configuring and Synchronizing Account Lockout and Unlockout
To enable the Account Lockout feature, you must do the following:
-
Make the Password policies same on both Active Directory and Directory Server.
-
Enable Account Lockout.
-
Map certain attributes, which are different in Directory Server and in Active Directory
Identity Synchronization for Windows can synchronize the following events between Active Directory and Directory Server:
-
Lockout events from Active Directory to Directory Server
-
Lockout events from Directory Server to Active Directory
-
Manual unlockout events from Active Directory to Directory Server
-
Manual unlockout events from Directory Server to Active Directory
Note –
Account lockout and unlockout synchronization is not supported on Windows NT directory servers.
Prerequisites for Account Lockout
The attribute lockoutDuration should be set to the same value at both the places before enabling the account lockout feature. Make sure that the system time is also uniform across the distributed setup. Otherwise, the lockout events can expire if the lockoutDuration is less than the difference in the system dates.
Note –
Set the symmetric password policy at both ends. For example, if the password policy at Active Directory signifies a permanent lockout then the same password policy should be set at Directory Server.
Using the Account Lockout Feature
Enable Account Lockout Synchronization between Directory Server and Active Directory.
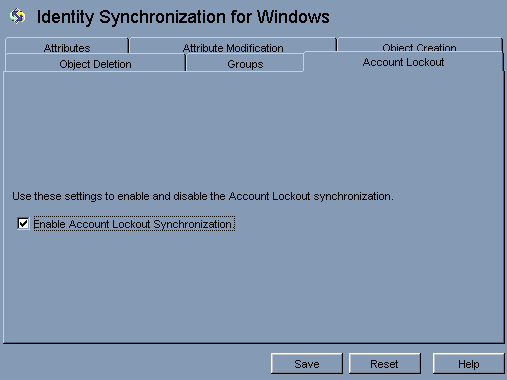
To enable Account lockout synchronization, you need to map attributes pwdaccountlockedtime (Directory Server) and lockoutTime (AD). pwdaccountlockedtime can be selected in the console after loading the schema with passwordObject object class.
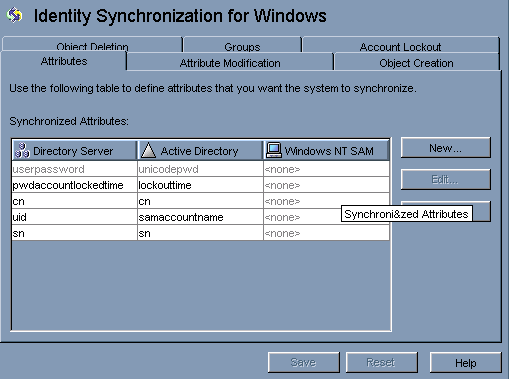
Note –
You can enable or disable the account lockout synchronization using command line tool idsync accountlockout. For more information, see Appendix A, Using the Identity Synchronization for Windows Command Line Utilities.
Specifying How Deletions Flow
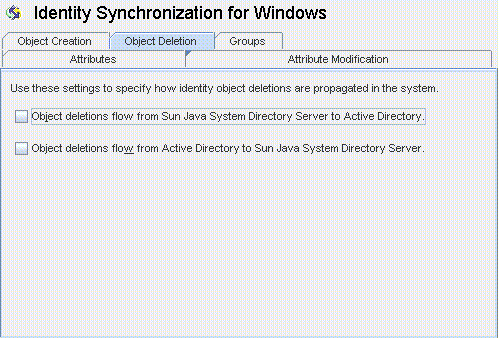
Use Object Deletions tab to specify how deleted user entries should flow between Directory Server and Active Directory systems.
Note –
You cannot specify Object Deletions flow for Windows NT.
 To Specify how Deleted Entries Flow Between Directory Server
and Active Directory Systems
-
Select the Identity Synchronization for Windows node at the top of the navigation pane, and then click the Object Deletion tab.
Figure 8–48 Propagating User Entry Deletions
-
Enable or disable the flow of deletions as follows:
-
Enable Object deletions flow from Sun Java System Directory Server to Active Directory to propagate deletions from the Sun Directory Server environment to your Active Directory servers.
-
Enable Object deletions flow from Active Directory to Sun Java System Directory Server to propagate deletions from the Active Directory environment to your Sun Directory Servers.
-
Enable both options for bidirectional flow.
-
Disable both options to prevent user deletions from propagating from one system to the other (Default setting).
-
- © 2010, Oracle Corporation and/or its affiliates
