Chapter 9 Using Sun Java System Active Server Pages
Sun Java System Web Server 6.1 supports SunTM Java System Active Server Pages version 4.0.1 (formerly Sun Chili!Soft ASP). This means that the Web server passes processing of all pages having the .asp file name extension to the Sun Java System Active Server Pages Server.
To use the Active Server Pages Server, you need to install and configure Sun Java System Active Server Pages against the Web server. The Sun Java System Active Server Pages installer is available on the Companion CD if you purchased the Sun Java System Web Server Media Kit, or by download from the following location:
http://www.sun.com/software/chilisoft/index.xml
You need to log in as root to install Sun Java System Active Server Pages.
Administering ASPs
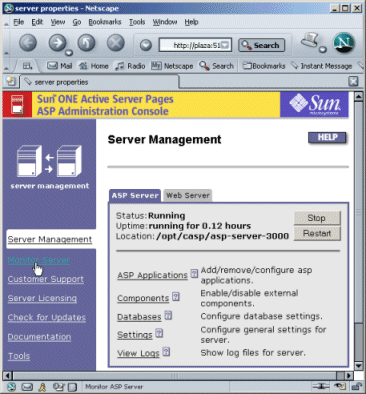
When you install Sun Java System Active Server Pages, you can choose to configure it against any of the Web server instances that the Active Server Pages installer automatically detects. The Active Server Pages installer configures a URL to connect from a browser. For example; http://plaza:5100
To administer Sun Java System Active Server Pages, type the specified URL in a browser window.
Figure 9–1 Administering ASP

You can fine-tune the Active Server Pages server to work with the Web server. See the product documentation included with Sun Java System Active Server Pages for more details on what you need to do to achieve this.
To deploy a simple application, index.asp, which displays the current date, and run it off the Web Server.
 To deploy a simple application
-
Use a text editor to create a file called index.asp and copy the following lines into it:
<html>
<body>
<h1> Today’s date is :<%response.write (date())%> </h1>
</body>
</html>
-
Create a directory for this program.
mkdir /opt/casp/sampleapp
-
Copy the index.asp file into the newly created /opt/casp/sampleapp directory.
-
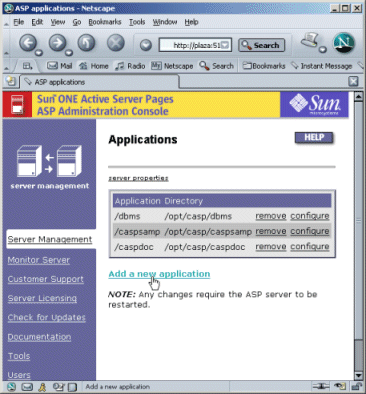
Access the Active Server Pages Server interface on a browser and click on the “Add a new application” link.
Figure 9–2 ASP Console — Adding a New application

-
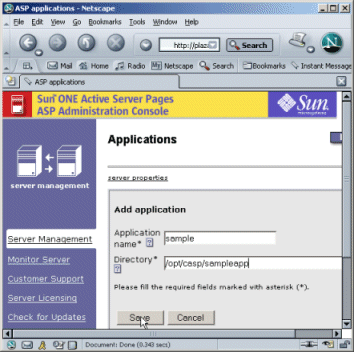
In the Add Application page, specify sample as the name of the application and /opt/casp/sampleapp as the directory name, and then click Save.
Figure 9–3 ASP Application — General Information

-
Open a browser window and type the following URL:
http://web-server-hostname/sample/index.asp
The sample application displays the current date in the browser.
Figure 9–4 Sample ASP

- © 2010, Oracle Corporation and/or its affiliates
