Chapter 3 WSIT Example Using a Web Container and NetBeans IDE
This chapter describes how to use NetBeans IDE (“the IDE”) and GlassFish to build and deploy a web service and client that use WSIT. It includes examples of the files that the IDE helps you create and examples of the build directories and the key files that the IDE produces to create a web service and a client.
This chapter covers the following topics:
Registering GlassFish with the IDE
Before you create the web service, perform the following steps to register Glassfish with the IDE.
 To Register GlassFish with the IDE
-
Start the IDE and choose Tools->Server Manager from the main window.
The Server Manager window appears.
-
Click Add Server.
-
Select the Sun Java System Application Server, assign a name to the server instance, and click Next.
The platform folder location window appears.
-
Specify the platform location of the server instance and the domain to which you want to register, then click Finish.
The Server Manager window appears.
-
Type the server username and password that you supplied when you installed the web container (the defaults are admin and adminadmin), then click Close.
Creating a Web Service
The starting point for developing a web service to use WSIT is a Java class file annotated with the javax.jws.WebService annotation. The WebService annotation defines the class as a web service endpoint. The following Java code shows a web service. The IDE will create most of this Java code for you.
package org.me.calculator;
import javax.jws.WebService;
import javax.jws.WebMethod;
import javax.jws.WebParam;

@WebService()
public class Calculator {
    @WebMethod(action="sample_operation")
    public String operation(@WebParam(name="param_name")
            String param) {
        // implement the web service operation here
        return param;
    }

    @WebMethod(action="add")
    public int add(@WebParam(name = "i") int i,
           @WebParam(name = "j") int j) {
        int k = i + j;
        return k;
    }
}
Notice that this web service performs a very simple operation. It takes two integers, adds them, and returns the result.
 To Create the Web Service
Perform the following steps to use the IDE to create this web service.
-
Click the Runtime tab in the left pane and verify that GlassFish is listed in the left pane. If it is not listed, register it by following the steps in Registering GlassFish with the IDE.
-
Choose File->New Project, select Web Application from the Web category, and click Next.
-
Assign the project a name that is representative of services that will be provided by the web service (for example, CalculatorApplication), set the Project Location to the location of the Sun application server, and click Finish.
Note –When you create the web service project, be sure to define a Project Location that does not include spaces in the directory name. Spaces in the directory might cause the web service and web service clients to fail to build and deploy properly. To avoid this problem, Sun recommends that you create a directory, for example C:\work, and put your project there.
-
Right-click the CalculatorApplication node and choose New->Web Service.
-
Type the web service name (CalculatorWS) and the package name (org.me.calculator) in the Web Service Name and the Package fields respectively.
-
Select Create an Empty Web Service and click Finish.
The IDE then creates a skeleton CalculatorWS.java file for the web service that includes an empty WebService class with annotation @Webservice.
-
Right-click within the body of the class and choose Web Service->Add Operation.
-
In the upper part of the Add Operation dialog box, type add in Name and choose int from the Return Type drop-down list.
-
In the lower part of the Add Operation dialog box, click Add and create a parameter of type int named i. Click OK. Click Add again and create a parameter of type int called j. Click OK and close the Enter Method Parameter dialog box.
-
Click OK at the bottom of the Add Operation dialog box.
-
Notice that the add method has been added to the Source Editor:
@WebMethod public int add(@WebParam(name = "i") int i, @WebParam(name = "j") int j) { // TODO implement operation return 0; } -
Change the add method to the following (changes are in bold):
@WebMethod(action="add")
public int add(@WebParam(name = "i") int i, @WebParam(name = "j") int j) {
    int k = i + j;
    return k;
}
Note –To ensure interoperability with Windows Communication Foundation (WCF) clients, you must specify the action element of @WebMethod in your endpoint implementation classes. WCF clients will incorrectly generate an empty string for the Action header if you do not specify the action element.
-
Save the CalculatorWS.java file.
Configuring WSIT Features in the Web Service
Now that you have coded a web service, you can configure the web service to use WSIT technologies. This section only describes how to configure the WSIT Reliable Messaging technology. For a discussion of reliable messaging, see Chapter 6, Using Reliable Messaging. To see how to secure the web service, see Chapter 7, Using WSIT Security.
 To Configure WSIT Features in the Web Service
To configure a web service to use the WSIT Reliable Messaging technology, perform the following steps:
-
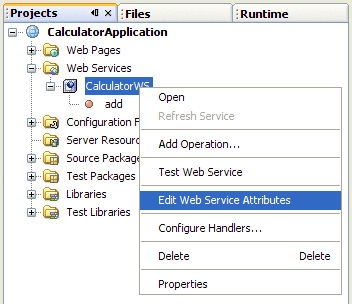
In the Projects window, expand the Web Services node under the CalculatorApplication node, right-click the CalculatorWS node, and choose Edit Web Service Attributes, as shown in Figure 3–1.
Figure 3–1 Editing Web Service Attributes

-
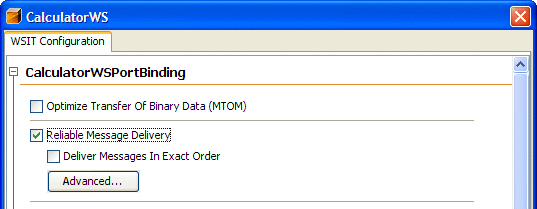
Select the Reliable Message Delivery check box, as shown in Figure 3–2, and click OK.
Figure 3–2 Reliable Messaging Configuration Window

This setting ensures that the service sends an acknowledgement to the clients for each message that is delivered, thus enabling clients to recognize message delivery failures and to retransmit the message. This capability makes the web service a “reliable” web service.
-
In the left pane, expand the Web Pages node and the WEB-INF node, and open the wsit-endpoint-classname.xml file in the Source Editor.
Notice that the IDE has added the following tags to the file to enable reliable messaging:
<wsp:Policy wsu:Id="CalculatorWSPortBindingPolicy">
  <wsp:ExactlyOne>
    <wsp:All>
      <wsaw:UsingAddressing xmlns:wsaws="http://www.w3.org/2006/05/addressing/wsdl"/>
      <wsrm:RMAssertion/>
    </wsp:All>
  </wsp:ExactlyOne>
</wsp:Policy>
Deploying and Testing a Web Service
Now that you have configured the web service to use WSIT technologies, you can deploy and test it.
 To Deploy and Test a Web Service
-
Right-click the project node, select Properties, then select Run.
-
Type /CalculatorWSService?wsdl in the Relative URL field and click OK.
-
Right-click the project node and choose Run Project. The first time Glassfish is started, you will be prompted for the admin password.
The IDE starts the web container, builds the application, and displays the WSDL file page in your browser. You have now successfully tested the deployed a WSIT-enabled web service.
Notice that the WSDL file includes the following WSIT tags:
<wsp:UsingPolicy/>
<wsp:Policy wsu:Id="CalculatorWSPortBindingPolicy">
  <wsp:ExactlyOne>
    <wsp:All>
      <ns1:RMAssertion/>
      <ns2:UsingAddressing/>
    </wsp:All>
  </wsp:ExactlyOne>
</wsp:Policy>
Creating a Client to Consume a WSIT-Enabled Web Service
Now that you have built and tested a web service that uses WSIT technologies, you can create a client that accesses and consumes that web service. The client will use the web service’s WSDL to create the functionality necessary to satisfy the interoperability requirements of the web service.
 To Create a Client to Consume a WSIT-Enabled
Web Service
To create a client to access and consume the web service, perform the following steps.
-
Choose File->New Project, select Web Application from the Web category and click Next.
-
Name the project, for example, CalculatorWSServletClient, and click Finish.
-
Right-click the CalculatorWSServletClient node and select New->Web Service Client.
The New Web Service Client window appears.
Note –NetBeans submenus are dynamic, so the Web Service Client option may not appear. If you do not see the Web Service Client option, select New->File\Folder->Webservices->Web Service Client.
-
Select the WSDL URL option.
-
Cut and paste the URL of the web service that you want the client to consume into the WSDL URL field.
For example, here is the URL for the CalculatorWS web service:
http://localhost:8080/CalculatorApplication/CalculatorWSService?wsdl
When JAX-WS generates the web service, it appends Service to the class name by default.
-
Type org.me.calculator.client in the Package field, and click Finish.
The Projects window displays the new web service client.
-
Right-click the CalculatorWSServletClient project node and choose New->Servlet.
-
Name the servlet ClientServlet, specify the package name, for example, org.me.calculator.client and click Finish.
-
To make the servlet the entry point to your application, right-click the CalculatorWSServletClient project node, choose Properties, click Run, type /ClientServlet in the Relative URL field, and click OK.
-
If ClientServlet.java is not already open in the Source Editor, open it.
-
In the Source Editor, remove the line that comments out the body of the processRequest method.
This is the start-comment line that starts the section that comments out the code:
/* TODO output your page here
-
Delete the end-comment line that ends the section of commented out code:
*/
-
Add some empty lines after the following line:
out.println("<h1>Servlet ClientServlet at " + request.getContextPath () + "</h1>"); -
Right-click in one of the empty lines that you added, then choose Web Service Client Resources->Call Web Service Operation.
The Select Operation to Invoke dialog box appears.
-
Browse to the Add operation and click OK.
The processRequest method is as follows, with bold indicating code added by the IDE:
protected void processRequest(HttpServletRequest request, HttpServletResponse response) throws ServletException, IOException { response.setContentType("text/html;charset=UTF-8"); PrintWriter out = response.getWriter(); out.println("<html>"); out.println("<head>"); out.println("<title>Servlet ClientServlet</title>"); out.println("</head>"); out.println("<body>"); out.println("<h1>Servlet ClientServlet at " + request.getContextPath () + "</h1>"); try { // Call Web Service Operation org.me.calculator.client.CalculatorWS port = service.getCalculatorWSPort(); // TODO initialize WS operation arguments here int i = 0; int j = 0; // TODO process result here int result = port.add(i, j); out.println("Result = " + result); } catch (Exception ex) { // TODO handle custom exceptions here } out.println("</body>"); out.println("</html>"); out.close(); } -
Change the values for int i and int j to other numbers, such as 3 and 4.
-
Add a line that prints out an exception, if an exception is thrown.
The try/catch block is as follows (new and changed lines from this step and the previous step are highlighted in bold text):
try { // Call Web Service Operation org.me.calculator.client.CalculatorWS port = service.getCalculatorWSPort(); // TODO initialize WS operation arguments here int i = 3; int j = 4; // TODO process result here int result = port.add(i, j); out.println("<p>Result: " + result); } catch (Exception ex) { out.println("<p>Exception: " + ex); } -
If Reliable Messaging is enabled, the client needs to close the port when done or the server log will be overwhelmed with messages. To close the port, first add the following line to the import statements at the top of the file:
import com.sun.xml.ws.Closeable;
Then add the line in bold at the end of the try block, as shown below.
try { // Call Web Service Operation org.me.calculator.client.CalculatorWS port = service.getCalculatorWSPort(); // TODO initialize WS operation arguments here int i = 3; int j = 4; // TODO process result here int result = port.add(i, j); out.println("<p>Result: " + result); ((Closeable)port).close(); } catch (Exception ex) { out.println("<p>Exception: " + ex); } -
Right-click the project node and choose Run Project.
The server starts (if it was not running already), the application is built, deployed, and run. The browser opens and displays the calculation result.
- © 2010, Oracle Corporation and/or its affiliates
