 To Configure SSL for Your Application
The following steps are generic to any application, but have example configurations that will work with the tutorial examples, in particular, Example: SAML Authorization over SSL (SA) and Example: Transport Security (SSL).
To configure SSL for your application, follow these steps.
-
Select one of the mechanisms that require SSL.
These include Transport Security (SSL), Message Authentication over SSL, and SAML Authorization over SSL.
-
Server Configuration
-
GlassFish is already configured for SSL. No further SSL configuration is necessary if you are using Transport Security. However, if you are using one of the Message Security mechanisms with SSL, you must update the GlassFish certificates as described in To Update GlassFish Certificates.
-
Configure a user on GlassFish as described in Adding Users to GlassFish.
-
-
Client Configuration
For configuring your system for SSL in order to work through the examples in this tutorial, the same keystore and truststore files are used for both the client and the service. This makes it unnecessary to set system properties to point to the client stores, as both GlassFish and NetBeans IDE are aware of these certificates and point to them by default.
In general, for the client side of SSL you will not be using the same certificates for the client and the service. In that case, you need to define the client certificate stores by setting the system properties -Djavax.net.ssl.trustStore, -Djavax.net.ssl.keyStore, -Djavax.net.ssl.trustStorePassword, and -Djavax.net.ssl.keyStorePassword in the application client container.
You can specify the environment variables for keystore and truststore by setting the environment variable VMARGS through the shell environment or inside an Ant script, or by passing them in when you start NetBeans IDE from the command line. For example, in the latter case, you would specify the property settings as follows:
netbeans-install/bin/netbeans.exe
 -J-Djavax.net.ssl.trustStore=as-install/domains/domain1/config/cacerts.jks
 -J-Djavax.net.ssl.keyStore=as-install/domains/domain1/config/keystore.jks
 -J-Djavax.net.ssl.trustStorePassword=changeit
 -J-Djavax.net.ssl.keyStorePassword=changeit
Use the hard-coded path to the keystore and truststore files, not variables.
For the SSL mechanism, The browser will prompt you to accept the server alias s1as.
-
On the client side, for the Transport Security (SSL) mechanism, you must either use the fully-qualified hostname in the URL for the service WSDL when you are creating the web sercie client, or else you must follow the steps in Transport Security (SSL) Workaround.
-
Service Configuration
To require the service to use the HTTPS protocol, you have to specify the security requirements in the service’s application deployment descriptor. This file is ejb-jar.xml for a web service that is implemented as an EJB endpoint, and web.xml for a web service implemented as a servlet. To specify the security information, follow these steps:
-
From your web service application, expand Web Pages->WEB-INF.
-
Double-click web.xml (or ejb-jar.xml) to open it in the editor.
-
Select the Security tab.
-
On the Security Constraints line, click Add Security Constraint.
-
Under Web Resource Collection, click Add.
-
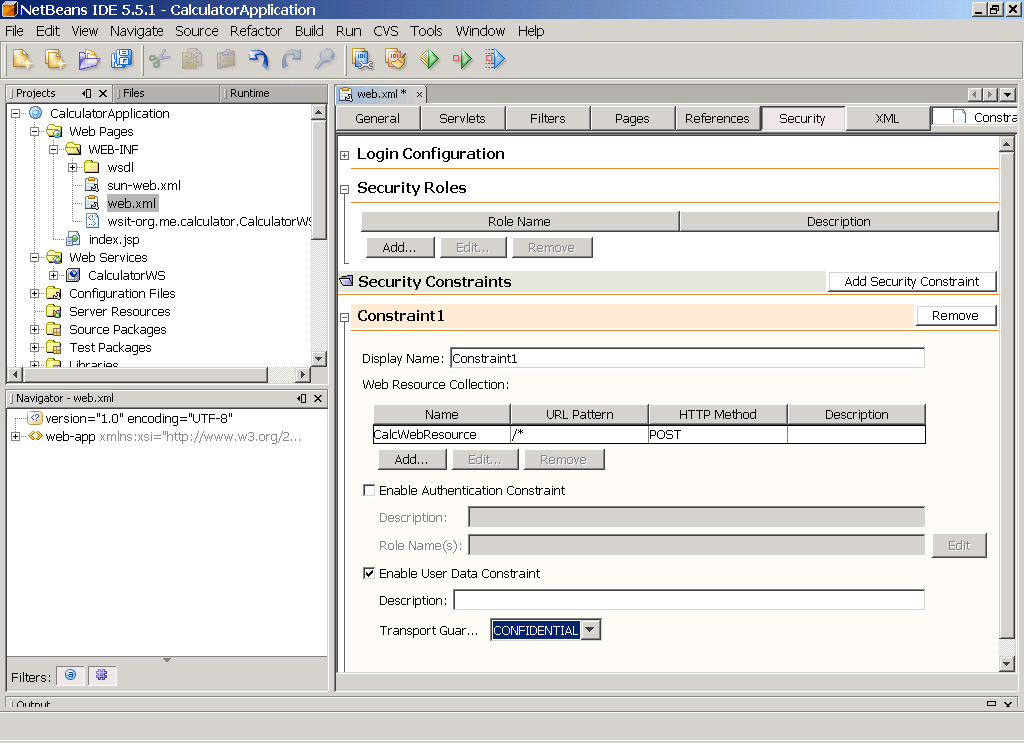
Type a Name for the Resource (for example, CalcWebResource), and type the URL Pattern to be protected (for example, /*). Select which HTTP Methods to protect, for example, POST. Click OK to close this dialog.
-
Check the Enable User Data Constraint box. Select CONFIDENTIAL for the Transport Guarantee to specify that the application uses SSL because the application requires that data be transmitted so as to prevent other entities from observing the contents of the transmission.
The IDE appears as shown in Figure 7–4.
Figure 7–4 Deployment Descriptor Page

-
Click the XML tab to display the additions to web.xml. The security constraint looks like this:
<security-constraint> <display-name>Constraint1</display-name> <web-resource-collection> <web-resource-name>CalcWebResource</web-resource-name> <description/> <url-pattern>/*</url-pattern> <http-method>POST</http-method> </web-resource-collection> <user-data-constraint> <description/> <transport-guarantee>CONFIDENTIAL</transport-guarantee> </user-data-constraint> </security-constraint> -
When you run this project (right-click, select Run Project), the browser will ask you to accept the server certificate of s1as. Accept this certificate. The WSDL appears in the browser.
-
-
Creating a Client
When creating your client application, use the fully-qualified hostname to specify the secure WSDL location (use https://fully_qualified_hostname:8181/CalculatorApplication/CalculatorWSService?wsdl, for example, in place of http://localhost:8080/CalculatorApplication/CalculatorWSService?wsdl).
In some cases, you might get an error dialog telling you that the URL https://fully_qualified_hostname:8181/CalculatorApplication/CalculatorWSService?wsdl couldn’t be downloaded. However, this is the correct URL, and it does load when you run the service. So, when this error occurs, repeat the steps that create the Web Service Client using the secure WSDL. The second time, the web service reference is created and you can continue creating the client.
- © 2010, Oracle Corporation and/or its affiliates
