| Skip Navigation Links | |
| Exit Print View | |

|
Sun Fire X2270 M2 Server Product Documentation |
About This Documentation (PDF and HTML)
Download Server System Tools and Drivers
Hardware Installation and Product Notes
Sun Fire X2270 M2 Server Installation Guide
Installation Overview and Preparation
Installing the Server Into a Rack With Optional Slide Rails
Communicating With the ILOM and the System Console
Configuring the Factory--Installed Oracle Solaris 10 Operating System
Powering On and Powering Off the Server
Sun Fire X2270 M2 Server Product Notes
Oracle Solaris Operating System
Planning the Oracle Solaris Operating System Installation
Installing Oracle Solaris 10 OS
Introduction to Linux Installation
Preliminary Tasks Before Installing an OS
Installing Oracle Enterprise Linux
Installing SUSE Linux Enterprise Server
Installing Red Hat Enterprise Linux
Booting From OS Distribution Media
Configuring a Linux Server to Support PXE Installation
Identifying Logical and Physical Network Interface Names for Linux OS Configuration
Planning the Operating System Installation
Installing Windows Server 2008 Operating System
Incorporating Sun Fire Drivers Into a WIM Image
Configuring RAID Controller in the BIOS Setup Utility
Sun Fire X2270 M2 Server Installation Guide for ESX Software
Preparing to Install VMware ESX 4.0 and ESXi 4.0
Task Map for the VMware Installation
How to Obtain VMware Installation and Administration Documentation
How to Obtain an Image of the Installation File
How to Connect to the SP Using a Web-Based Client
How to Connect to the SP Using an SSH Client
Selecting a Boot Media and OS Delivery Option
How to Update the ESX or ESXi Operating System
How to Determine the NIC MAC Address Using the ILOM CLI
Translating Network Interface Card PCI Bus Numbers to Physical Network Ports
How to Install VMware ESXi 4.0
How to Boot From OS Media Locally
How to Boot From OS Distribution Media or ISO File Remotely
Administration, Diagnostics, and Service
Overview of the ILOM Supplement
Communicating With the ILOM and the System Console
ILOM Platform Features for the Sun Fire X2270 M2 Server
Using ILOM to Monitor the Host
Introduction to Diagnostic Tools
U-Boot Diagnostic Startup Tests
Accessing the Pc-Check Diagnostics Utility on the Tools and Drivers CD/DVD
Sun Fire X2270 M2 Server Service Manual Organization
Sun Fire X2270 M2 Server Overview
Maintaining the Sun Fire X2270 M2 Server
Sun Fire X2270 M2 Server Service Procedures and Information
Use this task in conjunction with the VMware installation documentation to boot and install ESX 4.0.
Before You Begin
This task requires that the installation media boots from one of the following sources:
CD or DVD (internal or external CD/DVD)
ISO software image (network repository)
Note - If you want to use a CD/DVD for installation, you must create it. The OS software is only available as a download.
This task requires that you know the MAC addresses of the network ports (NET 0 and NET 1). To determine the MAC addresses, see How to Determine the NIC MAC Address Using the ILOM CLI.
For CD/DVD distribution media. Insert the VMware ESX media boot disk into the local or remote USB CD/DVD-ROM drive.
For ISO images. Ensure that the ISO images are available and that the boot disk image has been selected in the ILOM Remote Console application's Device menu (Device > CD-ROM Image).
Locally using a physical CD/DVD, see How to Boot From OS Media Locally.
Remotely using an ISO image or a CD/DVD, see How to Boot From OS Distribution Media or ISO File Remotely.
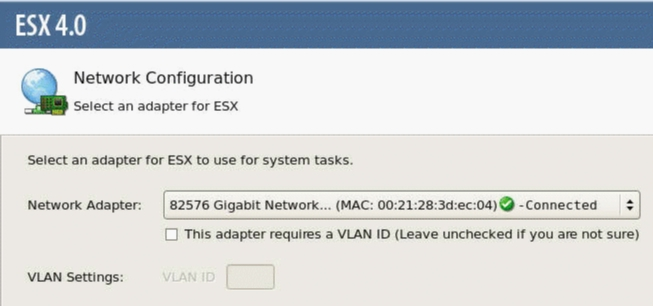
During the installation process, a Network Configuration dialog appears.

A live network adapter (an adapter connected to the network) must be specified for the VMware service console (vmnic0). Each network adapter that is live has a green check mark next to it as shown in the above dialog. Also, notice that the MAC address that is associated with the server’s physical network port (NET0 or NET1) is displayed. Therefore, you can use the MAC address to determine which of the server’s physical network ports is being displayed.
Note - If you are not sure which network adapter to select, contact your network administrator.
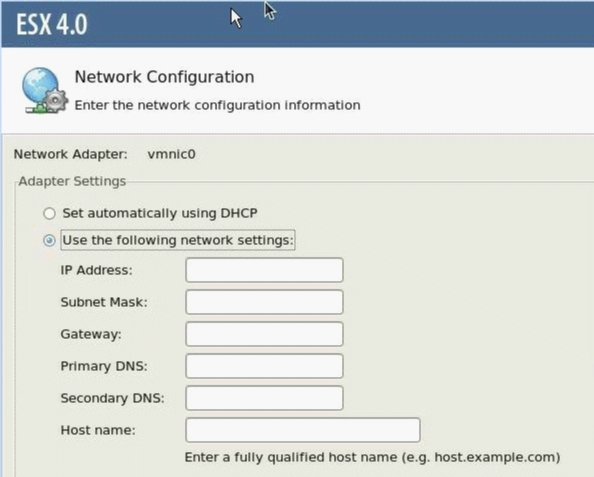
A second ESX 4.0 Network Configuration dialog appears.

Do one of the following:
To auto-configure the network adapter, select Set automatically using DHCP, and click Next.
Or
To manually configure the network adapter, select Use the following network settings, enter the network settings, and click Next.
Next Steps