| Skip Navigation Links | |
| Exit Print View | |

|
Sun Fire X2270 M2 Server Product Documentation |
About This Documentation (PDF and HTML)
Download Server System Tools and Drivers
Hardware Installation and Product Notes
Sun Fire X2270 M2 Server Installation Guide
Installation Overview and Preparation
Installing the Server Into a Rack With Optional Slide Rails
Communicating With the ILOM and the System Console
Configuring the Factory--Installed Oracle Solaris 10 Operating System
Powering On and Powering Off the Server
Sun Fire X2270 M2 Server Product Notes
Oracle Solaris Operating System
Planning the Oracle Solaris Operating System Installation
Task Map for Oracle Solaris 10 OS Installation
Supported Versions of Oracle Solaris 10 OS
Preinstalled Oracle Solaris 10 OS Image
Oracle Solaris Installation Methods
How to Install From the Local Console
How to Install From a Remote Console
How to Install From Local Boot Media
How to Redirect Boot Media From a Remote Storage Device
Verifying BIOS Settings for New Installations
How to View or Edit BIOS Settings for New Installations
Installing Oracle Solaris 10 OS
Post Oracle Solaris Installation Configuration
Installing System Device Driver(s) to Support Additional Hardware
How to Install System Device Drivers Using Local or Remote Media
How to Install the System Device Driver Using a Network Share or USB Device
Installing Critical Oracle Solaris Patches
Introduction to Linux Installation
Preliminary Tasks Before Installing an OS
Installing Oracle Enterprise Linux
Installing SUSE Linux Enterprise Server
Installing Red Hat Enterprise Linux
Booting From OS Distribution Media
Configuring a Linux Server to Support PXE Installation
Identifying Logical and Physical Network Interface Names for Linux OS Configuration
Planning the Operating System Installation
Installing Windows Server 2008 Operating System
Incorporating Sun Fire Drivers Into a WIM Image
Configuring RAID Controller in the BIOS Setup Utility
Sun Fire X2270 M2 Server Installation Guide for ESX Software
Preparing to Install VMware ESX 4.0 and ESXi 4.0
Administration, Diagnostics, and Service
Overview of the ILOM Supplement
Communicating With the ILOM and the System Console
ILOM Platform Features for the Sun Fire X2270 M2 Server
Using ILOM to Monitor the Host
Introduction to Diagnostic Tools
U-Boot Diagnostic Startup Tests
Accessing the Pc-Check Diagnostics Utility on the Tools and Drivers CD/DVD
Sun Fire X2270 M2 Server Service Manual Organization
Sun Fire X2270 M2 Server Overview
Maintaining the Sun Fire X2270 M2 Server
Sun Fire X2270 M2 Server Service Procedures and Information
Before You Begin
Meet all applicable installation prerequisites for installing an operating system. For further information about these prerequisites, see Task Map for Oracle Solaris 10 OS Installation.
Note - The following procedure explains the initial steps for booting the install media and launching the Oracle Solaris installation program. For further details about installing Oracle Solaris 10, see the Solaris 10 Installation Guide: Basic Installations.
For distribution CD/DVD, insert the Oracle Solaris 10 OS Distribution media (CD labeled 1 or the single DVD) into the local or remote CD/DVD-ROM drive.
For ISO images, ensure that the ISO images are available and that the ILOM Remote Console application is aware of the first ISO image location.
For additional information about how to set up the install media, see How to Install From Local Boot Media and How to Redirect Boot Media From a Remote Storage Device.
From the ILOM web interface, select Remote Control –> Remote Power Control, then select the Power Cycle option from the Host action drop-down list box.
From the ILOM CLI on server SP, type: reset /SYS
From the local server, press the Power button (approximately, 1 second) on the front panel of the server to turn the server off, then press the Power button again to turn the server on.
The BIOS screen appears.
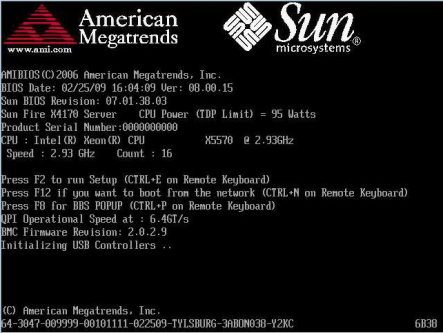
Note - The following event occurs very quickly. Watch carefully for the messages, which appear on the screen for only a brief time.
The Please Select Boot Device menu appears.
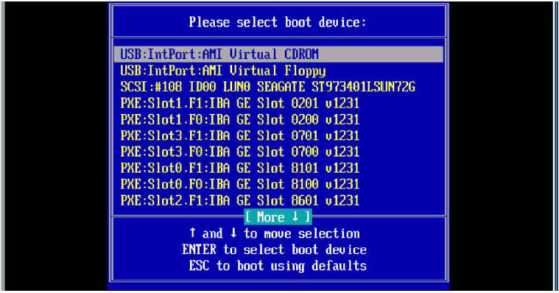
If you are performing the Oracle Solaris installation from the ILOM Remote Console application, select in the Boot Device menu the AMI Virtual CDROM.
The GRUB menu appears.
Note - The device strings listed on Boot Device menu are in the format: device type, slot indicator, and product ID string.
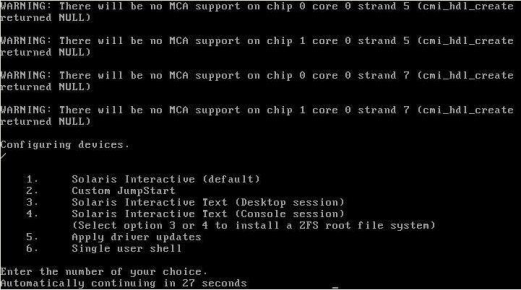
Graphical User Interface (default) – Type 1 then press Enter.
Text Installer From Desktop Session – Type 3 then press Enter.
Text Installer From Console Session – Type 4 then press Enter.
The system discovers and configures the devices and interfaces. If the system discovers a keyboard, the Configure Keyboard Layout menu appears.
Note - The screens that appear on your system might vary depending on the type of interface you chose to configure in Step 6. The following sample screens are based on the default Graphical User Interface (GUI) option (option 1).

The system configures the keyboard layout selection and searches for configuration files.
If you selected a web interface installation in the earlier steps, the next two steps (Step 8 and Step 9) confirm that the GUI is functioning. If you did not select a web interface earlier, skip to Step 10.
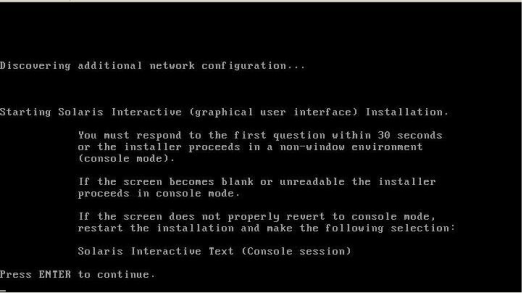
A second screen appears to confirm that the web interface is functioning.
If this screen is not legible, restart the installation and consider choosing one of the text modes in Step 6.
The Language Selection menu appears.
After a few moments the Solaris Welcome screen appears.
Note - The following sample screen reflects the web interface installation program. If you are running a text-based installation interface, the text-based Solaris Welcome screen (not shown) appears.
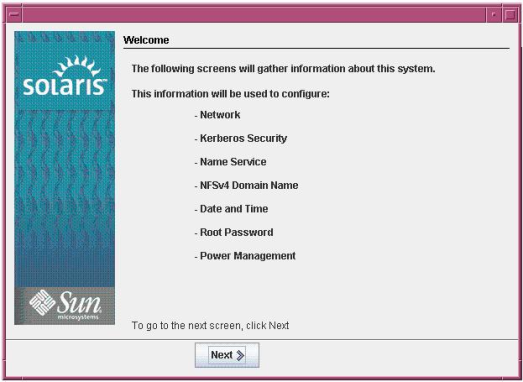
If you preconfigured all the system information, the installation program does not prompt you to enter any configuration information. If you did not preconfigure all the system information, the installation program prompts you for this information on several configuration screens.
If you configured the system to reboot when the installation is done, the system automatically reboots and displays the Solaris login prompt.
If you did not configure the system to automatically reboot when the installation is done, you must manually reboot the system.
See Also