| Skip Navigation Links | |
| Exit Print View | |

|
Sun Fire X2270 M2 Server Product Documentation |
About This Documentation (PDF and HTML)
Download Server System Tools and Drivers
Hardware Installation and Product Notes
Sun Fire X2270 M2 Server Installation Guide
Installation Overview and Preparation
Installing the Server Into a Rack With Optional Slide Rails
Communicating With the ILOM and the System Console
Configuring the Factory--Installed Oracle Solaris 10 Operating System
Powering On and Powering Off the Server
Sun Fire X2270 M2 Server Product Notes
Oracle Solaris Operating System
Planning the Oracle Solaris Operating System Installation
Installing Oracle Solaris 10 OS
Introduction to Linux Installation
Preliminary Tasks Before Installing an OS
Installing Oracle Enterprise Linux
Installing SUSE Linux Enterprise Server
Installing Red Hat Enterprise Linux
Booting From OS Distribution Media
Configuring a Linux Server to Support PXE Installation
Identifying Logical and Physical Network Interface Names for Linux OS Configuration
Planning the Operating System Installation
Installing Windows Server 2008 Operating System
Incorporating Sun Fire Drivers Into a WIM Image
Configuring RAID Controller in the BIOS Setup Utility
Sun Fire X2270 M2 Server Installation Guide for ESX Software
Preparing to Install VMware ESX 4.0 and ESXi 4.0
Administration, Diagnostics, and Service
Overview of the ILOM Supplement
Communicating With the ILOM and the System Console
ILOM Platform Features for the Sun Fire X2270 M2 Server
Using ILOM to Monitor the Host
Introduction to Diagnostic Tools
U-Boot Diagnostic Startup Tests
Accessing the Pc-Check Diagnostics Utility on the Tools and Drivers CD/DVD
Sun Fire X2270 M2 Server Service Manual Organization
Sun Fire X2270 M2 Server Overview
Supported Operating Systems and the Preinstalled Oracle Solaris OS Option
Front and Rear External Features and Components
Front Panel Features and Components
Rear Panel Features and Components
Maintaining the Sun Fire X2270 M2 Server
Preparing for Service and Operation
Antistatic Procedures and Precautions
How to Remove the Server from the Rack
How to Remove the Server Cover
How to Install the Server Cover
Powering On and Powering Off the Server
Component Replacement Procedures and Topic
Locations of Internal Server Components
Replacing the System Battery (CRU)
Removing and Installing DIMMs (CRU)
Removing and Installing a PCIe Card (CRU)
Removing and Installing the PCIe Riser (CRU)
Removing and Installing a Power Supply (CRU)
Removing and Installing a Hard Drive Filler and Hard Drive Assembly (CRU)
Removing and Installing the Air Duct (CRU)
Replacing a Blower Module (CRU)
Replacing the Hard Drive Backplane Assembly (FRU)
Removing and Installing the SP Module (CRU)
Sun Fire X2270 M2 Server Internal Cabling
Replacing the SATA Cable Harness (CRU)
Replacing the Front I/O Cable (CRU)
Replacing the Front I/O Board (FRU)
Removing, Installing, and Adding a CPU and Heatsink (FRU)
Replacing the Motherboard (FRU)
Sun Fire X2270 M2 Server Service Procedures and Information
Using the Tools and Drivers CD
How to Use the Tools and Drivers CD
How to Backup Motherboard FRUID Information
Front Panel System Status LEDs
BIOS Booting and Setup Considerations
Default BIOS Power-On Self Test (POST) Events
BIOS POST Memory Testing Sequence
Recovering the SP and BIOS Firmware
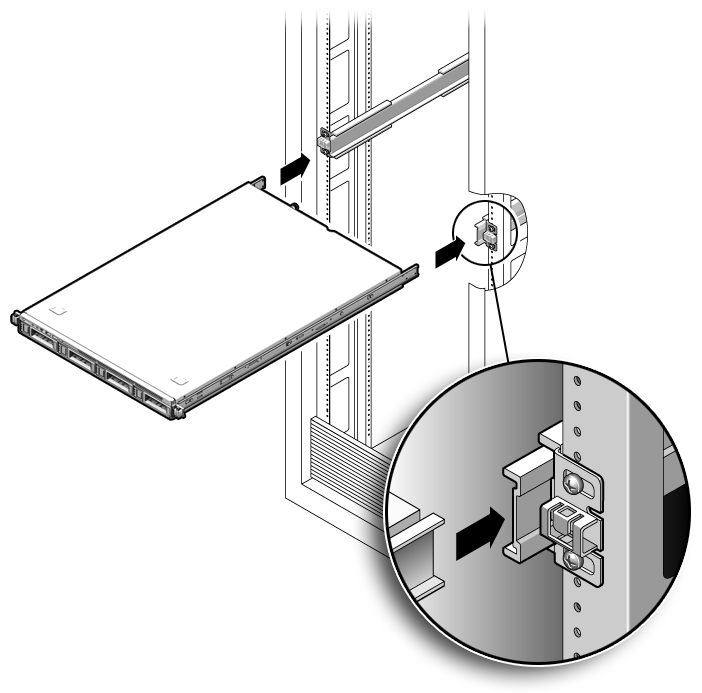
Use this procedure to install the server chassis, with mounting brackets, into the slide rail assemblies that are mounted to the rack.
 | Caution - This procedure requires a minimum of two people because of the weight of the server. Attempting this procedure alone could result in equipment damage or personal injury. |
 | Caution - Always load equipment into a rack from the bottom up so that it does not become top-heavy and tip over. Deploy your rack’s anti-tilt bar to prevent the rack from tipping during equipment installation. |
Push the slide rails into the slide rail assemblies and then collapse the assemblies.

You will hear a click.
 | Caution - Verify that the server is securely mounted in the rack and that the slide rails locks are engaged with the mounting brackets before continuing. |
Next Steps
See Also