Working With Administered Objects
Once you have connected an object store to the Administration Console, you can proceed to add administered objects (connection factories and destinations) to it. This section describes how.
Note –
The Administration Console displays only Message Queue administered objects. If an object store contains a non–Message Queue object with the same lookup name as an administered object that you want to add, you will receive an error when you attempt the add operation.
Adding a Connection Factory
Connection factories are used by client applications to create connections to a broker. By configuring a connection factory, you can control the properties of the connections it creates.
 To Add a Connection Factory to an Object Store
-
Make sure the object store is connected to the Administration Console (see Connecting to an Object Store).
-
Click on the Connection Factories item under the object store’s name in the Administration Console window’s navigation pane and choose Add Connection Factory Object from the Actions menu.
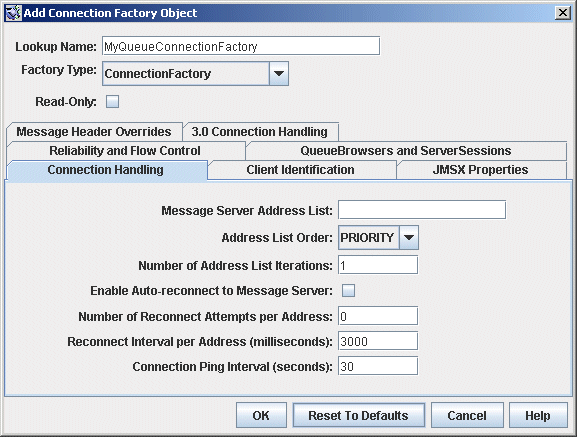
Alternatively, you can right-click on Connection Factories and choose Add Connection Factory Object from the pop-up context menu. In either case, the Add Connection Factory Object dialog box ( Figure 2–13) will appear.
Figure 2–13 Add Connection Factory Object Dialog Box

-
Enter a name for the connection factory in the Lookup Name field.
This is the name that client applications will use when looking up the connection factory with JNDI.
For this exercise, type in the name MyQueueConnectionFactory .
-
Choose the type of connection factory you wish to create from the Factory Type pull-down menu.
For this exercise, choose QueueConnectionFactory.
-
Click the Connection Handling tab.
The Connection Handling panel will appear, as shown in Figure 2–13.
-
Fill in the Message Server Address List field with the address(es) of the broker(s) to which this connection factory will create connections.
The address list may consist of a single broker or (in the case of a broker cluster) multiple brokers. For each broker, it specifies information such as the broker’s connection service, host name, and port number. The exact nature and syntax of the information to be specified varies, depending on the connection service to be used; see Connection Handling for specifics.
For this exercise, there is no need to type anything into the Message Server Address List field, since the sample application HelloWorldMessageJNDI expects the connection factory to use the standard address list attributes to which it is automatically configured by default (connection service jms , host name localhost, and port number 7676 ).
-
Configure any other attributes of the connection factory as needed.
The Add Connection Factory Object dialog box contains a number of other panels besides Connection Handling, which can be used to configure various attributes for a connection factory.
For this exercise, do not change any of the other attribute settings. You may find it instructive, however, to click through the other tabs to get an idea of the kinds of configuration information that can be specified. Use the Help button to learn more about the contents of these other configuration panels.
-
If appropriate, click the Read-Only checkbox.
This locks the connection factory object’s configuration attributes to the values they were given at creation time. A read-only administered object’s attributes cannot be overridden, whether programmatically from client code or administratively from the command line.
For this exercise, do not check Read-Only.
-
Click OK to create the connection factory, add it to the object store, and dismiss the dialog box.
The new connection factory will appear in the result pane.
Adding a Destination
A destination administered object represents a physical destination on a broker, enabling clients to send messages to that physical destination independently of provider-specific configurations and naming syntax. When a client sends a message addressed via the administered object, the broker will deliver the message to the corresponding physical destination, if it exists. If no such physical destination exists, the broker will create one automatically if auto-creation is enabled, as described under Creating a Physical Destination, and deliver the message to it; otherwise, it will generate an error signaling that the message cannot be delivered.
The following procedure describes how to add a destination administered object to the object store corresponding to an existing physical destination.
 To Add a Destination to an Object Store
-
Make sure the object store is connected to the Administration Console (see Connecting to an Object Store).
-
Click on the Destinations item under the object store’s name in the Administration Console window’s navigation pane and choose Add Destination Object from the Actions menu.
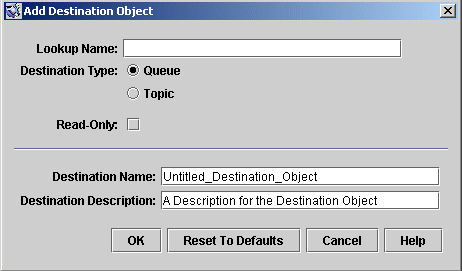
Alternatively, you can right-click on Destinations and choose Add Destination Object from the pop-up context menu. In either case, the Add Destination Object dialog box (Figure 2–14) will appear.
Figure 2–14 Add Destination Object Dialog Box

-
Enter a name for the destination administered object in the Lookup Name field.
This is the name that client applications will use when looking up the destination with JNDI.
For this exercise, type in the name MyQueue.
-
Select the Queue or Topic radio button to specify the type of destination object to create.
For this exercise, select Queue if it is not already selected.
-
Enter the name of the corresponding physical destination in the Destination Name field.
This is the name you specified when you added the physical destination to the broker (see Working With Physical Destinations).
For this exercise, type in the name MyQueueDest.
-
Optionally, enter a brief description of the destination in the Destination Description field.
The contents of this field are intended strictly for human consumption and have no effect on client operations.
For this exercise, you can either delete the contents of the Destination Description field or type in some descriptive text such as
Example destination for MQ Admin Guide tutorial
-
If appropriate, click the Read-Only checkbox.
This locks the destination object’s configuration attributes to the values they were given at creation time. A read-only administered object’s attributes cannot be overridden, whether programmatically from client code or administratively from the command line.
For this exercise, do not check Read-Only.
-
Click OK to create the destination object, add it to the object store, and dismiss the dialog box.
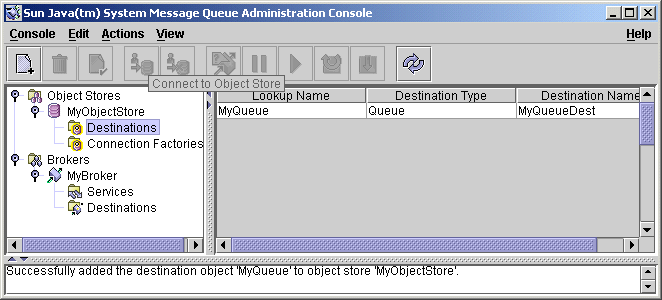
The new destination object will appear in the result pane, as shown in Figure 2–15.
Figure 2–15 Destination Object Displayed in Administration Console Window

Viewing Administered Object Properties
You can use the Properties command on the Administration Console’s Actions menu to view or modify the properties of an administered object.
 To View or Modify the Properties of an Administered
Object
-
Select Connection Factories or Destinations under the object store’s name in the Administration Console window’s navigation pane.
A list of the available connection factory or destination administered objects will appear in the result pane, showing the lookup name and type of each (as well as the destination name in the case of destination administered objects).
-
Select an administered object by clicking on its name in the result pane.
-
Choose Properties from the Actions menu.
The Connection Factory Object Properties or Destination Object Properties dialog box will appear, similar to the Add Connection Factory Object (Figure 2–13) or Add Destination Object (Figure 2–14) dialog. You can use this dialog box to change the selected object’s configuration attributes. Note, however, that you cannot change the object’s lookup name; the only way to do this is the delete the object and then add a new administered object with the desired lookup name.
-
Click OK to accept the new attribute values and dismiss the dialog box.
Deleting an Administered Object
Deleting an administered object removes it permanently from the object store to which it belongs.
 To Delete an Administered Object
-
Select Connection Factories or Destinations under the object store’s name in the Administration Console window’s navigation pane.
A list of the available connection factory or destination administered objects will appear in the result pane, showing the lookup name and type of each (as well as the destination name in the case of destination administered objects).
-
Select an administered object by clicking on its name in the result pane.
-
Choose Delete from the Edit menu.
A confirmation dialog box will appear, asking you to confirm that you wish to proceed with the operation.
-
Click Yes to confirm the operation and dismiss the confirmation dialog.
For this exercise, do not delete the administered objects MyQueue or MyQueueConnectionFactory that you created earlier; instead, click No to dismiss the confirmation dialog without performing the delete operation.
- © 2010, Oracle Corporation and/or its affiliates
