Packaging the Application using deploytool
In this section, you practice packaging the Hello World application using deploytool
 To Package the Application using deploytool
Steps
-
Select File ⇒ New ⇒ Web Component.
The wizard’s Introduction appears.
-
Click Next to display the Wizard’s main screen.
You will create a new stand-alone WAR module, so accept the default selection for the WAR Location panel.
With the hello.war file open, the default WAR File location is shown as install_dir/samples/quickstart/. With no WAR files open, the field is blank. Either way, click the Browse button to specify the name of the WAR file to create. (“WAR File” must specify the full path to a WAR file.)
-
If you are not already there, navigate to install_dir/samples/quickstart.
-
Enter the filename as hello2 and click Create Module File to create the WAR file and return to the Wizard.
The Wizard now shows WAR Name as hello2. WAR Display Name is the title that appears in administration utilities like deploytool and the Admin Console. It defaults to the same name as the WAR file in the Wizard, but it can be different.
-
In Context Root enter /hello2 to define the URL for the web application as http://server:port/hello2. In most production systems, of course, the Application Server software uses a default port, so the port number is not part of the URL that users type.
-
Click Edit Contents to add the files that make up the application.
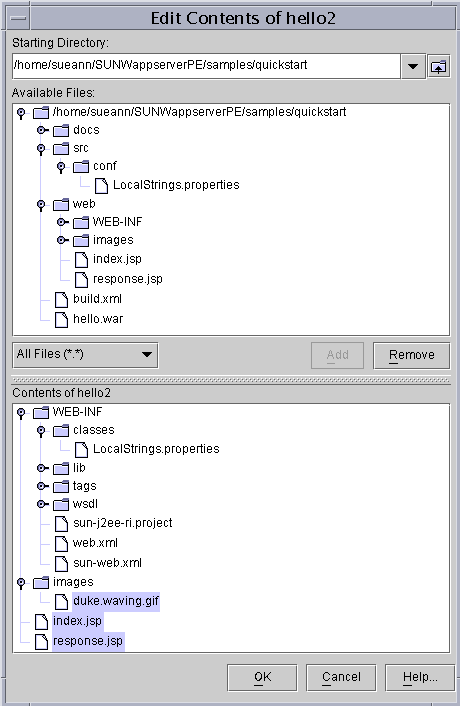
The Edit Content dialog appears.
You can press the Control key and click multiple files.
-
Navigate to install_dir/samples/quickstart.
Note –You can use the drop-down list of shortcuts.
-
In the lower panel, “Contents of hello2,” click the WEB-INF node to expand it.
-
In the upper panel, “Available Files,” under src/conf, click the file LocalStrings.properties and drag and drop it on the WEB-INF/classes directory in the lower panel.
The LocalStrings.properties file is added under the WEB-INF/classes directory.
-
In the web/ directory, select the images/ directory and the index.jsp and response.jsp files.
-
Click Add. The dialog shows that the selected files have been added.

-
Click OK to return to the Wizard’s WAR File definition window.
-
Click Next to complete the process of defining the WAR file.
The Choose Component Type dialog appears.
-
Select JSP Page and click Next.
The Component General Properties screen appears.
-
From the drop-down list for “JSP Filename,” select index.jsp.
This selection populates the other fields with default values based on the name.
-
Click Next and read the notes about the next steps you can take.
-
Click Finish to end the Wizard and return to the deploytool screen.
Next Steps
You have just packaged a simple application. In The J2EE 1.4 Tutorial, you can learn how to package more complex applications, but the general outline of the process is similar. Now that it is packaged, deploying the application is a simple operation. You will do that next.
- © 2010, Oracle Corporation and/or its affiliates
