Configuration Example
This section contains an overview of the procedure for creating a Solaris Bandwidth Manager configuration using batool. The configuration in this chapter is that defined for the Paris site in "Configuration Planning Example".
In Solaris Bandwidth Manager, traffic is allocated bandwidth on the basis of the class to which it belongs. Classes are defined in terms of filters, and filters are defined in terms of URL groups, host and subnet groups, and services. You must also define the interface(s) running Solaris Bandwidth Manager. To configure Solaris Bandwidth Manager:
-
Define the interface running Solaris Bandwidth Manager.
-
Define the information that will be used to create filters.
-
Create filters.
-
Create classes.
Before you can create a new configuration file, you must:
-
Start the batool application by running the batool script:
/opt/SUNWconn/ba/sbin/batool
-
Create a new configuration file. To do this, select New from the File menu. This creates a configuration file called new.conf with undefined parameter values.
-
Display the configuration window. Click the Configuration tab.
Defining Interfaces
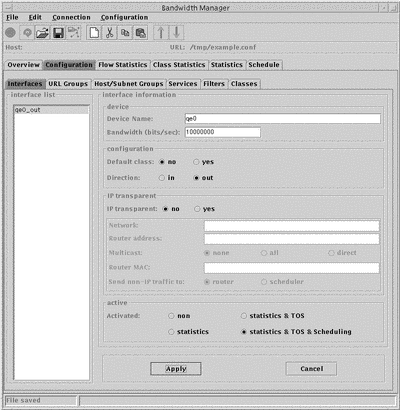
The example system requires two interfaces: one to handle outgoing traffic and one to handle incoming traffic. Define qe0_out to handle outgoing traffic like this:
-
Change the default device name new0 to the name of the interface, in this case qe0. Do not append _out, this is done automatically for you.
-
Specify the bandwidth for this interface, in this case 1000000 bits per second.
-
Specify that there is a default class for this interface, that the direction of traffic handled is out, and that the interface is not IP transparent.
-
Specify the level of activation for the interface, statistics, TOS, and scheduling.
-
Click Apply, then choose Save from the File menu to save your changes.

Creating Filter Components
A Solaris Bandwidth Manager filter is defined using URL, host and subnet groups, and services. You must define these before you create filters. The example configuration requires 3 subnet groups, one each for the Paris, Bonn and London networks. It also requires services to handle the following protocols: http, telnet, snmp, smtp, imap, and ftp. However, as these services are all preconfigured, you do not need to create them. It does not require any URL groups or any host groups.
Creating a Subnet Group
Using Solaris Bandwidth Manager, you can classify traffic based on the source or destination IP address of an individual machine. If you want to classify all of the traffic from a given network or group of networks, a convenient way to do this is to create a subnet group. To create a subnet group for the Bonn site:
-
Display the Host/Subnet Groups configuration window by clicking the Host/Subnet Groups tab.
-
Click the new icon to create a new group.
-
Allocate a name to the group, by changing the default name new.
-
Specify that the group type is Subnet.
-
Specify the list of subnets that belong to the Bonn site. To do this, click the top left of the Addresses pane -- this creates an editable field where you can type an address. After entering an address, click Apply, this records the address you just entered and makes the line below writable for your next entry. Specify subnet addresses in standard IP dotted notation.
-
Specify the subnet mask for these addresses.
-
Click Apply then choose Save from the File menu to save your changes.
You could also use a host group for the same purpose, but you would have to enter the IP address of each host at the Bonn site separately.
Creating Filters
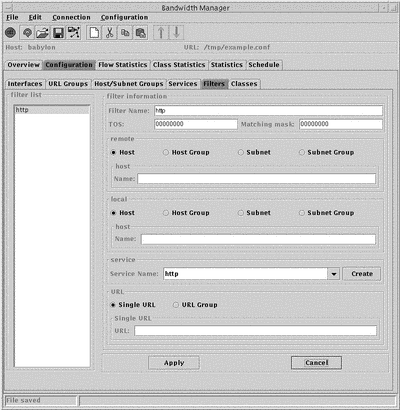
Filters are used by Solaris Bandwidth Manager to put traffic into classes. They are defined using host, subnet, and URL groups and services. For example, to create a filter http:
-
Click the Filters tab to display the Filters window.
-
Click the new icon to create a new filter.
-
Assign a name to the filter, by overtyping new in the Filter Name field.
-
Specify that this filter applies to http traffic. Use the pull-down menu in the service pane to choose http.
-
Click Apply.
-
Choose Save from the File menu to save your changes.
The completed http filter looks like this:
-
Click the new icon to create a new filter.
-
Assign a name to the filter, by overtyping new in the Filter Name field.
-
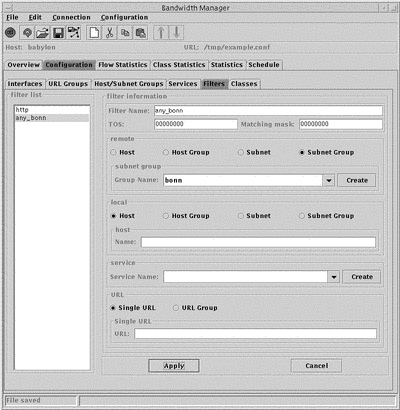
Specify that this filter applies to traffic for Bonn. In the remote pane, click beside Subnet Group, then use the pull-down menu to choose the subnet group bonn.
-
Click Apply.
-
Choose Save from the File menu to save your changes.
The completed any_bonn filter looks like this:
Creating Classes
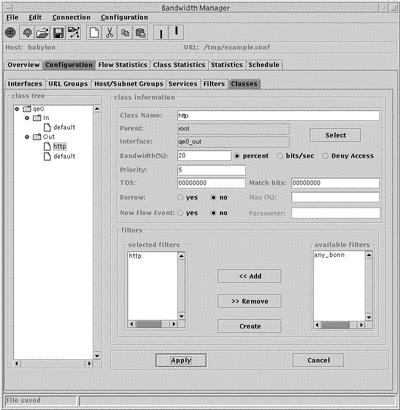
Once you have created all the filters you require, you can create classes using them. When you open the Classes window (click the Classes tab) there is a navigation pane on the left hand side of the window. The class qe0 already exists. This represents the interface you configured earlier. The expanded class hierarchy looks like this:

Note that a default class has been created automatically for each interface, as you specified when creating the interface that there would be a default class. To create the class http as a child of the Out class:
-
Click to highlight the Out class in the navigation window. A new class is always created as a child of the highlit class.
-
Click the new icon to create a new class.
-
Assign a name, for example http, to the new class.
-
Specify the percentage of bandwidth to be allocated to the new class (20%) and the priority (5) it should be given.
-
From the list of available filters, choose the filter(s) that define this class and add them to the selected filters list.
-
Click Apply.
-
Choose Save from the File menu.
The completed new class looks like this:
- © 2010, Oracle Corporation and/or its affiliates
