
This document contains information about configuring and installing the SBus Ethernet card. Use this document in conjunction with Installing SBus Cards in Desktop SPARCstations or Installing SBus Cards in Deskside and Data Center Cabinet Systems, as well as the hardware installation guide for your system.
Note - This SBus Ethernet card is not intended for use in all Sun systems. Contact you local Sun representative if you are in doubt as to whether this card is supported in your system. A maximum of two SBus Ethernet cards can be installed in a single, supported system.
The SBus Ethernet card provides you with an extra Ethernet port. The SBus Ethernet card is used in applications in which your Sun system acts as a gateway between two physically distinct Ethernet networks. The card also provides the Cheapernet (Thin-net) interface option.
Note - The SBus Ethernet card cannot be used as a boot device.
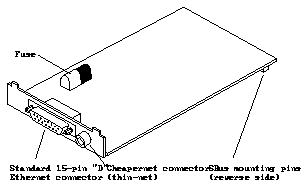
Figure 1-1 shows the general appearance of the SBus Ethernet card and shows the location of the connectors.
Figure 1-1 SBus Ethernet Card
The following special instructions explain how to set the connector selection and the +12 VDC switches on the SBus Ethernet card.
Figure 1-2 shows the location of the connector selection and +12 VDC switches on the card. Before you install the card in your system, make sure that the switches are set correctly for your specific installation.
Caution -
Only one connector at a time can be used - either the Ethernet connector or the Cheapernet (Thin-net) connector - but not both at the same time!
Figure 1-2 Location of the Connector and +12 VDC Switches
To use the Ethernet (default) connector:
Set switches 1 - 6 to the OFF position.
To use the Cheapernet (Thin-net) connector:
Set switches 1 - 6 to the ON position.
The +12 VDC is provided on this card to power an external Ethernet
transceiver or an Ethernet signal repeater. Per the SBus specification, the
maximum current that may be drawn continuously by this card is 30mA at
+12 volts. Due to this power limitation, it is strongly recommended that you use a
self-powered MuxModem box in an Ethernet Gateway configuration, if possible.
Normally, the +12 VDC is turned off. If you need to turn the +12 VDC on, you can do so if there is only one internal hard disk drive present in your Desktop SPARCsystem.
To turn the +12 VDC on:
Set switches 7 and 8 to the ON position.
There are two software installation procedures pertaining to the SBus Ethernet card. One software procedure, creating the /etc/hostname.le<n'> file and editing the /etc/hosts file, must be followed if you install the SBus Ethernet card into a system after SunOS is installed. The other software procedure, suninstall, must be followed if you install the SBus Ethernet card before the initial SunOS installation.
To install the SBus Ethernet card in a system with SunOS already installed, you must create the /etc/hostname.le<n'> file, where <n'> is 1 for the first SBus Ethernet card and <n'> is 2 for the second SBus Ethernet card. You must then edit the /etc/hosts file.
The numbering for <n'> depends upon the SBus slot probe order, which is controlled by the OBP sbus-probe-list parameter. The default is "0123", which means the SBus slots will be probed in the following order:
Slot 0 (motherboard)
Slot 1
Slot 2
Slot 3
For example, if an SBus Ethernet card is installed in SBus slots 2 and 3, the default probe order would be le0 (motherboard ethernet interface), le1 (Ethernet card in SBus slot 2), and le2 (Ethernet card in SBus slot 3).
To create the /etc/hostname.le<n'> file:
Replace <n'> with 1 for the first SBus Ethernet card. Replace <n'> with 2 for the second SBus Ethernet card.
This unique name corresponds to a unique IP address in the /etc/hosts file and the NIS maps for the network that the Ethernet interface will be connected to.
The following screen example summarizes the preceding steps. This example is for the first SBus Ethernet card with the unique name zipper.
To edit the /etc/hosts file:
The following screen example summarizes the preceding steps. This example conforms to the preceding example by using the unique name zipper. Replace the IP address shown in the example with the unique SBus Ethernet card IP address.
Note - For more information on networks, gateways, and ifconfig, refer to your System and Network Administration manual and to the ifconfig(8c) man page.
To install the SBus Ethernet card during the initial SunOS installation, perform the following procedure. Upon booting, the workstation will acknowledge the card and attach it to the kernel.
To turn the card on:
This selection will display le0 and le1. le1 is the SBus Ethernet card.
For additional software installation information, see your System and Network Administration manual.
Note - For more information on software installations, networks, gateways, and ifconfig, refer to your System and Network Administration manual and to the ifconfig(8c) man page.