
This chapter is designed to inform the System Administrator on how to install the SNC board in the system. Normally the SNC boards will be installed and configured in the factory.
The hardware installation process has three segments:
The installation of the SNC hardware is essentially the same for all SPARCservers, whether they are rack mounted or pedestal mounted.
Complete the Software installation portion of the installation process before installing the hardware.
You may interrupt the installation process during or after the hardware installation. Make sure backplane jumpers are properly set for the board you have installed and that you boot your original kernel. You can safely resume the installation at a later time.
If the server is running, halt it and power down the system as follows. If you
have previously run the deinstall_snc script, re-install using cdm or
cdmanager before you shutdown

Caution -

To minimize risk of ESD damage:
Table 2-1 SNC Boards per Server Limits
-------------------------------------------------------------------------


System  SNC Board Limit          SNC Board Limit        SNC Board Limit
        (# of IPI Controllers)(  (without Prestoserve)  (with Prestoserve)
-------------------------------------------------------------------------
4/470   4 (2)                    4                      4

4/490   6 (2)                    6                      6

670MP   4 (2)                    6                      5

690MP   8 (3)                    8                      5

-------------------------------------------------------------------------
Note - SNC and Prestoserve both use large amounts of the operating system kernelmap space on SPARCserver 6xxMP systems. Using Prestoserve therefore reduces the number of SNC boards that can be used on these systems.
The instructions that follow are for installing the SNC board.
Refer to one of the following manuals for SNC cardcage slot assignments and board installation and removal in your SPARCserver:
These switches may have to be changed if there is a chance of VME address space conflicts. See Appendix C, Address Space Conflicts with Other Hardware.
Make sure the jumpers and switches are set as illustrated.
Note - If you are installing more than one SNC, you will have to modify the switch settings on the additional boards. The SNC comes configured as if it will be the only SNC in the system. Refer to Figure 2-3 and Figure 2-4.
The SNC is usually installed to the right of most communication boards, but to the left of disk controller boards [1]). For more about installing cards in the card cage, see Sun Card Cage Slot Assignment and Backplane Configuration Procedures, which is supplied with your Sun server.
Note - If you are installing additional SNCs, they should be placed in the slots immediately to the right of the first SNC.
Caution -

Currently-shipping SNC boards are equipped with jumpers for all hardware addressing, while the first version of the SNC includes some DIP switches in that role, as shown in Figure 2-1 and Figure 2-2.
.

Figure 2-1 SNC Board Jumper Locations
.

To avoid conflicts, each SNC's board's VME address must be set properly, as shown in Figure 2-3 and Figure 2-4.

Figure 2-3 16-Bit VME Address SNC Jumper Configurations
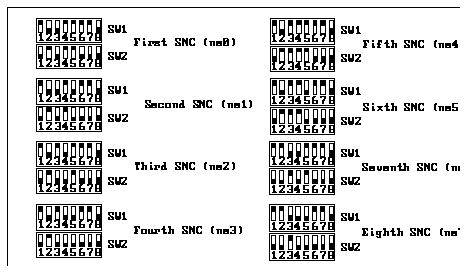
Figure 2-4 16-Bit VME Address Switched SNC Settings
Each slot on the card cage has jumpers on the backplane. When installing boards, these jumpers must be properly configured.
When installing the SNC in a slot in the cardcage remove both BG3 and IACK jumpers.
Refer to the documentation you received with your SPARCserver.
The figure below shows where the backplane jumpers are located.

You have now completed the hardware installation portion of the SNC. Continue to the next chapter to complete the installation process.
