
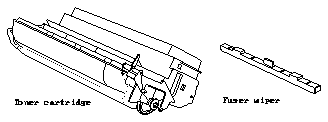
This document tells you how to install the high yield toner cartridge kit, which
consists of a toner cartridge and a fuser wiper. The toner cartridge will print
approximately 14,000 pages on letter or A4 size paper at 5% coverage.
See the SPARCprinter E Hardware Installation and User's Guide for additional
information on storing and using toner cartridges.
Note -
If the new toner cartridge has been stored in a cool environment, keep
the cartridge in a warm room for at least one hour before installing it. This is to
prevent condensation from forming inside the printer.
To install the toner cartridge kit:
1.
Remove the used toner cartridge.
2.
Clean the printer.
3.
Replace the fuser wiper.
4.
Install the new toner cartridge.
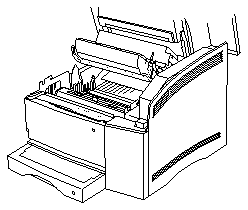
Remove the Used Toner Cartridge
1. Turn the printer Off.
2. Open the top cover of the printer.
3. Remove the new cartridge from the packaging and place it beside the
printer.
4. Pull out the used toner cartridge, keeping it aligned with the toner
cartridge cradle.
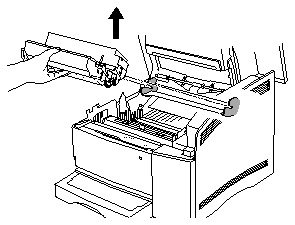
5. Place the used cartridge in the plastic bag that held the new cartridge.
Note -
To avoid damaging the new cartridge, do not open the drum cover on
the bottom of the cartridge or the light shutter on the top of the cartridge.
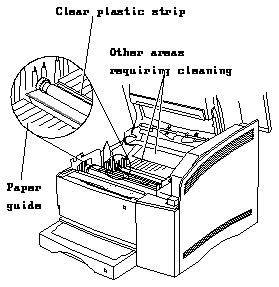
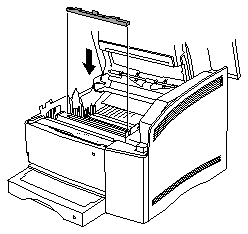
Clean the Printer
Note -
Be careful not to get toner on your clothing.
1. Make sure the printer power is Off and the toner cartridge is removed.
2. Use a lint-free cloth, slightly dampened with water, to clean paper and
toner dust from the areas shown in this illustration.
3. Make sure the clear plastic strips are clean.
4. Use a corner of the cloth to clean the plastic covering the paper guide.
Move the cloth from side to side across the entire surface.
Note -
Be sure to clean the printer each time you replace the toner cartridge.
Toner and paper dust accumulates and can cause poor print quality and impair
printer operation.
Replace the Fuser Wiper
Be sure to replace the fuser wiper whenever you replace the toner cartridge.
Caution -

Operating the printer without the fuser wiper installed could
damage the printer.
1. Grasp the tab on the used fuser wiper and pull up from the fuser housing.
Immediately discard the used fuser wiper.
Warning -

The fuser housing may be very hot.

2. Remove the new replacement fuser wiper from its packaging. Do not
remove the small felt pad attached at the end of the wiper.
3. Insert the small felt pad into the fuser housing and use it to wipe the
fuser roller.

4. Now, remove and discard the small felt pad.
Note -
Remove the small pad at the end of the fuser wiper. Do not remove the
long felt pad on the fuser wiper.
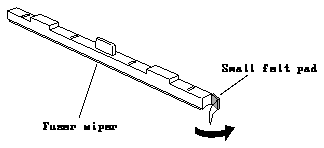
5. Insert the fuser wiper into the fuser housing.
Install the New Toner Cartridge
1. With the toner cartridge label on top, align the cartridge pins with the
slots in the cartridge cradle and slide the pins into the slots.
The front edge above the slots in the cartridge cradle are purple.

2. Close the top cover of the printer. If the cover does not close properly,
make sure the toner cartridge is installed correctly.
Note -
The cartridge should be tilted slightly when correctly installed.
3. Turn the printer power On.
Please recycle your used toner cartridge. For instructions on the Sun
Microsystems cartridge recycling program, see the instructions printed on the
top panel of the toner cartridge kit carton.