Chapter 2 Understanding the Netra Administration GUI
The Netra Proxy Cache Server uses a Hyper Text Mark-up Language (HTML)-based GUI for its administration. Each screen is a hypertext document. A browser running on a client accesses these documents from an administration web server running on the Netra server.
Netra Administration Modules
An administration function in the Netra Administration GUI is called a module and is made up of a set of related tasks. For example, the User Accounts module contains tasks to add user accounts as well as to modify or delete them. These modules are grouped into five categories:
-
Network Services Administration
-
Network Connection Administration
-
Security Administration
-
System Administration
-
Documentation
The modules are displayed as hypertext links on the Main Administration page of the GUI. Choosing a link displays the administration page for the module associated with the task.
Types of Pages
The Netra Administration GUI has five types of administration pages, described in the following subsections.
Navigation Page
A navigation page is used to choose tasks. A task is chosen by clicking on a link, which may be displayed as an underlined or emphasized word or phrase.
Some navigation pages are dynamic: they display only the options that are available on the particular Netra system. If information that changes the available options is entered, the navigation pages reflect these changes.
Figure 2-1 shows a navigation page for the Administration Web Server module.
Figure 2-1 Navigation Page

Task Page
A task page is also called a form. There are two types of forms: regular and special.
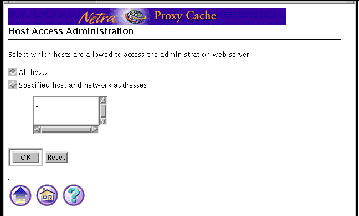
Regular forms provide the only way to change the system state. When a form is displayed, the values in the fields are either the current operating or default conditions. Information is entered into a regular form by typing it into the text boxes or by selecting the radio button options.
Regular forms have an OK button. If information is entered or changed in the form, then the OK button must be clicked to save or activate the changes, and hence change the system state.
Some forms also have a Reset button. To discard the changes, use the Reset button to return fields to their previous conditions.
The user-input elements in a form are described in Table 2-1.
Table 2-1 User-Input Elements|
Element |
Description |
|---|---|
|
Text Box |
Accepts one line of text input. |
|
Text Area |
Accepts multiple lines of text input. |
|
Radio Buttons |
A group of one or more buttons, only one of which can be chosen. Click on a radio button to choose it. This de-selects any other chosen radio button in its group. The only way to de-select a radio button is to choose another one. |
|
Check Box |
Selects an option. Click on the button to change its state. |
|
Pop-up Menu |
A list of options displayed in a menu. Only one option can be chosen. The chosen item is shown. Click and hold on the menu to display the list of options. Release over a new option to choose it. |
|
Scrolling List |
A list of options displayed in a window. Click on an option to choose it. Scrolling lists permit multiple selections. |
Figure 2-2 shows a form for the Host Access module.
Figure 2-2 Task Page/Form
Special forms are based on regular forms. There are two types of special forms: an error form and a verify form.
-
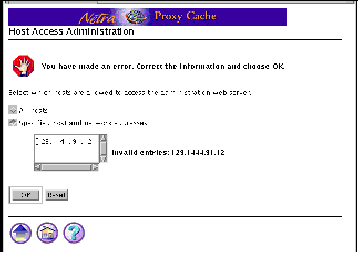
An error form, or error page, does not change the system state. It displays an Error icon, and enables the user to correct the error and re-type information in the form. Errors are marked on the form, alongside the relevant field.
Figure 2-3 shows an error form for the Host Access module.
Figure 2-3 Error Form
Note -
If the information typed into a form produces an error, the system state is not changed. The form is redisplayed with the erroneous data. The data must be corrected.
-
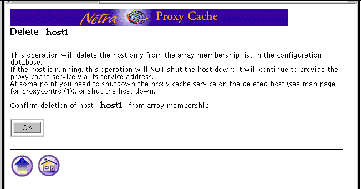
A verify form is used only to confirm a previous choice.
Figure 2-4 shows a verify form for the deleting an array member from a Netra Proxy Cache Array.
Figure 2-4 Verify Form
Help Page
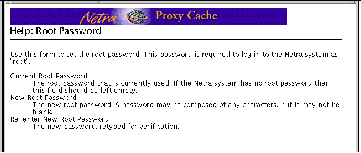
The Netra Administration GUI also provides help pages that contain information which may assist filling out a form. By clicking on a help icon, the help window opens and it displays a help page for the respective module being configured. Some help pages have terms that are linked to the glossary page.
Figure 2-5 shows a help page for the Root Password module.
Figure 2-5 Help Page
In use, the help window may open directly over the Netra Administration GUI and obscure the module administration page from view. It is possible to move, iconify or close the help window, independent of the Netra Administration GUI.
When moved or iconified, the help window remains active. Clicking the help icons of other module administration pages updates the help window with the respective help page.
When closed, the help window is dismissed, and cannot be accessed until a help icon is clicked again.
Glossary Page
The glossary page is accessed using links in the help pages of a module. When a term that is a link is chosen, the term and its explanation are displayed at the top of the glossary page. The glossary page is displayed in a scrolling window. To return to the help page, use the Back Arrow icon.
Success Page and Reminder Page
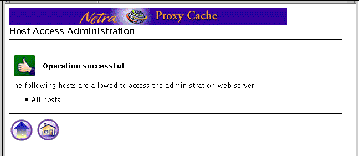
Either of these pages is displayed once all the forms for a task have been filled out and the OK button has been chosen. A success page contains a Success icon and a reminder page contains a Reminder icon. A success page confirms that the system state has changed. A reminder page does the same, but also states a message indicating additional tasks are required.
Figure 2-6 shows a success page for the Host Access module.
Figure 2-6 Success Page
Types of Icons
Navigation Icons
The Netra Administration GUI uses navigation icons for moving from one page to another. One or more of these navigation icons are located at the bottom of each administration page. The five navigation icons are displayed in Table 2-2.
Table 2-2 Navigation Icons|
Icon |
Description |
|---|---|
|
Home icon. Returns to the Netra Main Administration page. (Selecting the banner also does this.) |
|
|
Help icon. Opens the help window for displaying help pages that explain fields in the related form. |
|
|
Back Arrow icon. Goes back one page. |
|
|
Top of Module icon. Returns to a module's top-level page. |
|
|
Forward Arrow icon. Continues to the next configuration task. Displayed only during initial configuration. |
Information Icons
Information icons are displayed when a task form is submitted. They tell the user the status of the configuration task at hand. The three information icons are displayed in Table 2-3.
Table 2-3 Information Icons|
Icon |
Description |
|---|---|
|
Reminder icon. Shows that a task has been completed successfully, but calls attention to an important message indicating an additional task is required. |
|
|
Error icon. Calls attention to errors in form entries. |
|
|
Success icon. Shows that a task has been completed successfully. |
Accessing the Netra Administration GUI
The HTML-based Netra Administration GUI is accessed through a dedicated administration web server. A web browser and knowledge of the system administrator user name and password are required to access this GUI. Access the GUI as follows:
To Access the Netra Administration GUI
-
Start a browser on a machine that is network-accessible to the Netra Proxy Cache Server.
-
http://
netra:81
http://
netra.domain:81
Where netra is the host name or host address for the Netra server and domain is the qualified domain.
The latter format may be needed if a proxy server is being used. The Netra password screen is displayed.
-
Type setup for the User ID and then the password.
The Netra Welcome page is displayed.
-
In the Netra Welcome page, choose Administration.
The Main Administration page is displayed.
If you are configuring a Netra Proxy Cache Server for the first time, the initial configuration page is displayed.
- © 2010, Oracle Corporation and/or its affiliates
