This tutorial introduces features of the iPlanet Application Builder by walking you through the creation of a simple application. This sample application enables users to purchase and sell compact discs.
This tutorial assumes that you have successfully installed:
- iPlanet Application Builder Version 6.0
- iPlanet Application Server 6.0
- iPlanet Enterprise Server 4.1
- LDAP 4.0
This tutorial includes the following tasks:
- Task 1: Starting a New Project
- Task 2: Creating Static Links
- Task 3: Creating an Input Form
- Task 4: Creating a Login Sequence
- Task 5: Creating a Database Form
- Task 6: Creating Browse Activities
- Task 7: Creating a Search Activity
- Task 8: Using Queries and Result Sets
- Task 9: Inserting Form Data Into a Database
- Task 10: Using Queries With Database Forms
- Task 11: Creating Enterprise JavaBeans
- Task 12: Building and Testing the Application
You can use Symantec Visual Cafe Pro to edit, compile, and debug your Java servlets. For more information, see Using iPlanet Application Builder with Symantec Visual Café.
Task 1: Starting a New Project
This part of the tutorial describes launching iPlanet Application Builder, creating a new project, creating a data model to link the application with a database, and saving the project files to disk.To create a new project, perform the following tasks:
- Launch iPlanet Application Builder
- Create a New Project
- Create a Data Model
- Clean Up Project File
- Add Any Pre-Existing HTML Files
- Save Your Work
Launch iPlanet Application Builder
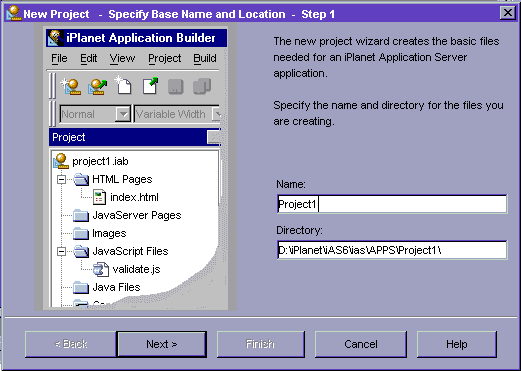
Launch iPlanet Application Builder from the Windows Start Menu by choosing the iPlanet Application Builder 6.0 menu item. iPlanet Application Builder starts the New Project wizard.Create a New Project
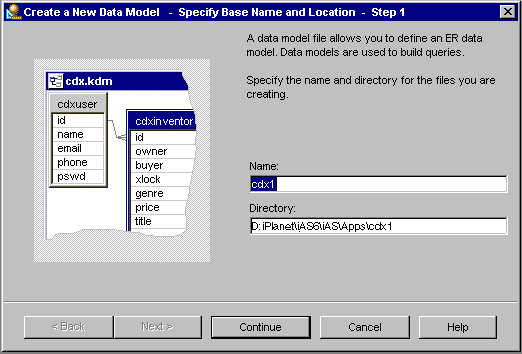
Name the new project cdx1 in directory "<iasRoot>\cdx1".
Note that the sample tutorial created uses the directory "cdx", you cannot copy pieces of the cdx tutorial into your cdx1 project without modifications, such as query (.gxq) paths, JavaServer Page (.jsp) paths, and class definitions.
- Click Next to create each of the project starter files.
- Click Next. The New Project wizard displays the files it will create.
- Click Finish.

In this tutorial, you need not create an index.html page, because you will copy an existing file when you come to the section on Adding Any Pre-Existing HTML Files. The purpose of this dialog box is to allow you some flexibility in which files are created initially. For example, if you wanted to keep an existing index.html file in your web server's doc directory, you would uncheck this file; otherwise, your file would be overwritten by the empty index.html file created by this wizard.
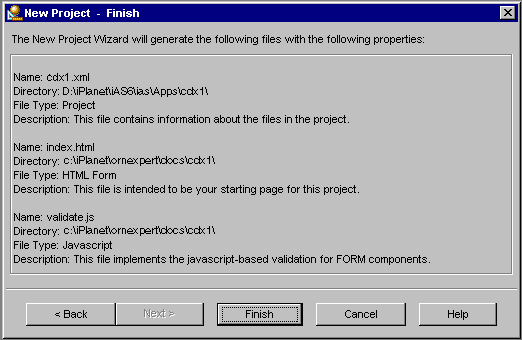
The iPlanet Application Builder creates the following files:
| File Type | File Names |
|---|---|
| Project | cdx1.xml |
| HTML start page | index.html |
| JavaScript source code | validate.js |
You only use the project file to open an existing project. You should not modify the project file; iPlanet Application Builder handles all changes to the project file for you.
Create a Data Model
- Click the Yes, Add a Data Model button in the Create Data Model dialog.
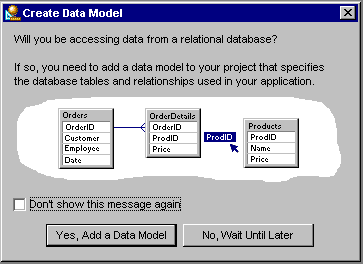
- Double-click the Data Model icon under New file(s).

- Specify a name and directory for your data model and click Continue.
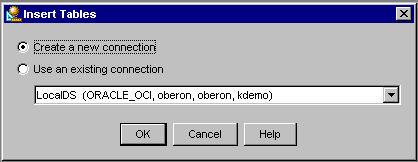
- Specify "Create a new connection" and click OK.
- Specify the following values for the listed fields:
Field Value Driver The name of your driver, such as ODBC Data Sources cdx User name The data source's user name, such as netscape Password The associated password, such as netscape 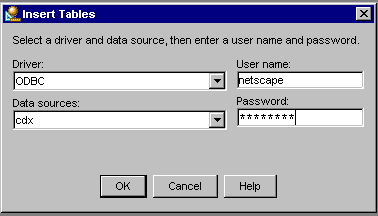
Note that if you select another driver, such as select ORACLE_OCIfor the table, iPlanet Application Builder displays an additional field, Database; the proper value you should supply is nsample.
- Click OK and the Add Tables dialog appears.
- Add cdxinventory and cdxuser to the Data Model by selecting
them from the available tables and clicking the right-arrow button to move
them to the "Tables in data model" pane.

- Click OK to finish.
- Click OK to add relationships.
Creating Aliases
You will see each table with its list of columns in the Data Model editor.You are then ready to establish relationships between these tables. In the cdx application, three columns of the cdxinventory table are related to the same column (id) in the cdxuser table.
To represent this in iPlanet Application Builder, you create two aliases of the cdxinventory table.
- Right-click the cdxinventory table and select Insert Table Alias
from the pop-up menu.
iPlanet Application Builder displays the table cdxinventory_2.
- Repeat this step to create another table (cdxinventory_3).
Joining Tables
To create the joins, first drag the table boxes so they do not overlap, then perform the following steps:
- Click the cdxuser.id field and drag it to cdxinventory.owner.
This step creates a one-to-many join from cdxuser.id to cdxinventory.owner.
- Drag the cdxuser.id field to cdxinventory_2.buyer.
- Drag the cdxuser.id field to cdxinventory_3.xlock.
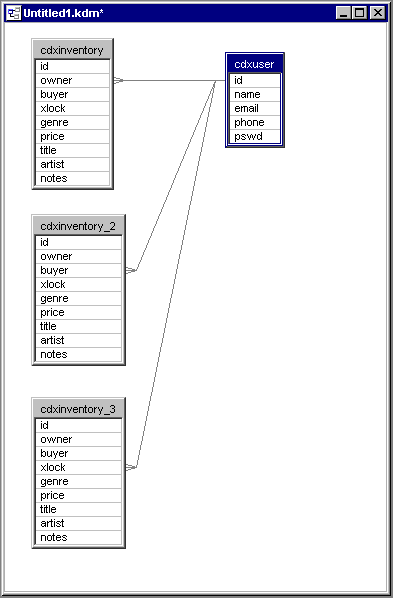
The data model now allows one user to own many titles, purchase many titles, and have many purchases pending.
- Click the close box [x] to close the data model editor.
- Save the cdx1.kdm file when prompted.
Alternatively, you can access the existing data model. To specify an existing data model, perform the following steps:
- Yes, Add a Data Model.
- Click the Existing tab.
- Select cdx\cdx.kdm.
- Double click cdx.kdm in the project tree to view the data model.
Clean Up Project File
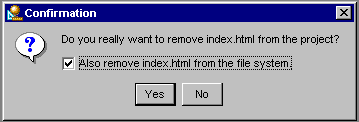
Since the tutorial already includes a file named index.html, you need to remove the file of the same name iPlanet Application Builder automatically creates for you.
- Right-click index.html in the iPlanet Application Builder Project tree, and select "Remove".
- Check "Also remove index.html from the file system" so that the actual file is deleted.
- Click Yes to remove the file from the project and from disk.
Add Any Pre-Existing HTML Files
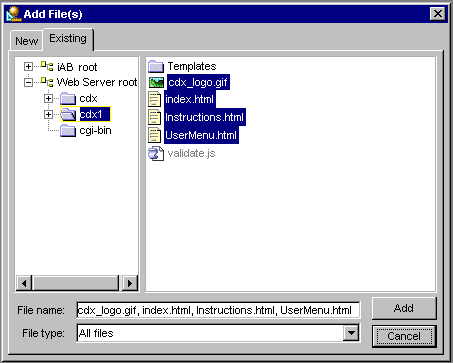
Now, it's time to add any pre-existing HTML files, or images to the project. For this tutorial, we will start with the files installed in <iasroot>/APPS/GXAPP. To add these pre-existing HTML files to the tutorial application, perform the following steps:
- Using Windows Explorer, copy the files and sub-folders in <IABroot>\tutorial\starters to the web server's project directory under <WebRoot>\docs\cdx1.
- Using iPlanet Application Builder, select Project - Add File(s) then select the Existing tab to add existing files to the project.
- Select the Existing tab and, Under Web Server root\cdx1, select the following files:
- index.html
- UserMenu.html
- Instructions.html
- cdx_logo.gif
- Click Add.
The iPlanet Application Builder adds the files to the project.

You must copy the logo image file to your project directory as well, so that .jsp templates will properly display the logo.
The cdx\templates subdirectory includes a Macromedia Dreamweaver template that can be applied within Dreamweaver to the pages generated by iPlanet Application Builder. You do not need to add this file to your iPlanet Application Builder project.
Save Your Work
Now is a good time to save your work. Click the double-disk toolbar icon to save all project files. If the Save All option is not enabled, then Click Save.Task 2: Creating Static Links
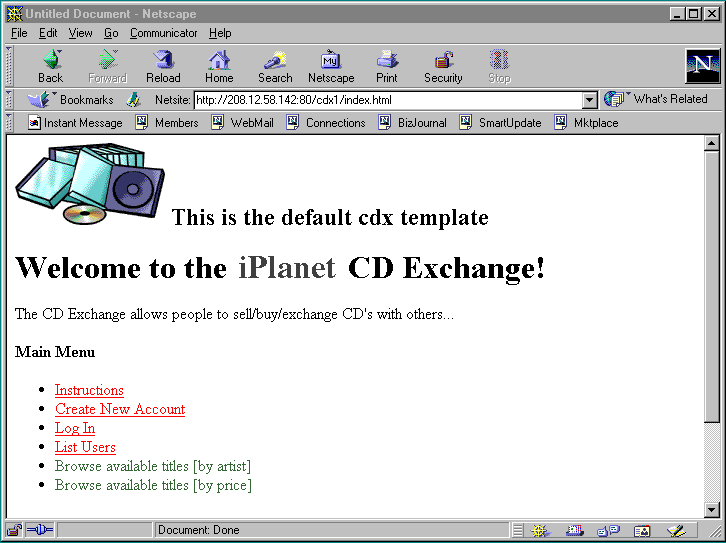
iPlanet Application Builder provides easy-to-use code generation wizards to create sets of HTML and JavaServer pages, servlets, and database queries. To use these wizards most effectively, it is best to think of your application in terms of activities, and from there, map each activity to the use of one or more Wizards.This tutorial illustrates this process as you first create and link in the activities for the Main Menu page and the User Menu page. The primary difference between these pages, is that the User Menu page presents some activities that require a user to have previously logged in.
Create and/or Link the Destinations for the Main Menu (index.html)
- From the Project tree, double-click the HTML Page "index.html" to open it in iPlanet Application Builder's integrated HTML editor.
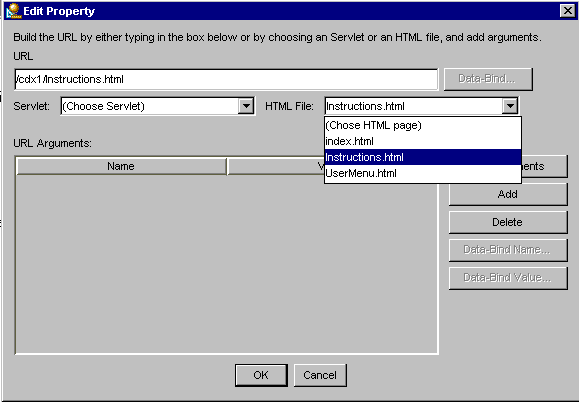
- Perform the following steps to convert the static text "Instructions" to a hyperlink to the instructions.html page:
- Select the text of the first bullet: Instructions.
- Click the Create Link icon at the far right of the toolbar. If the Create Link icon is not present, then select View -> Toolbars -> Standard.
- In the Properties inspector, click the Destination URL property editor button.
- In the HTML File drop-down, select the file Instructions.html.
- Click OK to complete the link.
 You may use an HTML editor of your choice by specifying a third-party
HTML editor in the Tools -> Development Options dialog. However, to create
or modify links, especially those that call servlets, it is much easier
to use the iPlanet Application Builder "built-in" HTML editor.
You may use an HTML editor of your choice by specifying a third-party
HTML editor in the Tools -> Development Options dialog. However, to create
or modify links, especially those that call servlets, it is much easier
to use the iPlanet Application Builder "built-in" HTML editor.
Note that you can also right-click the highlighted text and choose "Create Link" from the pop-up menu to create the link.
The text becomes a link.

Task 3: Creating an Input Form
To create the "New Account" data entry form, perform the following tasks:
- Generate a Data Entry Form and Associated Servlet
- Edit the JavaServer Page
- Edit the Query File
- Edit the Servlet File
- Add the Link in index.html
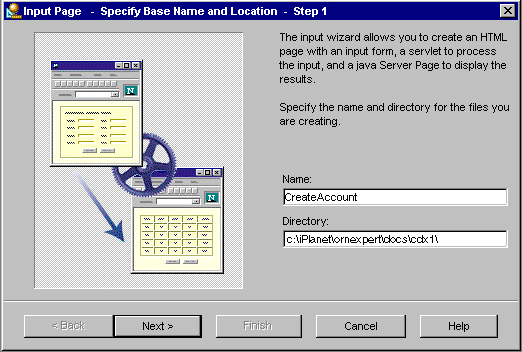
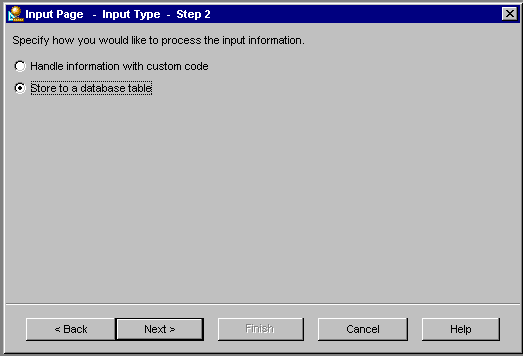
For the new account activity, use the Input Wizard to generate a data entry form and a servlet to process the form data.
- Select File -> New -> Input.
- Type "CreateAccount" for Name.
- Store to a database table.
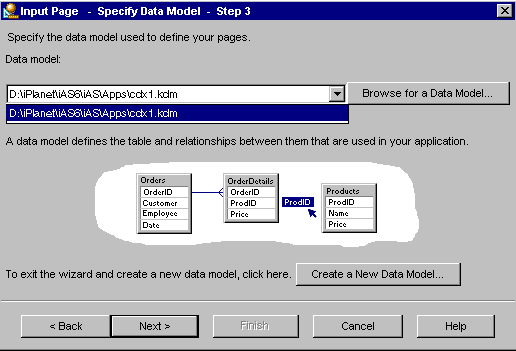
- Select the project data model (cdx1.kdm).
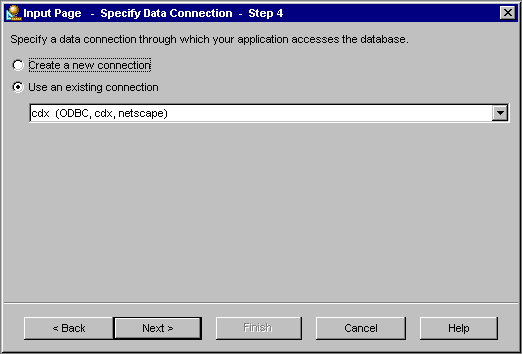
- Select Use the existing connection and verify that the name is "cdx".
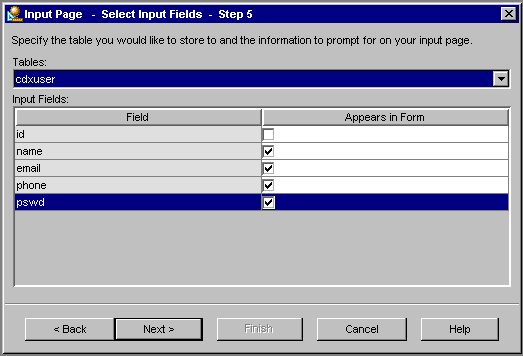
- Select the table cdxuser to specify name, email, phone, and password fields for stored input data (uncheck "id" so it does not appear on the form).
- Click Next.
- Click Finish.
The iPlanet Application Builder generates the following project files, which are identified in the project window:
- CreateAccount.html
- CalledCreateAccount.gxq
- CalledCreateAccount.java
- CalledCreateAccount.jsp
Edit the JavaServer Page
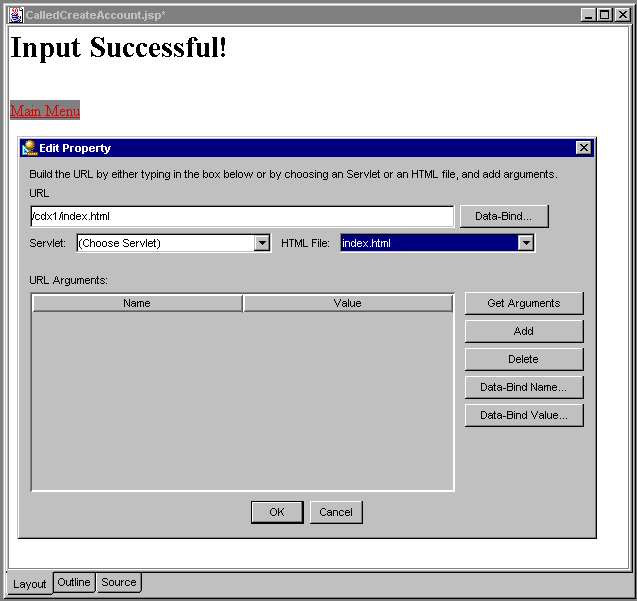
Next, edit the CalledCreateAccount.jsp response page to add an identifying message and a link to index.html. To create link:
- Type in the text "Main Menu" and select the text.
- Click the Create Link icon at the far right of the toolbar.
- In the Properties inspector, click the Destination URL property editor button.
- In the HTML File drop-down, select the file "index.html".
- Click OK to complete the link.
- Close and save the file.
If the Create Link icon is not present, then select View -> Toolbars -> Standard. Note that you can also right-click the highlighted text and choose "Create Link" from the pop-up menu to create the link.
The text becomes a link.
Edit the Query File
- Double-click CalledCreateAccount.gxq in Project tree to open the query file.
- Double-click the CalledCreateAccount_Insert query.
- Click the Fields tab, and set the Value for the "id" column to be :id.
- Click Finish.
- Close and save the file.
The iPlanet Application Builder displays the InsertQuery Properties Dialog.
This action tells iPlanet Application Builder to bind the id column to the value of the 'id' valList parameter.
Edit the Servlet File
- Add the code to set the "id" parameter in the servlet, CalledCreateAccount.java.
- Double-click the CalledCreateAccount.java file to open it.
- Find the defaultAction() method and before the insertStmt.executeUpdate() statement, add the following code to the servlet file:
- In order to display the "CalledCreateEntry.jsp" on successful creation
of the new account, enter the following code after the statement "insertStmt.executeUpdate( );":
String addJsp = "/CalledCreateAccount.jsp"; RequestDispatcher dispatcher = getServletContext().getRequestDispatcher(addJsp); res.setContentType("text/html"); dispatcher.forward(req, res); - Delete or comment-out the line "displayMessage( req, res, "Insert Success");"
- Save all modified files.
- Compile (and test, if desired).
	String sname = (String)req.getParameter("NAME");
	int code = sname.hashCode();
	insertStmt.setInt(((Integer)params.get("ID")).intValue(), code);
Add the Link in index.html
- Open the index.html file and select the "Create New Account" text.
- Click the link icon.
- Select the destination URL Property Editor.
- Select the html page CreateAccount.html.
- Click OK.
- Close and save the file.
Task 4: Creating a Login Sequence
To create the login page and associated servlet, perform the following tasks:
- Create the Login Page and Servlet to Process Login Data.
- Edit the CalledLogin.jsp file.
- Link the Login Page to the Main Menu.
Create the Login Page and Servlet to Process Login Data
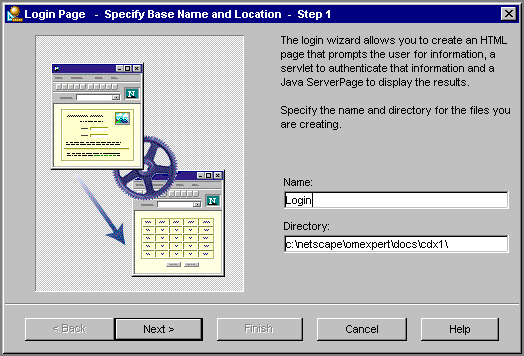
- Select File -> New -> Login.
- Type "Login" for Name.
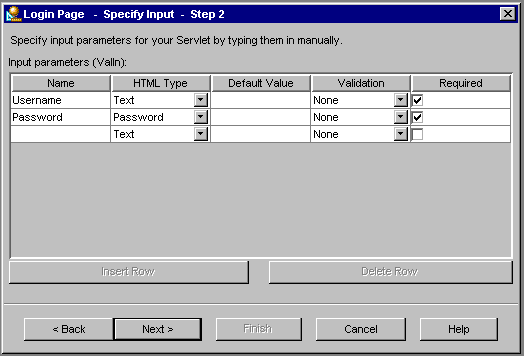
- The Username and Password parameters are already specified; select Next.
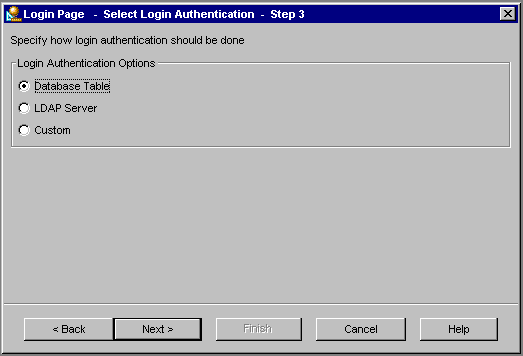
- Check Authenticate with a Database Table.
- Select the project's data model (cdx1.kdm).
- Select Use the existing connection and verify that the name is "cdx".
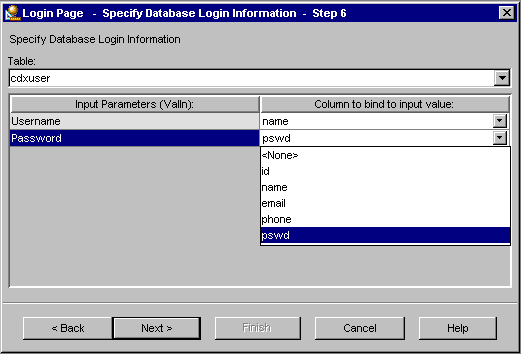
- Select Table "cdxuser" and bind Username and Password to name and pswd columns, respectively; click Next.
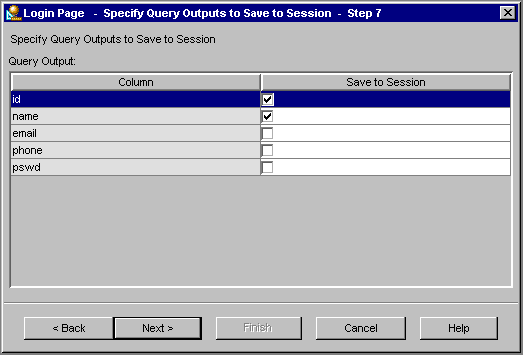
- Make sure "id" and "name" are checked to save to session.
- Click Next.
- Click Finish.
The iPlanet Application Builder creates the following files:
	Login.html
	CalledLogin.java
	CalledLogin.jsp
	CalledLogin.gxq
Edit the CalledLogin.jsp file
- Open CalledLogin.jsp.
- Select the Layout view by clicking on the Layout tab at the bottom of the editor frame.
- Type in "UserMenu" below the "Login Successful" text.
- Highlight and link the "UserMenu" text to index.html.
- Type in "Try Again" below the "Login Failed" text.
- Highlight and link the "Try Again" text to Login.html.
Link the Login Page to the Main Menu
- Open index.html.
- Select Log In and specify it as a link.
- Click the link icon.
- Select the destination URL Property Editor.
- Select the html page Login.html.
- Close and save the file.
Task 5: Creating a Database Form
- Create the List Users destination.
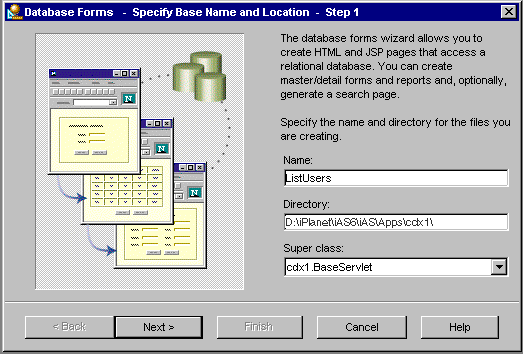
- Select File -> New -> Database Forms.
- Type "ListUsers" for Name.
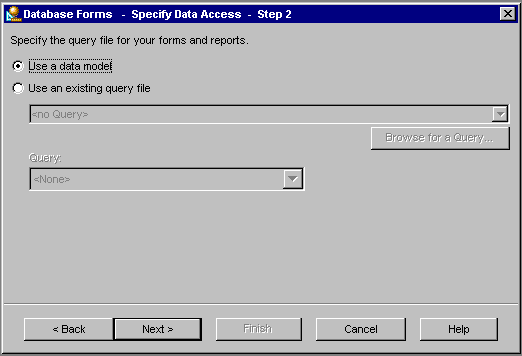
- Click Next and specify "Use data model."
- Click Next and specify cdx1.kdm for your data model.
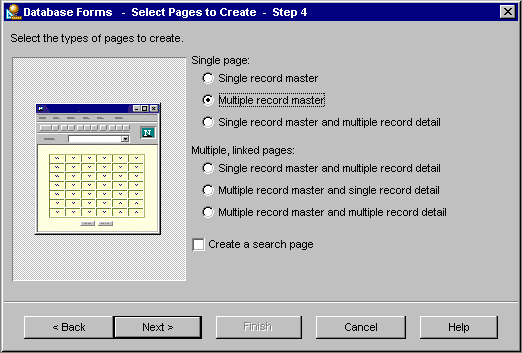
- Select Single page, Multiple record master.
- Specify the project's data model (cdx1.kdm).
- Select Use the existing connection and verify that the name is "cdx".
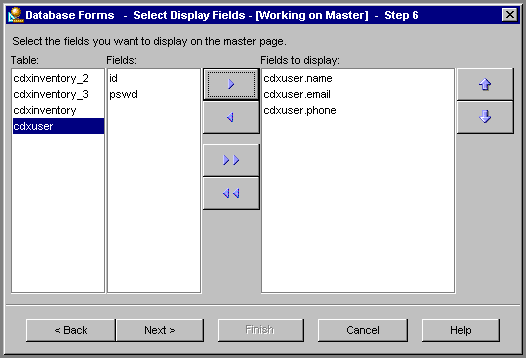
- Select the cdxuser table and the name, email, and phone fields.
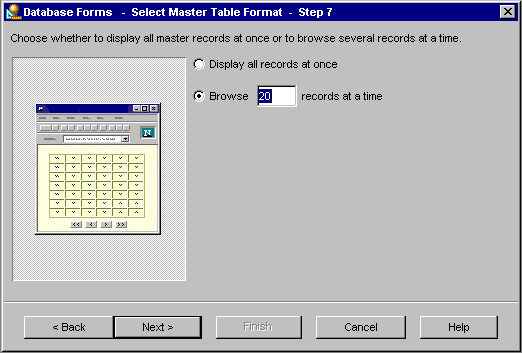
- Select display all records at once.
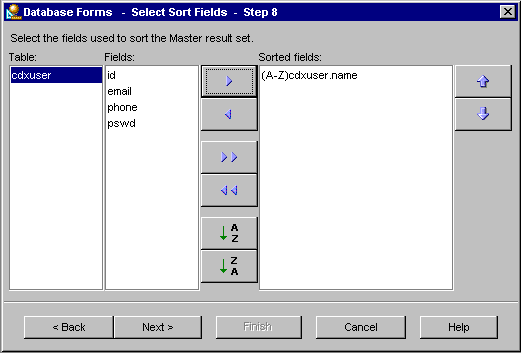
- Select cdxuser.name to sort.
- Click Next.
- Click Finish.
- Open ListUsers.jsp and add a link back to the main menu.
- Type the text "Main Menu" and select it.
- Click the Link icon.
- Set destination URL property to index.html.
- Open index.html and convert the text "List Users" to a link.
- Select the text, then click the Create Link icon at the far right of the toolbar.
- Select the ListUsers servlet from the Servlet drop-down and click OK.

The iPlanet Application Builder creates the following files:
	ListUsers.gxq
	ListUsers.java
	ListUsers.jsp
You can also drag index.html to the page, and change text to "Main Menu".
If the Create Link icon is not present, then select View -> Toolbars -> Standard. Edit Destination URL in Properties.

You can also right-click the highlighted text and choose Create
Link from the pop-up menu to create the link.
Task 6: Creating Browse Activities
To create the browse activities, perform the following tasks:
- Create Browse Titles By Artist Activity
- Create Browse Titles By Price Activity
- Connect Main Menu Links to the Browse Activities
Create Browse Titles By Artist Activity
- Select File -> New -> Database Forms.
- Type "BrowseArtist" for Name; then click Next.
- Choose "Use a data model;" then click Next.
- Specify the project's data model (cdx1.kdm); then click Next.
- Select Single page, Multiple Record Master; then click Next.
- Select Use the existing connection and verify that the name is cdx; then click next.
- Select table: cdxinventory.
- Select table fields: id, artist, title, and price.
- Click Next.
- Select Browse 20 records at a time; then click Next.
- Select Sort by cdxinventory.artist; then click Next.
- Click Next.
- Click Finish.
The iPlanet Application Builder creates the following files:
	BrowseArtist.gxq
	BrowseArtist.java
	BrowseArtist.jsp
Adding Select Conditions
Now must edit the query to only display available CDs. In the data model, CDs that have already been purchased or are pending purchase will be marked with the buyer's id in the buyer or xlock field.
- Open the query, BrowseArtist.gxq.
- Double-click the BrowseArtist.
- Select the Conditionals tab on the query properties dialog.
- Click Add Condition.
- Select the cdxinventory table, buyer field, and = operator, and enter 0 as the value.
- Click OK, then repeat steps 4 and 5 for the xlock field.
- Click Finish.

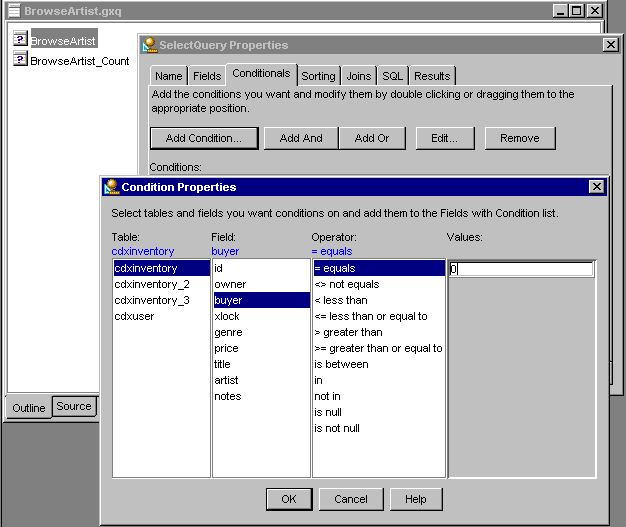
The Conditions panel of the Query Designer displays the new query conditions.
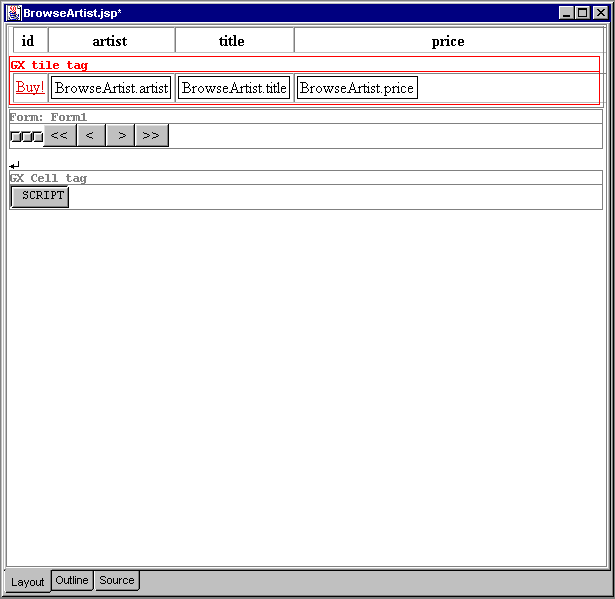
Converting a Column to Links
Convert the id column to the Buy! link in the BrowseArtist.jsp file:
- Open BrowseArtist.jsp.
- Click the BrowseArtist.id data-bound label.
- Press the Delete key to delete it.
- Drag the Data-Bound HTML hyperlink from the Palette to the cell, creating a hyperlink
- Select the Hyperlink and change the text to Buy!
You can also right-click the highlighted text and choose "Create
Link" from the pop-up menu to create the link.
After you create the Buy! activity (see Task 8: Using Queries and Result Sets), you will use the Destination URL property editor to complete the data-bound link.
Create Browse Titles By Price Activity
- Select File -> New -> Database Forms.
- Type "BrowsePrice" for Name; then click Next.
- Click Use a data model; then click Next.
- Specify the project's data model (cdx1.kdm); then click Next.
- Select Single page, Multiple Record Master; then click Next.
- Specify the project's data model (cdx1.kdm); then click Next.
- Select Use the existing connection and verify that the name is cdx; then click Next.
- Select table: cdxinventory; then click Next.
- Select table fields: id, artist, title, and price; then click Next.
- Choose Browse 20 records at a time; then Click Next.
- Select Sort by cdxinventory.price; then click Next.
- Click Next.
- Click Finish.
The iPlanet Application Builder creates the following files:
	BrowsePrice.gxq
	BrowsePrice.java
	BrowsePrice.jsp
Adding Select Conditions
- Open the query, BrowsePrice.gxq; double-click the BrowsePrice select query; and select the Conditionals tab on the query properties dialog.
- Click Add Condition.
- Select the cdxinventory table, buyer field, and = operator, and enter 0 as the value.
- Click OK, then repeat steps 2 and 3 for the xlock field. The Conditions panel of the Query Designer displays the new query conditions; then click Finish.
Converting Columns to Links
- Convert the id column to the Buy! link in the BrowserPrice.jsp file.
- Open the BrowsePrice.jsp file.
- Select BrowsePrice.id data-bound label.
- Press the Delete key to delete it.
- Drag the Data-Bound HTML hyperlink from the Palette to the cell, creating a hyperlink
- Select the Hyperlink and change the text to Buy!
If the Create Link icon is not present, then select View -> Toolbars -> Standard. Note that you can also right-click the highlighted text and choose "Create Link" from the pop-up menu to create the link.
After you create the Buy! activity (see Task 8: Using Queries and Result Sets), you will use the Destination URL property editor to complete the data-bound link.
Connect Main Menu Links to the Browse Activities
To connect the Main menu links to the Browse By Artist & Browse by Price activities, perform the following steps:
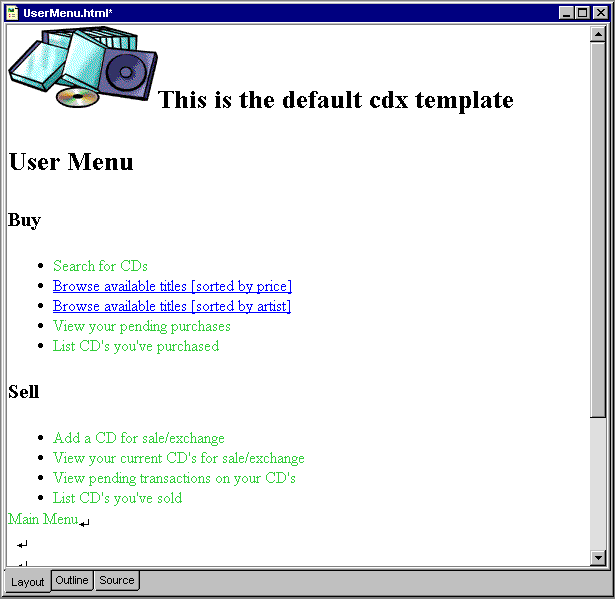
- Open UserMenu.html.
- Select the text to become a link, either Browse Available Titles [Sorted by Price] or Browse Available Titles [Sorted by Artist].
- Click the Create Link icon at the far right of the toolbar.
- Bring up Destination URL Property Editor from Properties.
- Select BrowseArtist or BrowsePrice servlet as necessary.
- Click OK.
- Repeat steps 2-6 for the other link.
If the Create Link icon is not present, then select View -> Toolbars -> Standard. Note that you can also right-click the highlighted text and choose "Create Link" from the pop-up menu to create the link.
Task 7: Creating a Search Activity
Now you are ready to create the User Menu activities. You will also create the "Buy CD" activity and connect it to the "Browse CD Buy!" links. To perform this task, you need to create the CD Browser master/detail/search set, which is designed for browsing after login with view of owner detail for purchase.
- Select File -> New -> Database Forms.
- Type CDBrowser for Name; click Next.
- Select the option "Use a data model" and click Next.
- Specify the project's data model.
- Select cdx1.kdm and click Next.
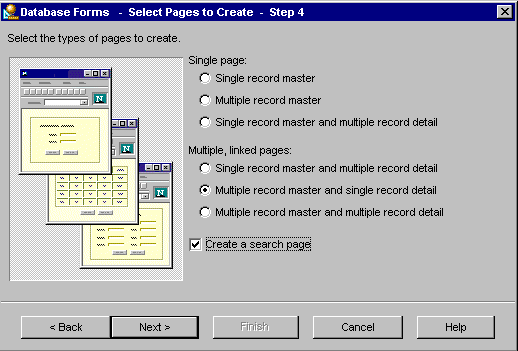
- Select Multiple record master and single record detail.
- Select the "Create a search page" checkbox.
- Click Next.
- Select "Use an existing connection" and verify that the name is cdx; then click Next.
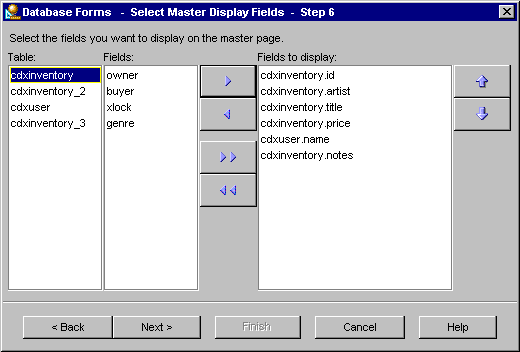
- Select fields to display in master in the following order:
- Select browse 20 records at a time; then click Next.
- Select sorting by cdxinventory.artist and cdxinventory.title; then click Next.
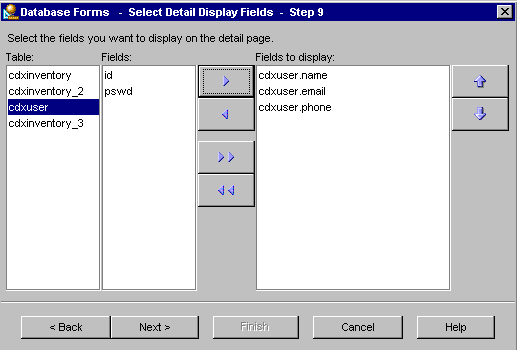
- Select the fields to display in the detail; then click Next.
- Choose cdxuser: name, email, and phone.
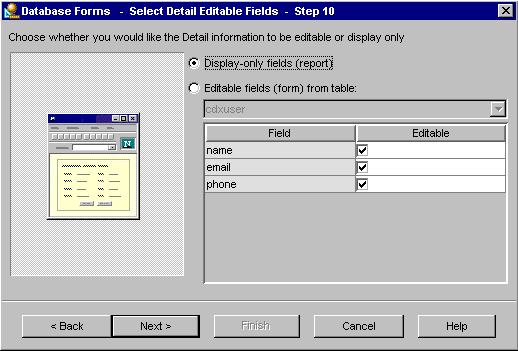
- Leave detail fields display-only; then click Next.
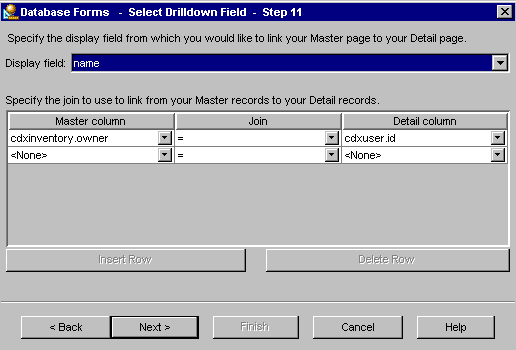
- Select name for Display Field; this is the drill-down field.
- Specify join as (Master) cdxinventory.owner= (Detail) cdxuser.id.
- Click Next.
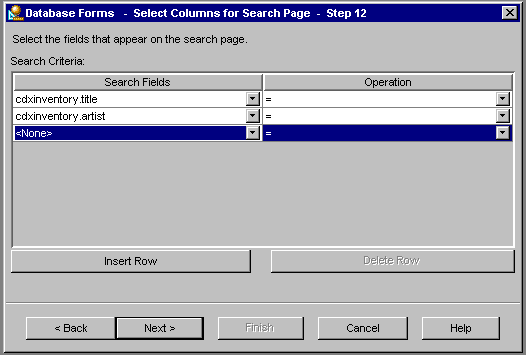
- Specify columns for search page: title and artist; then click Next.
- Click Next.
- Click Finish.

	cdxinventory.id
	artist
	title
	price
	cdxuser.name
	cdxinventory.notes
The id will be converted to the Buy! link later.
The iPlanet Application Builder creates the following files:
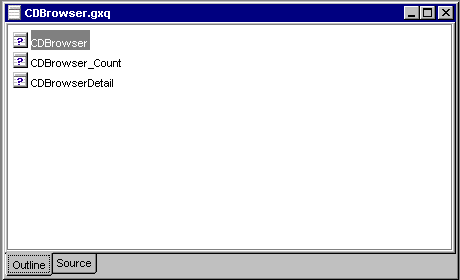
	CDBrowser_Search.html
	CDBrowser.gxq
	CDBrowser.java
	CDBrowser.jsp
	CDBrowserDetail.java
	CDBrowserDetail.jsp
Modifying a SQL Query
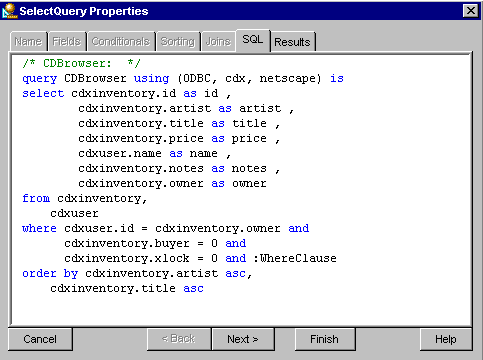
Next, you need to edit the generated query, CDBrowser.gxq to ensure that only CDs that are available for purchase are displayed.
- Open the CDBrowser.gxq query file.
- Double-click the CDBrowser select query.
- Select the SQL panel where you can enter the additional where conditions directly into the SQL SELECT statement.
- Edit the statement to include the conditions:
- Click Finish.
- Close and save the file.
This time, the Conditionals panel is disabled because the query includes the variable ":Whereclause" and is considered a custom query.

	cdxuser.id = cdxinventory.owner and
	cdxinventory.xlock = 0 and cdxinventory.buyer = 0
	and :WhereClause
Deleting From a JavaServer Page
Edit the CDBrowser.jsp JavaServer page as follows:
- Select "id" text in column header.
- Right click and choose Table options.
- Select Delete column to delete "id" column.
- At the bottom of the page enter text "Usermenu".
- Select the text "UserMenu".
- Click the Create Link icon at the far right of the toolbar.
- Set destination URL property to Usermenu.html.
- Close and save the file.
Edit the CDBrowserDetail.jsp JavaServer page as follows:
- At the bottom of the page, enter the text "Usermenu."
- Select the text "UserMenu."
- Click the Create Link icon at the far right of the toolbar.
- Set the destination URL property to Usermenu.html.
- Close and save the file.
Add the Link in Usermenu.html
- Open UserMenu.html.
- Select the text to become a link "Search for CDs".
- Click the Create Link icon at the far right of the toolbar.
- Bring up Destination URL Property Editor from Properties.
- Select CDBrowse_search.html.
If the Create Link icon is not present, select View -> Toolbars
-> Standard. You can also right-click the highlighted text and choose "Create Link" from the
pop-up menu to create the link.
Task 8: Using Queries and Result Sets
To create the Buy! browse activities, perform the following tasks:
- Create SELECT Query
- Create UPDATE Query
- Create New Database Form
- Edit BuyCD JavaServer Page
- Create Transaction Confirmation Page
Create SELECT Query
To create a SELECT query to specify purchase item, perform the following steps:
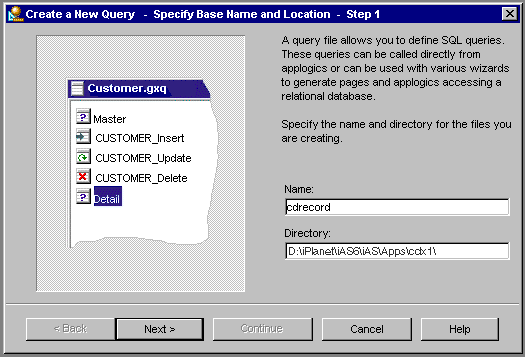
- Select File -> New -> Query.
- Type cdrecord for Name.
- Specify the project's data model (cdx1.kdm).
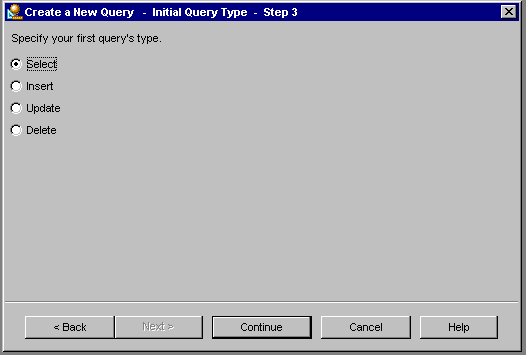
- Specify Select for the query type; then press Continue.
- Using the Select Query Properties dialog box, perform the following
actions:
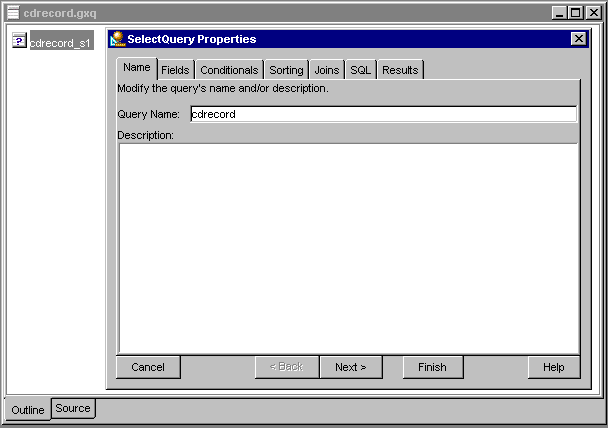
- Under the Name Tab, specify cdrecord; then click Next.
- Under the Fields Tab, specify All from cdxinventory, then click Next.

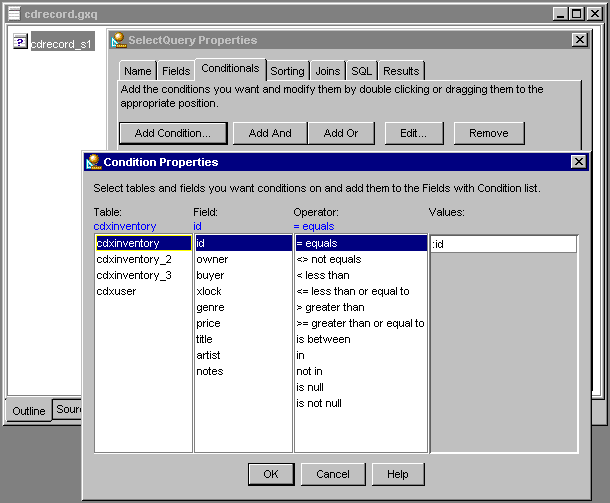
- Under the Conditionals Tab, select Add Condition and set cdxinventory.id to :id.
- Click OK to continue.
- Click Finish.
The iPlanet Application Builder creates the cdrecord.gxq SELECT query.
Create UPDATE Query
To create an UPDATE query for locking the purchase, perform the following steps:
- Select File -> New -> Query.
- Type updatelock for Name; then click Next.
- Specify the project's data model (cdx1.kdm); then click Next.
- Select Update for the query type; then click Continue.
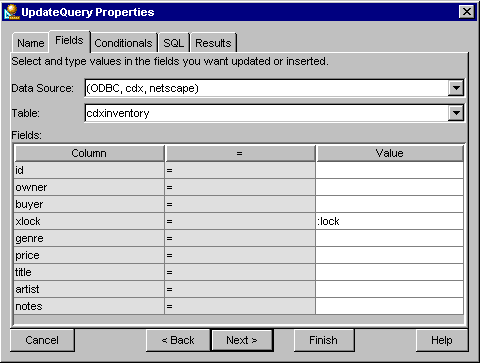
- Using the UpdateQuery Properties dialog, perform the following steps:
- Under the Name Tab, specify updatelock.
- Under the Fields Tab, specify xlock = :lock.
- Under Conditionals Tab, click Add Condition.
- Set cdxinventory.id to :id.
- Click OK.
- Click Finish.
- Close the query and save the file.
The iPlanet Application Builder creates the updatelock.gxq UPDATE query.
Create New Database Form
- Select File -> New -> Database Forms.
- Type BuyCD for Name; then click Next.
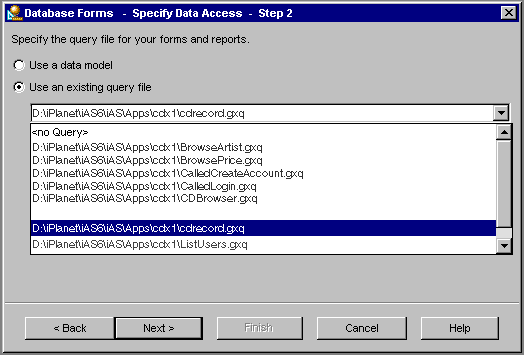
- Specify "Use an existing query file."
- Select cdrecord.gxq query; then click Next.
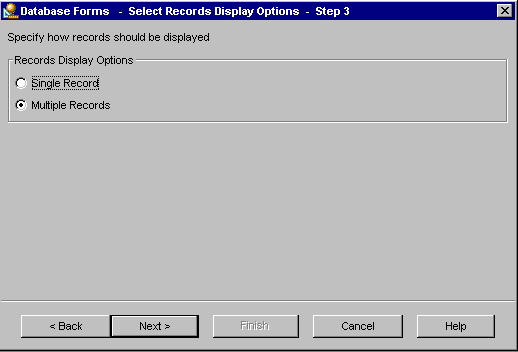
- Select "Multiple Records" to get a tabular layout; then click Next.
- Specify "Use an existing connection" and verify that it is cdx; then click Next.
- Click Next.
- Click Next.
- Click Finish.
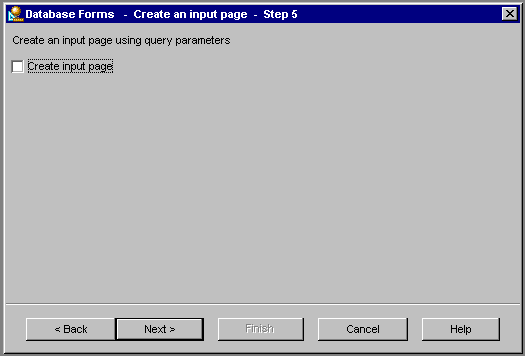
Do not check the "Create input page" checkbox.
The iPlanet Application Builder creates the following files:
	BuyCD.java
	BuyCD.jsp
Edit BuyCD JavaServer Page
- Open the BuyCD.jsp file.
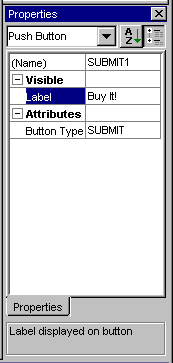
- From the Palette Form tab, drag a push button component below the table.
- Use the Properties editor to change the Label property to Buy It!.
- Drag the BuyCD.id column to the form.
- Right click on the field and choose "Change Type To Data-Bound Text Field."
- Reselect the BuyCD.id text field.
- In the Properties window, change the Type of field attribute to HIDDEN.
- Select the owner, buyer, xlock, and genre column headings.
- Press the Delete key to delete them.
- Select the empty id column and delete it.
- Repeat the above steps to delete the owner, buyer, xlock, and genre columns.

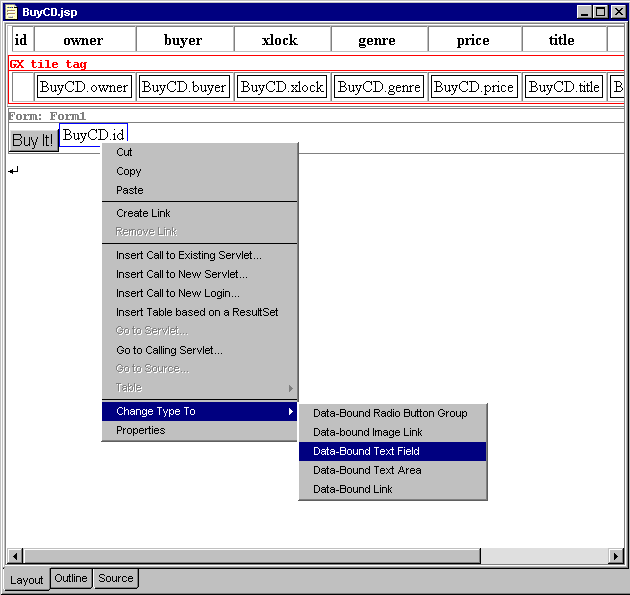
You may need to change to Outline view first.
After the BuyCD pages is presented and the user confirms the purchase, the BuyCommit servlet updates the cdxinventory table and sends mail to the seller.
Create Transaction Confirmation Page
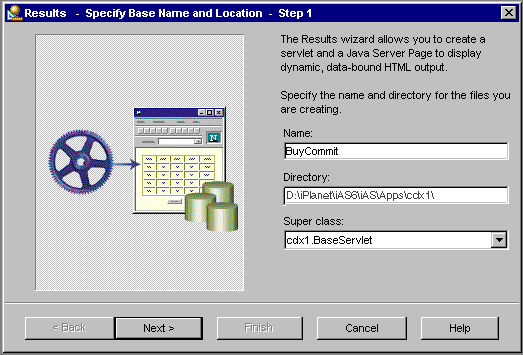
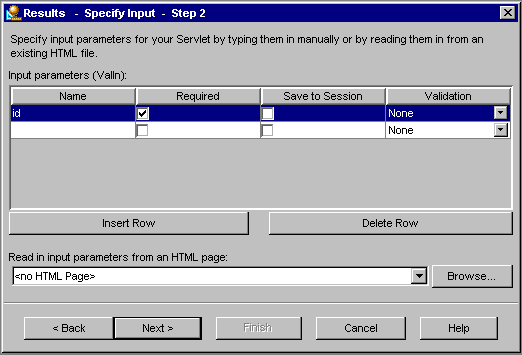
Use the iPlanet Application Builder Results wizard to get started on the BuyCommit servlet and transaction confirmation page.To create the transaction confirmation page, perform the following tasks:
Using the Results Wizard
- Select File -> New -> Results.
- Type BuyCommit for Name.
- Enter the input parameter id and check Required.
- Click Next.
- Click Finish.
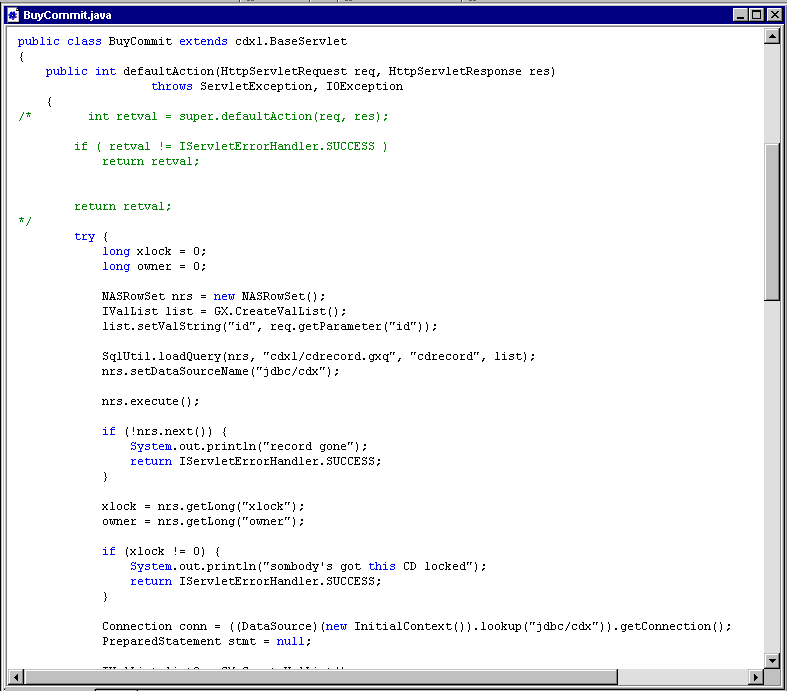
- Copy the implementation inside the BuyCommit class from <IASRoot>\Apps\cdx\BuyCommit.java to your BuyCommit.java file; do not change import, or class declarations.
- Change the package name at the beginning of BuyCommit.java to cdx1.
- Change the directories for cdrecord.gxq, updatelock.gxq, and CDBrowser.gxq from cdx to cdx1:
The iPlanet Application Builder creates the following files:
	BuyCommit.java
	BuyCommit.jsp
	cdx1/cdrecord.gxq
	cdx1/updatelock.gxq
	cdx1/CDBrowser.gxq
Link BuyCommit to the BuyCD Confirmation Page
Next, you need to link the BuyCommit servlet to the BuyCD confirmation page.
- Open the BuyCD.jsp file.
- Select Form: Form1.
- Open Action property editor.
- Select Action.
- Click within the rightmost part of a blank field to activate the custom
property button .
- Click the property button .
- Select BuyCommit from the servlet drop-down list.
- Open the <IASRoot>\Apps\cdx\BuyCD.jsp file.
- Copy the following line.
<rdbm:param name="ID" type="String" bindOnLoad="true">
<attr:getParametername="ID">1=1</attr:getParameter></rdbm:param> - Open the BuyCD.jsp in source view and replace the following line:
- In BuyCD.jsp search for the following code:
- Delete the above code.
- Now, insert the following code:
<rdbm:goRecord query="BuyCD" start="1" execute="true"/>
<INPUT TYPE="HIDDEN" NAME="ID" VALUE="<rdbm:field query="BuyCD" name="ID" />">The Buy! Activity is now complete. Next, return to Browse pages to connect the "Buy!" JSP to the BuyCD servlet.
<rdbm:param name="WhereClause" type="String" bindOnLoad="true">
<attr:getAttribute name="whereClause">1=1</attr:getAttribute></rdbm:param>
<INPUT TYPE="HIDDEN" NAME="ID" VALUE="<rdbm:field query="BuyCD" name="ID" urlEncode="true" />" FILEREFS="validate.js" EBPROPS="{ dataField = ID;dataSet = BuyCD;}" EBCLASS="netscape.blizzard.components.TextField">
Link Buy! to BuyCD Servlet
- Open the BrowseArtist.jsp file.
- Select Buy! to edit the Destination URL property.
- Select the BuyCD servlet.
- Click the Add button, Click in name field, enter ID and press Enter.
- Select Data Bind-Value.
- In the cell editor dialog box, select BrowseArtist in the ResultSet drop-down list and select id in the DataField drop-down list; click Add.
- Click OK in the Cell editor.
- Click OK in the Edit property dialog box.
- Repeat steps 1-7 for BrowsePrice.jsp.
- Select BrowsePrice in step 5.
The iPlanet Application Builder displays the data-binding expression.
Task 9: Inserting Form Data Into a Database
To add the "CD for Sale/Exchange" buyer destination functions, perform the following steps:- Select File -> New -> Input.
- Type "CreateEntry" for Name.
- Select "Store to a database table."
- Specify the project's data model (cdx1.kdm).
- Use an existing connection (cdx).
- Select table cdxinventory.
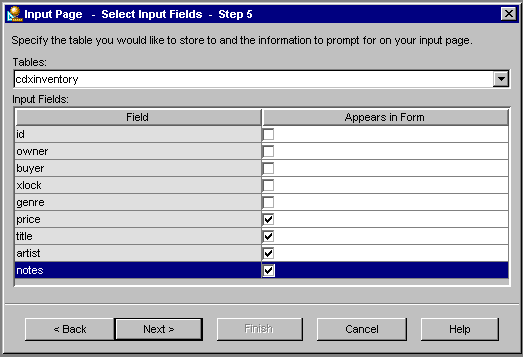
- Deselect all fields except those that you want to appear on the form: price, title, artist, and notes, to appear on the form.
- Click Next.
- Click Finish.
The iPlanet Application Builder creates the following files:
	CreateEntry.html
	CalledCreateEntry.gxq
	CalledCreateEntry.java
	CalledCreateEntry.jsp
Editing Called Code
- Open CalledCreateEntry.java
- Comment out or delete the line, displayMessage( req, res, "Insert Success");

Before the statement, insertStmt.executeUpdate( ); in defaultAction method, add the following code:
	String sname = (String)req.getParameter("TITLE");
	int code = sname.hashCode();
	insertStmt.setInt(((Integer)params.get("ID")).intValue(), code);
	HttpSession session=req.getSession(true);
	String curUser = (String)session.getAttribute("NAME");
	String ids = ((String)session.getAttribute("ID")).trim();
	int idFromSession = new Integer(ids).intvalue();
	insertStmt.setInt(((Integer)params.get("OWNER")).intValue(),idFromSession);
To display the corresponding jsp, add the following code after the insertStmt.executeUpdate(); in defaultAction method:
	String addJsp = "/CalledCreateEntry.jsp";
	RequestDispatcher dispatcher = getServletContext().getRequestDispatcher(addJsp);
	res.setContentType("text/html");
	dispatcher.forward(req, res);
If you do not add the above code, the dynamically generated page will display.
Creating a Custom Query
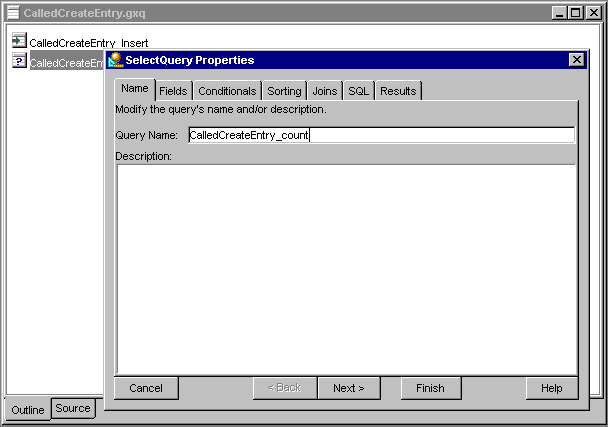
To edit CalledCreateEntry.gxq to create the CalledCreateEntry_Count custom query perform the following steps:
- Open the CalledCreateEntry.gxq file.
- Right-click the view and select the Insert Select Query pop-up menu item.
- In the SelectQuery Properties dialog, name the query "CalledCreateEntry_Count".
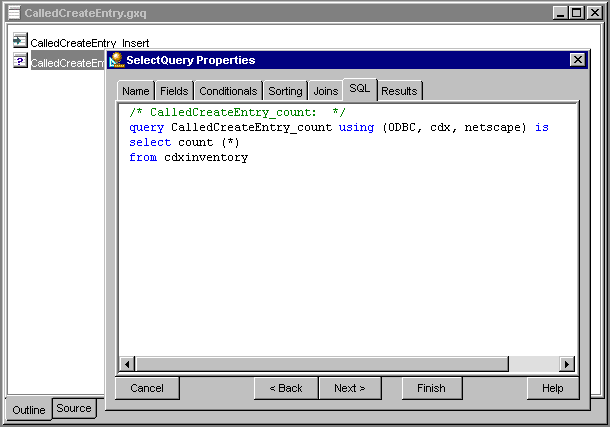
- Select the SQL tab and edit the SQL statement to read:
- Click Finish.
	/* CalledCreateEntry_Count:  */
	query CalledCreateEntry_Count using (ODBC, cdx, iPlanet) is
	select count(*) from cdxinventory
The query is now a custom query.
A warning message displays indicating that this is a custom query.
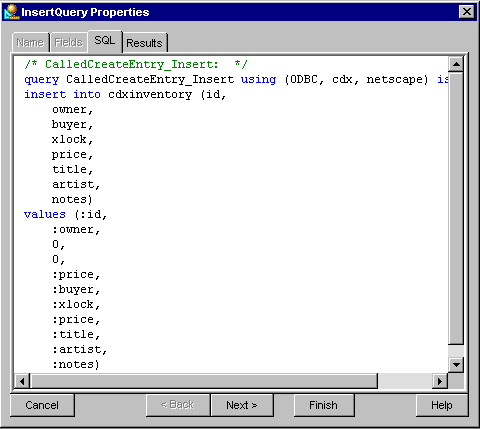
Editing Insert Query Properties
You now need to add the id, buyer, and xlock fields to the query; setting id to the new record identifier and initializing the buyer and xlock fields to 0.
- With the CalledCreateEntry.gxq file still open in the Query Editor view, double-click the CalledCreateEntry_Insert icon to display the InsertQuery Properties dialog box.
- Select to the SQL tab and edit the SQL statement to contain the following code:
- Click Finish.
	/* CalledCreateEntry_Insert:  */
	query CalledCreateEntry_Insert using (ODBC, cdx, iPlanet) is
	insert into cdxinventory
		(id, owner, buyer, xlock, price, title, artist, notes)
	values (:id, :owner, 0, 0, :price, :title, :artist, :notes)
The query is now a custom query.
Linking to an HTML File
To link the "Add CD for Sale" item to the Create Entry page:
- Open the UserMenu.html file.
- Select the text "Add CD for Sale/Exchange".
- Click the Create Link icon, or right-click the text selection and choose Create Link from the pop-up menu.
- From the Properties editor, open the Destination URL property editor.
- Select CreateEntry.html from the HTML File drop-down list.
- Click OK to complete the link.
Task 10: Using Queries With Database Forms
Since the queries for this report are more complicated than for previous reports, this tutorial first uses the query editor to create the queries. Then, we use the Database Forms wizard to use the generated queries. Recall that in the data model, the alias cdxinventory_3 is joined by xlock to user. For the required SELECT query, you need to take any inventory fields from this alias because the xlock field identifies CDs with pending transactions.To create the "view pending transactions" activity, perform the following tasks:
- Create SELECT Queries
- Create UPDATE Queries
- Build Pending Sales Report
- Create AcceptSale Servlet
- Edit Servlet to Load and Execute Update Query AcceptSale
- Create CancelSale Servlet
- Edit Servlet to Load and Execute Update Query CancelSale
- Connect Links to Servlets
- Link View Pending Transactions Activity to User Menu
- Add Links in the AcceptSale and CancelSale Java Server pages
Creating SELECT Queries
First you must create a query for the report itself.
- Select File -> New -> Query.
- Type PendingSeller for Name.
- Specify the project's data model (cdx1.kdm).
- Specify Select for Type.
- Click Continue.
Selecting Query Properties
Using the SelectQuery Properties dialog box, perform the following steps:
- Type PendingSeller for Name.
- Select the title, price, and artist fields from the cdxinventory_3 table. Choose the cdxinventory_3 table to display related information about the prospective buyer.
- Select name from the cdxuser table.
- Select xlock and id from the cdxinventory_3 table.

Specifying Select Conditions
To add conditions for the select query:
- Click Add Condition to add the following conditions:
- Click the Join tab.
- Remove the join from cdxuser.id to cdxinventory_3.xlock.
- Click SQL tab and add the following condition in the where clause:
cdxinventory_3.xlock <> 0
cdxuser.id = cdxinventory_3.owner
The SQL code appears as follows:
	query PendingSeller using (oracle_oci, cdx, nsample, netscape) is
	select cdxinventory_3.title as title3 ,
		cdxinventory_3.price as price3 ,
		cdxinventory_3.artist as artist3 ,
		cdxuser.name as name ,
		cdxinventory_3.xlock as xlock3 ,
		cdxinventory_3.id as id4
	from cdxinventory cdxinventory_3,
		cdxuser
	where (cdxinventory_3.xlock <> 0)
		and cdxuser.id = cdxinventory_3.owner
The iPlanet Application Builder creates the PendingSeller.gxq query file.
Creating UPDATE Queries
Next, you need to create an UPDATE query to accept the transaction and sell the CD.
- With the PendingSeller query view still active, select Insert -> Update Query from the menu or by right-clicking in the query window.
- Type AcceptSale for Name.
- From the Fields tab, using the cdxinventory table, set fields buyer and xlock to:
- From the Conditionals tab, click Add Condition to add the following condition:
- Click OK.
- Click Finish.
- With the PendingSeller query view still active, select Insert -> Update Query from the menu or by right clicking in the query window.
- Type CancelSale for Name.
- From the Fields tab, using the cdxinventory table, set field xlock to:
- From the Conditionals tab, click Add Condition to add the following condition:
- Click Finish.
	buyer = :buyer
	xlock = 0
cdxinventory.id = :id
The iPlanet Application Builder adds the query to the query file.
Next, you need another UPDATE query to cancel a sale.
xlock = 0
cdxinventory.id = :id
The iPlanet Application Builder adds the query to the query file.
Build Pending Sales Report
Now you are ready to build the pending sales report.
- Select File -> New -> Database Forms.
- Type PendingSeller for Name then click Next.
- Specify the existing query file: PendingSeller.gxq then click Next.
- Specify Parent query: PendingSeller then click Next.
- Specify Multiple records then click Next.
- Choose "Use an existing connection" and verify that it is cdx then click Next.
- Do not check "Create input page."
- Click Next.
- Click Finish.
The iPlanet Application Builder creates the following files:
	PendingSeller.java
	PendingSeller.jsp
Converting Fields to Links
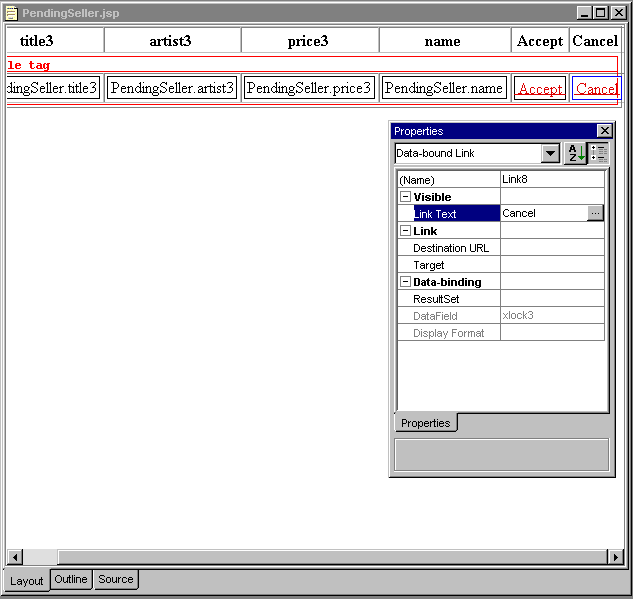
You need to convert the id and xlock fields in the report to "Sold" and "Cancel" links, which enable the user to accept or cancel the sale:
- Open the PendingSeller.jsp file.
- Edit the column headers for the two right-most columns by replacing the field text "id4" with "Accept" and "xlock3" with "Cancel".
- Select the PendingSeller.id4 data-bound label and delete it.
- Type in the text "Accept" and make it a link.
- Select the PendingSeller.xlock3 data-bound label and delete it.
- Type in the text "Cancel" and make it a link.
Create AcceptSale Servlet
Before you can fill in the Destination URL properties for the two prior management links, you need to create two servlets, one that accepts the transaction, and one that cancels it. For such servlets that return simple confirmation pages, you can use the iPlanet Application Builder Results wizard.
- Select File -> New -> Results.
- Type AcceptSale for Name.
- To execute the AcceptSale query, you need theid and buyer inputs, so specify these parameters as required inputs.
- Click Next.
- Click Finish.

The iPlanet Application Builder creates the following files:
	AcceptSale.java
	AcceptSale.jsp
Edit Servlet to Load and Execute Update Query AcceptSale
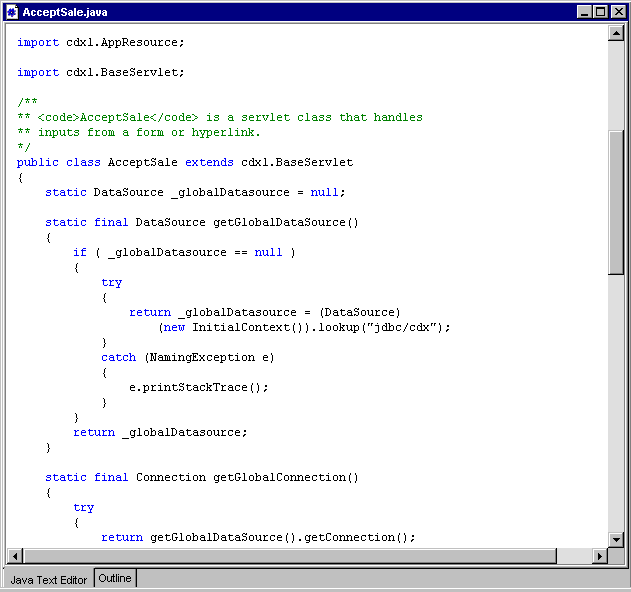
Next, you need to enter the code necessary to load and execute the associated query from the query file. You will find this code in the completed file installed in <IASRoot>\Apps\cdx\AcceptSale.java.This code is similar to the Insert or Update code produced for a data-entry form by the Database Forms Wizard of the Input Wizard.
- Copy the implementation inside the AcceptSale class from <IASRoot>\Apps\cdx\AcceptSale.java to your AcceptSale.java file; do not change import, or class declarations.
- Change the package name to cdx1.
- In AcceptSale.java, change the directories for PendingSeller.gxq from cdx to cdx1:
cdx1/PendingSeller.gxq
Create CancelSale Servlet
To create the CancelSale servlet, use the Results wizard and perform the following steps:
- Select File -> New -> Results.
- Type CancelSale for Name; click Next.
- Specify the id input as a required input; then click Next.
- Click Finish.
The iPlanet Application Builder creates the following files:
	CancelSale.java
	CancelSale.jsp
Edit Servlet to Load and Execute Update Query CancelSale
Next, you need to enter the code necessary to load and execute the associated query from the query file. You will find this code in the completed file installed in <IASRoot>\Apps\cdx\CancelSale.java.This code is similar to the Insert or Update code produced for a data-entry form by the Database Forms Wizard of the Input Wizard.
- Copy the implementation inside the CancelSale class from <IASRoot>\Apps\cdx\CancelSale.java to your CancelSale.java file; do not change import, or class declarations.
- Change the package name to cdx1.
- In CancelSale.java, change the directories for PendingSeller.gxq from cdx to cdx1:
cdx1/PendingSeller.gxq
Connect Links to Servlets
Next, return to the PendingSeller.jsp file to connect the Accept and Cancel links to the update servlets. Start by opening the PendingSeller.jsp file.Connecting the Accept Link
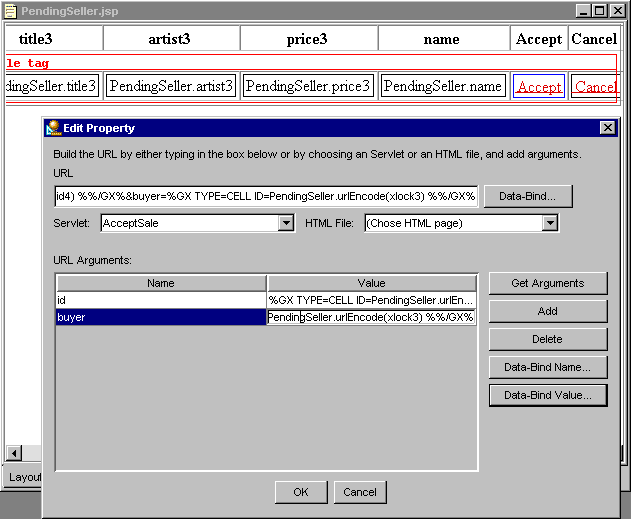
- Click the Accept link and edit the Destination URL property.
- In the Servlet drop-down list, select the AcceptSale servlet.
- Click the Add button.
- Click in the name cell, add "ID4" and press enter.
- Then click the Data-bind value button.
- In the cell editor drop-down lists, select the PendingSeller ResultSet and the DataField, ID4.
- Click Add, then click OK.
- Repeat the above steps for the buyer value, setting XLOCK3 in the name cell, and selecting XLOCK3 in the cell editor as the source DataField.
- Click OK on the main property editor to complete the Accept URL specification.
Connecting the Cancel Link
Continuing with the Cancel link, click Cancel and edit the Destination URL with the URL property editor:
- In the Servlet drop-down list, select the CancelSale servlet.
- Click the Get Arguments button.
- Click in the name cell, add "ID4" and press enter.
- Click the Data-bind value button.
- In the cell editor drop-down lists, select PendingSeller ResultSet and the DataField, ID4.
- Click Add, then click OK.
- Click OK on the main property editor to complete the Cancel URL specification.
Link View Pending Transactions Activity to User Menu
This completes the View Pending Transactions activity. You can now return to the User Menu and hook up the associated link.
- Open the UserMenu.html file.
- Select the "View pending transactions on your CDs" text.
- Click the Create Link icon at the far right of the toolbar. If the Create Link icon is not present, then select View -> Toolbars -> Standard. Note that you can also right-click the highlighted text and choose "Create Link" from the pop-up menu to create the link.
- Display the Destination URL property editor, and select the servlet PendingSeller.
- Click OK.
Add Links in the AcceptSale and CancelSale Java Server pages:
- Open AcceptSale.jsp, enter text "UserMenu".
- Click on the create link and in the destination url, specify Usermenu.html.
- Repeat the above step for CancelSale.jsp.
Task 11: Creating Enterprise JavaBeans
The iPlanet Application Builder allows you to create Enterprise JavaBeans or import existing JavaBeans from jar files. This task shows you how to create a session bean using the Session Bean wizard.
- Choose New from the File menu and select Session Bean.
- Choose CreditCheck for the name of the bean.
- Click Next.
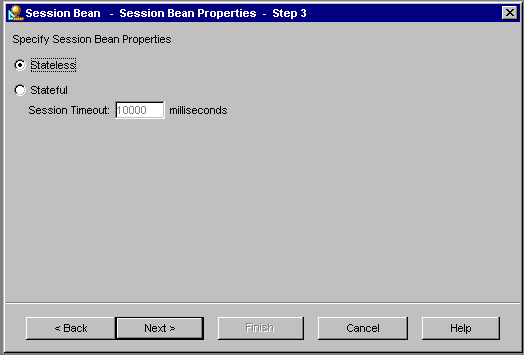
- Choose Stateless; then click Next.
- Click Finish.
- Edit the bean's interface file to define the CheckCredit() method.

- Open ICreditCheck.java which is the remote interface and define the checkCredit() method.
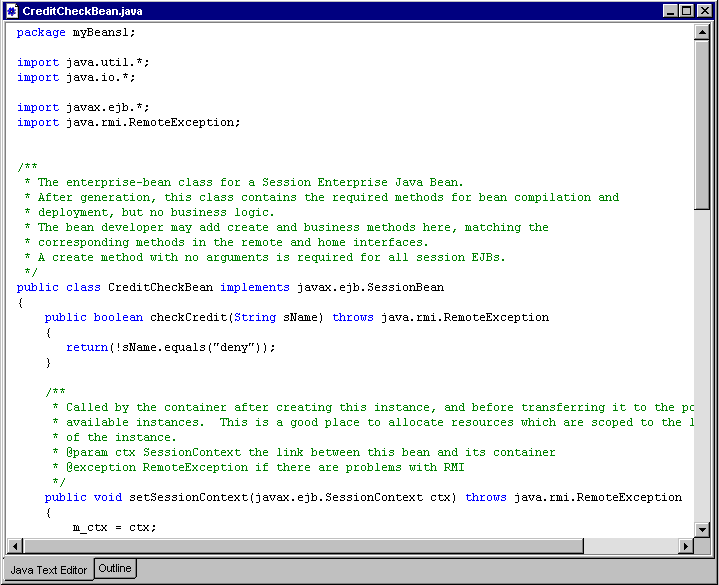
- Add an implementation of the checkCredit() method to the CreditCheckBean.java file.
- In the Project window, right-click on cdx1.iab to display a context-sensitive submenu.
- Select the Project Metadata ... option.
The Project Metadata Editor window appears.
- Select the EJB References tab.
- Add a new reference with the following values:
Reference: CreditCheck BeanType: Session Bean Home Interface: ICreditCheckHome Bean Remote Interface: ICreditCheck Linked To Bean: CreditCheck JNDI Name: ejb/cdx1Ejb/cdx1/CreditCheck - Press enter.
The entire line is highlighted in blue.
- Close the Project Meta Editor window and save your project.
- Rebuild your project.
- Modify the BuyCD.Java file to use the credit check session bean.
- Replace occurences of cdx with cdx1.
- Choose Build Project from the Build menu.
- Choose Start Server from the Test menu if your server is not running.
- Choose Restart Server from the Test menu, if your server is running.
- Choose Test Project from the Test menu.
- Registration messages are displayed in the Registration tab of the Messages window.
- Test your application.
The directory specifies the package that contains the bean. The name specifies the names of the bean class and interfaces. You can change the class and interface names in the next panel in the dialog box. You can also specify control descriptors as well. For information about control descriptors, see the Programmer's Guide. No changes are required for this example.
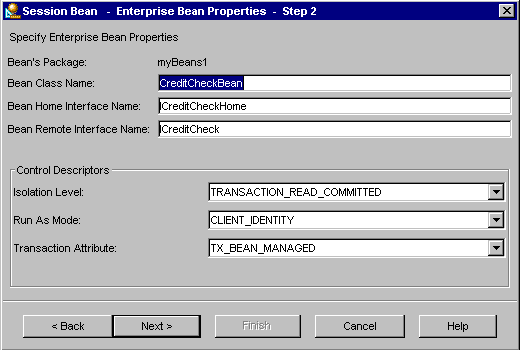
The next dialog box allows you to specify whether the bean is a stateful or stateless session bean.
The iPlanet Application Builder creates the following files:
	ICreditCheckHome.java
	ICreditCheck.java
	CreditCheckBean.java
	public interface ICreditCheck extends javax.ejb.EJBObject
	{
	public boolean checkCredit(String name) throws RemoteException;
	}
	public boolean checkCredit(String name) throws RemoteException
		{
			return (!name.equals("deny"));
		}
	public class BuyCD extends HttpServlet
	{
		ICreditCheckHome home = null;
		ICreditCheck remote = null;
		String JNDI_NAME = "java:comp/env/CreditCheck";
	public void doGet(HttpServletRequest req, HttpServletResponse res)
			throws ServletException, IOException
	{
		defaultAction(req, res);
	}
	public void doPost(HttpServletRequest req, HttpServletResponse res)
			throws ServletException, IOException
	{
		defaultAction(req, res);
	}
	public void displayMessage(HttpServletRequest req,
			  HttpServletResponse res,
			  String messageText)
			throws ServletException, IOException
	{
		res.setContentType("text/html");
		PrintWriter out = res.getWriter();
		out.println(messageText);
	}
	public void defaultAction(HttpServletRequest req, HttpServletResponse res)
		throws ServletException, IOException
	{
	int result = formAction(req,res);
	if(result == 1){
		RequestDispatcher dispatcher = getServletContext().getRequestDispatcher(_defaultTemplate);
		res.setContentType("text/html");
		dispatcher.forward(req, res);
	     }
	     else{
	     // replace the Below with a suitable Error jsp
	     displayMessage(req,res,"Credit Check Failed");
	     }
	}
	public int formAction(HttpServletRequest req, HttpServletResponse res)
		throws ServletException, IOException
	{
	     int result = -1;
	     HttpSession session = req.getSession(true);
	     javax.naming.Context initContext = null;
	     java.util.Hashtable env = new java.util.Hashtable(1);
	 try {
	     initContext = new javax.naming.InitialContext(env);
	     }
	     catch(Exception e) {
		System.out.println("oops.. couldn't get initContext. caught exception");
	     }
	     Object beanObject = null;
	     try {
	     String sName = (String)session.getAttribute("NAME");
	     beanObject = initContext.lookup(JNDI_NAME);
	     ICreditCheckHome home = (ICreditCheckHome) beanObject;
	     ICreditCheck remote = home.create();
	     boolean bCreditOK = remote.checkCredit(sName);
		if (!bCreditOK) {
				return result;
		}
		else {
			result = 1;
			System.out.println(sName + " passed the Credit Check");
		}
	     }
	     catch(Exception e)
	     {
		e.printStackTrace();
	     }
		return result;
	  }
	  public int delete(HttpServletRequest req, HttpServletResponse res)
		throws ServletException, IOException
	  {
	     return SUCCESS;
	}
	     String _defaultAction = "/.jsp";
	String _defaultTemplate = "/BuyCD.jsp";
	static final int SUCCESS = 0;
	static final int STREAM_SUCCESS = 1;
	static final int STREAM_ERROR = -1;
	}
Task 12: Building and Testing the Application
You have finished constructing the CD Exchange tutorial application. You can build and test your application.
You must restart your server each time you modify source
code.
An informational message appears in the Java Server tab of the Messages window indicating that the server is ready: info: ENGINE-ready: ready: <server port number>.
You can ignore "No GUID" messages for EJBs. iPlanet Application Builder brings up the browser with the initial screen: