
Contents
![]() Before
You Begin
Before
You Begin
![]() Mounting
the APPS and docs directories as Forte For Java filesystems
Mounting
the APPS and docs directories as Forte For Java filesystems
![]() Creating
a kjs StartEngine Class
Creating
a kjs StartEngine Class
![]() Invoking
the Application Server within Forte for Java
Invoking
the Application Server within Forte for Java
![]() Attaching
the Forte Debugger to the Application Server
Attaching
the Forte Debugger to the Application Server
![]() Stopping
the Debug Session
Stopping
the Debug Session
Before You Begin
You must have the following programs installed on your machine:- The iPlanet Application Server version 6.0 and iAB 6.0.
- The iPlanet Web Server (Enterprise Edition) 4.1.
- Forte for Java Community Edition 1.0.1. You can freely download a copy at http://www.sun.com/forte/ffj/ce/download.html. You have to use the jdk 1.2.2 version with Forte for Java Community Edition in order to run or debug IAS applications (this is found in <IAS-INSTALL-DIRECTORY>\ias\usr\java\bin)
- The Java Platform Debugger Architecture Software addon correctly installed on top of the jdk1.2.2 version. To achieve that, unzip the jpda zip file and copy all the 5 files (*.dll and *.exe) from the bin directory to the jdk1.2.2\bin directory, and the jpda.jar file from the lib directory to the jdk1.2.2\jre\lib\ext directory. Overriding the jdb.exe file in the bin directory is OK.
- An IAS application developed and deployed using iAB that you want to debug. As an example, you can use the iAS 6.0 HelloWorld sample application instructions at http://developer.iplanet.com/appserver/samples/index.html, and create the application/
- Optionally, you can download the HelloWorld application (zip file) .
- Create a HelloWorld folder in the <WEBSERVER-INSTALL-DIRECTORY>\docs directory. (be careful with the capital H and capital W)
- Copy the HTML, GIF, and validate.js files from the above zip file into the HelloWorld folder.
- Create another HelloWorld folder in the <IAS-INSTALL-DIRECTORY>\ias\APPS directory.
- Copy all the other files from the above zip file into this HelloWorld folder.
Summary
Here is a summary of the steps involved in order to run/debug an IAS application with Forte for Java.- First of all, you have to add (or mount) the <IAS-INSTALL-DIRECTORY>\ias\APPS and <WEBSERVER-INSTALL-DIRECTORY>\docs directories as Forte for Java filesystems. A Filesystem can be seen as a CLASSPATH and SOURCEPATH entry in Forte for Java. Once they are mounted, you can see the content of these directories in the FFJ explorer window.
- Then, You'll have to add a few JAR files into Forte for Java in order to make them available for the IAS applications.
- Then, we'll create a Java class in charge of starting from the IDE a kjs process.
- We'll have to configure a special executor to set up the runtime parameters correctly for the kjs process.
- Using the JPDA debugger, we can now attach the Forte for Java debugger to this running kjs instance and the debugger will stop on any breakpoints set on servlets or EJBs registered.
Mounting the APPS and docs directories as a Forte for Java filesystem
 To mount the APPS and docs directories as a Forte
for Java filesystem
To mount the APPS and docs directories as a Forte
for Java filesystem
- Open Forte for Java Community Edition.
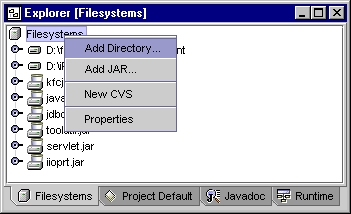
- Select the Filesystems icon in the Explorer. Right click to display a pop-up menu and select Add Directory...(note: with FFJCE v2.0, the menu item has been renamed as Mount Directory...)
- Select the <IAS-INSTALL-DIRECTORY>\ias\APPS directory:
- For the docs directory, select the Filesystems icon in the Explorer. Right click to display a pop-up menu and select Add Directory... (or Mount directory...) and navigate to the <WEBSERVER-INSTALL-DIRECTORY>\docs directory and click the Add button
- Select the Filesystems tab from the Explorer window.
- Click to select the Filesystems icon. Right-click to display the pop-up menu and select Add JAR... (or Mount JAR...)
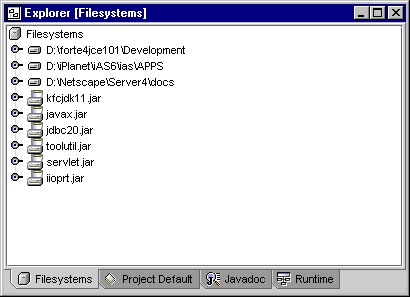
- Add the following JAR files:

To add the neccessary JAR files into FFJ:
The Add JAR Archive window appears.
<IAS-INSTALL-DIRECTORY>\ias\lib\java\kfcjdk11.jar
<IAS-INSTALL-DIRECTORY>\ias\lib\java\jdbc20.jar
<IAS-INSTALL-DIRECTORY>\ias\lib\java\javax.jar
<IAS-INSTALL-DIRECTORY>\ias\usr\java\jre\lib\ext\iioprt.jar
<IAS-INSTALL-DIRECTORY>\ias\classes\java\servlet.jar
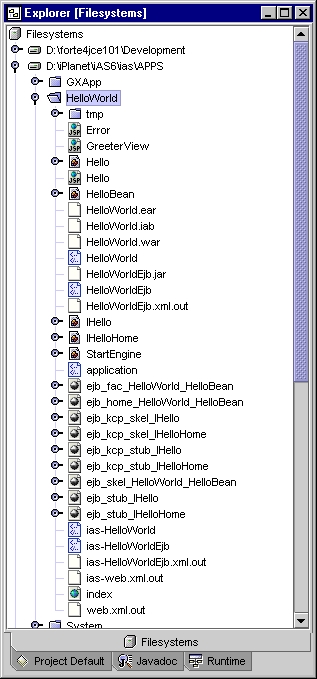
Once you have added each file, it should appear in the Filesystems tab for your project.
Creating a kjs StartEngine Class
To create a StartEngine.java:
Now we need to create a Java class that when executed will start a kjs
process from the Forte for Java IDE itself. This is this process that we'll
use to connect the FFJ debugger, allowing us to debug IAS applications.
Note: If you used the Helloworld.zip file, it contains the StartEngine.java file and you can skip the creation step.
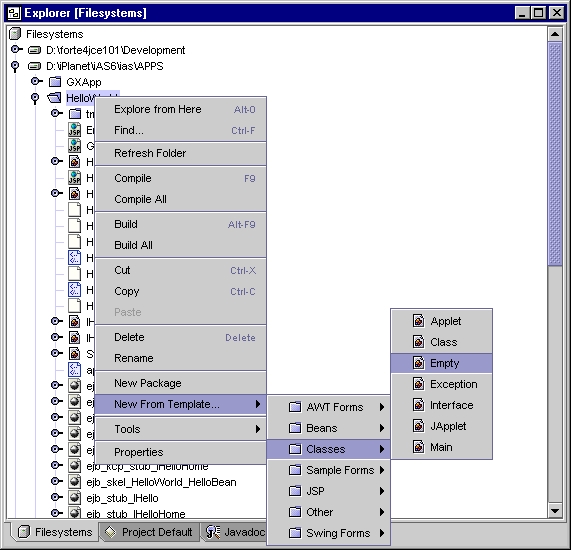
- From the Explorer window Filesystems tab, select a java package where you want to create the Java class. In this example, we'll use the HelloWorld package. Right-click to display the pop-up menu and select "New From Template...", "Classes", "Empty" meu item as follow:
- In the Name field, enter StartEngine as the name, and click the finish button.
- The StartEngine.java file is opened in the Forte For Java editor.
- Add the following code in the editor for the StartEngine file.
- Right-click on the StartEngine file in the Explorer window to display the pop-up menu.
- Select Compile...
- Save your work by selecting Save All from the File menu.
The New From Template - Target Location window appears.
To create a special executor for the kjs class
- Select the Project Menu and The "Settings" menu item.
- Expand the Execution Types node to display the External and Internal Execution.
- Right-click on the External Execution node to display a pop-up menu.
- select New External Execution Service.
- Double-click on the External Execution sub-node to display the properties window.
- Select the Identifying Name field to edit it.
- Enter the name iPlanet and click elsewhere.
-
Select the External Process field to display the
 icon.
icon. -
Select the to open External Process Property
Editor.
- In the Arguments field type the following arguments (as one single line) and click OK:
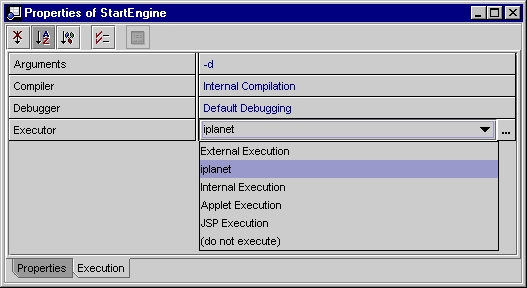
- You've just created an iPlanet executor. Now we need to tell the StartEngine class to use this executor. In the Explorer, select the StartEngine java class. Activate the popup menu on it and select the "Properties" Menu item. In the Properties Window, select the "Execution" tab. In the Executor property, select the newly created iplanet executor:
(Note: with Forte for Java CE V2.0, the way to create a new executor is by using the popup menu on the Execution Types node and selecting the New then External Execution Service menu item.)
A new sub-node appears labeled External Execution.
-classic -Xdebug -Xnoagent -Xrunjdwp:transport=dt_socket,server=y,suspend=n
-Djava.compiler=NONE -Djava.library.path=D:\iPlanet\iAS6\ias\bin
-cp {filesystems} {classname} {arguments}
Where D:\iPlanet\iAS6\ias\bin is the location where you have the
iPlanet Application Server installed.
Be careful: the Arguments entry field must be a single line. Remove
any extra carriage return chars.

Congratulations: you've just modified the Executor property for the StartEngine Class. Now on, whenever you execute the StartEngine class, you will launch a kjs java process with the correct execution flags.
Invoking the iPlanet Application Server within Forte For Java
To invoke iAS from the Forte for Java IDE
- From the DOS command prompt, launch KXS by typing:
- In the Explorer Filesystems Tab, select the StartEngine java class.
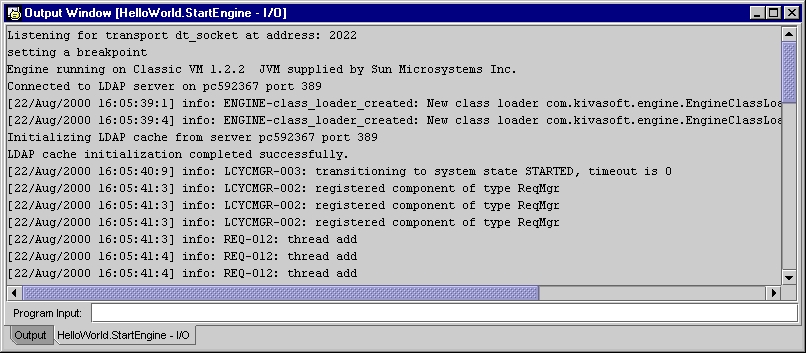
- Activate the popup menu on the StartEngine java class ans select the 'Execute' menu item. An output message appears identifying that the server has been started. When you see the message that the engine is ready, then you are ready to test your application.
- Open a browser and type the following URL in the location field:
- Test the application to ensure proper functionality.
start kxsA DOS window appears identifying the server initialization process and launches the server.
You are now ready to execute the StartEngine java class from the IDE.
http://<yourmachinename base URL>/yourprojectname>/HelloIn this example, the machine name base url is pc541437/NASApp, and the project name is HelloWorld.
Attaching the Forte debugger to the Application Server
To attach the Forte debugger to the Application
Server:
- Set breakpoints in the Servlets and EJB's.
- Make sure that a kxs process is already running from a DOS session outside the IDE.
- Select the StartEngine class in the Forte For Java Explorer window.
- Select the Execute button or the execute popup menu item
- Review the Output window to verify the KJS has been started.
- Review the messages window to verify that the Engine is ready.
- Select "Connect..." from the Debug menu in the Forte for Java menu bar. (Note: with FFJCE V2.0, the menu item has changed to "Attach to VM...".)
- From the Connector pop-up menu, select the "socketAttach (Attaches by socket to other VMs)" to connect to the running kjs virtual machine.
- Enter the Port Number in the Port entry field and click OK.
- Note: I you don't see the dialog as it is in this tutorial, it means that you did not installed the Java Platform Debugger Architecture Software addon correctly on top of the jdk1.2.2 version used by Forte For Java.
- Run your application in a browser.
- When the debugger stops at the specified breakpoints, select Continue.

Stopping the Debugging Session
To stop the debug session:
- When the debugger has gone through all the breakpoints, stop the debugger by selecting Finish Debugging from the Debug menu.
- Open the View Execution window and terminate th process for the StartEngine class.
Copyright
© 2000, Sun Microsystems Inc. All rights reserved.
Copyright © 2000, Netscape Communications Corporation.
All rights reserved.
Sun, Sun Microsystems, the Sun logo, Java, iPlanet, and the Sun, Java, and iPlanet-based trademarks and logos are trademarks or registered trademarks of Sun Microsystems, Inc. in the U.S. and other countries.
Netscape and the Netscape N logo are registered trademarks of Netscape Communications Corporation in the U.S. and other countries. Other Netscape logos, product names, and service names are also trademarks of Netscape Communications Corporation, which may be registered to other countries.