Creating an Appointment
You can use Calendar to create an all-day appointment, or an appointment of short duration. You can create a standalone appointment, or a series of appointments.
To Create a Standalone Appointment
Perform the following steps:
-
Choose File -> New -> Appointment.
-
Enter the appointment details in the Appointment tabbed section. The following table describes the elements in the Appointment tabbed section:
-
To schedule an alert to remind you about the appointment, click on the Reminder tab. The following table describes the elements in the Reminder tabbed section:
Element
Description
Basics
Displays the date, start time, and end time of the appointment.
Display a Message
Select one of the following alert types from the drop-down list:
-
Display a message
-
Play a sound
-
Run a program
-
Send an Email
Time-units spin box
Use the spin box to specify the number of time units.
minute(s)
Select one of the following time-unit types from the drop-down list:
-
minute(s)
-
hour(s)
-
day(s)
before
Select one of the following options from the drop-down list:
-
before
-
after
start of appointment
Select one of the following options from the drop-down list:
-
start of appointment
-
end of appointment
Options
Click on the Options button to display an Alarm Options dialog. For more information about the Alarm Options dialog, see Alarm Options Dialog.
Alarm list
This element displays a list of the alarms that are set for the currently selected appointment.
Add
Click Add to add the specified alarm to the Reminders list.
Remove
Click Remove to remove the selected alarm from the Reminders list.
Note –Email and Calendaruses time zone settings from various sources. In each of these sources, the time zones must be set to the same value for reminders to function correctly. For more information about how to set time zones, see Setting Calendar and Tasks Preferences.
-
-
To save the appointment, choose File -> Save.
To save the appointment and then close the Appointment window, choose File -> Save and Close.
To save the appointment in a file, choose File -> Save As to display the Save as window. Type the filename, then click OK.
To close the Appointment window without saving the appointment, choose File -> Close.
-
To preview the details of the appointment, choose File -> Print Preview.
To print the details of the appointment, choose File -> Print.
Alarm Options Dialog
Use the Alarm Options dialog to specify additional options for an alarm. The following table describes the elements in the Alarm Options dialog:
To Create an All-Day Appointment
Perform the following steps:
-
Choose File -> New -> All Day Appointment. An Appointment window is displayed, with the All day event option selected. The Appointment window is similar to that displayed when you choose File -> New -> Appointment, except that the start time and end time are not displayed.
-
Enter the appropriate details in the Appointment window, as described in To Create a Standalone Appointment.
-
Choose File -> Save and Close.
Email and Calendarsaves the all-day appointment and then closes the Appointment window.
To Create a Recurring Appointment
Perform the following steps:
-
Create an appointment as described in To Create a Standalone Appointment.
-
In the Appointment window, click on the Recurrence tab to display the Recurrence tabbed section. The following table describes the elements in the Recurrence tabbed section:
Element
Description
Basics
Displays the date, start time, and end time of the appointment.
Recurrence Rule
Select one of the following options:
-
No recurrence: Select this option to schedule one appointment only.
-
Simple recurrence: Select this option to use predefined settings to schedule a series of appointments.
-
Custom recurrence: If this option is selected, the appointment contains recurrences that you cannot edit in
Email and Calendar.
Every
Use this spin box to specify the number of time units between each appointment in the series.
day(s)
Select one of the following time-unit types from the drop-down list:
-
day(s)
-
week(s)
-
month(s)
-
year(s)
forever
Select one of the following options from the drop-down list, to specify when the series of appointments ends:
-
forever: Select this option to specify that the series of appointments continues indefinitely.
-
for: Select this option to display the occurrences spin box. Use the spin box to specify the number of appointments in the series.
-
until: Select this option to display a drop-down combination box. Use the drop-down combination box to specify the date of the last appointment in the series.
Exceptions
Use this drop-down combination box to specify the dates in the series when you do not want to schedule an appointment.
Add
Click Add to add the specified date to the list of exceptions.
Modify
Click Modify to make the specified changes to the selected date in the list of exceptions.
Remove
Click Remove to remove the selected date from the list of exceptions.
Preview
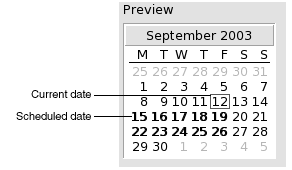
The Preview section displays all of the dates in the current month. The current date is outlined in red. Dates on which an appointment is scheduled in the current series are displayed in bold. Figure 6–2 shows a typical Preview section.
Click on the left arrow, to the left of the month name in the Preview section, to display the previous month. Click on the left arrow several times to scroll back through several months.
Click on the right arrow, to the right of the month name in the Preview section, to display the next month. Click on the right arrow several times to scroll forward through several months.
-
-
Choose File -> Save and Close.
Email and Calendarsaves the series of appointments and then closes the Appointment window.
Figure 6–2 Typical Preview Section

- © 2010, Oracle Corporation and/or its affiliates
