 To Install a Linux Distribution or the Solaris OS
-
Log into the BMI server.
-
On the Status page, check existing systems to make sure that the one upon which you want to perform a bare-metal installation does not yet exist.
Note –If you run the BMI server functions on an existing Linux system or Solaris system, the previous operating system and all data are overwritten.
-
Click Provisioning.
The Select Platform page appears.
-
From the Select list, click the platform of the system that you want to provision, then click Continue.
The Server Provisioning page appears. This pageis platform-specific.
-
Type the host name and MAC address of the system to be provisioned.
-
Select an IP assignment type:
-
Dynamic – DHCP gives IP addresses on dynamic basis. If you select this, leave the IP Address field blank.
-
Static – Predefined IP address in the DHCP server for this host. If you select this, enter the static IP address in the IP Address field. Whenever you boot the system, the DHCP server assigns the defined IP address to the host.
-
-
If you are provisioning a Linux system, skip to Step 8. If you are provisioning a Solaris system, select the appropriate Disk Type from the list.
-
Select the distribution from the drop-down menu.
-
If you are provisioning a Linux system, skip to Step 10. If you selected a SPARC platform distribution, select the system platform in the Platform Name field.
-
(Optional) Select either or both of the following optional profile deployments:
-
In the Post-install Action field, select one or more system-defined tests to run after the installation:
-
System Check – Identifies missing dependencies
-
Security Check – Identifies available security updates to install
-
Upgrade – Installs any available software upgrades
-
-
In the Host Profile field, select one or more profiles from the list. The list contains the profiles that you created in Sun Update Connection – Enterprise.
Note –If you create a profile after you log into the BMI server, the profile does not display until the next time that you log in to the BMI server.
-
-
In the Root Password field, create a password for root permissions for the new system.
-
Determine if you want to customize startup files..
-
To customize a start up file, select the Edit netboot File or Edit Kickstart checkbox, then click Continue. The file is uploaded to the BMI and is displayed for you to view, edit, or overwrite. For editing information, see Editing Files.
The kickstart files are for Red Hat Kickstart, for YaST for SUSE, or the AutoYaST module of YaST2 applications.
-
To provision the system without customizing a start up file, or to continue provisioning after editing your netboot file, deselect the Edit netboot file checkbox, then go to Step 13.
-
-
Click Continue.
The system data is displayed in the Confirmation table.
-
Determine if you want to provision the systems displayed, or if you want to provision additional systems.
-
Select the checkboxes for the host systems that you want to provision, then click Commit.
The new hosts are added to the BMI server database. A window containing the group designation opens for each host that is added to the database.
-
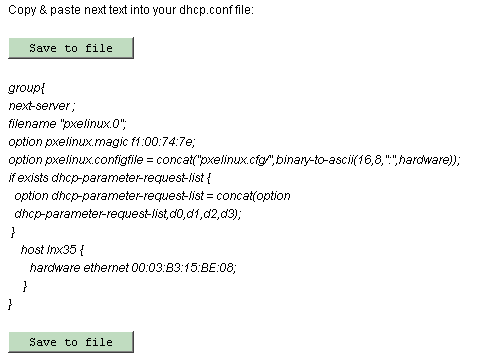
Copy the group designation text and paste the text into the IP address range in the dhcp.conf file on the DHCP server.
The graphic shows an example of the group designation text that you need to add to the IP address range in the dhcp.conf file.

-
Depending on the type of DHCP server your environment uses, do one of the following:
-
Local DHCP server – Define additional options in the dhcp.conf file.
-
Save the exported dhcp.conf data as a file.
-
Add the following lines:
option space pxelinux;
option pxelinux.magic code 208 =string;
option pxelinux.configfile code 209 =text;
option pxelinux.pathprefix code 210 = text;
option space SUNW;
option SUNW.root-mount-options code 1 = text;
option SUNW.root-server-ip-address code 2 = ip-address;
option SUNW.root-server-hostname code 3 = text;
option SUNW.root-path-name code 4 = text;
option SUNW.swap-server-ip-address code 5 = ip-address;
option SUNW.swap-file-path code 6 = text;
option SUNW.boot-file-path code 7 = text;
option SUNW.posix-timezone-string code 8 = text;
option SUNW.boot-read-size code 9 = unsigned integer 16;
option SUNW.install-server-ip-address code 10 = ip-address;
option SUNW.install-server-hostname code 11 = text;
option SUNW.install-path code 12 = text;
option SUNW.sysid-config-file-server code 13 = text;
option SUNW.JumpStart-server code 14 = text;
option SUNW.terminal-name code 15 = text;
option SUNW.magic code 208 =string;
option SUNW.configfile code 209 =text;
option SUNW.pathprefix code 210 =text;
option SUNW.magic code 208 =string;
-
Append the file to the DHCP server’s dhcp.conf file.
-
-
Local DHCP server on Windows – Define additional options in the DHCP server application.
-
See the following URL:
http://www.microsoft.com/resources/documentation/WindowsServ/2003/standard/
proddocs/en-us/Default.asp?url=/resources/documentation/WindowsServ/2003/standard/
proddocs/en-us/sag_DHCP_pro_Topnode.asp
-
Add the following lines:
option space pxelinux;
option pxelinux.magic code 208 =string;
option pxelinux.configfile code 209 =text;
option pxelinux.pathprefix code 210 = text;
-
-
-
Restart the dhcp server.
The following actions are carried out on the system:
-
The selected distribution/operating system is installed on the host.
-
The Sun Update Connection – Enterprise agent is installed for further management tasks.
-
The new system is installed with software of the profile, provisioning it for the selected purpose (if you selected an optional profile).
-
The selected Post-Install Actions are performed to ensure the integrity of the server.
-
- © 2010, Oracle Corporation and/or its affiliates
